AndyE1976 Posted August 25, 2015 Share Posted August 25, 2015 My next contribution will be the Dogfight Double set of the Do-17Z and Defiant. Right now they will be OOB with the original decals, so 5K-AR for the Dornier and PS-B for the Defiant. That may change if I can find a different set for the Dornier. So box art and sprues: 2 Link to comment Share on other sites More sharing options...
AndyE1976 Posted August 25, 2015 Author Share Posted August 25, 2015 I'm starting with the Dornier as frankly that's why I bought the set. The fact it came with a new tool Defiant was a bonus! First problem though is that the fuselage is warped: A lot of dry fitting and it looks like the big wing and some patient gluing should take care of it. I tried giving it a warm water bath, but that didn't do anything. Any suggestions gratefully received though. 2 Link to comment Share on other sites More sharing options...
AndyE1976 Posted August 26, 2015 Author Share Posted August 26, 2015 Lots of progress today, got most of the interior together and all the bits that needed to be painted interior grey prepped and painted. Fortunately the Germans didn't have a very imaginative colour palette, so this just needs a little black for the ammo and the control column. I prefer to build up the undercarriage before putting the nacelles on as that makes it easier to locate the undercarriage legs. 6 Link to comment Share on other sites More sharing options...
prowler0000 Posted August 27, 2015 Share Posted August 27, 2015 Enjoying this! Fancy the Do. Myself, but the last plane i built was.............. WOAH, i honestly cannot remember! Anyhoo, carry on. This is good stuff! Link to comment Share on other sites More sharing options...
AndyE1976 Posted August 27, 2015 Author Share Posted August 27, 2015 This is a cracking little kit, but not the easiest of the new tool kits. I may get another and do a North Africa version when there are more aftermarket decal sets available. I believe they were used out there. Link to comment Share on other sites More sharing options...
Stew Dapple Posted August 27, 2015 Share Posted August 27, 2015 Hi Andy, You're right, the Do17 is pretty complex but the detail is beautiful and the various bombload options a bonus. I had a little trouble with the parts that fit behind the exhaust stacks and the little windows that go in the top wing but everything else was okay (for me at least) - re: the bent fuselage... the internal bulkheads and some decent clamps should hopefully fix it in place. As for aftermarket transfers... http://www.hannants.co.uk/product/X72206 http://www.hannants.co.uk/product/TM72136 http://www.hannants.co.uk/product/TM72107 ... I recommend any of the above, the Xtradecal set does include a desert scheme. Cheers, Stew Link to comment Share on other sites More sharing options...
AndyE1976 Posted August 27, 2015 Author Share Posted August 27, 2015 That Xtradecal set looks cracking - the Finnish and desert schemes particularly. Link to comment Share on other sites More sharing options...
philp Posted August 27, 2015 Share Posted August 27, 2015 Damn it. I may have to break down and buy two more kits. Got to do a BoB version but I agree, the Desert and Finn ones look great. Link to comment Share on other sites More sharing options...
AndyE1976 Posted August 28, 2015 Author Share Posted August 28, 2015 After painting the interior grey I added a little black detail - mainly ammo boxes - and then gave it a dark wash which really gives it a nice grimy look. Also got the fuselage together. lots of tape to keep the rear together and then using the braces and wing to keep the nose aligned. Leaving it overnight to dry - hopefully that will straighten it out. 4 Link to comment Share on other sites More sharing options...
AndyE1976 Posted August 30, 2015 Author Share Posted August 30, 2015 It's slowly starting to take shape. There are plenty of seams to deal with, partly due to the twisted fuselage and partly my hamfisted assembly. Unfortunately I had to put stuff away on Thursday and when I got it back out again the middle brace across the bomb bay had disappeared. I may still have the bay open since you'd only notice it if you knew it was supposed to be there. Just a few more engine parts to clean up and the canopy to mask before painting starts again. 5 Link to comment Share on other sites More sharing options...
AndyE1976 Posted September 3, 2015 Author Share Posted September 3, 2015 Look what showed up on the carpet this morning! No idea how I missed it for 5 days since it was right behind the chair I sit in all day for work! 1 Link to comment Share on other sites More sharing options...
AndyE1976 Posted September 3, 2015 Author Share Posted September 3, 2015 Got the masking done, but paint will have to wait until Monday as life intervenes 6 Link to comment Share on other sites More sharing options...
AndyE1976 Posted September 16, 2015 Author Share Posted September 16, 2015 After much masking and some re-painting when the tape removed paint it wasn't supposed to, the camo is done and the flaps and doors can start to go on. The Model Masters RLM65 didn't want to stay on and there were quite a few areas that needed a touch-up, even after 24hrs of drying. The Tamiya paint held up better, but wasn't perfect. Once all of these have dried properly then the engines can go on and then I'm on to varnishes, decals and washes. This part just seems to take so long, but the end justifies the time. 7 Link to comment Share on other sites More sharing options...
prowler0000 Posted September 16, 2015 Share Posted September 16, 2015 As a 1/350 builder, i know how the uncovering process is a 'hit & miss' process. I once pulled off 90% of a waterline, & still don't know why or how.... But this looks like a hit to me!! Link to comment Share on other sites More sharing options...
Stew Dapple Posted September 17, 2015 Share Posted September 17, 2015 Certainly looks like a hit to me too, just caught up with this build... nice job on the masking, that must have been quite a chore to do ' by hand'. Looking really nice now, hope the transfers go okay. Cheers, Stew Link to comment Share on other sites More sharing options...
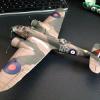
AndyE1976 Posted September 20, 2015 Author Share Posted September 20, 2015 Thanks, this one has taken a bit more effort than I anticipated. From the twisted fuselage to the paint issues and the fit of those T-pieces on the nacelles it was starting to feel like hard work! I'm calling this done though, here's the final result: 6 Link to comment Share on other sites More sharing options...
Stew Dapple Posted September 20, 2015 Share Posted September 20, 2015 Lovely job there Andy Cheers, Stew Link to comment Share on other sites More sharing options...
AndyE1976 Posted September 20, 2015 Author Share Posted September 20, 2015 Cheers, got there in the end! Link to comment Share on other sites More sharing options...
Stew Dapple Posted September 20, 2015 Share Posted September 20, 2015 In some style, too I think you will find the Defiant an easier ride, apart from the masking, anyway... Cheers, Stew Link to comment Share on other sites More sharing options...
CedB Posted September 20, 2015 Share Posted September 20, 2015 Nice build Andy, very tidy Link to comment Share on other sites More sharing options...
prowler0000 Posted September 20, 2015 Share Posted September 20, 2015 Link to comment Share on other sites More sharing options...
AndyE1976 Posted September 22, 2015 Author Share Posted September 22, 2015 Now on with the Defiant! I started cutting bits off the sprues and before I knew it the interior was together and painted, I think this one is going to be a lot easier than the Dornier. So here is the interior. A good level of detail given that very little will be seen. And the wings: This morning I started bright and early thanks to calls with our off-shore development centre, so the fuselage is now together: I have a feeling that at some point today the wings will be attached along with the rest of the flying surfaces. Maybe ready for painting this evening at this rate, although some of the joins look like they could do with a bit of Mr Surfacer. 3 Link to comment Share on other sites More sharing options...
jrlx Posted September 22, 2015 Share Posted September 22, 2015 Hi Andy, Great looking Dornier you have there! And the Defiant is coming together really well! Cheers Jaime Link to comment Share on other sites More sharing options...
AndyE1976 Posted September 24, 2015 Author Share Posted September 24, 2015 This one seems to be flying together and I have to keep remembering to take pictures and post here! The plane is together now, the turret, undercarriage and propeller are built ready for painting and the prop has had a coat of white Tamiya XF-2. Masking was surprisingly difficult, especially on the turret, I think I've got it covered ok, but I guess I'll find out when it's painted. Next up is to splash some paint on it, but this weekend is way too busy for that to occur much before Monday unless I can sneak a few minutes during the day! 3 Link to comment Share on other sites More sharing options...
AndyE1976 Posted October 7, 2015 Author Share Posted October 7, 2015 Apologies for the lack of updates, it's been a busy few weeks. I've moved on to painting, starting with the black of the turret interior and prop. The prop needs to have a white nose and the rest black, which posed some masking problems. The solution - a pencil and some Tamiya tape to create an even circle that the propellor can sit in while painted black. Worked pretty well. Then on with the camo, pretty simple job and the tape didn't take any paint off this time. Couple more pieces before I can give it a gloss coat and some decals. Nearly done 3 Link to comment Share on other sites More sharing options...

Recommended Posts