Ian Suds Posted August 2, 2015 Author Share Posted August 2, 2015 Notice the black part on the tail fin. Supplied as a decal but I decided against using the decals. I Used the decals as a stencil then painted the fin instead. I didn't want the stress of a large decal not going on properly and all other decal problems. All in all, the result was for me was much better. Link to comment Share on other sites More sharing options...
Ian Suds Posted August 2, 2015 Author Share Posted August 2, 2015 The finished model will be on a simple diorama. So I intend to use the Airfix Snatch Land Rover with a couple of Airfix figures, Now as a vehicle modeller one might expect an expert build. Wrong! I didn't intend to fuss too much with it as its not the main feature, not say that it was going to be thrown together either. Sounds very much like an excuse to me lol. That's it for now. Thanks to all who are following this, I hope to inspire those among us who might be dubious to post up their efforts. There is room for us guys who aren't experts so give it ago. Link to comment Share on other sites More sharing options...
12jaguar Posted August 2, 2015 Share Posted August 2, 2015 Nice build. The J internal tanks aren't bigger, it's just that the engines are more fuel efficient; that said, some (not all) RAF J's are now fitted or capable of being fitted with external tanks. John 1 Link to comment Share on other sites More sharing options...
Ian Suds Posted August 2, 2015 Author Share Posted August 2, 2015 Nice build. The J internal tanks aren't bigger, it's just that the engines are more fuel efficient; that said, some (not all) RAF J's are now fitted or capable of being fitted with external tanks. John Thanks for that bit of info, much appreciated. Link to comment Share on other sites More sharing options...
Ian Suds Posted August 2, 2015 Author Share Posted August 2, 2015 Fast forward most of the build to these stages. Not a bad kit at all and mostly went together well. Link to comment Share on other sites More sharing options...
Ian Suds Posted August 2, 2015 Author Share Posted August 2, 2015 Time to lay on the top coat. I used the desert tan scheme, idea being that on my diorama the aircraft would be sat on the runway threshold during an exercise prior to the Army unit deploying to a war zone. Interior has been duly weathered. Link to comment Share on other sites More sharing options...
Ian Suds Posted August 2, 2015 Author Share Posted August 2, 2015 (edited) I know this is an aircraft thread but bear with me. Next problem was the Barracuda netting as in this photo. Then I remembered that I had an Eduard 1:35 photo etch sheet, decided it was better to use it rather than some home made job which wouldn't look right anyway. The sheet was in European camo so it was painted with a lightened tan. Here painted. Edited August 2, 2015 by Ian Suds Link to comment Share on other sites More sharing options...
Ian Suds Posted August 2, 2015 Author Share Posted August 2, 2015 Fourth photo should have been this one. Link to comment Share on other sites More sharing options...
Ian Suds Posted August 2, 2015 Author Share Posted August 2, 2015 The netting was carefully applied using thin superglue. Not perfect but better than anything else I could have done. Link to comment Share on other sites More sharing options...
Ian Suds Posted August 2, 2015 Author Share Posted August 2, 2015 What this kit didn't supply was the mesh in the Bull Bars, I corrected this with some left over from a Leopard Tank, supplied to make wire baskets. Also the windscreen shield wasn't correct, the kit had a decal to place on the windscreen. Here was my solution. Now we can return to the real deal. The Herc. Link to comment Share on other sites More sharing options...
Ian Suds Posted August 2, 2015 Author Share Posted August 2, 2015 Wings test fitted. The sharp eyed will notice that the careless clot ie Me broke the probe off, not to worry that'll be sorted later. Also removed the windscreen which was temporarily fitted. Engines fitted to the Port wing after gluing in position. Followed by the Starboard wing then the joint filled. 2 Link to comment Share on other sites More sharing options...
Blitz23 Posted August 2, 2015 Share Posted August 2, 2015 Epic build! 1 Link to comment Share on other sites More sharing options...
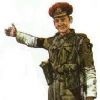
Ian Suds Posted August 2, 2015 Author Share Posted August 2, 2015 Thanks for the comment Blitz, by the way get that Hurricane started lol. Figures started. Link to comment Share on other sites More sharing options...
Ian Suds Posted August 2, 2015 Author Share Posted August 2, 2015 (edited) Snatch and figures completed and weathered, perhaps a little over done? Edited August 2, 2015 by Ian Suds Link to comment Share on other sites More sharing options...
Ian Suds Posted August 2, 2015 Author Share Posted August 2, 2015 Looking very shiny with several coats of Klear prior to fitting decals. 1 Link to comment Share on other sites More sharing options...
Blitz23 Posted August 2, 2015 Share Posted August 2, 2015 Thanks for the comment Blitz, by the way get that Hurricane started lol. Figures started. Haha I will I will, just gotta clear this P-40 off the bench first! 1 Link to comment Share on other sites More sharing options...
Ian Suds Posted August 2, 2015 Author Share Posted August 2, 2015 Next task was applying the decals, despite plenty of Klear I still had a little silvering. Here they are applied then covered with a coat of Klear for the weathering protection. Remember the black patch on the tail fin was painted and I reckon looked much better than applying the decals. Had a peek at the windscreen to see if it had masked OK with no paint running under the masking. This was always going to be a stressful moment. Looked OK, but what about the rest? Link to comment Share on other sites More sharing options...
Ian Suds Posted August 2, 2015 Author Share Posted August 2, 2015 1 Link to comment Share on other sites More sharing options...
Ian Suds Posted August 2, 2015 Author Share Posted August 2, 2015 Now at the stage where I'm a little nervous, oil washes/ filters and weathering. At this scale I wasn't sure this was going to be a success. The masks were removed from the windscreen, I was relieved that there were no major issues Oil filters to change the paint tone in places. The high gloss slowly going. 1 Link to comment Share on other sites More sharing options...
Ian Suds Posted August 2, 2015 Author Share Posted August 2, 2015 (edited) Final photos for tonight. It's nearing completion Remasked the windscreen with liquid mask and the whole aircraft was given two light coats of mat varnish. Work had also started on the props and they were near ready to be fitted. After breaking off the refuelling probe there was no way they were being fitted 'till the aircraft was on the base. That's all for now, again it's a goodnight to all you modellers out there. Edited August 2, 2015 by Ian Suds 4 Link to comment Share on other sites More sharing options...
Romeo Alpha Yankee Posted August 2, 2015 Share Posted August 2, 2015 Nice work Ian, Are you using the kit decals? 1 Link to comment Share on other sites More sharing options...
Barneydhc82 Posted August 3, 2015 Share Posted August 3, 2015 All that space going to waste...and raised panel lines...Take a look here http://www.barneysairforce.com and see what an old geezer with too much time on his hands did about the above. My better half says that I'm nuts. Nice looking Herc by the way \ Barney 1 Link to comment Share on other sites More sharing options...
Martin @ RAM Models Posted August 3, 2015 Share Posted August 3, 2015 Very nice looking model. Enjoying seeing this take shape. 1 Link to comment Share on other sites More sharing options...
Ian Suds Posted August 3, 2015 Author Share Posted August 3, 2015 Nice work Ian, Are you using the kit decals? Thanks for the comments, yes I used the kit decals. The lad who bought this had put his grubby mits (he is a motor mechanic) over them also I had the kit around two years before starting it. The decals were a bit of a struggle to put because of that but they did go down. I wasn't for spending any money on this, apart from my paints Link to comment Share on other sites More sharing options...
Ian Suds Posted August 3, 2015 Author Share Posted August 3, 2015 All that space going to waste...and raised panel lines...Take a look here http://www.barneysairforce.com and see what an old geezer with too much time on his hands did about the above. My better half says that I'm nuts. Nice looking Herc by the way \ Barney His example is something else. Just didn't have the time, or the skill if I'm honest, to sand off all the raised lines and then scribe them.The owner was chuffed with it, he is a TA para and just wanted this done as he has jumped from them many times. He was more than happy for an out of the box build with some weathering. Link to comment Share on other sites More sharing options...

Recommended Posts
Create an account or sign in to comment
You need to be a member in order to leave a comment
Create an account
Sign up for a new account in our community. It's easy!
Register a new accountSign in
Already have an account? Sign in here.
Sign In Now