yankeemodeller Posted August 25, 2015 Share Posted August 25, 2015 For those of you who have seen my builds that I have shared on the forum probably know by now that I'm a fan of a diorama. I love to see an aircraft in an operational setting with work going on around it, but as of late I'm running out of space quicker than I'm building. What to do? Stop building? Sell my kits on eBay? Turn the dioramas into some sort of functional appliance? The first suggestion is out of the question, I love modelling and am not about to stop while I still have a few square feet of space free. The second suggestion is also a non-starter, I might not be 100% pleased with all of my builds, but I spend my precious time building them and want to enjoy them for as long as possible (*cough* and they're not good enough to sell *cough*). Erm, turn them into a functional appliance, let's give that a go... This idea may sound a bit mad, but I think if I can pull it off it might be quite special. I've been meaning to build a Lightning for a while and have been fostering a growing love for the aircraft with a particular interest for the quick response interceptor role they had thoughout the Cold War. I've also seen some of the Lightning RFI and WIPs as well as Bar side's HAS build and they've really inspired me. 'Tell us where the functional appliance bit come in, you fool!?' I hear you all shouting at your monitors. Well, this picture below of the Bruntingthorpe QRA shed (maintained by the Lightning Preservation Group) made me think: can I make something similar in 1/72 scale that not only acts as a cool diorama during the daylight hours but also acts as a super cool desk lamp when the sun goes down? My plan is to make a 12x12 inch diorama base which will sit in the corner of my office desk. It will include the front portion of the QRA shed and a portion of the crew quarters. Although not entirely accurate, I plan to include the Lightning just outside of the shed with some ground crew and equipment on and around it. I'm intending to really go to town on the detailing so I thought about including a mirrored section in the Tarmac so you can also see the underside. On top of the QRA, as per the image above, there will be one or two lights which will act as the 'useful' part of the diorama and illuminate my desk.I'm not sure how I'm going to wire up the lighting just yet, that will require some thought and planning, however, there are plenty of QRA reference photos on http://www.lightnings.org.uk including some really useful pictures of the internal structure which will help with the building. The Lightning itself will be the Airfix F6, Eduard PE set and masks, Xtradecals for the Binbrook aircraft (XR727) and any other bits that I like the look of. The QRA and ground equipment will be a mixture of Flightpath (Houchin power unit and RAF diorama accessories) and scratch building. So there we have it! I hope I can pull this off, although if I don't, I'll still have the Lightning that I can put...somewhere. That's brilliant. That'll solve your problem short term, but after reading that, it sounds like your passion for modelling will cause this issue to come up again. I have a similar problem as most of my models are in storage in the basement. I could use a few ideas such as yours. KEEP EM COMING!! 1 Link to comment Share on other sites More sharing options...
MattBlack33 Posted August 26, 2015 Author Share Posted August 26, 2015 Thanks, Yankee. Welcome to the boards by the way! Hopefully I'll be able to post an update this weekend! Link to comment Share on other sites More sharing options...
yankeemodeller Posted August 27, 2015 Share Posted August 27, 2015 Someone gave me the name TONYOT as reference to a brush painter, and I must have got on this topic by mistake. I also am airbrusher but challenged myself to do an entire model without touching an airbrush. It went well and enjoyed it. That being said, I am watching your progress here as it sounds like a cool idea. I also have the Tucano kit that you completed but can't decide which scheme to paint. Yours looks very nice. 1 Link to comment Share on other sites More sharing options...
MattBlack33 Posted September 5, 2015 Author Share Posted September 5, 2015 (edited) I've done both Tucanos now but I think the Church Fenton version looks nicer. I've never been able to brush paint, it always ends up looking horrendous! Glad to hear you've mastered it though, maybe I'll try doing my own all in brushes...one day! I've got some green on her, but needs a few touch ups as I've overdone some of the lightening. I've been focused on the diorama base as I'd love to have somewhere to put the finished a/c once completed! You can check out my progress on the shed here: http://www.britmodeller.com/forums/index.php?/topic/234987148-raf-binbrook-1970s-q-area-building-diorama-and-desk-lamp/page-3 Edited September 5, 2015 by MattBlack33 1 Link to comment Share on other sites More sharing options...
yankeemodeller Posted September 5, 2015 Share Posted September 5, 2015 I've done both Tucanos now but I think the Church Fenton version looks nicer. I've never been able to brush paint, it always ends up looking horrendous! Glad to hear you've mastered it though, maybe I'll try doing my own all in brushes...one day! I've got some green on her, but needs a few touch ups as I've overdone some of the lightening. I've been focused on the diorama base as I'd love to have somewhere to put the finished a/c once completed! You can check out my progress on the shed here: http://www.britmodeller.com/forums/index.php?/topic/234987148-raf-binbrook-1970s-q-area-building-diorama-and-desk-lamp/page-3 Thanks for the vote of confidence, but I must disagree that "mastered" is the correct word. More like "did a decent job." It definitely takes more work to get close to a comparable airbrush finish. Fixing to check out your link. 1 Link to comment Share on other sites More sharing options...
AdrianMF Posted September 6, 2015 Share Posted September 6, 2015 (edited) Great diorama and model. I bet it will look great, especially in the dark! Just wondering if you can make the mirrors look like a puddle, and make it look like the apron is drying out after rain. I'm jealous of your space though - the biggest base I've got away with so far is 4"x4", just big enough for an S6B on the diagonal. Regards, Adrian (Edit - just like the picture above, in fact!) Edited September 6, 2015 by AdrianMF 1 Link to comment Share on other sites More sharing options...
MattBlack33 Posted September 6, 2015 Author Share Posted September 6, 2015 (edited) This is what she looks like at the moment: For those following this thread but not the shed build thread, you can see I've moved away from the cardboard skeleton idea and overhauled the shed completely. Thanks, Adrian. This is about as big as it gets for now, it's testing the limits of my desk space as it is! As you can see from the pics above I've done away with the mirror idea, I couldn't find the materials to achieve what I wanted in the end. I've got myself the Alclad to do the NMF of the underbelly and chrome of the nose ring, I just haven't got round to doing it! I'll probably whack some gloss black on it today so at least it'll be halfway there. Edited September 6, 2015 by MattBlack33 3 Link to comment Share on other sites More sharing options...
tweeky Posted September 6, 2015 Share Posted September 6, 2015 As you can see from the Sat pics the area out the runway side of the aircrew accommodation was fully grassed the aircrew transport (BMC mini) was parked with the QRA Landrover in the QRA car park. The aerial pic is post closure there was quite a lot of barbed wire around QRA in the early 80's. Nothing was in front of the aircrew accommodation all the Ground support equipment was in the sheds or stored to the right of the sheds but close in to them as the area was used to turn the fuel bowser around once and top ups had happened. The bowser was always brought along the rear of the sheds on the concrete section. As regards to your model the Lightning only had two positions for the flaps up and down no mid setting, If you planning to have you Lightning in that position the aircraft would be buttoned up ready for take off canopy down and locked all safety devices removed etc etc. Also there was a wooden U section that guided the nose wheel out of the sheds must have been some where like 15ft long. 1 Link to comment Share on other sites More sharing options...
MattBlack33 Posted September 6, 2015 Author Share Posted September 6, 2015 (edited) Hi Tweeky, thanks for the pointers I really appreciate your feedback. My research on the Binbrook Q Sheds has revealed something different to what you're saying above and has, in places, come from people who have actually worked on the shed personally. I'm happy to hear what you think about the below as for all I know you could also have experience working at Binbrook too and I'd really like to get your perspective Regarding there not being concrete in front of the crew quarters I disagree. The satellite picture shows a distinct change in grass hue (as indicated in my image) in comparison with the rest of the grass alongside this route. Furthermore, this image: shows a concrete-like structure on the ground underneath the grass. The arrow on the satellite image indicates the location of a door which would suggest that the crew quarters did have an element of concrete surrounding it which does not appear on the satellite as it has become overgrown in the 20+ years since its last use. The longer grass (indicated in green) would suggest that there was also a more established strip of grass up against the brickwork (the grass here is able to grow longer as its roots go straight into the soil and not onto concrete as the grass in the red area does). Regarding the fuelling, I was told that fuelling occurred on the main pan and the aircraft were armed and fuelled prior to being towed to the shed. Again, I'd like to hear your opinion on this. i have some great reference photos of the wooden guide rail and will be including this when I get back to the build here's the one I'm using for reference: With regards to the other points, the equipment will be stored in the shed, admittedly not at the back right as per real life, the ailerons are down due to a hydrolics malfunction (the annoyed pilot is stood talking to one of the ground crew who is calling over someone to assist him), and the aircraft are outside the shed for function rather than form as I don't have the space to build the entire shed I'm toying with the idea of having the Landie as an RAF police vehicle responding to a call out that a group of schoolchildren had jumped the crash gate and made their way toward the shed to get a closer look EDITHere's an picture that shows at least some sort of activity occurring out front Edited September 6, 2015 by MattBlack33 Link to comment Share on other sites More sharing options...
tweeky Posted September 6, 2015 Share Posted September 6, 2015 (edited) Yes I worked at Binbrook, in fact i was on 5 Sqn for five years and did several "Q" stints and I as I've said there was no hard standing in front of the Aircrew accommodation the only areas of hard standing were the taxi way in in front of the sheds the one at the rear Where we brought the bowser in for top ups i have an old pic i took whilst on "Q" taken during a service on Q1 (first jet in) that may help. Also have a look here http://www.airshowspresent.com/raf-binbrook-qra-shed.html Edited September 6, 2015 by tweeky 1 Link to comment Share on other sites More sharing options...
MattBlack33 Posted September 7, 2015 Author Share Posted September 7, 2015 Yes I worked at Binbrook, in fact i was on 5 Sqn for five years and did several "Q" stints and I as I've said there was no hard standing in front of the Aircrew accommodation the only areas of hard standing were the taxi way in in front of the sheds the one at the rear Where we brought the bowser in for top ups i have an old pic i took whilst on "Q" taken during a service on Q1 (first jet in) that may help. Also have a look here http://www.airshowspresent.com/raf-binbrook-qra-shed.html And just like that my amateur archeology skills were undone like a pair of cheap sandals! Looks like I'll be sewing some 1/72 grass seeds next time I'm at the bench thank you for sharing the picture too. I don't suppose you remember what was in the front two rooms of the crew quarters? (ie the ones with the windows overlooking the taxiway) 1 Link to comment Share on other sites More sharing options...
tweeky Posted September 7, 2015 Share Posted September 7, 2015 (edited) Well I assume you mean the three windows on the Q shed main doors (Runway side) as you entered the Accommodation there was a sliding door on your right and a glass paneled door on the left. The sliding door on the right was the entrance to the Aircrew Accommodation this consisted of a sitting room (with contacts to air traffic and a a Hadley box connected to RAF Boulmer) in the sitting room was two standard RAF/MOD chairs a TV and a radio the decor was neutral (magnolia) the windows that covered the sitting room was the first two furthest from the Jets (bungee jump ad in the linked pics). There was a door withing the sitting room this led to the aircrew bedroom with two single beds not much other than this as the aircrew slept in there flying suits boots were normally left off for sleeping. The third window closest the the actual sheds covered this area. There was another window that served the sitting aircrew sitting room and that over looked the airfield extreme right window in the first pic in the linked pics. There was a third door on the corridor past the aircrew this was one of the Ground crew accommodation entrances/exit. Through the glass paneled door (this corridor can be seen in the 9th pic) there was a row of coat hooks on the right, first door on the left was the Kitchen then the toilets/drying room then the Ground crew sitting room quite a large room it had to windows in it (the first 2 on the left in the 2nd pic). This area doubled up as an office for paperwork when servicing the jets. The ground crews bedroom had a door into it at the end of this corridor (in the 9th pic the photographer must had had his back to it) The Ground crew bed room had a stepped roof with sky lights in it can be seen in the 1st,2nd and 3rd pics. The Grey fire door (6th pic) led directly to the Aircraft sheds Q1 first then Q2 ................Q3 was ether on slot 1 on the pan or first in the hanger with the tractor and the towing arm attached. Hope this helps Edited September 7, 2015 by tweeky 1 Link to comment Share on other sites More sharing options...
tweeky Posted September 7, 2015 Share Posted September 7, 2015 Matt, The Lightning was well know to leak fuel at an alarming rate, so the constant drips usually meant the Aircraft would need a "topup" so a bowser would be called and the aircraft topped up some time taking less that 100lbs of fuel but the light would be all out on the refueling panel. Yes the aircraft would be readied on the main ASP/pan serviced and armed but i have know it to be done up at the sheds, usually after a scramble or an aircraft going U/S. In the event of a weekend scramble Q3 would be dragged up to QRA and then the missiles and bullets delivered from MSF, Once armed (sqn armoures were always on call). the Pilot of Q2 would call out another pilot and he`d check the Jet in with Boulmer then remaim on Q until Q1 landed. Q1 would then be unarmed serviced and put away in the main hanger becoming Q3. There would also be several Q spares prep'ed for the weekend I've seen up to Q5 readied for the weekend. 1 Link to comment Share on other sites More sharing options...
MattBlack33 Posted September 7, 2015 Author Share Posted September 7, 2015 Absolutely spot on, thank you so much for that. I'm only planning to model the front two rooms, but it's really interesting to hear what everything else is to put it into context. I've seen a few pictures of the quarters and shed as they are now and have no idea what everything is/was. Do you have fond memories of doing Q stints? I'd be really interested to hear about your experiences. Link to comment Share on other sites More sharing options...
MattBlack33 Posted September 13, 2015 Author Share Posted September 13, 2015 Bit of NMF to lighten things up a bit. Airframe aluminium highlighted with chrome. The shed has taken priority so I'm moving quite slowly with this! 9 Link to comment Share on other sites More sharing options...
Danyel Posted September 16, 2015 Share Posted September 16, 2015 Holy Cow! That NMF looks amazing 1 Link to comment Share on other sites More sharing options...
RMP2 Posted September 17, 2015 Share Posted September 17, 2015 Looking very nice indeed. Don't forget the tips of the ventral fins! 1 Link to comment Share on other sites More sharing options...
MattBlack33 Posted September 18, 2015 Author Share Posted September 18, 2015 Thanks all, Alclad really is the future! Truly great stuff! I can only hope to improve my techniques the more I use the stuff. Hopefully this weekend I'll be a step closer to decalling. Link to comment Share on other sites More sharing options...
mirageiv Posted September 18, 2015 Share Posted September 18, 2015 Lovely work so far! Link to comment Share on other sites More sharing options...
tweeky Posted September 18, 2015 Share Posted September 18, 2015 (edited) RMP2, Dont forget the stress panel on the fuselage under the wing root. The tips of the Ventral fins were a composite type material the forward edge had a metal type "cover" applied to them then covered in PRC (brown goo) there was also a drain hole drilled in the same area so the hydraulic oil etc etc could drain out. Matt will post a couple of things about Q later in the weekend. Edited September 20, 2015 by tweeky 1 Link to comment Share on other sites More sharing options...
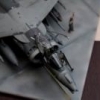
MattBlack33 Posted September 24, 2015 Author Share Posted September 24, 2015 Hi all! I've been putting the final touches to this for a while now, the decals are more or less done now. Quick picture of the pilot, wondering how long it's going to be before his aircraft is ready for the flight line. Ground crew are PJ Productions and pilot is from the Revell NATO pilots set. I'm just wondering if anyone has any spare wheels for this kit? I'd like them for the diorama. Let me know 5 Link to comment Share on other sites More sharing options...
PhantomBigStu Posted September 24, 2015 Share Posted September 24, 2015 I might have some from one of mine, Ill have a check 1 Link to comment Share on other sites More sharing options...
mirageiv Posted September 24, 2015 Share Posted September 24, 2015 Lovely looking Lightning Matt! I have some spare wheels but they are from the Hasegawa kit so not sure you want those? 1 Link to comment Share on other sites More sharing options...
Danyel Posted September 24, 2015 Share Posted September 24, 2015 Absolutely bloomin' fantastic, David. 1 Link to comment Share on other sites More sharing options...
PhantomBigStu Posted September 24, 2015 Share Posted September 24, 2015 nope had a look, looks like I got rid of them, though I'm going to my local shop, he normally has a lightning on the shelf, if I do pick one up Ill let you know 1 Link to comment Share on other sites More sharing options...

Recommended Posts
Create an account or sign in to comment
You need to be a member in order to leave a comment
Create an account
Sign up for a new account in our community. It's easy!
Register a new accountSign in
Already have an account? Sign in here.
Sign In Now