Marty Posted August 27, 2015 Author Share Posted August 27, 2015 Got the RAF Dark Green on last night, Gunze Sangyo Aqueous this time. Really happy with the way she's turned out - no overspray or double edges to clean up A couple of coats of Klear next then it's onto the decals. Thanks for all your comments, appreciated and motivating 3 Link to comment Share on other sites More sharing options...
Ozzy Posted August 27, 2015 Share Posted August 27, 2015 Nice paint work, I'm going to give your method a go when I paint mine. Link to comment Share on other sites More sharing options...
Marty Posted August 27, 2015 Author Share Posted August 27, 2015 Nice paint work, I'm going to give your method a go when I paint mine. Thanks Ozzy, it's a failsafe method IMHO. Blue-Tac allows for quite complex shapes to be masked but doesn't give too hard an edge to the demarcation between the two colours. You just need to be careful when handling the model during painting as it's easy to push the Blue-Tac out of place and end up with multiple edges..! 1 Link to comment Share on other sites More sharing options...
Dan Posted August 27, 2015 Share Posted August 27, 2015 Excellent work, this is looking superb Marty. I have one of these and at the rate I'm building my spit and 109 I might just do the hurri too and have all three main players 1 Link to comment Share on other sites More sharing options...
Homerlovesbeer Posted August 27, 2015 Share Posted August 27, 2015 Looking great Marty. Nice! Link to comment Share on other sites More sharing options...
Arniec Posted August 27, 2015 Share Posted August 27, 2015 Nice paintjob!!!! Can't wait to see it with decals on!!! Cheers, Link to comment Share on other sites More sharing options...
sean Posted August 27, 2015 Share Posted August 27, 2015 Superb paint job, I really like the finish on that, Sean Link to comment Share on other sites More sharing options...
Marty Posted August 28, 2015 Author Share Posted August 28, 2015 Excellent work, this is looking superb Marty. I have one of these and at the rate I'm building my spit and 109 I might just do the hurri too and have all three main players Looking great Marty. Nice! Nice paintjob!!!! Can't wait to see it with decals on!!! Cheers, Superb paint job, I really like the finish on that, Sean Thanks everyone, I can't wait to start decaling too - should make some progress tonight so watch this space..! Link to comment Share on other sites More sharing options...
Marty Posted September 1, 2015 Author Share Posted September 1, 2015 Decals on..! Not sure about the colour of the red on the roundels and fin flash, but the alternatives in the Aviaeology set seem a little too dark. I'm hoping that once the matt varnish is on it'll calm down a bit. Still need to add the m/c gun cover canvas - wondering whether to use painted Tamiya tape or go for a decal on this - any suggestions..? Onto the panel line wash next, followed by matt varnish and some very subtle weathering. The end is in sight 3 Link to comment Share on other sites More sharing options...
PlaStix Posted September 1, 2015 Share Posted September 1, 2015 That is looking really good! Excellent progress Marty. Link to comment Share on other sites More sharing options...
Ozzy Posted September 1, 2015 Share Posted September 1, 2015 Looks fantastic Marty, I did my covers with tamiya tape, it worked well and no detail lost under the transfers. I also did the blu tac masking it worked really well thanks. Link to comment Share on other sites More sharing options...
Marty Posted September 4, 2015 Author Share Posted September 4, 2015 (edited) Onto the final detailing, first up is the aerial mast and wire. I used some (very) thin elastic wire from Uschi Van Der Rosten, which is so thin it makes it quite difficult to work with. It's got a strange reaction to superglue too, seems to curl up when it's applied..! The wire isn't fixed at the rear as yet, still need to untwist it and tension it correctly. Tried to add a little weathering to the prop. I realise now that the Rotol props are wooden so don't remind me that the metallic scratches are incorrect..! I'll be rubbing these out and redoing them with a dark grey Well that's all for now. She's very nearly finished, just needs a matt coat and a few final bits n pieces. Should have her completed by the end of the weekend. Edited September 4, 2015 by Marty 4 Link to comment Share on other sites More sharing options...
Stew Dapple Posted September 4, 2015 Share Posted September 4, 2015 Lovely job there Marty I read somewhere on this very forum that the Gloster-built Hurricanes were still using pre-war red and blue for the roundels well into the Battle of Britain so the red is probably not as outrageous as it might first appear to you... Cheers, Stew Link to comment Share on other sites More sharing options...
Ozzy Posted September 4, 2015 Share Posted September 4, 2015 Looking good Marty, I like the elastic idea did you drill it into the top of the fuselage? Or did you attach it prior to closing the fuselage up? Link to comment Share on other sites More sharing options...
Marty Posted September 7, 2015 Author Share Posted September 7, 2015 Looking good Marty, I like the elastic idea did you drill it into the top of the fuselage? Or did you attach it prior to closing the fuselage up? Thanks Ozzy. Yes, I drilled the top of the fuselage and fed in the wire after attaching it to the mast first. I left the mast off until this had been done so I could have the wire taught when the mast was glued in place. Lovely job there Marty I read somewhere on this very forum that the Gloster-built Hurricanes were still using pre-war red and blue for the roundels well into the Battle of Britain so the red is probably not as outrageous as it might first appear to you... Cheers, Stew Cheers Stew, think I'm coming round to liking the bright red and after the matt varnish they look a little less 'in your face' She's nearly done, just a few more things to do and it's back onto a long term 1/32 Revell He111 build that I started a few years ago ..!! Hoping to get it finished for Telford (this year..!) 1 Link to comment Share on other sites More sharing options...
PlaStix Posted September 7, 2015 Share Posted September 7, 2015 Absolutely superb work again Marty. Your finishing is amazing! Well done! 1 Link to comment Share on other sites More sharing options...
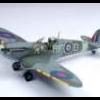
Marty Posted September 8, 2015 Author Share Posted September 8, 2015 She's finally finished, and I'm really pleased with the way she turned out Everything seemed to go my way on this one. Apologies for the crappy pics, will try to get some better ones to post in RFI sometime over the coming week. Thanks for looking 5 Link to comment Share on other sites More sharing options...
Ozzy Posted September 8, 2015 Share Posted September 8, 2015 Wow, really nice work Marty, that's one thing the Airfix kit is missing is the rear view mirror. 1 Link to comment Share on other sites More sharing options...
PlaStix Posted September 8, 2015 Share Posted September 8, 2015 Wow, really nice work Marty, that's one thing the Airfix kit is missing is the rear view mirror.+1 2 Link to comment Share on other sites More sharing options...
sean Posted September 11, 2015 Share Posted September 11, 2015 Wow, really nice work Marty, that's one thing the Airfix kit is missing is the rear view mirror. +2 Superb Hurricane, Sean 1 Link to comment Share on other sites More sharing options...

Recommended Posts