MattBlack33 Posted July 30, 2015 Author Share Posted July 30, 2015 You're all too kind! She's all glossed up and ready for decalling tonight so I might post a few pictures if I get time. I used a Humbrol gloss as opposed to the Klear that I've been using which will hopefully avoid the horrible silvering that I've been experiencing. I've also tidied up the supporting wire and primed it white. I hadn't appreciated how tough it looks in the above pictures! I'm just wondering if anyone has any ideas as to what colour I should do it to best blend it with the dio base? Link to comment Share on other sites More sharing options...
spitfire1677 Posted July 30, 2015 Share Posted July 30, 2015 Have you thought of using clear acrylic rod? You can get it from eBay fairly cheap. 1 Link to comment Share on other sites More sharing options...
MattBlack33 Posted July 30, 2015 Author Share Posted July 30, 2015 Have you thought of using clear acrylic rod? You can get it from eBay fairly cheap. Hi Spitfire, I did think of doing this but unfortunately too late in the game. My problem now would be how to attach it to the base. I'd gladly use one if you (or anyone else) can solve the problem of attaching it Link to comment Share on other sites More sharing options...
Danyel Posted July 31, 2015 Share Posted July 31, 2015 If you go the acrylic rod route how about glueing a suction pad http://www.ebay.co.uk/itm/4-x-40mm-suction-cups-pads-strong-suckers-rubber-plastic-clear-/190677053152?pt=LH_DefaultDomain_3&hash=item2c653ceee0 to the tile perhaps with epoxy, fitting the rod into this then covering with filler, blending with grass and disguising the hump with logs? Whatever you decide, it's a winner 1 Link to comment Share on other sites More sharing options...
MattBlack33 Posted August 1, 2015 Author Share Posted August 1, 2015 If you go the acrylic rod route how about glueing a suction pad http://www.ebay.co.uk/itm/4-x-40mm-suction-cups-pads-strong-suckers-rubber-plastic-clear-/190677053152?pt=LH_DefaultDomain_3&hash=item2c653ceee0 to the tile perhaps with epoxy, fitting the rod into this then covering with filler, blending with grass and disguising the hump with logs? Whatever you decide, it's a winner That's actually not such a bad idea, I wouldn't have considered doing that. I think the problem I have now is that the scenery is dried and established and I don't fancy tearing it up now. I've gone with the wire (for ease) in the end and painted the bottom half brown to match the scenery and the top (above the treeline) is white. Link to comment Share on other sites More sharing options...
MattBlack33 Posted August 5, 2015 Author Share Posted August 5, 2015 I've done goofed...help!! Before I went away I thought I'd do a quick touch up of paint in a few areas, so far so good. However, there's a particular spot on the main fuselage that I accidentally touched and have left a bit of a thumb print. Being the catastrophist I am, I thought I'd ruined the whole kit and should throw it in the bin and start again. The optimist in me says, you e done a great job so far and it'd be a shame for all my hard work to go into the black shiny hangar (aka the bin). So, what do people recommend I do? My worries are that the bits that I re-paint won't match the rest of the airframe as they will look brighter so was thinking about doing the whole thing again from scratch. I'm going to have to shell out for another set of decals and stencils either way so I'm not averse to doing this. If I were to do a re-spray, what can I use to strip the paint back? Do I sand, or use thinners? Or is there another way? Help me! Link to comment Share on other sites More sharing options...
sean Posted August 5, 2015 Share Posted August 5, 2015 Any pics? Where abouts on the kit is it? Sean Link to comment Share on other sites More sharing options...
MattBlack33 Posted August 5, 2015 Author Share Posted August 5, 2015 Hi Sean. I don't have any on me, but I can upload some at the weekend when I have my laptop. It's on the dorsal area right in the middle of the engine access bay between the wing roots. I'd not be so bothered if it was underneath as I'm going to add some more weathering to this area but it's in such a prominent area. Link to comment Share on other sites More sharing options...
sean Posted August 5, 2015 Share Posted August 5, 2015 I see, probably a bit awkward to try and mask, but I'd try that first rather than taking all the paint off. This area will be weathered as well? A bit of a blow all the same, it looked excellent, Sean Link to comment Share on other sites More sharing options...
MattBlack33 Posted August 5, 2015 Author Share Posted August 5, 2015 I know, I'm gutted! I think because I was so pleased is why I'd prefer to start again from scratch as I don't want to lose the all over uniformity of the finish. Even if it's masked, that area is going to be lighter than the rest and look really out of place... Link to comment Share on other sites More sharing options...
sean Posted August 5, 2015 Share Posted August 5, 2015 I suppose really it's what you're most comfortable doing, although it's shame to have to strip the lot. I'm sure you'll get it looking great again. I'll say one for you.... Sean 1 Link to comment Share on other sites More sharing options...
Beard Posted August 5, 2015 Share Posted August 5, 2015 Although I'd go for the stamp on it until it's in a thousand tiny pieces route myself, you have done a great job so far and I think you can rescue the situation. How about trying to sand the area with very fine wet & dry (used wet)? You might be able to remove the finger print. If that removes too much paint, mask and respray. If that doesn't work, strip the whole thing. I've heard oven cleaner works but it might be worth doing a web search for some tips. If that doesn't work, then break the kit up for spares and start from scratch. 1 Link to comment Share on other sites More sharing options...
xffw45343tg Posted August 5, 2015 Share Posted August 5, 2015 I have a feeling that the panels on the central spine area are interchangeable on the real thing (to some extent). It is also a big "NO STEP" area so an acceptable back story could be that some oaf( Ed? Chris? HRH?) stuck his boots/backside on the panels after slipping on the icy airframe when replenishing the water tank. A replacement panel was then fitted at short notice without being painted to match the rest of the airframe. Pure fantasy of course but just about within the realms of the possible? That way your can paint the panel in bare metal finish. Kirk 2 Link to comment Share on other sites More sharing options...
Danyel Posted August 5, 2015 Share Posted August 5, 2015 Gutted for you mate. Very fine wet and dry, like Beard said to get the worst off followed by 'fitting' the lucy pinder panel that was taken off ZD404 (don't know how it ended up in Norway, but anyway). That way you get some lovely tats on your plane. Sheeran's done you a favour. Why won't the paint match if you do a gentle repair to the area? 1 Link to comment Share on other sites More sharing options...
MattBlack33 Posted August 6, 2015 Author Share Posted August 6, 2015 Thanks all! I think the initial rage has subsided enough for me to come back to this and think about this with impartiality. I think I'm going to go over what I can with wet and dry and respray what I can. If anyone has a spare set of Harrier Gr3 stencils is love to make you an offer for them! Link to comment Share on other sites More sharing options...
xffw45343tg Posted August 6, 2015 Share Posted August 6, 2015 Re-read your post and realise you're talking about panels 11 & 12 rather than the wing fairing. I'm pretty sure these were interchangeable (unlike many 2nd generation Harrier panels) and that it would be quite reasonable for there to be a noticeable difference. Judging by your usual standard of work, I suspect your "repair" will be invisible to mortals in any case! The usual grumble with models is that the APU exhaust (on the port side) is moulded solid and this is far more visible than a non-matching panel. Kirk 1 Link to comment Share on other sites More sharing options...
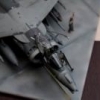
MattBlack33 Posted August 11, 2015 Author Share Posted August 11, 2015 Well, it's not the clean looking first-sortie-of-the-campaign Harrier I had in mind, but at least the great big thumb print has gone. I've really lost my mojo for this build, I was so pleased with the camo finish! I will soldier on regardless just to say I've done it though. I've weathered the top of the airframe to blend in the lighter, new white distemper, something that, although accurate, I was reluctant to do at first. It's better than a bin full of plastic at least... Next up: putting the ordnance back on, finishing the stencils and putting on the exhausts, aerials and other PE gubbins. Then on to a high shelf... 3 Link to comment Share on other sites More sharing options...
Beard Posted August 11, 2015 Share Posted August 11, 2015 Looks good. 1 Link to comment Share on other sites More sharing options...
Tomoshenko Posted August 11, 2015 Share Posted August 11, 2015 Glad you stuck with it. An original idea and one of my favourite Harrier schemes. 1 Link to comment Share on other sites More sharing options...
Danyel Posted August 12, 2015 Share Posted August 12, 2015 It does look good, David. Even though you're disappointed with it now you'll grow to love it again 1 Link to comment Share on other sites More sharing options...
Col. Posted August 12, 2015 Share Posted August 12, 2015 Love the concept and execution David. I can't see where the paint problem would have been so suspect your repair is better that you credit it to be. Only thing I'd mention is to perhaps have some of the green showing through the white around random edges and in a couple patches as it seemed to wear off and weather easily. Please excuse me taking so long to comment on this one, was sure I had already, watching your progress has inspired me with a few similar ideas and it surely has done the same for other BM members 1 Link to comment Share on other sites More sharing options...
MattBlack33 Posted August 12, 2015 Author Share Posted August 12, 2015 Thanks guys, Danyel, you're right, it's growing on me again and hopefully once it's finished I won't have to put it on a high shelf I really appreciate the kind words from everyone though. Love the concept and execution David. I can't see where the paint problem would have been so suspect your repair is better that you credit it to be. Only thing I'd mention is to perhaps have some of the green showing through the white around random edges and in a couple patches as it seemed to wear off and weather easily. Please excuse me taking so long to comment on this one, was sure I had already, watching your progress has inspired me with a few similar ideas and it surely has done the same for other BM members Thanks, Col. I'm going to give some of the areas a light run with very fine paper to reveal the green underneath. I had a quick practice before I did the respray (I had nothing to lose!) and it looked quite effective. I look forward to seeing some of your builds. 2 Link to comment Share on other sites More sharing options...
sean Posted August 12, 2015 Share Posted August 12, 2015 Great save M.B., better than the bin, that's for sure. Look forward to seeing the end result, Sean 1 Link to comment Share on other sites More sharing options...
MattBlack33 Posted August 12, 2015 Author Share Posted August 12, 2015 Great save M.B., better than the bin, that's for sure. Look forward to seeing the end result, Sean Thanks, Sean. I'm starting to feel a bit better about it now. I think once the matt coat goes on it'll even out the finish too 1 Link to comment Share on other sites More sharing options...
Knight_Flyer Posted August 12, 2015 Share Posted August 12, 2015 Looks good to me too. Unfortunately mis-haps will occur in this hobby and glad you managed to recover from this one. Look forward to seeing the completed result. 1 Link to comment Share on other sites More sharing options...

Recommended Posts
Create an account or sign in to comment
You need to be a member in order to leave a comment
Create an account
Sign up for a new account in our community. It's easy!
Register a new accountSign in
Already have an account? Sign in here.
Sign In Now