MattBlack33 Posted July 2, 2015 Share Posted July 2, 2015 (edited) I thought I'd move beyond my regular "plane at rest on a 6x6 tile" and see if I could expand to a "plane in flight on a 6x6 tile". I've always had an affinity for the Harrier, particularly the GR3 and GR7/9 and remember getting the GR3 as my second kit at the age of about 9 so this will be my subject of this build. Details: Airfix GR3. Eduard PE detailing. Freightdog fin replacement. Trees and base details yet to be sourced. I've done a few sketches of what I'd like this to look like but I don't think my drawing skills are up to much so I'm reluctant to share them here! I want to do a Harrier in arctic camouflage in the midst of a low level pass over the Norwegian countryside. For interest, I'd like to include a road and a mud track as well as a few trees. I was hoping that the trees could be used to hide the wire that will be supporting the aircraft in some way with the jet sitting about six inches above the base and the tallest tree being about two inches tall. The whole thing will have a fine dusting of snow too. So that's the challenge. I've got to finish my Hawk over the next month or so, so I'm still very much in the planning stage at the moment. Any pointers or suggestions would be very welcome! David Edited July 5, 2015 by MattBlack33 1 Link to comment Share on other sites More sharing options...
Knight_Flyer Posted July 2, 2015 Share Posted July 2, 2015 Look forward to seeing this one. I can imagine the set up you described and quite intrigued. My first Airfix GR3 was done in a winter camo, should bring back a few memories 1 Link to comment Share on other sites More sharing options...
MattBlack33 Posted July 3, 2015 Author Share Posted July 3, 2015 To save me the embarrassment of posting my childlike hieroglyphs, I've put together the following designs to better show what I have in mind. I didn't include a key as I hope it's all pretty self explanatory. With the Harrier She's tilted to starboard so that the pylons and underside detailing will also be visible. Without I'm tempted to throw in some ground troops, but I really want the harrier to be the centrepiece. 1 Link to comment Share on other sites More sharing options...
James G Posted July 3, 2015 Share Posted July 3, 2015 Nice, looking forward to seeing it come together! 1 Link to comment Share on other sites More sharing options...
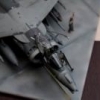
MattBlack33 Posted July 5, 2015 Author Share Posted July 5, 2015 Hi all, no progress on the aircraft to report, but as my Hawk build is drying I've made a start on the diorama base. I'd intended this to be a bit of practice, but it's turned out okay, so it looks like I'll keep it! I started by marking out where everything is going to be (more or less). The road section is a sliver of fine-grade sandpaper. For the groundwork I used Asda filler, and used an axle and feet of some Hasegawa blokes to make footprints and wheel tracks in the mud. I've taken a picture of one of my Tucanos above the diorama to simulate the position and height of the Harrier. Once dried I used a mix of Humbrol 119 and a drop of 33 for the mud airbrushed over Tamiya grey primer. Citadel Nulne Oil wash but only on the areas that will be tracks. Then, a mixture of flock, bushes and a pile of bricks to add a bit of interest. Mud areas drybrushed with undarkened Humbrol 119. I've used a couple of paintbrush covers as pipes, I'll paint these blue at some point. All is needed now are a few pine trees the fence re-adding and some snow before I can call it done. I do think it needs some troops or a vehicle on the ground. Maybe the Airfix Landrover and trailer kit. Might even make a start on the jet at some point too... Thanks for looking! David 7 Link to comment Share on other sites More sharing options...
James G Posted July 6, 2015 Share Posted July 6, 2015 Good stuff! 1 Link to comment Share on other sites More sharing options...
MattBlack33 Posted July 7, 2015 Author Share Posted July 7, 2015 First layer of snow added tonight. I'm not sure how much more to add as I'm tempted to keep it as it is. Fence posts in place too, however the gates are not secure. Thanks for looking. 5 Link to comment Share on other sites More sharing options...
louiex2 Posted July 7, 2015 Share Posted July 7, 2015 Very nice. I'd suggest holding off on more snow for now- it's easy to add more later but hard to remove once it's on. 1 Link to comment Share on other sites More sharing options...
sean Posted July 7, 2015 Share Posted July 7, 2015 That looks pretty good so far. I'd leave the gates unattached myself, (maybe have a couple of scallys coming through them with nicked pipes!) Perhaps a foot patrol would be in order to keep it strictly military. Sean 1 Link to comment Share on other sites More sharing options...
MattBlack33 Posted July 7, 2015 Author Share Posted July 7, 2015 Very nice. I'd suggest holding off on more snow for now- it's easy to add more later but hard to remove once it's on. Thank you! I think you're right, it looks ok for now so I might just add another light dusting once the fencing is on. That looks pretty good so far. I'd leave the gates unattached myself, (maybe have a couple of scallys coming through them with nicked pipes!) Perhaps a foot patrol would be in order to keep it strictly military. Sean Haha! I wonder if Revell ever did a "Norwegian Scally" set in 1/72?! Link to comment Share on other sites More sharing options...
Knight_Flyer Posted July 7, 2015 Share Posted July 7, 2015 Well, the scenery is looking excellent. I think the snow is at the right amount, any more might cover up too much of the detail. 1 Link to comment Share on other sites More sharing options...
MattBlack33 Posted July 8, 2015 Author Share Posted July 8, 2015 Thanks again for your comments, I promise I'll actually start building an aircraft at some point...this is the "Aircraft Modelling" section after all! Link to comment Share on other sites More sharing options...
Ex-FAAWAFU Posted July 8, 2015 Share Posted July 8, 2015 Thank you! I think you're right, it looks ok for now so I might just add another light dusting once the fencing is on. Haha! I wonder if Revell ever did a "Norwegian Scally" set in 1/72?! Skis don't have hubcaps to steal, so the Scallies would struggle to get started... 1 Link to comment Share on other sites More sharing options...
MattBlack33 Posted July 8, 2015 Author Share Posted July 8, 2015 Skis don't have hubcaps to steal, so the Scallies would struggle to get started... Haha! I gave it my best shot, but I'm having difficulty recreating the polyester on my scratch-built scale track suits... 1 Link to comment Share on other sites More sharing options...
James G Posted July 8, 2015 Share Posted July 8, 2015 Nice work! What will you use for the fence wire? 1 Link to comment Share on other sites More sharing options...
MattBlack33 Posted July 8, 2015 Author Share Posted July 8, 2015 Nice work! What will you use for the fence wire? Thanks, James. For the top section I'm just going to use fine grade wire to simulate barbed wire, then for the chainlink I've got a sheet of material that looks chain-linky so I'm going to cut that to size and glue it on. Hopefully it'll bring it all together. Link to comment Share on other sites More sharing options...
MattBlack33 Posted July 10, 2015 Author Share Posted July 10, 2015 Seeing as this is an aircraft work in progress, here's a few pictures of the PE going into the cockpit. I should be getting on with the priming and painting over the weekend! Thanks for looking! David 3 Link to comment Share on other sites More sharing options...
MattBlack33 Posted July 12, 2015 Author Share Posted July 12, 2015 Lots of progress today. The PE is all in the cockpit and it's all buttoned up. I'm left, however, with a bit of a technical problem. I want to put an aftermarket pilot in there, however with the seat in there's barely any room at all. For those who've built a GR3, what have you done!? I was just thinking about doing some serious hacking and slashing to get the lad in there. Ideas on a postcard.... Link to comment Share on other sites More sharing options...
eng Posted July 12, 2015 Share Posted July 12, 2015 Hack and slash away. Using the kit pilot mine lost 50% of his weight around his torso and had suffered ejection injuries to his legs!!! (OK so I shaved a fair chunk off his back and bum and he lost his legs below the knees) Rgds, Eng 1 Link to comment Share on other sites More sharing options...
MattBlack33 Posted July 13, 2015 Author Share Posted July 13, 2015 Thanks, eng. I thought I'd done something wrong, that 'pit is impossibly small! Looks like someone will be going through some serious surgery before his first flight! Link to comment Share on other sites More sharing options...
MattBlack33 Posted July 17, 2015 Author Share Posted July 17, 2015 More progress! It lures me into a false sense of security when builds start going together so quickly! The build has been an absolute pleasure so far. Here's what has been done: There wasn't an awful lot of PE to add to the exterior. I wonder if the inclusion of an access ladder in the Eduard set is to balance this out? I guess it's a testament to the quality of Airfix's kit that it doesn't need much in the ways of extras. I'm saying goodbye to this part...like I said above, such a small cockpit and I'm not sure how much of these details will be visible once the pilot is in and the canopy is closed! Sealed up and primed. I've had a go at pre-shading. These are the results and it looks a bloody mess!! I think the airbrush was to blame so after doing the best I could here I took it apart and gave it a thorough cleaning! First coat of DSG (Humbrol 163) has tidied it up a bit. You can just about see the preshading, however the real life model it is more apparent. The DSG was a bit D for my liking, so I made another mix with a hint of white in to brighten up the panels a bit and break up the coat. The next step is to mask off and get the green on. I'm then going to put a bit of Maskol in strategic places to represent paint chipping, then lay the white coat over the top as per the real aircraft. I've got a few plans regarding the stencilling, roundels and squadron markings, but more on that tomorrow I hope this is helpful in some way? David 4 Link to comment Share on other sites More sharing options...
Vingtor Posted July 17, 2015 Share Posted July 17, 2015 Whatever you do, don't paint it green (or grey) and white, and then apply the decals. This is how many modellers do it wrong. The real aircraft had the white distemper applied on top of the green or the grey camouflage colour, and most of the markings - except the national markings, serial numbers and squadron markings. The only way to get it right is to first finish the model in its standard colours and markings, and then apply the white distemper. Nils 1 Link to comment Share on other sites More sharing options...
MattBlack33 Posted July 17, 2015 Author Share Posted July 17, 2015 Way ahead of you Nils I've been making masks for the decals most of the evening as I'm completing as much as I can before the white distemper goes on. I'm trying to achieve the rough look of the real thing by making the masks slightly bigger so you can still see some of the green underneath. I hope that makes sense, I'm confident it'll work in reality but it sounds a bit mad... 1 Link to comment Share on other sites More sharing options...
AnonymousAA72 Posted July 17, 2015 Share Posted July 17, 2015 (edited) Dunno if you saw my reply to your query on how to paint this scheme in your other thread ....but On my GR3, built a few months ago I painted a section of decal sheet Dark Green and then applied those stencils, squadron markings, serials, codes etc directly onto that, and then on to the white paint on the model. Edges of white were feathered in using a small but broad paint brush.... Edit: Actually just read my post from a few years ago on my GR3..... http://www.britmodeller.com/forums/index.php?/topic/234951646-airfix-harrier-gr1a-two-gr3s-and-a-gr5-in-172nd/ I actually brush painted the Dark Green patches on the White and THEN applied the decals. Edited July 17, 2015 by Bill Clark 1 Link to comment Share on other sites More sharing options...
MattBlack33 Posted July 18, 2015 Author Share Posted July 18, 2015 Hi Bill, Thanks for that. I hadn't seen it until you just mentioned it, but I'll post it here too if you don't mind? Great kits by the way. Hi Matt, The white wash paint faded dramatically, so you could get away with a more solid white block scheme or very faded. Here's an early 'pointy-nose' GR3 I built recently. I painted the Dark Sea Grey upper surfaces then overpainted in white. I paited a block section of decal sheet Dark Green, and added any stencils etc to that , that should appear on Dark Green Areas...the white generaly only covered the green sections. When dry I added the other decals. It was then weathered uo wuth a Flory wash. I then used a fine but wide brush and "feathered" the edges of the white, to show fading and to cover some of the stencils. Decals were from Xtradecal, the 233 OCU'S blue 44 came from a Modeldecal set I was planning to do something slightly different. I'll do a step-by-step of what I'm intending to do over the weekend, let me know what you think. 1: paint the kit as usual adding the green to the grey that I already have done. This will be done using tape rather than tac as I want a solid boundary between the two camo colours. 2: I have scanned and printed a copy of the decal sheet, and printed out a paper copy which is 0.5-1mm bigger than the original. I have used these slightly bigger paper decals to cut out masks for the kit. 3: once the green is dry I will then place these masks onto the kit where the decals are going to be. Some of these may overlap with the tape used to mask off the grey, but that's fine. 4: I will then add some Maskol to the airframe in places where there's likely to be chipping of the white paint from maintenance etc. 5: now comes the layer of white. Airbrushed rather than hand-painted. 6: once dry, the tape and Maskol will come off hopefully leaving green spaces (in the white areas) in which to place the decals. Once the decals are set I'll then brush-paint around the edges of some of the decals as you have done. The other decals can now be added too. I hope this makes sense? If anyone has any comments I'd love to hear them (preferably before I embark on this!! ) I'll be posting pictures this evening of how it all went! Link to comment Share on other sites More sharing options...

Recommended Posts
Create an account or sign in to comment
You need to be a member in order to leave a comment
Create an account
Sign up for a new account in our community. It's easy!
Register a new accountSign in
Already have an account? Sign in here.
Sign In Now