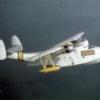
ancient mariner Posted June 28, 2015 Share Posted June 28, 2015 Have you ever had one of those projects on the bench that you thought would be a straight forward OOB build,then just turned to rats almost from the start.? This is my Hasegawa 1:48 Kawanishi "George" project. The actual construction posed no real problem,its the second generation release of the George ,great fit and good cockpit detail with nice engraved panel lines replacing the raised ones of the original issue. My problems started with the painting stage. Since my first ventures into WW2 Japanese aircraft the more recent and informed research into colours has turned most of my references on there head. Not helped by every paint manufacturer having their own ideas. (I think the Luftwaffe guys had/have the same problem) My original references gave IJN green topsides and light grey undersides..................apparently not anymore. Kawanishi green was different and nat.metal was the underside colour (or non colour) Nick Millmans blog (http://www.aviationofjapan.com)offers a wealth of information and even colour chips. This and the http://arawasi-wildeagles.blogspot.co.uk became my "go to"references. Trouble is I have so many questions regarding just this one aircraft type that Im in danger of having a restraining order issued for stalking. Using their info I managed to mix what to my eye (doesnt make it correct)was the correct colour. At least for the initial coat. First problem the top colour note the total shift under a coat of Kleer. Then getting the yellow ID leading edge the correct width. The George seems to have a quite narrow yellow leading edge. Problem ; getting it narrow,including the cannon ports and not having a very noticeable kink. More of that later. It always helps if you paint the cowling the "right road up" Half an hour of Fairy Powerspray and cling film took care of that Now to tackle my other problems.......so much for a quick build. 1 Link to comment Share on other sites More sharing options...
Nachtwulf Posted June 28, 2015 Share Posted June 28, 2015 I had to laugh with you on the wrong way cowl paint. I have been messing around with he idea of finishing this kit for a number of years now. No fault with the kit , just modellers block. Each time I open it to play around with the kit I always seem to try to put the cowling on upside down. : ) I like your topside color with the clear on it. I think it looks better darker. -Dale 1 Link to comment Share on other sites More sharing options...
ancient mariner Posted June 29, 2015 Author Share Posted June 29, 2015 Im thinking that the weathering and chipping is a bit much for the aircraft type. So its back to the painting booth to try and tone it down. Getting there I think but maybe still a bit OTT??? 1 Link to comment Share on other sites More sharing options...
ancient mariner Posted June 30, 2015 Author Share Posted June 30, 2015 Now a couple of questions raise there ugly head. At the late date in WW2 when the "George" was being produced would the inside of the combat flaps have been unpainted or lacquered.? Would the combat flaps have been painted upper surface green on the parts that fitted under the wing.? From notes I have on the "Raiden" the nearest contemporary of the "George" say silver for flap bays and upper surface green for complete upper flap surfaces. The big but is the Raiden was built by Mitsubishi and seems to have had a different production paint specification. Link to comment Share on other sites More sharing options...
Nachtwulf Posted June 30, 2015 Share Posted June 30, 2015 According to the Aero Detail book on the Shiden-kai the flap upper surface was all green and the flap bay was the same as the underside color ( silver ) I have not seen aotake blue anywhere on the shiden-kai. Inside of cowl flaps was also silver or natural metal. -Dale- 1 Link to comment Share on other sites More sharing options...
ancient mariner Posted June 30, 2015 Author Share Posted June 30, 2015 Thanks Dale, the flaps are done and I dont see too much problem getting rid of the aotake. First airbrush job tomorrow Link to comment Share on other sites More sharing options...

Recommended Posts
Create an account or sign in to comment
You need to be a member in order to leave a comment
Create an account
Sign up for a new account in our community. It's easy!
Register a new accountSign in
Already have an account? Sign in here.
Sign In Now