MiniModelPaint Posted April 14, 2015 Share Posted April 14, 2015 (edited) Hi Britmodellers, A quick intro - I'm Peter, I'm new here, and this is my first post. I've been around plastic and glue for 20+ years, and by far my favourite subjects to depict are Movies and Sci-Fi. I've built Batmobiles, USS Enterprises, Deloreans and Aliens. I have a strange pull towards the 1990s kits from AMT/Ertl and Halcyon. They're not the best moulds, or even the best plastics, but they were the things I lusted after when I was 15 - especially the Halcyon PVC kits like the Facehuggers and Chestbursters. In the last few years, I've dabbled in 28mm figures - Warhammer 40k and Fantasy, and I'd like to think I take the skills and techniques I've learned in painting tiny scales across to 'giant' models of 1/9th and 1/24th scales. I found this site via Twitter, and Rob's Aoshima Back to the Future build, which is coming along really nicely - I'm looking forward to seeing the final result! So - onto my own ambitious project! A few weeks ago I found a couple of my old Halcyon kits in the stash. A 1/9th Attacking Alien, and a 1/9th Predator from Predator 2 (the Danny Glover one in the city). My favourite moment in that film is a throwaway piece of scenery: in the Predator's trophy cabinet on the spacecraft is an Alien skull - a perfect universe connector, and one that has spawned the whole AvP franchise - but how can I get both of these kits to interact with each other? I started with the Predator. It's an awesome kit - standard brittle styrene, with soooo many mould lines and ejection pin marks to clean up. There are 43 separate dreadlocks, and when I fit them, they have to go in a specific order, and have a very small tolerance in angle. I'll be painting them well before I glue them on! The Alien will be involved as well, although at this point, I'm not sure quite how. There are two heads on the sprues, though, so that opens up some options. I'll be writing up the build here, and eventually on my own blog, with on-the-fly photo updates on Twitter. Please feel free to leave comments, advice and even criticism! See you next time. Edited April 16, 2015 by MiniModelPaint 8 Link to comment Share on other sites More sharing options...
John.R Posted April 14, 2015 Share Posted April 14, 2015 Will be following this, have to say the Alien & Predator movies are some of my all time fav's, and the Terminator series coming in a close third! 1 Link to comment Share on other sites More sharing options...
Dermo245 Posted April 14, 2015 Share Posted April 14, 2015 Welcome Peter, you'll enjoy it around these parts! Look forward to seeing your builds - past, present and future. All the best, Dermot Link to comment Share on other sites More sharing options...
S5 modeller Posted April 14, 2015 Share Posted April 14, 2015 Hiya peter. Welcome aboard. Will be watching this build with interest, as I have the same halcyon predator kit in my stash. Been put off starting it, mainly due to the dreadlocks. I have heard some bad things about the alien kit, mainly poor moulding with near zero definition around the teeth area. Looking forward to seeing more progress on this. Matt Link to comment Share on other sites More sharing options...
Knikki Posted April 15, 2015 Share Posted April 15, 2015 Welcome Peter be watching this as well, I am sure I have a couple of the Halcyon kit in the stash as well, not sure I well ever build them but you never know either. Link to comment Share on other sites More sharing options...
Ian Shumsky Posted April 15, 2015 Share Posted April 15, 2015 Welcome! Looking forward to watching this unfold, though I really don't envy you on those dreads! Link to comment Share on other sites More sharing options...
Carts Posted April 15, 2015 Share Posted April 15, 2015 Oooooo,will be watching this,I've built the predator kit,it's a nice little kit,but the forced perspective due to its stance looks a little odd. Link to comment Share on other sites More sharing options...
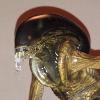
MiniModelPaint Posted April 15, 2015 Author Share Posted April 15, 2015 (edited) Thanks for the many welcome messages! This does look like a friendly group (usually the case, but I've been around some stinkers in the past!) Here's a shot of the head - glue drying - this is not a simple OOB stick-together. Lots of filler work, as I suspected. The detail in the moulding is a bit soft, but it's okay. It's enough to give me an idea of textures I can paint along with and expand on. Also, here's the Attacking Alien, unclipped from the sprues. I suspect that this is exactly the same kit as Halcyon's "Alien Warrior with Egg", but without the egg, and with a different head. It's an appalling pose, too - not in any way menacing. I'm getting an idea of how I will merge these kits. What I want to do, and what I will do are probably poles apart. More, obviously, later... Edited April 16, 2015 by MiniModelPaint Link to comment Share on other sites More sharing options...
Carts Posted April 15, 2015 Share Posted April 15, 2015 Hi Peter,looking at your pictures of the Alien and my positively ancient version with egg,it seems the only difference is the(2nd) head and arms,they are in a straighter pose than the original. 1 Link to comment Share on other sites More sharing options...
Hunter Rose Posted April 16, 2015 Share Posted April 16, 2015 Welcome to the fun Peter! Looks like your off to a good start, big predator fan will be following with interest! 1 Link to comment Share on other sites More sharing options...
MiniModelPaint Posted April 18, 2015 Author Share Posted April 18, 2015 I've been playing with some ideas - mostly in my head - of how to stitch these two chaps together. The pose of the Predator, with his arched back, could lend it to being impaled by the Alien's tail-spike. Plenty of conversion work to do, and resculpting on the feet, to account for gravity. It would be great to have them facing each other, so the Alien can bare his teeth right in the Pred's face. The biggest problems, though are the crap pose on the Alien, the difficult adjustments for centre of gravity and the cheap plastic in the Alien kit. Time constraint is the other thing - my last Alien Dio took 10 years to finish (http://www.minimodelpaint.com/2014/11/how-to-make-scary-alien-diorama.html), and this group build is over at the end of June! Maybe I'll take a less nutty approach. Here's the beginnings of glueing the body: Lots of filing, sanding and filling to go. The wine needs some work, too. 2 Link to comment Share on other sites More sharing options...
Carts Posted April 18, 2015 Share Posted April 18, 2015 Thought I had recognised your profile picture,I came across it while looking for inspiration,its a fantastic build,time constraints aside,if its up to that standard,this current build is going to be something else! Link to comment Share on other sites More sharing options...
MiniModelPaint Posted April 18, 2015 Author Share Posted April 18, 2015 Cheers fella - appreciate the ego boost! (pile on the pressure, why don't you?) 1 Link to comment Share on other sites More sharing options...
MiniModelPaint Posted April 18, 2015 Author Share Posted April 18, 2015 Quick update - his head is on. Tonight, he's called "Ol' toothless" Still haven't sorted any seams. Doing this one the wrong way round... 1 Link to comment Share on other sites More sharing options...
MiniModelPaint Posted April 23, 2015 Author Share Posted April 23, 2015 Next phase on this. I've glued the hands and sword - so far, so OOB. A thin coat of Alclad II grey primer with microfiller helps to soften the moulded plastic's reflections so I can see where the major (and minor) scraping and gap-filling is needed. Conversion plan: The Alien head is going to be an on-sword trophy, with gory bits dangling out of the neck, and in place of the boxed human skull/spine, it'll be the ripped-out Alien tongue, which I may have to reconstruct for size - the one in the Alien kit is a touch small and undynamic. Not sure if I will actually use the provided base. If I do, I definitely won't use the movie title plate. 2 Link to comment Share on other sites More sharing options...
whitestar12chris Posted April 23, 2015 Share Posted April 23, 2015 Looking good Mini, watching with interest All the best Chris Link to comment Share on other sites More sharing options...
neron-fx Posted April 24, 2015 Share Posted April 24, 2015 (edited) This is looking Awesome Peter! Lovely work indeed and a very nice looking kit, I must say. Welcome to the forums mate, good to have you around! Cheers, Rob Edited April 24, 2015 by neron-fx Link to comment Share on other sites More sharing options...
Hunter Rose Posted April 24, 2015 Share Posted April 24, 2015 Coming together nicely Peter, I must say this is making me want to get my hands on one of those predators! Link to comment Share on other sites More sharing options...
Caerbannog Posted April 24, 2015 Share Posted April 24, 2015 Very nice! A vinyl Predator was the first figure kit I tried - and the Alien was the scond. Will be whatching with interest. Rene 1 Link to comment Share on other sites More sharing options...
MiniModelPaint Posted April 26, 2015 Author Share Posted April 26, 2015 (edited) Sometimes experience and knowledge gives way to newbie excitement. I definitely should have shaved and filled some edges before assembling the larger parts. Still, it's done now, and I'll just have to use the right tools to clean up. The seams on the teeth are easy to clean off, but the edges where the face meets the cheeks and forehead are going to a nightmare. Add to which, I've gone and done this: This obviously adds a little extra weight to the hilt-end of the sword, but chopping the blade and reattaching not only makes it easier to work with, it elongates it to epic Predator proportions. I'm tempted to do something with the gauntlet blades, too. We'll see - plenty enough to do here... Edited May 17, 2015 by MiniModelPaint 4 Link to comment Share on other sites More sharing options...
neron-fx Posted May 1, 2015 Share Posted May 1, 2015 Looking amazing mate! 1 Link to comment Share on other sites More sharing options...
MiniModelPaint Posted May 17, 2015 Author Share Posted May 17, 2015 At Christmas, I received a 3Doodler pen. It's a cool toy, and you can make interesting geometric wireframes with it. Lots of users freehand-doodle cars, figures and buildings. It's not controllable enough to create greebly details on plastic models, but I thought I'd give it a go. A plastic stick goes in one end, gets heated to melting point inside the pen, and then pushed out of the nozzle where it cools down and hardens again. As you can see from the picture, the results are a cross between a glue gun and an icing sugar piping bag. My aim is to make some gore - primarily to hide the cut & glue seams between the Alien head and the Predator's sword - and also to detail some exposed bit of the head. There's a flat area on the neck that would be glued to the Alien's body, and a gap in the mouth where the tongue hasn't been fitted. Narrative-wise, though, it needs to look like the victorious Predator has sliced off the head and ripped out the tongue. And the Xenomorph has gloopy acid for blood. I think my ability with the 3Doodler, although severely limited, is perfect for this application. This created on a piece of paper, and then trimmed and glued to the model. I didn't want to melt the head! Gory bits through the head wounds were created on the head - there wasn't a way around it, the mouth has bits of tongue ripped through, and the tongue itself has some mess hanging off it now. There's be lots of yellow and green in the paintup. Next step is to prime the whole thing and check for the joins I've missed. Just got hold of some Mr Dissolved Putty for this exact job. 4 Link to comment Share on other sites More sharing options...
Hunter Rose Posted May 18, 2015 Share Posted May 18, 2015 Never heard of that tool before, sounds interesting, and the gore you've created with it looks sweet! Link to comment Share on other sites More sharing options...
MiniModelPaint Posted May 23, 2015 Author Share Posted May 23, 2015 And now, onto the dreadlocks. The dreaded dreads. The problem: 43 individually numbered strands which only fit in the correct order. They need mould-lines removing, priming and painting black before attaching to the head. Once a dread has been removed from the sprue, it's no longer numbered... This is the only way my brain can get around this problem. I hope nothing knocks them off the blu tack! Either way, it's going to a slow part of the job... 3 Link to comment Share on other sites More sharing options...
MiniModelPaint Posted May 30, 2015 Author Share Posted May 30, 2015 A couple of pics to show some progress. I've blocked out the colours on the main figure. and I've finished cleaning the mould lines on the dreads. These have been a nightmare. All done, though. Actually, I've done a bit more than that, too. Primed and painted the dreads gloss black. And started detailing the beads, and attaching the dreads to the head. ZOMG! I realised after attaching the first 3 that the armour and skin underneath probably *will* be visible. Better to get it painted before it's too late! Waiting for washes to dry, and then some more details as I attach them layer by layer. 1 Link to comment Share on other sites More sharing options...

Recommended Posts