MattBlack33 Posted April 4, 2015 Share Posted April 4, 2015 Hi all, ever get the sense of déjà vu? I started a WIP thread with a similar title which, for those who were following it, ended rather abruptly due to a few issues I was having with the kit. So, not one to be beaten, I'm back again to see if I can get this one done! As before, the intention is to put together a diorama of an RAF Valley Hawk just about to leave the flightline. The kit-list comprises of: Airfix BAE Hawk Eduard PE set (exterior and interior) https://www.hannants.co.uk/product/ED73354 Xtradecal decals for RAF Valley/Leeming T.1 http://www.hannants.co.uk/product/X72167 Flightpath access ladder https://www.hannants.co.uk/product/FHP72060L PJ Productions 1/72 RAF Pilots (standing and sitting - one sat getting buckled in, the other standing) I wasn't too impressed (or maybe I was just cr*p putting the PE together) with the Eduard cockpit coaming so, after a bit of a search I thought I'd add the NeOmega Resin cockpit to the list to see how that comes out. http://www.neomega-resin.com/172nd-bae-hawk-t100t2-118-p.asp So, here we go again! Comments, questions and criticisms welcomed David 1 Link to comment Share on other sites More sharing options...
HOUSTON Posted April 4, 2015 Share Posted April 4, 2015 David, Looks GREAT to ME .. Jolly GOOD choice sir. Keep us posted ... NICE . 1 Link to comment Share on other sites More sharing options...
MattBlack33 Posted April 5, 2015 Author Share Posted April 5, 2015 Thanks, Houston! Just wondering if anyone knows where I can get (or if anyone has one that's going free or cheap) a pilot's baggage pod? As far as I've seen Freightdog did a resin one one, but I can't seem to find one anywhere! Thanks Britmodeller!! Link to comment Share on other sites More sharing options...
MattBlack33 Posted June 15, 2015 Author Share Posted June 15, 2015 I'm awaiting the Neomega cockpit parts in order to get on with this. In the meantime I've been painting pilots. PJ Productions' 90' RAF pilots. I used to think I was pretty good at figure painting, but for some reason I can't seem to get it "right" these days!! 2 Link to comment Share on other sites More sharing options...
Ex-FAAWAFU Posted June 15, 2015 Share Posted June 15, 2015 (edited) Don't be hard on yourself; I'd be very happy with any 1/72 figure that looked remotely that good! Indeed, it's kind of why I no longer build any aircraft smaller than 1/48. Mind you, I think some of the writing on his knee board might be a bit smudged. It must be all of a couple of microns wide... Edited June 15, 2015 by Ex-FAAWAFU 1 Link to comment Share on other sites More sharing options...
Scarlet Posted June 15, 2015 Share Posted June 15, 2015 Depending how accurate you want to be, the Hawk T2's use a different type of steps to the T1's. http://www.google.co.uk/imgres?imgurl=http://www.fourfax.co.uk/wordpress/wp-content/uploads/2012_06_09_david_thompson_hawk_zk020_centenary-02.jpg&imgrefurl=http://www.fourfax.co.uk/06/sqn-news/centenary-colour-scheme-more-photos&h=960&w=1280&tbnid=iIfG9oK__uMzLM:&zoom=1&docid=vCClXAI1UH9KNM&ei=PNl-VceoBuq57ga405rQBQ&tbm=isch&ved=0CCAQMygcMBw4yAFqFQoTCMe29fHskcYCFeqc2woduKkGWg 1 Link to comment Share on other sites More sharing options...
James G Posted June 15, 2015 Share Posted June 15, 2015 Good work on the pilots David, looking forward to seeing your dio. 1 Link to comment Share on other sites More sharing options...
MattBlack33 Posted June 15, 2015 Author Share Posted June 15, 2015 Depending how accurate you want to be, the Hawk T2's use a different type of steps to the T1's. http://www.google.co.uk/imgres?imgurl=http://www.fourfax.co.uk/wordpress/wp-content/uploads/2012_06_09_david_thompson_hawk_zk020_centenary-02.jpg&imgrefurl=http://www.fourfax.co.uk/06/sqn-news/centenary-colour-scheme-more-photos&h=960&w=1280&tbnid=iIfG9oK__uMzLM:&zoom=1&docid=vCClXAI1UH9KNM&ei=PNl-VceoBuq57ga405rQBQ&tbm=isch&ved=0CCAQMygcMBw4yAFqFQoTCMe29fHskcYCFeqc2woduKkGWg Hi Scarlet, I did realise this soonafter is bought and built the Flightpath steps. I'd seen a video on YouTube of a row of what I thought were T2s using those steps. On closer inspection the jets were T1s. I'll have to re-think the step situation. Good work on the pilots David, looking forward to seeing your dio. Thanks, James. I've made some changes to them as I wasn't happy. Think I might use them with my Tucano instead and put two seated pilots in the Hawk instead. Link to comment Share on other sites More sharing options...
MattBlack33 Posted June 22, 2015 Author Share Posted June 22, 2015 My Neomega resin arrived at the weekend and progress is already being made on the aircraft. I decided not to use the pilots on this build but instead use the seated pair I got at the same time. The cockpit is a bit of a Frankenstein mix up of resin PE and Airfix. The resin seats look amazing, but with the belts being moulded on they aren't conducive to having a pilot seated on them. So, I removed the head box from the resin seats and attached them to the kit seats. I'm really happy with the outcome and they sit nicely in the tub. I also did some work re-shaping the coloured PE parts so that they will fit over the top of the resin instrument panels. Again, quite a bit of work but it looks the part. As of now the 'pit is done, just need to finish the seats and pilots. I'll take some pictures when I can, I've still no unpacked my battery charger from a recent holiday so wasn't able to take any as I was building. Questions and comments welcome! David Link to comment Share on other sites More sharing options...
MattBlack33 Posted July 4, 2015 Author Share Posted July 4, 2015 I'm afraid I've neglected this thread somewhat as I started the build and failed to take pictures as I was going along. Needless to say, the build is making progress and here's where I'm at as of this morning. I've done one pilot so far. As with the seat I think I've overdone the drybrushing so will have to make amends later. I decided against using the standing lad in the post above and used him on my Tucano build instead. Undercarriage nearly done, etched parts added, details painted and an ink wash added to bring out the details. Ejector seat with the Neomega resin headbox transplanted onto the Airfix seat so the pilots have room to manoeuvre. It looks a bit battered from close up so I might be tempted to tone down the dry brushing effects at a later date as most of the seats I've seen look brand new. Doesn't look too bad in situ. Tried out using acrylic paint for the first time which looked Matt in places so this was sanded down and I've used Xtracolor "night black" which has given a better all over gloss finish. I'm happy with it so far but there's a way to go and it hasn't been without its problems! I'm sure there's someone or something out there stopping me from finishing this kit!! 1 Link to comment Share on other sites More sharing options...
Simon382 Posted July 4, 2015 Share Posted July 4, 2015 I must say this is looking good. I especially like the pilot. I wish my painting skills were up to this standard,hey ho. One day perhaps, lol. Keep up the good work and I look forward to your next update 1 Link to comment Share on other sites More sharing options...
MattBlack33 Posted July 5, 2015 Author Share Posted July 5, 2015 Thanks, Simon. I used to play Warhammer as a youth so I've had a bit of practice painting figures. I guess it comes with practice. This video has also helped me to learn and develop a few techniques too. I hope you find it useful. They're still not up to the standard that I set myself, but then I don't think I've been 100% happy with any of my builds...I'm too picky! Link to comment Share on other sites More sharing options...
Simon382 Posted July 6, 2015 Share Posted July 6, 2015 Thanks for the link, very useful. As for our own standards, I have to agree with you, we're most certainly our own worst critic. Not sure I've ever built anything I've ever been completely happy with. One day perhaps, lol 1 Link to comment Share on other sites More sharing options...
MattBlack33 Posted July 6, 2015 Author Share Posted July 6, 2015 I guess the day that I build a kit that I like is the day I give up! I'm glad you found the video useful too. Link to comment Share on other sites More sharing options...
Danyel Posted July 9, 2015 Share Posted July 9, 2015 Love the undercarriage 1 Link to comment Share on other sites More sharing options...
James G Posted July 10, 2015 Share Posted July 10, 2015 Super work mate! 1 Link to comment Share on other sites More sharing options...
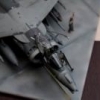
MattBlack33 Posted July 10, 2015 Author Share Posted July 10, 2015 Thanks, guys. Here's what it looks like right now. The airframe is painted and I've started decalling, I'm not 100% happy with the finish, but a coat of gloss should even it out a little bit (I hope). Next week will be the cockpit bits and the landing gear. I like it more than I did, but I'll be glad to get this mother off the bench!! 1 Link to comment Share on other sites More sharing options...
MattBlack33 Posted July 12, 2015 Author Share Posted July 12, 2015 More progress... Landing gear on, second pilot painted but not finished yet, another step closer!! All I need now is to finish the decalling tonight, get the doors on and finish the canopy. Oh, and sort out a base! 4 Link to comment Share on other sites More sharing options...
Danyel Posted July 13, 2015 Share Posted July 13, 2015 She's looking excellent 1 Link to comment Share on other sites More sharing options...
James G Posted July 16, 2015 Share Posted July 16, 2015 Looks great to me 1 Link to comment Share on other sites More sharing options...
MattBlack33 Posted July 16, 2015 Author Share Posted July 16, 2015 Thanks again, guys. I'm wondering if anyone can help with the central pilot/instructor dividing panel in the canopy? I've got a few ideas, but if anyone could tell me how to get a realistic finish on this particular pain in my neck I would very much appreciate it! David Link to comment Share on other sites More sharing options...

Recommended Posts
Create an account or sign in to comment
You need to be a member in order to leave a comment
Create an account
Sign up for a new account in our community. It's easy!
Register a new accountSign in
Already have an account? Sign in here.
Sign In Now