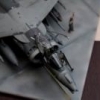
MattBlack33 Posted March 2, 2015 Share Posted March 2, 2015 (edited) As a precursor to a more detailed Hawk T.2 build (WIP here: http://www.britmodeller.com/forums/index.php?/topic/234977585-172-raf-valley-hawk-t2-diorama/) here are some pics from my 1/72 Tucano finished at the weekend. I enjoyed the build a lot, particularly the gloss finish and its overall look. I'm wanting to improve my photography skills too so if anyone has any tips for photographing models is be very grateful. I have a Canon 600D but am not getting the quality pictures I want. Anyway, here's the kit! Edited March 2, 2015 by MattBlack33 9 Link to comment Share on other sites More sharing options...
stevej60 Posted March 2, 2015 Share Posted March 2, 2015 She,s a beauty,nice one! Link to comment Share on other sites More sharing options...
MattBlack33 Posted March 2, 2015 Author Share Posted March 2, 2015 She,s a beauty,nice one! Thanks, Steve. She turned out alright Link to comment Share on other sites More sharing options...
HOUSTON Posted March 2, 2015 Share Posted March 2, 2015 Matt,, How STUNNING she looks... The glossy paintwork is quite RESPLENDENT.. BRAVO... 2 Link to comment Share on other sites More sharing options...
Pat C Posted March 2, 2015 Share Posted March 2, 2015 Looks very nice - I like the finish. As for photography, IMHO you can't beat natural light which means you can take sharper pics with a quicker shutter speed. Trouble is at the moment its tricky to find the right moment when the model won't get blown or washed away!! Pat 1 Link to comment Share on other sites More sharing options...
Val Posted March 3, 2015 Share Posted March 3, 2015 Great gloss work 1 Link to comment Share on other sites More sharing options...
MattBlack33 Posted March 3, 2015 Author Share Posted March 3, 2015 Great gloss work Thanks, Val. It lost a bit of its sheen when I put the decals on. I finished it off with another gloss coat, but it didn't seem as shiny! 1 Link to comment Share on other sites More sharing options...
Viper15 Posted March 3, 2015 Share Posted March 3, 2015 Nice work, I have a few of these to build but have heard plenty of bad things so I'm glad you enjoyed it. As for the photography, I recently got a Nikon D5300 and have been struggling myself at times. As Pat C mentioned above however, natural light it our best friend going on what I've experience so far. The British weather doesn't make that easy however, you could look into buying a natural light set up if you are serious, you can get them cheap enough if you look around. Another tip I would suggest is to add a simple back drop, I have found a cheap roll of white or black paper works wonders and makes your photos look a lot more professional with very little effort. Not to hijack your thread, but here is an example of a natural light picture I took with a simple paper backdrop. Unfortunately I had to do it inside given the wind so the bay window is reflecting in the Big Chaps dome. 2 Link to comment Share on other sites More sharing options...
Leonl Posted March 3, 2015 Share Posted March 3, 2015 Nice.... Link to comment Share on other sites More sharing options...
Val Posted March 3, 2015 Share Posted March 3, 2015 Thanks, Val. It lost a bit of its sheen when I put the decals on. I finished it off with another gloss coat, but it didn't seem as shiny! Yes, I've heard before that gloss coats kill gloss finishes a bit, weirdly enough!! I'm about to embark on my first gloss model, so will see what happens It looks superb to me though, top work! Link to comment Share on other sites More sharing options...
MattBlack33 Posted March 3, 2015 Author Share Posted March 3, 2015 Nice work, I have a few of these to build but have heard plenty of bad things so I'm glad you enjoyed it. As for the photography, I recently got a Nikon D5300 and have been struggling myself at times. As Pat C mentioned above however, natural light it our best friend going on what I've experience so far. The British weather doesn't make that easy however, you could look into buying a natural light set up if you are serious, you can get them cheap enough if you look around. Another tip I would suggest is to add a simple back drop, I have found a cheap roll of white or black paper works wonders and makes your photos look a lot more professional with very little effort. Not to hijack your thread, but here is an example of a natural light picture I took with a simple paper backdrop. Unfortunately I had to do it inside given the wind so the bay window is reflecting in the Big Chaps dome. The build was simple enough, just make sure you put plenty of weight in the nose as it likes to sit on its tail. I found there was a bit of filling to do, particularly the upper wing where it joins the fuselage and also below where the wings join the nose section. Nothing too bad though. Which version were you thinking of doing? The photo tips are great too by the way, I'll have a play at the weekend when I get a few minutes spare and let you know how I get on. Yes, I've heard before that gloss coats kill gloss finishes a bit, weirdly enough!! I'm about to embark on my first gloss model, so will see what happens It looks superb to me though, top work! Thanks, Val. I was really surprised how much gloss I lost with that final coat! I found this on another forum, http://www.militarymodelling.com/forums/postings.asp?th=69608 About five posts down there's a guide on gloss finishes that I'm going to try out on my Hawk. Don't know if you'll find it useful. 1 Link to comment Share on other sites More sharing options...
Val Posted March 3, 2015 Share Posted March 3, 2015 Thanks, Val. I was really surprised how much gloss I lost with that final coat! I found this on another forum, http://www.militarymodelling.com/forums/postings.asp?th=69608 About five posts down there's a guide on gloss finishes that I'm going to try out on my Hawk. Don't know if you'll find it useful. I certainly will, thanks for that 1 Link to comment Share on other sites More sharing options...
Viper15 Posted March 4, 2015 Share Posted March 4, 2015 Which version were you thinking of doing? One is the limited edition desert camo scheme, the others are the standard gloss black. I'll do at least one black, then the desert display scheme and then I'll see what the options are for the rest I think, although I'll likely do the spitfire colours as they look great on the Tucano imo. 1 Link to comment Share on other sites More sharing options...

Recommended Posts
Create an account or sign in to comment
You need to be a member in order to leave a comment
Create an account
Sign up for a new account in our community. It's easy!
Register a new accountSign in
Already have an account? Sign in here.
Sign In Now