Gaia1984 Posted May 4, 2015 Share Posted May 4, 2015 While it's true that the airframe was almost completely black (particularly when seen/photographed at public airshows as they were often given a quick touch up coat to look their best and possibly to help obscure sensitive secure elements of the aircraft), it really is a combination of a myriad of different greys and browns, and even white. Depending on the lighting and level of weathering and maintenance patches at any given time on a particular aircraft, the appearance would vary from an almost perfectly pristine black, to a wildly varied patchwork of different shades and hues. Add to this slight sun fading, exhaust staining on the vertical stabilizers off the unique "platypus" exhaust design, wear marks f4om pilot and crew entering and exiting the aircraft and performing various maintenence functions, hydraulic staining and the different materials used for the skin (and their different application methods)...this aircraft is anything but boring in its finish. Despite the "boring" moniker some have labeled it with. Feel free to stay in touch if I can assist in any way with reference material. I've got a small mountain of images and info that I've found immensely helpful for me anyway. Cheers Brian~ Yes I have seen what you are saying here. The grey shading seems to be different in almost every panel (at least in the ref pics I have seen) also notice the very reddish-brown coloration in the exhausts. It is definitely something interesting in the technical view of painting, getting all those shades of grey and be cohesive and aesthetically pleasing at the same time. I think I will go down to the more worn out painting approach, with distinction in the black-to-grey scale in the different panels. Also I have quickly check the armament bay of the Academy set (the one I have) and it seems that it will require and entire rebuild of it using plastic card. Also got some fine brass mesh for the frontal air intakes. Looking forward to start with it. Do you know if the plane has a gritty surface or is it more "polished"? From the pics looks a bit gritty. All the best, Alex 1 Link to comment Share on other sites More sharing options...
uilleann Posted May 4, 2015 Author Share Posted May 4, 2015 (edited) My understanding is that the surface texture was quite smooth in reality. Certainly if there were any form of texture to it, it would be completely lost at scale - even 1/32. It was generally flat (at least initially), but fluid staining, as well as mechanical wear from hands and (cloth covered) boots could impart a bit of slight sheen in areas. The RCS screens over the engine intakes have always been a sore spot with me. The plastic supplied by most kit makers (even Tamiya and Trumpeter) is not representative of the actual aircraft's 3 dimensional depth. The PE sometimes available for the kits is likewise far too flat to be believable. I'm currently trying to see if a proper resin part is a viable option, at least in 1/32nd. Sadly, even in this large scale, it's quite a challenge to get the vanes thin enough to make a viable replacement that look accurate with the proper thickness to the grid. One word of caution as you're picking out your panels for shading. Just make sure you don't fall into the "Tamiya trap" with your kit. Remember there were almost NO panel lines on operational jets, particularly on the top of the airframe. The theory is that when Tamiya looked to a jet to use to model their 1/48 kit from, that they used one of the prototype birds in a museum...that had all of its RAM coatings and sealant removed. This exposed a lot of panel lines and junctions that simply weren't present on active aircraft, and they mistakenly covered their entire kit (which was otherwise very nice) in erroneous lines. As you dig in to your panel shading, use reference photos whenever possibly as opposed to box art, or color call outs. Lastly, there is almost a 100% chance that all three wheel wells and landing gear are off...likely horrifically so. Particularly the main gear. Ironically, the bomb bays tend to be more or less correct on many F-117A kits, if not a touch sparse on detail. The Aires cockpit is a massive improvement any way you look at it of course. Though I've struggled to paint my huge-ish version in 1/32. I've no idea how one would cope with that much detail I. 72nd! I'll follow your progress intently when you get your WIP posted here! Brian~ Edited May 4, 2015 by uilleann 1 Link to comment Share on other sites More sharing options...
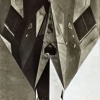
uilleann Posted May 5, 2015 Author Share Posted May 5, 2015 Some great examples of how varied the surface can get: And exhaust staining to make even a well used B-17 blush: 3 Link to comment Share on other sites More sharing options...
Danyel Posted May 5, 2015 Share Posted May 5, 2015 Hi Brian, I will have to rethink my plans to simply paint mine with Tamiya Nato black when I build mine. Not too far though as the decals from the Italeri kit represent a new/demonstration aircraft. The Italeri 72nd scale kit has raised panel lines which I want to either remove (to represent RAM tape or putty) or scribe. I haven't been able to find any references on which panel lines would/should remain. There is some interesting filling of panel lines done by Pappy, here: http://www.britmodeller.com/forums/index.php?/topic/234955151-wobblin-goblin/page-4 and I've found this image online which seems to show even fewer panel lines, but doesn't seem correct: http://zarco-macross.wdfiles.com/local--files/wiki:f-117-nighthawk/lockheed-f-117-nighthawk-5.gif I know nothing. Do you have any links to diagrams or images which show what should or shouldn't be represented? Best wishes Danyel 1 Link to comment Share on other sites More sharing options...
uilleann Posted May 5, 2015 Author Share Posted May 5, 2015 Danyel, pm me with your email address, and I'll send you the full image collection I've got. There is about 10 years worth of searching, and a fair number of images you can't find on the open web. 1 Link to comment Share on other sites More sharing options...
Danyel Posted May 6, 2015 Share Posted May 6, 2015 Hi Brian, I think I've pm'ed you. I've not sent a pm on here before, so please let me know if you don't receive my message. Best wishes Danyel 1 Link to comment Share on other sites More sharing options...
Homerlovesbeer Posted May 6, 2015 Share Posted May 6, 2015 Danyel, pm me with your email address, and I'll send you the full image collection I've got. There is about 10 years worth of searching, and a fair number of images you can't find on the open web. It's wonderful to see the community helping each other out. How's the build coming along? 2 Link to comment Share on other sites More sharing options...
uilleann Posted May 6, 2015 Author Share Posted May 6, 2015 It's wonderful to see the community helping each other out. How's the build coming along? S-L-O-W-L-Y! I'm hoping the extra time spent working out a few key details may well improve the overall kit beyond the sum of it's parts. Still working out and trying to refine the P.E. vector artwork (having to learn Adobe Illustrator from scratch has done anything but speed this little project along!), while at the same time hoping to learn some viable for of CAD drafting technique that I might be able to model proper wheel well bays for the Nighthawk. As I've gone along here, I've learned that the nose gear bay is close-ish (we'll call it maybe 70% accurate more or less)...but the main gear bays are something closer to perhaps 10-20% correct. In reality, the main gear are attached almost identically as the nose gear. The kits I've seen all have the nose strut with the roughly accurate "T" bar that hinges to the sides of the nose gear well. While the mains just stick straight up into the roof of their respective bays. In reality, the mains use the same "T" design as the nose, along with the two small stabilizing arms along each side of the drag brace armature. These are missing on every kit I've ever seen, as well as all aftermarket sets such as the old CMK flavor. In addition, the shape and structure of the main gear wells is horribly incorrect as well, and could use some serious aftermarket correction to truly look the part. I don't think my feeble skills are up to the task to be honest, but perhaps with a bit of luck, and a bit more financial persuasion, I may be able to convince another far more talented than I to undertake the challenge! Mind you, I'm only thinking of the later style gear...there is of course the added option to try and model the early gear and wheel sets in addition! Maybe, I'll just sit and rock in the corner, and home some of Nigel's magic elves come in and finish this kit off proper for me while I watch in astonishment! B~ Link to comment Share on other sites More sharing options...
logical Posted June 26, 2015 Share Posted June 26, 2015 Brian how's this one going? You can't let a "Stealth Fighter" stall. 2 Link to comment Share on other sites More sharing options...
Madhatter Posted June 27, 2015 Share Posted June 27, 2015 As I've gone along here, I've learned that the nose gear bay is close-ish (we'll call it maybe 70% accurate more or less)...but the main gear bays are something closer to perhaps 10-20% correct. In reality, the main gear are attached almost identically as the nose gear. The kits I've seen all have the nose strut with the roughly accurate "T" bar that hinges to the sides of the nose gear well. While the mains just stick straight up into the roof of their respective bays. In reality, the mains use the same "T" design as the nose, along with the two small stabilizing arms along each side of the drag brace armature. These are missing on every kit I've ever seen, as well as all aftermarket sets such as the old CMK flavor. In addition, the shape and structure of the main gear wells is horribly incorrect as well, and could use some serious aftermarket correction to truly look the part. How often are you likely to be turning over this build once it's finished? If very seldom/Never, then I wouldn't get to hung up on how the gear attached to the bays. I know accuracy is important for some people, but it seems that to stall a fantastic project on something you won't really see is a shame. Is this minor point something you can live with? I am thoroughly enjoying this build and would love to see this kept going. MH 1 Link to comment Share on other sites More sharing options...
Alan P Posted June 27, 2015 Share Posted June 27, 2015 Really enjoying watching you put so much into this. I've just got this kit and I'm getting excited by the possibilities. I'm actually not that fused about the wheel wells, mostly because the gear doors are usually closed, like the F-15. It would be a shame if you stopped over something less visible, and as you say, mostly unknown, like the shape of the main gear strut hinges. But I know how important such things are to some (not that I necessarily understand why!) but I hope you can continue soon! Al 1 Link to comment Share on other sites More sharing options...
uilleann Posted June 30, 2015 Author Share Posted June 30, 2015 Brian how's this one going? You can't let a "Stealth Fighter" stall. I agree! Sadly so far this summer, family, musical and work commitments have kept me farther away from the modeling bench than I would like. It's still there, but I have to involve some serious time working out the PE design, and adjusting some details that I had though to have previously worked out. I'll get back into the swing of it at some point, but I'd rather take the time and do it right, than rush ahead and create more work fixing dumb mistakes. How often are you likely to be turning over this build once it's finished? If very seldom/Never, then I wouldn't get to hung up on how the gear attached to the bays. I know accuracy is important for some people, but it seems that to stall a fantastic project on something you won't really see is a shame. Is this minor point something you can live with? I am thoroughly enjoying this build and would love to see this kept going. MH Granted, this build is taking a while, and there isn't much detail present when compared to say a Felixstowe. But the level of error is beyond a point that I can just 'ignore' it. The main gear well errors are visible in part, even though they're on the bottom, and tucked up under the wings a fair bit. But I'm also looking at correcting much more visible inaccuracies such as the intake RCS screens, and the exhaust vanes. Some I believe I can tackle with some custom designed PE well enough, but there is more that will take a higher level of thought, engineering and proper execution to pull off well. It's a work in progress... Really enjoying watching you put so much into this. I've just got this kit and I'm getting excited by the possibilities. I'm actually not that fused about the wheel wells, mostly because the gear doors are usually closed, like the F-15. It would be a shame if you stopped over something less visible, and as you say, mostly unknown, like the shape of the main gear strut hinges. But I know how important such things are to some (not that I necessarily understand why!) but I hope you can continue soon! Al It's a very good kit on balance, but just devoid of any areas of all important detail - where it should be so prominent on a kit such as this. The airframe shape and dimension is as good as it gets (apart from the oddly added saw tooth 'tape' seen at several points along the fuselage that simply shouldn't be there). And with the addition of things like the Aires cockpit set, and Eduard PE and Brassin wheel set (if you're wanting to model a later era jet of course) I'm sure it is more than adequate for many - perhaps most modelers of this subject. For me however, this has been a project in the back of my mind for more than 20 years now, and I have a particular affinity for this aircraft. I have always wanted to do something particularly special with it, and now in 1/32 scale, I am finally able to achieve a good deal of what I had hoped. Sadly, my previous attempts in 1/48 with Tamiya's excellent kit were too ham fisted to amount to much in the end. So I keep plugging away...though for the time being, very very slowly! Thanks all for the understanding. Brian~ 1 Link to comment Share on other sites More sharing options...
uilleann Posted February 16, 2016 Author Share Posted February 16, 2016 (edited) Sadly, I have some rather difficult news - though not entirely related to the build here. On Sunday the 7th, we lost our darling Mosey. You may remember her from back on page 1, as the cute, chocolate vacuum cleaner. We're not entirely certain what happened, but we do know that she had what seemed to be a normal morning, but by mid afternoon, it was obvious that something was very wrong, and she was in a growing amount of discomfort. By early evening, she couldn't stand, and so we rushed her to the puppy ER. They discovered that she was bleeding internally - possibly from a large, previously undiagnosed tumor. Emergency surgery was suggested, but with barely a 50/50 chance she would survive. And at that, if she did pull through, the doctor was unsure if she would likely have days, weeks or possibly months left - or indeed what her quality of life might be even so. So we sat with her, made sure she was comfortable with large doses of morphine, and tried our very best to ask if she felt right in saying goodbye. She has always been a dog stronger than any of us expected, and even with her long list of ongoing health challenges, she was always a fighter. But this time, we all felt her eyes told us she was ready for her next journey. So surrounded by her family, warm and wrapped in her favorite blanket, with tears in all our eyes we let her go. I would give almost anything to have her back and see her eat another important little bit of PE or styrene, just to see her mischievous smile, and tail wagging madly. But I know she is no longer in any pain, will never again know cold, hunger or fear. She is at peace - and so must we be. Eventually. The pain of her loss is palpable, but grows just a little more bearable each day. It's amazing how deeply these quiet furry souls touch our lives. We'll certainly never forget our Mosey - and I know that as this build slowly moves along, I will always be thinking of her warm body sitting at my feet under the modeling desk. If you have a four legged companion in your life, take a moment to give them an extra pet, an ear scratch, or belly rub. Perhaps a little extra dinner, a cookie or favorite treat. Throw that tennis ball just one more time. They can leave us so quickly - cherish every moment! Thank you Mosey Edited July 20, 2016 by uilleann Link to comment Share on other sites More sharing options...
shan Posted February 16, 2016 Share Posted February 16, 2016 So sorry to hear about Mosey!!! i lost mine too during this build. Mine was a cross breed between a spitz and a duchand . its been almost 2 years and i havent really got back to my same f117 Trumpeter build. i am so close, just left with the decals and yet so far. Mine lived for 14 years, yes a miracle according to the vet. she lived a good long life. Hope you will get back on the saddle soon. as for mine, i just want to finish up my build and take it from there. best of luck 1 Link to comment Share on other sites More sharing options...
uilleann Posted February 16, 2016 Author Share Posted February 16, 2016 So sorry to hear about Mosey!!! i lost mine too during this build. Mine was a cross breed between a spitz and a duchand . its been almost 2 years and i havent really got back to my same f117 Trumpeter build. i am so close, just left with the decals and yet so far. Mine lived for 14 years, yes a miracle according to the vet. she lived a good long life. Hope you will get back on the saddle soon. as for mine, i just want to finish up my build and take it from there. best of luck They're the best when they're with us, and leave usch a hole when they're not. So very sorry to hear of your loss too Shan. It's tough to get the groove back again. We still have our original chocolate monster Dugan to keep us well and truly busy! I'll be sure to post again as progress ensues on the black beast here once more. Hopefully not terribly much longer for the custom PE bits to be ready... Link to comment Share on other sites More sharing options...
rom1 Posted February 16, 2016 Share Posted February 16, 2016 Sorry for you loss mate 1 Link to comment Share on other sites More sharing options...
uilleann Posted February 22, 2017 Author Share Posted February 22, 2017 Well well...the old thread is still here. Look at that. I think it's a fair bet to say that 2016 on the whole was a particularly brutal year for many of us. The loss of so many incredibly talented artists and performers, and of course, our pup Mosey a year ago this month. Unfortunately, about a month after, my beautiful bride also lost her little brother to suicide. Needless to say, we're all forever changed. To say it's been hard to find the desire, and the happiness, in even simple things (like modeling again) would be massively understating our past year. But I have slowly felt some of that inner push to get back to the bench. In addition, the model store - the *only* model store anywhere near my house, that was a great place to find paints, tools, and random plastic and metal parts, went out of business and closed their doors forever. But - through it all, trying to keep calm and carry on. In addition to the above, my web hosting carrier was sold or some such nonsense over the past year, and all of my images got locked away in a new 'secure' file structure. Which required me to copy everything into a new directory, and then start the joyous task of going through one by one, and updating links to all the images in this now 4 year old thread. It was a treat I can tell you! I think I got everything sorted out, but if any of you good souls notice broken image pointers or links, and would be so kind as to let me know, I'll happily fix them asap. One of the last things I was working on here and there, was an attempt to sort out some custom PE parts for this kit. The gear door uplocks were one item in particular I was very interested in trying to get right (as they're fairly visible). And the more I looked at it, the exhaust vanes in the famous 'platypus' system used on the F-117A look quite different from the Trumpeter interpretation. So I added that to the PE workload. Still have a bit of tweaking to get final shapes and dimensions correct I'm afraid, but I am at least, closer than when I started. The current iteration looks something like this: Exhaust vanes, uplocks, and a few bits for the gear wells in general. I'm honestly not sure if I will ever get them to a satisfactory spot or not, but I'm determined to give it a go at least once. Again, a MASSIVE shout out to Peter over at airscale. The man has been nothing but absurdly giving of his time, skill, and boundless knowledge. He's quite a treasure, both in modeling badassery, but even more so in just amazing human being-ness... Here's to progress, no matter how small, or indeed how slow. 1 Link to comment Share on other sites More sharing options...
Danyel Posted February 22, 2017 Share Posted February 22, 2017 Hi uilleann I'll raise a glass to this " Here's to progress, no matter how small, or indeed how slow. " Take care fella 1 Link to comment Share on other sites More sharing options...
uilleann Posted February 22, 2017 Author Share Posted February 22, 2017 Cheers Danyel! Progress will be made - at any cost! Link to comment Share on other sites More sharing options...
uilleann Posted March 29, 2017 Author Share Posted March 29, 2017 Progress continues - at a pace that would make a lethargic snail blush - but it continues nevertheless! Recent work on the Nighthawk has been almost exclusively virtual as opposed to practical of late. But with a touch of luck, and more than a little homework, I believe I've cracked something of an enigma concerning the RCS screens in front of the engines. Photographs always show the screens to look completely black - no light seems to pass through the screens to illuminate the engine faces, or indeed even the bright yellow coverall of ground crew standing immediately behind the screens (in the opening of the aux. blow in doors during a FOD inspection. This had perplexed me mightily for years, as I tried to work out precisely how, you could move enough air to keep the engines from stalling, but block any visible light getting through. Recently, I rediscovered an old illustration I'd come across years ago, but never paid close attention to at the time. It describes a principle of radar energy reflection and absorption utilizing wedge shapes deftly staggered and placed immediately ahead of the engine face roughly as follows: Utilizing that concept, and after a few long hours trying to re-learn SketchUp, I set about build something of a conceptual model of something similar. The result was surprising as anything. I was able to create a grid, that appeared on the face to look like a standard rectangular grid. But due to the numerous strange angles involved (geometry was *never* a strong suit of mine!), I was able to recreate a grid structure that was very open to airflow, but extremely difficult to see through directly. Subtle changes to the pitch and spacing of the horizontal wedges made a substantial difference in visibility - or the lack thereof - through the screen. In the end, I settled on a general design that I am quite pleased with: Now the big question is, can I get my sizing, angles, and final dimensions sorted out with enough accuracy to be viable in 1/32, and can I find a manufacturer with the ability to create the parts with the needed fidelity to truly look the business?! Time will tell of course, though it seems there are more and more high precision, short run capable companies that might just be able to help me pull this off. My hope though, is that this, perhaps with the addition of the photo etch frets I tried sorting out a while back, may just make this kit something particularly eye catching. Brian~ 2 Link to comment Share on other sites More sharing options...
crushkill Posted March 29, 2017 Share Posted March 29, 2017 This build is truly magnificent 1 Link to comment Share on other sites More sharing options...
Danyel Posted March 29, 2017 Share Posted March 29, 2017 You're one of the few builders on here that builds at about my pace, so I don't feel completely intimidated when I get an update from your thread I'm also at the virtual stages of constructing (what should be a simple and straightforward) Airfix Hurricane. For some reason I've gotten distracted by my airbrush and paints so have simply HAD TO replace my airbrush and order some Mr Hobby Aqueous paints before I can put any more paint on the model. My last model completed? November 2015! haha Looking great Brian. Good luck with those screens. Best wishes Dan 1 Link to comment Share on other sites More sharing options...
James G Posted March 29, 2017 Share Posted March 29, 2017 Wow, this build has truly gone hi-tech, very impressive. The result will surely be the most accurate F-117 out there! 1 Link to comment Share on other sites More sharing options...
uilleann Posted March 29, 2017 Author Share Posted March 29, 2017 3 hours ago, James G said: Wow, this build has truly gone hi-tech, very impressive. The result will surely be the most accurate F-117 out there! Hoping so Gents...hoping so. The Devil lies in the details of any kit, and I know that this particular aircraft seems ungainly to many on the best of days, and downright - almost offensively - ugly to most on every day. But I find it to be quite a marvel of engineering, geometry, and aerodynamics. The fact that it ever flew was incredible enough. Add to it what it was capable of, and the further designs it lead to (including the B-2, F-22, F-35 in the US alone), along with numerous other designs from other countries as well. Quite an ingenious thing the '117 was. And still almost entirely drawn up on paper. 2 Link to comment Share on other sites More sharing options...
Serkan Sen Posted March 4, 2020 Share Posted March 4, 2020 Great level of detailing Brian. I have just seen your WIP. Did you have time to finish this beauty? Serkan 1 Link to comment Share on other sites More sharing options...

Recommended Posts
Create an account or sign in to comment
You need to be a member in order to leave a comment
Create an account
Sign up for a new account in our community. It's easy!
Register a new accountSign in
Already have an account? Sign in here.
Sign In Now