Aesthete Posted August 23, 2014 Share Posted August 23, 2014 (edited) Lavochkin La-7Commander of the 156th IAP Lt.Col., Hero of the Soviet Union S.F. Dolgushin,215th IAD, 8th IAK, 4th VA, Kluzow, Germany, April 1945Kit: 1/72 Eduard ProfiPack Afermarket parts: Pavla vacuformed canopy The main problem areas of the kit (fixed in this build) were: Wrong shaped wing tips (actually beginning at approx. 1/3rd of the span from the tip) both in profile and frontal view. While fixing this error, the aileron surface detail (being originally in "shrink-wrap" style) was lost and a new, more correct representation of doped fabric tautened over the frame with rib tapes added was done. Almost empty main wheel-wells: very little detail was provided and the most of what was available was wrong anyway. So, they had to be almost completely reworked. Some detail was scratch built of plastic and some corrections were done using Mr. Surfacer as well. The correct “ceiling” of the wheel bay area being originally just the inner surface of the upper main wing half was cut off, given the accurate profile and then positioned on its correct place. Inaccurate propeller spinner. It was corrected with Mr. Surfacer. Very basic representation of the louvers mounted in front of the engine being originally just a disc with a relief detail, while there should actually be empty intervals between the separate blades as well as between the blade tips and the cowling inner surface visible. To achieve the desired result, the excess plastic was removed from the original part, the edges of the blades were sanded off and the part was positioned onto a plastic tube mounted in the cowling interior. Gun ports being just holes in the cowling front ring, while their lower surface should actually go through the entire cowling. This was corrected by adding plastic inserts to the appropriate areas. The same had to be done with the wing root air intakes. Cockpit interior behind the pilot’s seat/radio compartment - again, almost empty and what was available, was wrong. Eventually the entire interior was scratch built there. The cockpit itself, despite some etched parts provided, could also benefit from some improvements as otherwise it still looks somewhat toy-like. Some cables and instruments were added there for more realism as well. The cockpit borders were too thick and, in addition, not exactly parallel, therefore, some sanding was required here as well. Canopy. Although crystal-clear, it is (both 1-piece and 3-piece parts) unfortunately thick enough to be unusable for displaying in open position. On the other hand, if displayed in closed position, due to the thickness, the cockpit interior looks severely distorted. The kit part was eventually replaced with the vacu-canopy by Pavla. The joint of the wing and the fuselage resulted in some sort of a small “peak” in the lower fuselage line. While correcting this, some moderate re-shaping of the fuselage in this area was required. In addition, the landing gear flaps were thinned down, some missing access hatches were engraved and some small details (e.g., Venturi tube) were added. Almost all kit decals proved to be of little use due to their wrong shape or dimensions: white borders of the stars too narrow, the number “93” and the under-wing stars undersized. So, mostly spare markings were used instead.This particular La-7, before handing it over to Dolgushin as his personal a/c, was completely re-primed and repainted and the stencil data weren’t re-applied, so that no use for all those beautifully printed markings either... Edited September 6, 2014 by Aesthete 14 Link to comment Share on other sites More sharing options...
stevej60 Posted August 23, 2014 Share Posted August 23, 2014 Superb build and finish.Always a pleasure to see something different especially great patriotic war aircraft. Link to comment Share on other sites More sharing options...
batcode Posted August 23, 2014 Share Posted August 23, 2014 Nice work, looks great Link to comment Share on other sites More sharing options...
Snitok1983 Posted August 24, 2014 Share Posted August 24, 2014 Superb! Looks wonderful! Link to comment Share on other sites More sharing options...
Kuro Nezumi Posted August 24, 2014 Share Posted August 24, 2014 Wonderful finish! Well done! Link to comment Share on other sites More sharing options...
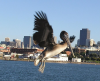
Ozzy Posted August 24, 2014 Share Posted August 24, 2014 Good looking aircraft, the pictures against the sky background are impressive, thanks Link to comment Share on other sites More sharing options...
pascal JMW Posted August 24, 2014 Share Posted August 24, 2014 Very Nice build and paintwork ! Link to comment Share on other sites More sharing options...
Bordfunker Posted August 24, 2014 Share Posted August 24, 2014 Wonderful looking little build. Karl Link to comment Share on other sites More sharing options...
Hamden Posted August 24, 2014 Share Posted August 24, 2014 Stunning!! Roger Link to comment Share on other sites More sharing options...
Pete610 Posted August 24, 2014 Share Posted August 24, 2014 Beautiful - and a great prototype Link to comment Share on other sites More sharing options...
Aesthete Posted August 27, 2014 Author Share Posted August 27, 2014 Many thanks to everyone for your feedback! Link to comment Share on other sites More sharing options...
Roman Schilhart Posted August 28, 2014 Share Posted August 28, 2014 Fantastic build with great attention to details! I wasn't aware that the Eduard kit has so many faults... With all that additional work done, I wonder why you haven't replaced the rather oversized pitot tube? However, as I am currently working on the same model, I find your build very inspirational. Thanks for showing! Link to comment Share on other sites More sharing options...
Aesthete Posted August 28, 2014 Author Share Posted August 28, 2014 (edited) Much obliged! As for the Pitot tube, it is actually a replacement made of an injection needle with about 0,4 mm diameter , which seems, however, to still be a bit too thick, but not as bad as it appears, for example, on the photo #1 or #5 because of an additional margin - well, you probably have an idea, how the in-flight-shots were actually created... Ca. 0,3 mm would indeed have been better. The root part of the tube is unfortunately also somewhat oversized, mainly due to the need of drilling a hole for the needle, as I thought, a butt joint would rather be PITA to handle... Anyway, it is well pointed and I am really glad to see such comments showing that someone was indeed thoroughly studying the pictures. In fact, there is at least one more small inaccuracy with the airframe not corrected, not to speak of the thing with the VVS colours... Edited August 28, 2014 by Aesthete Link to comment Share on other sites More sharing options...

Recommended Posts
Create an account or sign in to comment
You need to be a member in order to leave a comment
Create an account
Sign up for a new account in our community. It's easy!
Register a new accountSign in
Already have an account? Sign in here.
Sign In Now