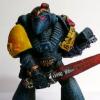
ChrisL Posted May 1, 2014 Share Posted May 1, 2014 This is not actually a work in progress thread. I work so incredibly slowly that updates would be at a geological pace. Rather this is a request for suggestions as to how I may recover a mess I've made. Hopefully this is still the best place in the forum for it. The following happened to my Blackbird egg plane when I attempted to give it a coat of matt varnish last night: It was painted in Humbrol acrylic gloss black (with Humbrol acrylic thinners). Decals were applied using Decalfix, which stained some of the paintwork, so the paint got reapplied in some places. The varnish was from a Humbrol acrylic rattlecan and was applied some time after the painting and decalling. Is there any obvious mistake I might have made? So except for trying to pass it off as some very heavy weathering, are there any suggestions about how I could recover this? I could try applying masking fluid over the decals (none of which have discoloured) then airbrush a coat of matt black back over everything. I could strip everything back to the plastic and try painting it again but I don't think there are any 3rd party decals for the Blackbird egg plane... Given the slow pace of my work I'm loath to abandon even such a small and simple kit as this. Then again the canopy masking has been on for far too long so taking that could well lead to another big mess. Any other ideas? Link to comment Share on other sites More sharing options...
Richard M Posted May 1, 2014 Share Posted May 1, 2014 As a first resort, try applying a gloss acrylic varnish, the frosting may be caused by the matting agent which the gloss varnish will dissolve. Link to comment Share on other sites More sharing options...
jer Posted May 1, 2014 Share Posted May 1, 2014 I often use a Matt acrylic humbrol rattle can to varnish. It's happened before to me when I've sprayed too close and the varnish is to thickly applied. I've resolved this like Richard says by gloss varnishing (in my case using johnsons Klear) then reapplying the Matt varnish. Link to comment Share on other sites More sharing options...
ChrisL Posted May 1, 2014 Author Share Posted May 1, 2014 I'll give that a try, thanks! I have some Klear/Future so if it's worked for you that's the one I'll try first. Link to comment Share on other sites More sharing options...
rbeach84 Posted May 1, 2014 Share Posted May 1, 2014 I often use a Matt acrylic humbrol rattle can to varnish. It's happened before to me when I've sprayed too close and the varnish is to thickly applied. I've resolved this like Richard says by gloss varnishing (in my case using johnsons Klear) then reapplying the Matt varnish. But why didn't the decaled areas react in the same way? Not to say Jer's 'fix' won't work since he obviously has had experience with it, but I have seen similar results using Testors Dullcote (which is, I believe, a lacquer) and always wondered what the heck happened (humidity was the prime suspect.) Knowing the exact 'science' could help with avoiding future incidents. My initial suspicion was that the flattening agent was not properly distributed in the can and so came out in too high a concentration (sinks to the bottom and gets fed through the uptake tube essentially undiluted...) However, this doesn't explain why the decals are still clear - this implies a reaction between the paint and the overcoat. It may indeed then be a reaction involving moisture, perhaps in the paint itself, similar to the 'frosting' that CA adhesives can develop when 'off gassing' onto surfaces that are not completely dry. So, question is, how long exactly from time of last paint and decal application to spraying the overcoat? With a rattle can, you were probably spraying outside so what were the conditions at the time? Was the spray can warmed prior to use? Was the model at ambient temp or had it come from a cooler indoor area? Acrylic paints rely on plastic particle pigments in an acrylic polymer emulsion, which is waterborne. Evaporation rate of the water to the atmosphere would be directly influenced by the relative humidity of the environment. It is possible that the 'frosting' occurred due to the paint being not fully 'dried', or due to ambient moisture, promoted by the cooling effect of the overcoat propellant resulting in trapped water droplets in the clear coat. Because the decals provided a barrier with the underlying paint, I suspect the former, perhaps aided by higher humidity extending the expected drying time. Future strategies might look at warming the clear coat can prior to use, allowing extended drying time for paint coats especially when humidity is high and using a 'drying booth' (which can be made simply of a cardboard box and a small wattage electric incandescent bulb...such as a nightlight.) Also avoid taking the model from a conditioned space into an unconditioned space without allowing for the tempartures to equalize, avoiding condensation on the model. My 2-P worth. Regards, Robert Link to comment Share on other sites More sharing options...
eng Posted May 1, 2014 Share Posted May 1, 2014 Did this to an Italeri Huey a few years ago, as has been mentioned already I successfully recovered it just bye spraying a coat of satin varnish! You'll be fine with this. Eng Link to comment Share on other sites More sharing options...
jer Posted May 1, 2014 Share Posted May 1, 2014 Gosh Robert I hadn't noticed the decals!! It happened to me on a Lightning I posted here a month odd ago on its tail, had a area on just the blue paint that had gone misty. Klear worked for me on that occasion, but the area was small and black is a difficult colour to work with. Maybe ChrisL should try first with Klear or an acrylic gloss in a test area on the plane. Best of luck ChrisL Link to comment Share on other sites More sharing options...
ChrisL Posted May 1, 2014 Author Share Posted May 1, 2014 It is very noticeable that the areas with decals have not suffered at all. It's particularly obvious where the carrier film is larger than the marking, such as on the tail fin decals. The effect is not constant across all non-decalled areas. Oddly it seems to be less present on those areas that most recently received a coat of black, which makes me wonder whether the Decalfix had something to do with it. To answer Robert's questions - there was a gap of 2 full days between the last paint work on the kit before I applied the matt coat. All the work was done indoors, the plane and the rattle can should have been about the same temperature - they are both kept in the same room. I sprayed the varnish in a spray booth with the window of the room I was working in open. I guess it was cold and damp outside but the window wasn't open for long before I did the spraying. I am not sure how humid my flat is generally but I wouldn't say it's particularly humid or damp. When (or if, after this!) I next use rattle cans I will give some thought to warming them up beforehand. I will try applying some Klear to a bit of the underside of the kit tomorrow to see if that helps things. Regarding the drying booth - how low power a light are we talking? Battery powered? Mains powered? I have a spare 40W desk lamp to hand, I'm not sure what else I could lay my hands on, incandescent bulbs are getting thin on the ground these days. Link to comment Share on other sites More sharing options...
ChrisL Posted May 2, 2014 Author Share Posted May 2, 2014 I've just had a go putting some Klear down over a discoloured area on the plane's underside. It briefly looked potentially promising while the Klear was still wet but it went back to looking grey/white as the Klear started drying. Darn. I think my options now are to repaint it, trying not to lose the decals, or to give up on it. Link to comment Share on other sites More sharing options...
rbeach84 Posted May 2, 2014 Share Posted May 2, 2014 Good question, I suppose it is more a problem of ventilation. A fellow over on FineScale's forum posted his example of a home-brew drying booth that is along the lines of what I was thinking of: http://cs.finescale.com/fsm/tools_techniques_and_reference_materials/f/18/t/146050.aspx He got pretty fancy with a dimmer switch to control the 'output'. Nice thing is by using standard wiring fixtures, you are fairly certain to not burn down your flat! In fact, I believe FineScale Modeler had an article on just this subject; if I had purchased their archive disk, I could tell you exactly where to find it I suppose. But as you see, it isn't rocket science. You probably could even use the heat vented from a computer to do the drying, assuming you're able to duct it into your drying 'box'. Main thing is to not let the temp get too high and ensure good flow through the box to promote the drying. Hey, that sounds like a good idea! Use that waste heat for something useful... I was thinking of the small 'candelabra' bulbs or similar. Frankly, 2 days sounds like enough 'set time' to me, but some acrylics can be finicky (Gunze comes to mind...) But, unless you had a 'bad batch' of overcoat or Humbrol's chemists are 'out to lunch' (doubtful) on compatibility within their product line, I feel we have to blame moisture *from somewhere*. The fact that it interacted with the plume from the spray can is obvious by the frosting pattern. As I understand it, the temperature of the spray plume drops because of the pressure differential from within the can to ambient. If the air from the window was humid enough, that cooler temp could have resulted in entrained moisture droplets (microscopic) and viola! Frosted clearcoat. You may have to stick to days with a wide dewpoint spread when using this method. Do you have an airbrush? If so, you could consider decanting the clearcoat and spraying with the brush instead of the can. That avoids the cooling effect on the spray plume, plus gives more control on where it goes... Make sure and let us see how it goes, eh? Regards, Robert Link to comment Share on other sites More sharing options...
rbeach84 Posted May 2, 2014 Share Posted May 2, 2014 I've just had a go putting some Klear down over a discoloured area on the plane's underside. It briefly looked potentially promising while the Klear was still wet but it went back to looking grey/white as the Klear started drying. Darn. I think my options now are to repaint it, trying not to lose the decals, or to give up on it. What about a bit of careful sanding with a fine grit film? R/ Link to comment Share on other sites More sharing options...
macgregor Posted May 2, 2014 Share Posted May 2, 2014 Had this problem a couple of times with Humbrol rattle can Matt varnish, really needs warming bit & shaking for a good few minutes before spraying, also cold air doesn't help. All I have done to save is use a soft cloth & rubbed over the paintwork with olive oil or grapeseed oil, then buffed up. Seems to kind of feed the varnish & takes away the blooming, it doesn't dry out either. Try it on a small area & see if it helps. Mac Link to comment Share on other sites More sharing options...
ChrisL Posted May 2, 2014 Author Share Posted May 2, 2014 (edited) I have an airbrush, I dug out the rattlecan in a fit of laziness, thinking I could get that stage done without having to set up the compressor, airbrush, sorting out the varnish, cleaning up after myself, etc. So much for saving my time! A quick experiment shows that I could get some mileage out of sanding down some areas, but it'll need to be combined with repainting, particularly where there's raised detail and/or decals nearby. I'll be sure to post a picture if I (a) get it finished, (b ) discover a new problem with I attempt to remove the canopy masking, or (c ) throw it in the bin in a fit of pique. Edited May 2, 2014 by ChrisL Link to comment Share on other sites More sharing options...
rbeach84 Posted May 2, 2014 Share Posted May 2, 2014 Hey, don't give up yet! If you have any leftover decals, you may want to see what happens using an ammonia based cleaner as a paint stripper. Use a test piece, painted decaled and coated then let dry and then try the cleaner. You may be able to salvage the decals... or just trace off the decals so you make stencils... you'd be surprised how much detail you can acheive with hand made stencils (since everything is in red, right?) R/ RobBea Link to comment Share on other sites More sharing options...
robvulcan Posted May 2, 2014 Share Posted May 2, 2014 (edited) I use them all the time but never have this happen. Well that's because I don't spray when its humid or this happens . 1. Let dry 2 do nothing st all 3. Wait till a hot dry day not humid 4. Spray light misted coats from a distance of the same matt or satin varnish It will re activate the varnish and de fogg itself it may take a few hours too start to clear. You should be ok then (I use these lots and experimented lots with them last summer) I had this happen and worked out how to correct it. These paints spray very well and the varnish is easy to over do as it goes on so well and clear it looks like nothing's happened. Spray from a good distance like 2ft away and you will get beautiful results do a few light coats. Biggest tip is this leave to can outside fit about an hour so it is the same climate temp as outside. Rather than bringing a cold can to the new warm outside. This is not good. I hope this helps you cheers Rob Edited May 3, 2014 by robvulcan Link to comment Share on other sites More sharing options...
robvulcan Posted May 3, 2014 Share Posted May 3, 2014 Don't use klear you will seal in the white and create a barrier to stop the chemical reaction to rectify this Link to comment Share on other sites More sharing options...
Bennygman Posted May 3, 2014 Share Posted May 3, 2014 For god's sake don't bin it Chris. Frustrating though it is at the end of the day it's an egg plane. It doesn't have to be authentic so if the decals are trashed, try finishing it as one of the early ones in natural metal, or adapt some NASA decals for one of theirs. Or, just finish it as something cool from your imagination. How about an RAF one? I'm sue the tips the guys have given here will help to save it though. Good luck. Steve. Link to comment Share on other sites More sharing options...
Deanflyer Posted May 3, 2014 Share Posted May 3, 2014 Solution: Place blobs of Blu-Tak over the decals to mask them, (as rolling it sideways to unmask afterwards is safer than using tape which may tear off the decals) and repaint it. It's all one colour after all, and very small, so it won't take long. Unmask, recoat with varnish from a new can. I've had the same problem with Humbrol Acrylic varnish, towards the end of the can. I read somewhere that if you don't shake it for long enough before use, the pigment in the paint doesn't mix properly, and the residue in the can gets more and more concentrated with each use - eventually only the thick matting agent comes out resulting in the frosting you had here. In fact, it happened when I made my 1/144 Blackbird! Was it a new can, or getting towards the end of one? As to why it didn't happen over the decalled areas - no idea. In future, shake the can for a couple of minutes, and spray several mist coats from a good distance away as Rob suggests. It's worked for me every time since. Hope that helps, Dean Link to comment Share on other sites More sharing options...
ChrisL Posted May 3, 2014 Author Share Posted May 3, 2014 I use them all the time but never have this happen. Well that's because I don't spray when its humid or this happens . 1. Let dry 2 do nothing st all Oops, too late... 3. Wait till a hot dry day not humid I live in Scotland! 4. Spray light misted coats from a distance of the same matt or satin varnish It will re activate the varnish and de fogg itself it may take a few hours too start to clear. You should be ok then (I use these lots and experimented lots with them last summer) I had this happen and worked out how to correct it. These paints spray very well and the varnish is easy to over do as it goes on so well and clear it looks like nothing's happened. Spray from a good distance like 2ft away and you will get beautiful results do a few light coats. Biggest tip is this leave to can outside fit about an hour so it is the same climate temp as outside. Rather than bringing a cold can to the new warm outside. This is not good. I hope this helps you cheers Rob I will store that away in case of future errors, particularly the warnings about temperature and humidity. I have however had a go with macregor's olive oil recommendation... I must admit I'm surprised but this seems to be showing some promising signs! As you predicted though the bit onto which I experimentally sprayed Klear wasn't responding to treatment so there I've had to resort to ammonia and sanding. Steve - thank you for your motivational words. The recently completed bare metal A-12 in the Ready for Inspection forum is quite an inspiration but I also like the sound of an RAF Blackbird. Even if this one is recovered those sound like very tempting ideas, which may be revisited if I see another one of these in a shop in the future. In response to Dean - can was maybe 1/2 to 2/3 used. I shook it for about a minute I think but it wasn't particularly warm when I sprayed it. I probably sprayed it too close though and presumably applied too thick a coat at once. Frustrating but hopefully a valuable learning experience. 1 Link to comment Share on other sites More sharing options...
trickyrich Posted May 4, 2014 Share Posted May 4, 2014 It looks like most of us have had this or a similar issue before. For me it was pretty much the same as yours though mine didn't go quite as white, plus my clear coats (was over a coat of clear and decals) cracked (was an Ar-234 in the Battle for the Third Reich GB)! Think the issue was a coat too thick and the rattle cannot mixed enough and a bit cold. Was going to throw the whole mess in the bin but decided to try a couple of ideas. First off I attacked the affected areas with 600grit wet & dry ( you could go even higher) and nail polishing sticks, just enough to carefully remove the too clear coat. I had decals underneath as well, so just take it slowly over those, using 600+ grit will help prevent damage. Just take your time and check the results (took me around 9hrs to complete, but the results were great), you should slowly get back to a shiny black finish. The shape of your little beasty should help with making even sanding, mine was an Ar-234, the entire upper surfaces were affected. Once you are happy with the finish then I’d use an acrylic clear coat, used it for the first time with the Ar-234 and have never looked back! Hopefully you can recover from this as it is an awesome looking wee model Link to comment Share on other sites More sharing options...
ChrisL Posted May 7, 2014 Author Share Posted May 7, 2014 Quick update. The olive oil removed the effect but left the model oily and glossy. I managed to remove enough of the oil to mostly matt it back down but removing it entirely caused the fogging to return, so it hadn't done anything permanent to the surface of the varnish. This does imply that the effect is on the surface of the varnish though, offering hope that another treatment (e.g. Rob's) will work. Anyway, I don't think that a greasy final model is really an answer, especially considering that a black model will gather dust easily enough that it doesn't need an oil coat helping it! With the oil removed I have just sprayed over the area that got coated in Klear. This was under one wing and there aren't many decals on the underside so this wasn't hard to mask up and sort out. I'll now leave it to dry for several days. A Britmodeller has offered me their spare Blackbird egg plane decal sheet - thanks Tony! This will enable me to re-apply the one decal that never made it onto my kit (it was far more interested in sticking itself to a finger), and generally re-apply decals if I can't recover the upper surface finish. After that's gone on I'll start waiting for a warm, dry day and try Rob's suggestion of re-applying the same varnish, after shaking the can for longer than before. Link to comment Share on other sites More sharing options...
robvulcan Posted May 8, 2014 Share Posted May 8, 2014 Oops, too late... I live in Scotland! I will store that away in case of future errors, particularly the warnings about temperature and humidity. I have however had a go with macregor's olive oil recommendation... I must admit I'm surprised but this seems to be showing some promising signs! As you predicted though the bit onto which I experimentally sprayed Klear wasn't responding to treatment so there I've had to resort to ammonia and sanding. Steve - thank you for your motivational words. The recently completed bare metal A-12 in the Ready for Inspection forum is quite an inspiration but I also like the sound of an RAF Blackbird. Even if this one is recovered those sound like very tempting ideas, which may be revisited if I see another one of these in a shop in the future. In response to Dean - can was maybe 1/2 to 2/3 used. I shook it for about a minute I think but it wasn't particularly warm when I sprayed it. I probably sprayed it too close though and presumably applied too thick a coat at once. Frustrating but hopefully a valuable learning experience. Only trying to help. What I meant by let dry is Cure. In other words or to better explain. I am saying if you have not covered it in Klear and Olive oil the new coat of varnish will reactivate it even if its sat a while. Cheers Rob Link to comment Share on other sites More sharing options...
rbeach84 Posted May 20, 2014 Share Posted May 20, 2014 Ah, that is one nice thing about using real lacquer (aka 'cellulose') paints - which includes Testors clear coat products - you can easily touch them up. Regards, Robert Link to comment Share on other sites More sharing options...
Hockeyboy76 Posted May 20, 2014 Share Posted May 20, 2014 (edited) If your still struggling I also have a spare decal sheet. The kit I bought for my Daughter had two sheets inside. Let me know if you want it. Edited May 20, 2014 by Hockeyboy76 Link to comment Share on other sites More sharing options...
ChrisL Posted June 9, 2014 Author Share Posted June 9, 2014 A week or two ago I received a spare decal sheet, so many thanks to Hockeyboy for that (and to Tony for offering what was sadly a sheet on the wrong side of the Atlantic). The missing decal got applied at the start of last week and yesterday I finally hit upon the magical trinity of dry and warm weather on a day I could actually do some modelling... ... The end result is that Rob's advice of applying a couple more thin coats of the varnish has done a lot to clear up the fogging. It's not gone and my egg plane is always going to look like a very well worn Blackbird but at least under most lights it generally looks black! So my next question: As I mentioned earlier, the bare metal foil I used to mask the canopy has been on too long. I've managed to pick it off but it's left a lot of sticky residue behind. Before I reach for various chemicals to try and remove the residue, are there any I should avoid to prevent damage to the kit's finish? The canopy was dipped in Future before assembly and the canopy framing will be covered by the Humbrol rattlecan varnish. I know that ammonia will eat at Future but is IPA OK to use? Once I've cleaned up the canopy I've also got to touch up the exhausts. These were masked but got a bit scratched during the main painting and varnishing process. I did dry fit the undercarriage this evening so for now it is sitting on its own wheels and combined with its exposed (if murky) canopy it is beginning to look like the end is in sight! Link to comment Share on other sites More sharing options...

Recommended Posts
Create an account or sign in to comment
You need to be a member in order to leave a comment
Create an account
Sign up for a new account in our community. It's easy!
Register a new accountSign in
Already have an account? Sign in here.
Sign In Now