pacificmustang Posted January 29, 2014 Share Posted January 29, 2014 That is indeed a lovely build. I would only add some belts to the seats as they look bare without them. When you say the fin decals did not fit, are you talking about the kit decals or the Xtradecals? Again, a lovely build Bruce Link to comment Share on other sites More sharing options...
XF442 Posted January 30, 2014 Author Share Posted January 30, 2014 That is GORGEOUS! Having fought my way to getting the 1:72nd kit looking not half that good, I'm seriously envious of your superior skills and starting point! Phil, as a starting point the kit is so well engineered that you don't need superior skills. I would only add some belts to the seats as they look bare without them. When you say the fin decals did not fit, are you talking about the kit decals or the Xtradecals? Ahh, sorry, I was talking about the kit's fin flash. Airfix provides you with a single decal for both sides of the fin to cover the leading edge as well. While I really appreciate the idea, in place the decal looks kind of tilted compared to the surrounding panel lines. Of course I noticed this (and the height issue) only after having applied the decal. I did not want to risk ruining it so I carefully cut it at the leading edge to correct at least the angle and touched it up with paint afterwards. The ejector seats I will probably rework when I build my second one, most likely XH905 from the Xtradecal sheet. Link to comment Share on other sites More sharing options...
Neil AS Posted January 30, 2014 Share Posted January 30, 2014 That's really nice, I've heard so much good talk about this kit I'll have to get one. Link to comment Share on other sites More sharing options...
goon Posted January 30, 2014 Share Posted January 30, 2014 That's gorgeous. Flawless finish and super sharp detail. Well done! Link to comment Share on other sites More sharing options...
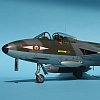
JD tiger 1 Posted January 30, 2014 Share Posted January 30, 2014 Thats a great job on the camo and the roundels look fantastic, the way that they've confomed to the raised parts (not sure what their called) make it look painted on. well done Link to comment Share on other sites More sharing options...
XF442 Posted January 30, 2014 Author Share Posted January 30, 2014 Well, I don't know what "conformed" means, but the raised vortex generators are brush painted... Link to comment Share on other sites More sharing options...
David H Posted January 30, 2014 Share Posted January 30, 2014 Beautifully executed! Not bad at all, for a newbie. I'm not a huge fan of the "Tandem Dragmaster", but i just bought one yesterday based on the praise heaped upon this kit. Like you said, "Bravo" to the kit designers! david Link to comment Share on other sites More sharing options...
Snitok1983 Posted January 30, 2014 Share Posted January 30, 2014 Superb!it is an Exellent build and paint work! By my oppinion it is an one of the interesting and elegance aircrafts from cold war period! Congratulation!!!!! Link to comment Share on other sites More sharing options...
kiwitrogg Posted January 31, 2014 Share Posted January 31, 2014 Looks great.....very nicely finished. Link to comment Share on other sites More sharing options...
Geologos Posted January 31, 2014 Share Posted January 31, 2014 Great build! Very nice model, hope I will build one soon! Link to comment Share on other sites More sharing options...
Leonl Posted January 31, 2014 Share Posted January 31, 2014 Very nice, I think you've painted that really well. Link to comment Share on other sites More sharing options...
F-32 Posted January 31, 2014 Share Posted January 31, 2014 She's a beauty! Link to comment Share on other sites More sharing options...
Pete in Lincs Posted January 31, 2014 Share Posted January 31, 2014 Lovely build, Chris. Link to comment Share on other sites More sharing options...
woody37 Posted January 31, 2014 Share Posted January 31, 2014 Stunning Link to comment Share on other sites More sharing options...
trigger39 Posted February 1, 2014 Share Posted February 1, 2014 One of the best finishes of the Javelin yet - with no weathering, as most Javelins looked. Shame about the problems with the fin flash, something I've been giving a lot of thought to. I don't have a kit to measure as I'm a bit past making detailed models (joined the RAF when Pontius was a navigator) as I worked on the real thing on 64 and 60 Sqns in Singapore. If someone could measure the dimensions of the flash, it would help. The real flash was 72" wide (3 bars x 24") and 60" high - the triangle of camo in front of the red bar was about 2/3 of the bars ( about 16") If my maths is correct then at 1/48th this should be 1.5" wide and 1.25" high. i have reason to believe that the fin problem is a bit worse than just a fin flash. It's hard to tell from photos of models but I believe the fin has too sharp a sweepback. The Javelin fin was swept 45 degrees from vertical and the fins on the models ( and on the kit reviews) seem to be about 55degrees. This would make the fin considerably shorter than it should be and add to the problems of fitting the fin flash. You're lucky you didn't make a 60 Sqn Javelin - you would never fit their markings on this model. Incidentally,you could have made the box-art subject as I have never seen any Javelin with a camo probe and that aircraft had a much more interesting career. cheers Clive Link to comment Share on other sites More sharing options...
Daryl J. Posted February 1, 2014 Share Posted February 1, 2014 Nice. And very. Link to comment Share on other sites More sharing options...
XF442 Posted February 1, 2014 Author Share Posted February 1, 2014 (edited) Clive, I just took out the decals from my second kit. The fin flash is 38mm / 1.5" wide while the height is 38.5mm / well a bit over 1.5". Probably the idea was to attach the decal to the painted fin before inserting it into the slot in the upper fuselage. 38.5mm minus 5.5mm (the depth of the slot) is about 33mm or 1,3". It's difficult to measure the sweep. Taking one of the horizontal panel lines on the fin as a reference I measure the angle to be ~40°. Regarding 893: I actually found ONE picture of it as "V" of 64 Squadron. Ironically the plane is not equipped with a refuelling probe at all (but at least with underwing tanks): http://www.millionmonkeytheater.com/javelinpics/xh893.jpg Edited February 1, 2014 by XF442 Link to comment Share on other sites More sharing options...
trigger39 Posted February 2, 2014 Share Posted February 2, 2014 Hi Chris I initially made the mistake of measuring sweep the way you did but found that you should measure it like wing sweep, with a protractor placed vertically or the sharper sweep shows as a lower number. Concerning XH893, 64Sqn never used refuelling probes after moving to Tengah and normally when based in UK they were only used for ferrying or practice or air-shows. While at Tengah the tanks were only carried for patrols (in Borneo) and weren't used at all after Confrontation ended. Your link to XH887 seems to show a fin sweep similar to the model (Airfix may have used this photo) but the image is badly stretched - noboby ever called a Javelin sleek. If you get the opportunity to look in "Javelin From The Cockpit" there is a superb photo probably taken at the same time (enroute to India, Exercise Shiksha) this shows how the aircraft should look. I have scaled up an accurate 1/72 fin to 1/48 and this measures 56mm from the top of the fin (below leading edge of the tailplane). cheers Clive Link to comment Share on other sites More sharing options...
macgregor Posted February 2, 2014 Share Posted February 2, 2014 Lovely build with great advice for others who build this kit (got mine ) Very well done indeed. Mac Link to comment Share on other sites More sharing options...
XF442 Posted February 2, 2014 Author Share Posted February 2, 2014 (edited) I initially made the mistake of measuring sweep the way you did but found that you should measure it like wing sweep, with a protractor placed vertically or the sharper sweep shows as a lower number. Hi Clive, I am sorry, but in this case I just do not understand what you're describing. I measured the angle as shown above on different photos on the net. The procedure maybe crude but is reproducible - the results are always very exactly 40°. What datum line do you use? ... 64Sqn never used refuelling probes after moving to Tengah and normally when based in UK they were only used for ferrying or practice or air-shows. Thanks, that confirms what I have been suspecting. I used to understand that the probe was a permanent attachment to the 9R and not some kind of "add-on" parts until I started encountering several pictures of probe lacking but tank carrying aircraft. However, it never occured to me that they may have been more "off" then "on". What a shame Airfix messed the painting instructions that much up. By the way: For a short time I actually thought of changing "B" to "Q". Did you notice that the aircraft in the 1963 shot is lacking the front and rear fence of vortex generators? I am not able to chop them off without ruining the finish ... http://www.millionmonkeytheater.com/javelinpics/xh887.jpg I'd like to ask something else: Did you really had to change the inner pylon depending on using underwing tanks or missiles? Edited February 2, 2014 by XF442 Link to comment Share on other sites More sharing options...
chuckb1 Posted February 2, 2014 Share Posted February 2, 2014 I am planning to start mine in April, that is truly stunning. I hope mine comes out half as good as that. Link to comment Share on other sites More sharing options...
trigger39 Posted February 2, 2014 Share Posted February 2, 2014 Sorry about the confusion on the angles - this confused me until I thought of the Lightning which has a 60degree sweep but if you measure the angle of a Lightning wing the way you did( and me at first) it seems to be 30 degrees. Placing the protractor vertically with the 90 degree line along the fuselage, is the only way you can get 60 degrees, but I'm no engineer. Even if the fin is wrong there is nothing that can be done but if the fin flash is in the correct place and the right height then it will be acceptable. I particularly like your idea of fixing the flash before fitting the fin - if this was intended it would have been nice to get the instruction. If a quarter of an inch is cut from the bottom of the flash it should fit right. The photo of XH887 from your link has poor definition or the reflexion is too bright, all Mk 8 and 9 Javelins had three rows of vortex generators. The inner pylons on a 9R were always tank pylons, if you wanted to carry four tanks then you had to remove the outer missile pylons and fit tank pylons - tank pylons could not carry missiles and missile pylons could not carry tanks. Airfix kindly supplies four tanks and only two tank pylons - so that load option is out. Missiles were never carried on the inner pylons of a 9R and tanks were never carried on a 9F/R even when a probe was fitted. Only Four Squadrons ever flew Javelins with tanks: 23, 29, 60 and 64 and 60 Sqn never flew Javelins with probes. Only 23 and 64 Sqns flew 9F/R with probes and four missiles. Cheers Clive Link to comment Share on other sites More sharing options...

Recommended Posts
Create an account or sign in to comment
You need to be a member in order to leave a comment
Create an account
Sign up for a new account in our community. It's easy!
Register a new accountSign in
Already have an account? Sign in here.
Sign In Now