MPaul Posted January 4, 2013 Share Posted January 4, 2013 (edited) Hi everyone, and welcome to my first ever WIP thread. Its a return to modelling, after making and painting in a day or two - about 25 years ago! I am not going to make any apologies, but this is probably going to have a lot of photos in the thread, not only to document my progress as a first proper project, but also to allow myself to keep a record to identify areas I can improve upon, and develop further for future builds. So, onto the first details, the obligatory (from perusing the forum) box and sprue picture: Excuse the picture quality, I am going to blame photobucket for that. I am going to do an out of the box build on this, as its mainly, hopefully, a bit of a test run for doing my next project. Therefore this will be painted up in the colours as per the instructions, and decals will be the provided 27 Squadron 75th Anniversary markings Edited January 4, 2013 by MPaul 1 Link to comment Share on other sites More sharing options...
erikmuntz Posted January 4, 2013 Share Posted January 4, 2013 (edited) Looking forward to this! I've never built a 1/144 scale aircraft as they are too dang small for me! I'm sure you'll make a good product of it, though! Just remember, patience, patience, patience. Will follow this one avidly! Edited January 4, 2013 by erikmuntz Link to comment Share on other sites More sharing options...
tomprobert Posted January 4, 2013 Share Posted January 4, 2013 Good luck... and more importantly welcome back to the hobby. Link to comment Share on other sites More sharing options...
MPaul Posted January 4, 2013 Author Share Posted January 4, 2013 (edited) Thanks guys. I think I may need luck, as some of the pieces are tiny! Anyway, so began painting the cockpit tub tonight. Didnt have the colour needed so I mixed it up. After painting, i decided it was too dark though: So i remixed with more white, to get a shade I was happier with, and this is the result: Happier with the colour, as its a closer match to the actual cockpit paint. Needs another coat though, as the macro has really shown up the brush strokes. I also think it may be mixed too thick, and this is exaggerating the strokes? Anyone able to confirm that? Edited January 4, 2013 by MPaul 1 Link to comment Share on other sites More sharing options...
Neal Posted January 4, 2013 Share Posted January 4, 2013 Good start, I built one last year and it's a lovely kit the only issue is the diminutive size of the parts and decals. Seem to think the only thing I did different from the instructions was to cut the rear IP decal to fit to the step in plastic moulding. Link to comment Share on other sites More sharing options...
MPaul Posted January 4, 2013 Author Share Posted January 4, 2013 I think i have looked at your thread, very good it was too. The instructions seem to suggest fitting the IP decals after the panels are glued ino the tub. Any reason you can think of that I couldnt fit them before fitting the IP? Link to comment Share on other sites More sharing options...
erikmuntz Posted January 5, 2013 Share Posted January 5, 2013 Good start! Nice save on that paint color, it'll look great underneath the canopy. Hope you are enjoying the hobby again! Erik Link to comment Share on other sites More sharing options...
MPaul Posted January 5, 2013 Author Share Posted January 5, 2013 (edited) Started today by fitting the IP decals to the pieces themselves. I have done this before fitting the IPs to the tub: I also fitted the rear control stick to the rear IP: Seats are also painted: Hopefully going to get the tub finished today, and the front fuselage joined around it. Though the FA Cup going on may delay progress slightly! Edited January 5, 2013 by MPaul 1 Link to comment Share on other sites More sharing options...
HOUSTON Posted January 5, 2013 Share Posted January 5, 2013 Hello welcome back to the modeling. Great work so far.. nice. Link to comment Share on other sites More sharing options...
MPaul Posted January 5, 2013 Author Share Posted January 5, 2013 Finished the cockpit now, quite pleased, although i realised the nav's IP was put in back to front, but as I had already added the decals, and they wouldnt loosen again, I had to overcome this mistake. I had to do some careful cutting and shaving of the navs display piece to get it to fit, but have managed. Then I assembled the forward fuselage around it, and left it to dry overnight: Link to comment Share on other sites More sharing options...
erikmuntz Posted January 5, 2013 Share Posted January 5, 2013 Still looking great. Nice detail work in the pit! Can't wait to see this one unfold more. Erik Link to comment Share on other sites More sharing options...
Radleigh Posted January 5, 2013 Share Posted January 5, 2013 I quite like these 1/144th kits I got a couple of Revells old Lightnings back at my dads. Look forward to the progress. Link to comment Share on other sites More sharing options...
104 squadron Posted January 5, 2013 Share Posted January 5, 2013 Those Lightnings are like gold dust, treasure those kits! Link to comment Share on other sites More sharing options...
McYellowbelly Posted January 5, 2013 Share Posted January 5, 2013 ...or trade them!! Let me know if you want a swap! Tornado is looking good, got a stash of these too, hoping to make a start on them soon Link to comment Share on other sites More sharing options...
Dazzio Posted January 5, 2013 Share Posted January 5, 2013 Nice to see another newbie to the hobby, admitted I'm not so new as I've been back into modelling for over a year now... Anyhow... Like what you have done thus far with the cockpit, will be watching this one with interest. Gotta finish my projects yet. Think I have 4 of these in my stash alone. Great little model from what I've seen. Kind Regards Dazz Link to comment Share on other sites More sharing options...
Radleigh Posted January 5, 2013 Share Posted January 5, 2013 Those Lightnings are like gold dust, treasure those kits! They are, last time I see them they were in a box hidden away in the loft! Sadly one of the three got started when I was younger (10+ years ago) and thats gone to model heaven. Link to comment Share on other sites More sharing options...
MPaul Posted January 5, 2013 Author Share Posted January 5, 2013 Well I test fitted the rear fuselage together this evening, and really didnt like the way that the tailerons move so easily and independantly. As this is going to be posed on the ground, I want them at roughly the same level, so using some spare sprue, joined them together: and then made sure they were the correct distance apart by test fitting in the grooves on the rear lower fuselage: Been thinking about the painting, and come to the conclusion that with fuselage fully assembled and glued, painting around the taileron would be problematic. Am guessing the solution is to paint with the fuselage only dry assembled, and then glue together later? Link to comment Share on other sites More sharing options...
Neal Posted January 6, 2013 Share Posted January 6, 2013 I left the trailerons off, cut off the "bulbs" leaving a small stalk to locate into the body. That left them free to be painted separately, a drop of superglue was then sufficient to hold them once all the painting and decals were complete. Watch out they're handed though. Link to comment Share on other sites More sharing options...
MPaul Posted January 6, 2013 Author Share Posted January 6, 2013 Thanks for that Neal, i really should have asked how you did yours, as I looked at yours and presumed you had only dry fited at first then opened it back up to fit them. Hopefully my solution will still work, and means i can pose them in different positions easily still. Hoping to get some more done today, mainly the rear fuselage and wing assembly I think. Link to comment Share on other sites More sharing options...
AirfixAndy Posted January 6, 2013 Share Posted January 6, 2013 Welcome back to the hobby !! You have picked a very nice kit to start off with and your progress looks great Andy Link to comment Share on other sites More sharing options...
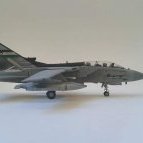
MPaul Posted January 7, 2013 Author Share Posted January 7, 2013 Thanks for the comments guys. Progress has not been quick over the weekend, but have now got a first coat on: Seems to have dried bluer than I wanted, and also the first coat is thinner than I wanted too - I was trying to avoid visible brush strokes. Hopefully the next coat will help rectify both issues. Also, any tips on how to paint the canopy metalwork at this scale? Link to comment Share on other sites More sharing options...
Jørgen Tangerud Posted January 7, 2013 Share Posted January 7, 2013 You could try to paint on decalfilm, then cut thin strips of it. Guess masking would be a fiddly work in this scale. Good job so far Link to comment Share on other sites More sharing options...
Neal Posted January 7, 2013 Share Posted January 7, 2013 I usually cut tamiya tape into thin strips (approx 1mm) then edge the canopy with that. You can then infill with more tape or maskol, but I don't usually bother. I use the same thin strips for most of my masking as it's flexible enough to go round the tight curves at this scale (and the tape goes further): Link to comment Share on other sites More sharing options...
MPaul Posted January 7, 2013 Author Share Posted January 7, 2013 Thanks for that Neal. Think I will have to go the same route, have never painted such a small canopy, so its a bit daunting lol. Link to comment Share on other sites More sharing options...
Neal Posted January 7, 2013 Share Posted January 7, 2013 Thanks for that Neal. Think I will have to go the same route, have never painted such a small canopy, so its a bit daunting lol. Stick it to the model or a block of bluetack to make it a bit more manageable. A magnifying glass and some patience can help as well Link to comment Share on other sites More sharing options...

Recommended Posts
Create an account or sign in to comment
You need to be a member in order to leave a comment
Create an account
Sign up for a new account in our community. It's easy!
Register a new accountSign in
Already have an account? Sign in here.
Sign In Now