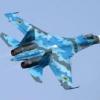
fu_manchu Posted September 10, 2012 Share Posted September 10, 2012 Hello On a bit of a roll in the last week or so and now managed to finish another. This is without a doubt my favourite aircraft in my favourite scheme. I have had this project on the back burner for ages, but when a set of spare of decals from the Eduard boxing became available on another site I finally had all the bits I needed! This is the Academy kit with a fair bit of AM; SAC Gear, Aires Exhausts and Cockpit and Quickboost's Nose and Pitot. Last and not least it has the Fairy Hobby replacement canopy. This really is an excellent part and greatly improves the shape of the cockpit area and is lovely and clear. It was a bit tricky to fit, as it involves replacing two sections of the fuselage (fore and aft of the canopy) which required a lot of time and effort to get it to insert at the correct depth and blend in. It is painted in Akan Acrylics which seem to match the pictures of the original I found. When these spray, they spray very nicely and leave a fantastic finish. However they do tend to dry on the tip very easily, this isn't so much of an issue on hard edge spraying however. I used a fair bit of masking tape on this one, specifically an entire role of 40mm tamiya to protect areas from overspray. The demarcation was also done with Tamiya tape, sliced into then 1-2mm strips and trimmed into shape in situ. Remarkably, I managed to get it done without any paint seeping under the tape, but there were one or two touch-ups required from minor paint lifts etc. I did the top scheme over 3 weeks allowing plenty of time for the paint to dry before masking. I am actually quite pleased with this one, hope you like it. (Please ignore the skwiffy pitot, it's not glued in place yet). Ian Firstly, the airframe I was trying to replicate: And the build: 2 Link to comment Share on other sites More sharing options...
Dads203 Posted September 10, 2012 Share Posted September 10, 2012 Thats very nice, great finish fella Link to comment Share on other sites More sharing options...
jacksdad Posted September 10, 2012 Share Posted September 10, 2012 In my opinion the panel wash is a bit dark and stands out to much. Apart from that all I can say is..............phoarrrrrr!!!!! Nice one. Steve Link to comment Share on other sites More sharing options...
oddball1973 Posted September 10, 2012 Share Posted September 10, 2012 Looks badass! Link to comment Share on other sites More sharing options...
colin Posted September 10, 2012 Share Posted September 10, 2012 Now it's the opposite for me I think the panel wash is spot on, just like the rest of it, really stunning model Link to comment Share on other sites More sharing options...
fu_manchu Posted September 10, 2012 Author Share Posted September 10, 2012 Cheers Guys. The panel lines were post shaded after each colour. I did ponder on it a bit today before I committed to a panel wash. I'm pretty happy that it isn't too heavy, but it is possibly a bit marginal, and I would have most likely got away with missing this step. Ian Link to comment Share on other sites More sharing options...
Parabat Posted September 10, 2012 Share Posted September 10, 2012 That is one incredible Flanker, to my eyes it looks every bit as good as the one you are replicating. Outstanding effort! Link to comment Share on other sites More sharing options...
maverick02k Posted September 10, 2012 Share Posted September 10, 2012 This looks gorgeous. Lovely crisp paintwork and Camo demarcation. Link to comment Share on other sites More sharing options...
Plasticbutcher Posted September 10, 2012 Share Posted September 10, 2012 Wow!! Thats a stunner Link to comment Share on other sites More sharing options...
Hawkkeeper Posted September 10, 2012 Share Posted September 10, 2012 a Cool machine, love the camo scheme. Link to comment Share on other sites More sharing options...
Skeg Posted September 10, 2012 Share Posted September 10, 2012 That is an awesome looking flanker! Link to comment Share on other sites More sharing options...
asgardiano Posted September 11, 2012 Share Posted September 11, 2012 i will newer build like you do!!!!! Link to comment Share on other sites More sharing options...
Will Vale Posted September 11, 2012 Share Posted September 11, 2012 I really like the finish too - super crisp and lovely strong colours make for an attractive 'plane. FWIW I think the panel wash is a pretty good match for the photograph. Link to comment Share on other sites More sharing options...
AndyC Posted September 11, 2012 Share Posted September 11, 2012 Great stuff Ian - that looks brilliant and it's my favourite Flanker scheme too Link to comment Share on other sites More sharing options...
SaintsPhil Posted September 11, 2012 Share Posted September 11, 2012 Awesome job, that looks like masking hell to me! Link to comment Share on other sites More sharing options...
Matcham11 Posted September 11, 2012 Share Posted September 11, 2012 Wow! Brilliant build mate! I'm gonna build Trumpeters 1/32 Flanker soon. Can't wait! Robin Link to comment Share on other sites More sharing options...
fu_manchu Posted September 11, 2012 Author Share Posted September 11, 2012 Wow! Brilliant build mate! I'm gonna build Trumpeters 1/32 Flanker soon. Can't wait! Robin Cheers, I would love to do one of those, but I know I would get sucked into all the Zactoman aftermarket, then I would also end up with something that is simply too big to house, every 6 months or so I go through buying pangs for one though! Awesome job, that looks like masking hell to me! Quite therapeutic actually! I basically masked it out using vectors with very thin tape, so just setting the angle and running an arbitrary long piece. Once I had boxed in each 'splinter' the only challenge was working out where to make the cuts. I figure it probably took 4 hours for each of the two main masking sessions. Link to comment Share on other sites More sharing options...
IXGR1 Posted September 11, 2012 Share Posted September 11, 2012 Having done the earlier version of this scheme I can appreciate your work - well done ! -and I follow your comments on masking therapy..... Link to comment Share on other sites More sharing options...
Motley Posted September 11, 2012 Share Posted September 11, 2012 Woww thats brilliant dont know how you can stand masking all that camo job, but boy does it look good Link to comment Share on other sites More sharing options...
RNoAF Aerobatic Team Posted September 11, 2012 Share Posted September 11, 2012 She`s a real stunner!!!! You have done a GREAT job on that Flanker! BE PROUD! Link to comment Share on other sites More sharing options...
Neilroy Posted September 11, 2012 Share Posted September 11, 2012 What a paint job, really great work Link to comment Share on other sites More sharing options...
PASANALA Posted September 11, 2012 Share Posted September 11, 2012 Very gooood. I love it. I like the plane, and this camo. Congratulations Link to comment Share on other sites More sharing options...
colihamp Posted September 11, 2012 Share Posted September 11, 2012 Paint work is exceptional! Looks like a big 'un! Link to comment Share on other sites More sharing options...
Lex77 Posted September 11, 2012 Share Posted September 11, 2012 What a nice Flanker. The colourscheme is really well done! Link to comment Share on other sites More sharing options...
lar74 Posted September 11, 2012 Share Posted September 11, 2012 Top class model.. Link to comment Share on other sites More sharing options...

Recommended Posts
Create an account or sign in to comment
You need to be a member in order to leave a comment
Create an account
Sign up for a new account in our community. It's easy!
Register a new accountSign in
Already have an account? Sign in here.
Sign In Now