Rodders Posted March 1, 2012 Share Posted March 1, 2012 Hi All, My next model is going to be the Italeri F51D as the RNZAF P51 but i know absolutely nothing about RNZAF aircraft. Could anyone help with a couple of questions, 1. Is the interior colour the same as for USAAF aircraft as listed in the instructions in the Italeri kit 2. Would the aircraft be heavilly weathered. 3. If anyone has done the kit like this, are the decals correct. 4. Please forgive the laziness, what part of the airframe would be in different metal shades. I've never done a Mustang before and don't know much about it. I'm just doing it oob, to get some experience of doing metallic shades. I am going to use Tamiya XF16 as the base aluminium colour, Can anyone help, Thank you. Link to comment Share on other sites More sharing options...
Don McIntyre Posted March 1, 2012 Share Posted March 1, 2012 1.) I believe that other than the national and squadron markings RNZAF P-51s would be identical to the US or RAAF aircraft. 2.) Go lightly. 3.) I don't have the kit so can't comment 4.) The wings would be painted on the original aircraft, so other than the gun bay doors, you won't see a lot of tonal variation there. For the fuselage, I'd just paint it aluminum and maybe make the panel around the exhausts a bit darker (maybe burnt steel (or just plain steel). Of course, someone will be along soon and tell me that I'm totally out to lunch… Link to comment Share on other sites More sharing options...
Harry Lime Posted March 1, 2012 Share Posted March 1, 2012 I've done a bit of research into this as I'm doing the Tamiya P-51 in RNZAF colours, so with much thanks to Andy(SilverFox- IPMS RNZAF SIG Leader) and Google, I'd be confident in answering your questions. 1. Cockpit colours are Interior Green, then black around the fuel tank, then Yellow Zinc Chromate (YZC) after that, including the tail wheel well. From what I can gather, the main well was YZC too with the inside faces of the doors in Aluminium Lacquer. 2. No. All pictures I've seen of these machines show them to be very well looked after. 3. I believe the decals are correct, there is the same option on the excellent Ventura Decals sheet. 4. Depending on the time, most RNZAF machines were painted overall High Speed Silver with matt black anti glare panels. Early in their careers they remained in Natural Metal Finish. Have a look in the Mustang Single type Group builds for more info. Mark. 1 Link to comment Share on other sites More sharing options...
Silver Fox Posted March 1, 2012 Share Posted March 1, 2012 Beat me to the keyboard Mark. Correct in ever detail Just to add, the panel behind the exhausts was normally left unpainted even when the rest of the airframe was painted in HSS. The P-51D25-NTs used by the RNZAF had the taller 'Dallas' hood and carried the underwing rocket stubs. I have yet to see a photo of an RNZAF machine with drop tanks, but the pylons and sway braces were there. NZ2429 was unique in carrying the Blue/Yellow triangles all its Squadron mates had Blue/Yellow checks I hope this helps. Link to comment Share on other sites More sharing options...
Silver Fox Posted March 1, 2012 Share Posted March 1, 2012 I've just seen the back of the Italeri box as posted in Kev!ns post on F-51D. The markings look pretty good. The box art misses the very tip of the spinner being painted Red. Link to comment Share on other sites More sharing options...
Giorgio N Posted March 1, 2012 Share Posted March 1, 2012 I can't answer any of the questions above, but as I'm building the Italeri kit in these very days, I can tell you it can be an annoying build ! On mine I've had to rebuild the wing-fuselage fillets, replace the radiator vents and use a lot of filler. If you have a look in the Mustang STGB, you can see the problems I mentioned. The model is now almost completed, showing that every kit can be built in the end, but if I had to do another mustang I would probably start from another kit. The italeri decals are very nice though, they were thin and bedded down perfectly in the panel lines yet were strong enough to withstand being moved around. The colours also look good on the sheet Link to comment Share on other sites More sharing options...
Rodders Posted March 1, 2012 Author Share Posted March 1, 2012 WOW Guys thank you for the quick replies, i'll look into all your suggestions. Thanks Link to comment Share on other sites More sharing options...
LDSModeller Posted March 2, 2012 Share Posted March 2, 2012 Hi All,My next model is going to be the Italeri F51D as the RNZAF P51 but i know absolutely nothing about RNZAF aircraft. Could anyone help with a couple of questions, 1. Is the interior colour the same as for USAAF aircraft as listed in the instructions in the Italeri kit 2. Would the aircraft be heavilly weathered. 3. If anyone has done the kit like this, are the decals correct. 4. Please forgive the laziness, what part of the airframe would be in different metal shades. I've never done a Mustang before and don't know much about it. I'm just doing it oob, to get some experience of doing metallic shades. I am going to use Tamiya XF16 as the base aluminium colour, Can anyone help, Thank you. Check out this link to a discussion on RNZAF P 51D's quite usefull in helping build mine (particularly comments by Agalbraith) RNZAF Mustangs This is my build on the RNZAF proboards P 51D build As Andy (Silverfox) stated it depends on when in the Mustangs life you want to build. They were received in standard US livery in 1945, placed in storage till about 1950. toward the end of their service HSS was the colouring on all Note: Roundels will have changed also during that period too from Pacific type roundels to standard "D" type later on Another note RNZAF P 51D's Did have the aerial wire running from Vertical stab through hood to back of headrest If you have any other queries please fire away Regards Alan 1 Link to comment Share on other sites More sharing options...
Smithy Posted March 2, 2012 Share Posted March 2, 2012 Check out this link to a discussion on RNZAF P 51D's quite usefull in helping build mine (particularly comments by Agalbraith)RNZAF Mustangs This is my build on the RNZAF proboards P 51D build As Andy (Silverfox) stated it depends on when in the Mustangs life you want to build. They were received in standard US livery in 1945, placed in storage till about 1950. toward the end of their service HSS was the colouring on all Note: Roundels will have changed also during that period too from Pacific type roundels to standard "D" type later on Another note RNZAF P 51D's Did have the aerial wire running from Vertical stab through hood to back of headrest If you have any other queries please fire away Regards Alan That's a blast from the past - that's my old thread. Still haven't finished that one either Link to comment Share on other sites More sharing options...
David M Posted March 2, 2012 Share Posted March 2, 2012 Rodders, As usual you need to check carefully against photos if you want to build an accurate RNZAF Mustang. All the known variations are covered and illustrated in SCM and so far Ventura do the closest match for the markings on any one airframe. Even than there are small niggles in their otherwise excellent decals. The RNZAF Mustangs were delivered in full USAAF markings and had initially had US finishes (as opposed to the CAC versions). There were numerous variations in the number, size and placement of their initial NZ insignia and even more in service. Some were refinished in HSS, others remained pretty much stock. Props were all the square tipped HS except for NZ2413 which had the round tipped, cuffed prop. Unit markings and the style and placement of the serials varied a lot and the RNZAF added its own version of the stencilling, some of which are bigger and more colourful than the NAA applied stencils. All had the late production electrical connection panel which was repositioned aft in the radiator skins rather than on the starboard fing fillet. Maintenance differed from unit to unit and from time to time: some were grubby, others immaculate. Interiors remained basically as delivered but the RNZAF did modify some items in line with the RAAF/CAC mods and also had some home-grown mods. Regards, David Muir Author 'Southern Cross Mustangs' 1 Link to comment Share on other sites More sharing options...
LDSModeller Posted March 2, 2012 Share Posted March 2, 2012 Hi David Was hoping to hear from you! I was under the impression that all the surviving P 51's toward the end of their service life (circa 1954/55) were in HSS. Looking at photos though, some P 51's were probably a little "Polished" in a metalic way than what I consider HSS Your comment on the airframes (some in HSS, rest in standard finish) answers some questions for me, as to why that was so! Thanks Alan Link to comment Share on other sites More sharing options...
Pete M. Posted March 2, 2012 Share Posted March 2, 2012 Hi Rodders. One quick recognition feature on how to to pick between a 'bare metal' and a HSS finished RNZAF Mustang, is to check the anti-glare panel. On the bare metal ones, the anti-glare panel angles up to a point at the tip of the nose, but the repainted ones have a straight lower demarcaction coming further down the cowl. I have a good diagram somewhere in my files that I'll try to find and post over the weekend that shows this better than I can explain it! The above posts have covered the other points you ask about pretty well. Cheers, Pete M. 1 Link to comment Share on other sites More sharing options...
Rodders Posted March 2, 2012 Author Share Posted March 2, 2012 Thanks again Guys, the info is really helpful. Thanks. Pete, that diagram would be really appreciated. Cheers all. Link to comment Share on other sites More sharing options...
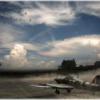
Pete M. Posted March 3, 2012 Share Posted March 3, 2012 Thanks again Guys, the info is really helpful. Thanks. Pete, that diagram would be really appreciated.Cheers all. Hi Rodders. Couldn't find the original diagram, so I've done a new one. And scanned a couple of my pics to show it as well. NZ2427 taken at an airshow at Omaka airfield near Blenheim in 1958. Note the painted wings.NZ2409 - date unknown, but appears to be at Woodbourne. Hope these help, Pete M. 1 Link to comment Share on other sites More sharing options...
Jennings Heilig Posted March 4, 2012 Share Posted March 4, 2012 This is what P-51 wings looked like from the factory. Bold black lines were visible. Greyed out lines, plus all rivets were filled, sanded, and smoothed. Light grey is aluminum paint, dark areas are natural metal. Don't believe what you read on forums about masses of wartime aircraft having stripped wings. It just didn't happen. Link to comment Share on other sites More sharing options...
Prop Duster Posted March 6, 2012 Share Posted March 6, 2012 This is what P-51 wings looked like from the factory. Bold black lines were visible. Greyed out lines, plus all rivets were filled, sanded, and smoothed. Light grey is aluminum paint, dark areas are natural metal. Don't believe what you read on forums about masses of wartime aircraft having stripped wings. It just didn't happen. Jennings That is the cleanest and most instructive wing paint diagram I have ever seen. So many times the words of explanation miss the complete point or at the very least leave out realistic details ( ie "...just paint the wings silver -the factory puttied and painted all the wings..." ) Your good Link to comment Share on other sites More sharing options...
Jennings Heilig Posted March 6, 2012 Share Posted March 6, 2012 Glad you liked it. One small note - when P-51s were crated for shipment overseas, the wing tips outboard of the panel line that's about 2/3 out the aileron (where the outboard little fence deal is located) were removed. In some WWII era photos that joint line is clearly visible, and in others it's completely invisible. I suspect that some a/c may have had that joint re-puttied and painted at the depots until they realized it was pointless to do so, so they quit. The E&M manual clearly shows that entire section of the wing (not just the tip cap outboard of the aileron) as a separate assembly in the crate. Link to comment Share on other sites More sharing options...
Rodders Posted March 8, 2012 Author Share Posted March 8, 2012 Hi Guys, Just on line for a few minutes, will look at info when i can get better connected. Thanks again for all your help, looking forward to reading it, Cheers. Link to comment Share on other sites More sharing options...
James Venables Posted March 9, 2012 Share Posted March 9, 2012 I'm building the Italeri kit in these very days, I can tell you it can be an annoying build! On mine I've had to rebuild the wing-fuselage fillets, replace the radiator vents and use a lot of filler Interesting comments. I built the Italeri F-51D about 10 years ago and I don't recall it being a challenging build at all. That said, I could be forgetting something, as it was a while ago. The only issues I recall now were: 1. Badly matching front and rear spinner parts - I had to temporarily tack the spinner front and back parts together and sand while turning in in a Dremel to get rid of the seam, then adjust the openings for the prop blades. 2. Undercarriage detail was a tad basic and heavy, I thought. 3. Tailwheel had a tendency to sit off-centre once the fuselage halves were joined and took a lot of coaxing to sit correctly. 4. Wing panel lines needed filling. 5. I recall that I had to do something with the carburettor scoop opening but I don't remeber what. Otherwise, I thought it was a clean and enjoyable build. I am pleased to hear about the decals too, as I always wanted to another in the RNZAF kit markings and wondered how the decals would behave. Cheers. Link to comment Share on other sites More sharing options...
Giorgio N Posted March 9, 2012 Share Posted March 9, 2012 Hi James, have a look at my recent build, this shows the problems I've had: http://www.britmodeller.com/forums/index.p...topic=234910194 Apart from losing the exhausts, that was totally my fault, I was not impressed by the italeri kit. And yes, I had your same problem with the spinner, didn't mention this in the thread. And I agree that the landing gear legs are a but clunky. The wheel wells detail is also not great, I thought about replacing the various ribs but then decided against this. For the tailwheel I have modified the fitting so that it can be glued at the end of the build, so I don't know if your same problem would have hit me. It might be that the moulds are now worn and some issues could be traced back to this. If so, better find an older issue than buying a brand new one, although I don't know what the decals might be like in the older boxes. Link to comment Share on other sites More sharing options...
Rodders Posted May 1, 2012 Author Share Posted May 1, 2012 Hi Guys, I just wanted to ask. I am absolutely hopeless at scratchbuilding, and wanted to ask if any one has used a resin cockpit for the Italeri F51D. For example, would a resin pit from Aires for the Tamiya or Hasegawa P51D fit the Italeri Mustang? This may be a stupid question, so forgive my naivety if i'm wrong, Thanks. Link to comment Share on other sites More sharing options...
James Venables Posted May 2, 2012 Share Posted May 2, 2012 Hi Guys,I just wanted to ask. I am absolutely hopeless at scratchbuilding, and wanted to ask if any one has used a resin cockpit for the Italeri F51D. For example, would a resin pit from Aires for the Tamiya or Hasegawa P51D fit the Italeri Mustang? This may be a stupid question, so forgive my naivety if i'm wrong, Thanks. No doubt it would, as it is for the same aircraft. It may not necessarily be a drop-in fit though - you may have to grind/file/sand away a little more (or a little less) of the cockpit walls to make it fit... but that's all part of the enjoyment of the hobby, isn't it? I found that the interior can be tidied up quite nicely with just a little basic scratchbuilding and some judicious painting/highlighting. Don't be scared to try it - a home made cockpit will cost you next to nothing and be just as satisfying once done. If you are planning to keep the canopy closed, then just a representation will be more than enough at this scale. Link to comment Share on other sites More sharing options...
mumbles Posted March 14, 2014 Share Posted March 14, 2014 And scanned a couple of my pics to show it as well. NZ2427 taken at an airshow at Omaka airfield near Blenheim in 1958. Note the painted wings. Hope these help, Pete M. Belated thanks for posting these images Pete, I'm building a set of RNZAF Mustangs and the overhead shot revealing the demarcation on NZ2427 has just made my masking task a bit easier - other non-photographic references have the anti-glare panel ending in a curve before reaching the propeller hub. It's interesting that while the fuselage of '27 looks highly polished and looked after the overwing roundels look somewhat faded. Link to comment Share on other sites More sharing options...
Silver Fox Posted March 14, 2014 Share Posted March 14, 2014 Mumbles, regarding the roundel, given the amount of people on the wing could it be that mud/dirt from their boots/shoes have dirtied it? Also the machines were taken out of service in 1955 so it would not have been as well looked after as it was in service. Just a couple of random thoughts no proof. Link to comment Share on other sites More sharing options...
stevehnz Posted March 15, 2014 Share Posted March 15, 2014 fwiw, when I saw the above shot last night, I wondered if it might have been the glare that seems to be apparent from the horizontal flying surfaces washing out the photo in that area, ie over exposing it considerably, including the roundels, especially if they were well polished too like the rest of the aircraft appears to be. Steve. Link to comment Share on other sites More sharing options...

Recommended Posts
Create an account or sign in to comment
You need to be a member in order to leave a comment
Create an account
Sign up for a new account in our community. It's easy!
Register a new accountSign in
Already have an account? Sign in here.
Sign In Now