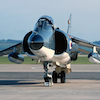
NG899 Posted November 26, 2011 Share Posted November 26, 2011 (edited) Following on from Graham 'Chocks Away' James's photos of his latest Harrier GR.Mk9s, here are some of my own from the Harrier Special Interest Group's Scale ModelWorld 2011 display... Far easier than an Airfix Sea Harrier FRS.1 of FA.2 but not a 'shake'n'bake, Hasegawa's GR.9 needs some care but does repay the effort. And, the real thing on the day... (OK, from the other side!) Yes, Graham, it's one of your photos! I'm still working to properly finish T.Mk12 ZH659/107 and will add images of it in due course; hey ho! Cheers, Nick Edited November 26, 2011 by NG899 Link to comment Share on other sites More sharing options...
Doug Rogers Posted November 26, 2011 Share Posted November 26, 2011 Really nice Nick, great finish and great display. Wish I could have seen it in the flesh. Link to comment Share on other sites More sharing options...
Scarlet Posted November 26, 2011 Share Posted November 26, 2011 Really nice Nick, great finish and great display. Wish I could have seen it in the flesh. I'm not a big Harrier fan, but the display was very impressive - one of the highlights of the show for me. Link to comment Share on other sites More sharing options...
Bozo Posted November 26, 2011 Share Posted November 26, 2011 Nice model of the GR.Mk9! The pilot add the little extra on this model, I think! I was really sad to hear the Harriers were let go. What are the issues with the Hasegawa set? I have some Harriers myself waiting to be built. How did you manage to make the det chord on the canopy? Link to comment Share on other sites More sharing options...
Col. Posted November 26, 2011 Share Posted November 26, 2011 Nice work! Both aircraft and aircrew look real and the weathering is very well executed. Link to comment Share on other sites More sharing options...
F-32 Posted November 26, 2011 Share Posted November 26, 2011 Superb build and a great display Link to comment Share on other sites More sharing options...
vinnydwj Posted November 26, 2011 Share Posted November 26, 2011 that is just stunning ! even down to the raf police seal on nose/fwd fuselage seal im glad to have worked on these jets and indeed 1(f) sqn, again a superb model Link to comment Share on other sites More sharing options...
woody37 Posted November 26, 2011 Share Posted November 26, 2011 Wow, I thought the close up of the cockpit was a real photo at first, stunning build Link to comment Share on other sites More sharing options...
nirvanagr Posted November 26, 2011 Share Posted November 26, 2011 That Harrier SIG was amazing! I truly enjoyed it! Your Harrier looks great, Nick! Link to comment Share on other sites More sharing options...
ChocksAway Posted November 27, 2011 Share Posted November 27, 2011 Nick The heavies will be around tomorrow to extract royalty payments! Up to your usual standard Nick - and I'm sure you can bring that T12 to the same level. What are the issues with the Hasegawa set? I have some Harriers myself waiting to be built. How did you manage to make the det chord on the canopy? How long have you got? Join the SIG and all will be revealed. And whilst I'm hijacking Nick's thread - the display of the Kestrel formation will be at Yeovilton and Cosford in 2012 for sure. Link to comment Share on other sites More sharing options...
Stephen Posted November 27, 2011 Share Posted November 27, 2011 I can't get tired of looking at these pics. Stephen Link to comment Share on other sites More sharing options...
Seahawk Posted November 27, 2011 Share Posted November 27, 2011 the raf police seal on nose/fwd fuselage seal What's the story behind that please? Was it routine or a one-off? Don't tell me that nowadays we need the RAF police to go around placing seals on our aircraft to stop people (RAF personnel, presumably) opening panels up and having a casual meddle? Link to comment Share on other sites More sharing options...
Shaun Posted November 27, 2011 Share Posted November 27, 2011 (edited) What's the story behind that please? Was it routine or a one-off? Don't tell me that nowadays we need the RAF police to go around placing seals on our aircraft to stop people (RAF personnel, presumably) opening panels up and having a casual meddle? I took some shots of the Harrier GR9 in Cosford show static a couple of years ago that had a few of these placed over the opening panels on the airframe. Nice Harrier Nick. Shaun. Edited November 27, 2011 by Shaun Link to comment Share on other sites More sharing options...
jimbuna Posted November 27, 2011 Share Posted November 27, 2011 She's a beauty. Link to comment Share on other sites More sharing options...
NG899 Posted November 27, 2011 Author Share Posted November 27, 2011 (edited) Thanks for all your comments about 472. The MDC is the Hasegawa kit decal which goes onto an already Kleared canopy quite well and the weathering is thinned Humbrol enamel dry-brushed and streaked on, then smudeged around with a cotton bud to get the right effect. The mix is some matt black (33) with a dash of matt desert yellow (93). As the airframe had been Kleared and decalled, any errors can easily be removed with a cotton bud dipped in thinners. Despite what Graham implies I think the kit's a good one, it's just not like Tamiya's famed 48th scale P51 Mustang in terms of the fit of the parts and does have people debating the washout 'kink' in the upper surface of the wing. The tricky bits... Dry fit part B3 - the aft cockpit decking ahead of the LERX - when joining the fuselage halves together, otherwise you risk the upper fusleage not being wide enough when you come to fit B3 and the nose. Don't worry about the fact that with B3 dry fitted in place the fan bellmouth (A5) will not quite touch the widest parts of each fuselage half. Some gentle fettling is needed around the rear edges (by the main u/c bay doors) on part B4 to get it to fit flush on both sides and be careful when fitting it that one side doesn't drop up into the fuselage. With some gentle persuasion I fitted B4 on both models after I'd got the main fuselage halves, bellmouth and bracings between the nozzles joined and set; this made getting the fit the same on both sides much easier. On the GR9, with yet more gentle persuasion, I managed to fit the wing having assembled the upper and lower pieces into one - making sure the rear centre section joins the rear fuselage well. On the T12 I followed the Hasegawa instructions and fitted the lower wing pieces to the fuselage first and then the one-piece upper. This was marginally easier but did require more care on the leading edge joints, especially by the wing fences and, if anything, made the underside joints of the wing and LERX harder. If using the kit 65% LERX, again more gentle fettling needs to be done to their undersides where they meet the top of the fuselage, which itself needs some gentle fettling. Also, note that the fairings under the 65% LERX where they meet the fuselage are not slab-sidded but curver: think of the fairing on the the top of a Spitfire's wing and invert it. Some gentle sanding down to get a concave cross section is all that's needed - do keep test fitting! Some filler will be needed to avoid a step between the lower sides of the LERX and wings. The flanges on the strakes need some reshaping and some gentle bending to fit the fuselage properly. The seams on the tank joints are hard to eradicate. The wing tip 'slime light' decals are way out; but correct light shapes can be made from them. In addition on the Revell GR7/9 boxing... I've had problems with a couple of kits where the central cross section of the front of the wing where it meets the rear of the LERX is too shallow - a moulding error for which milliput is the only cure. The Revell artist had a bad day at the office, getting some of the sprue references mixed up - not helpful; and their decals for the instrument panels and side consoles are awful! Without going to the expense of getting the Aires cockpit set, in which the seat is beautifully cast but is 2-3mm too short (even if raised the headbox is still undersized) you can make the kit parts look good by careful painting and drybrushing. The Pavla seat is the best aftermarket one, but needs the headrest/headbox sides area reshaping and detail adding on top of the headbox. Right, that's enough from me for now, I'm off to flatten down the finish on the T12... Cheers, Nick Edited November 27, 2011 by NG899 Link to comment Share on other sites More sharing options...

Recommended Posts
Create an account or sign in to comment
You need to be a member in order to leave a comment
Create an account
Sign up for a new account in our community. It's easy!
Register a new accountSign in
Already have an account? Sign in here.
Sign In Now