damian Posted July 2, 2008 Share Posted July 2, 2008 (edited) Hi All I'm going to try and build two Migs inspired by Gekko1's (Richard) profile one French and the other SAAF for all those (Overkiller) who demand it ;D for the What-If board's "Profile Tribute GB" The French Mig: The SAAF Mig: So for the first time in ages here are some in progress pics!! 1. The obligatory box shot 2. Glued the fronts to back BEFORE putting them together, thanks for the tips guys!! 3. Busying up the cockpit, here I've taken inspiration from Blackops while carrying this out...man am I rusty! 4. All that I got done between jobs today, I want to add more to the pit before I slap on paint. I'm still toying with the idea of an in-flight model 5. The decal and weapons donor So there you go guys. Any thoughts and opinions welcome!! D Edited July 2, 2008 by damian Link to comment Share on other sites More sharing options...
hatchet Posted July 2, 2008 Share Posted July 2, 2008 Good start mate! Still not too keen on the SAAF scheme (sorry Richard!) but that Djibouti-bird is going to look awesome! Link to comment Share on other sites More sharing options...
damian Posted July 3, 2008 Author Share Posted July 3, 2008 Hi all!! Was a little tired after my 4.4 hour round flight to Mossel Bay and back so all I've done is complete my cockpit greeblies, prep the pilot (by cutting the poor man's legs off!) and mocking everything up for comments! I'm going in-flight with this kit as I like the gearless look. 1. Starboard side showing off the gasbag ans AS.30L laser guided missile 2. Head on shot showing of all the kit including the ECM thingamajig Mk.3 (or if its French does it make it the majigthinga Mk.3??) 3. Mr. Pilotman in his office filled with greeblies because I'm not bothered with accuracy just "coolness" 4. The following is for B777LR's request to mock up the kit with MirIII wings to show a delta Mig Thats all for now As always thoughts, critisism and abuse welcomed! D Link to comment Share on other sites More sharing options...
damian Posted July 6, 2008 Author Share Posted July 6, 2008 I got more done today but the camera's battery is re-charging so I'll post pics later on.. D Link to comment Share on other sites More sharing options...
damian Posted July 7, 2008 Author Share Posted July 7, 2008 Hi all!! Here's the promised pics 1. Mr. Pilotman i his office chair, with his stick (control) in hand. I'm keeping him faily plain and simple. 2. In his office. I've got it all painted up and dirty. I really didn't spend too much time here as you won't really see anything once its buttoned up. Most of what I did was more for practicing my atrophied skills than making a "busy" cockpit. 3. Overheadinsh shot... 4. Front 3/4 beauty shot...glam baby, glam 5. 'Pit without the pilot and chair in, the detail is obviously fictional 6. A little bit more of the instruments... 7. Assembled empenage and tail, AS.30L and gasbags. As you can see I'm modding the one gasbag to carry an in-flight refueling reseptical. Saw this on a 50's USAF fighter and liked the idea as a way of increasing the MIG's short little legs 8. Overview of all the parts So there you go! Any hints, tips, suggestions or mild spankings welcome D Link to comment Share on other sites More sharing options...
damian Posted July 16, 2008 Author Share Posted July 16, 2008 Hi All!! I got the last of the clean up and PSR done tonite so tomorrow's the big day! Yes its paint day! Now I haven't airbrushed a kit for the better part of the last 9 to 10 months so tomorrow will definitley be interesting to say the least... Oh well just go to remember that I'm in this to have FUN!!! So here we go with the last of the nude pics! 1. MiG-21AL and the stores load L to R: AS.30L, gasbag with flight refuelling probe, chaff pod, standard gasbag, ECM pod (Barracuda?) 2. Last over view shot Well kepp everything crossed for tomorrow!! D ps. comments and crits always welcomed! Link to comment Share on other sites More sharing options...
model_madness Posted July 17, 2008 Share Posted July 17, 2008 nice progress Damian, that pit and pilot look great, keep 'em coming Link to comment Share on other sites More sharing options...
aeroplanedriver Posted July 17, 2008 Share Posted July 17, 2008 Looking great D! Between this, my ETPS MiG, and Ian's RAF Agressor we've got our own mini Whif-Fishbed GB going on! Link to comment Share on other sites More sharing options...
damian Posted July 17, 2008 Author Share Posted July 17, 2008 Hi All! Spent a loooong day painting as I'm only working tonite 1. Sprayed the cockpit black... 2. The green bits green... 3. Steel bits steel...which i've had to hand re-paint as the MM metaliser lifted like a ho... 4. Got the grey underside down with lightened weathered spots 5. And the free handed the top two colours, please note Richard's profile is my inspiration and not a strict painting guide because 1. I paint in the lounge with the PC in the bedroom; and 2. uuumm I'll get back to you Tomorrow is clear coating day and then Saturday is decaling day As always comments and crits welcome but please go easy on my paintjob as this is the first airbrushing in ages D Link to comment Share on other sites More sharing options...
hatchet Posted July 17, 2008 Share Posted July 17, 2008 Looking great D but please go easy on my paintjob as this is the first airbrushing in ages Showoff Link to comment Share on other sites More sharing options...
damian Posted July 19, 2008 Author Share Posted July 19, 2008 Hi All!! Got my decalling done yesterday and moved on to complete the weathering of the airframe today. So between studying Nav Plotting and working on the kit I give you the following pics! 1. Decls done!! Phew only botch two on this one so its a damn record for me!! The chosen sqn markings are for E.C. 03-03 "Ardennes" in 1987 2. Close up of the boar's head tail art. 3. Another over view shot... 4. Top side weathering done... 5. Close up of the weathering done... 6. Bottom doen too 7. And a close up Next will be the flat coat to seal it all in and weathering the stores. After that its trying to mount the sucker on a pole for display! As always crits and comments most welcomed! D ps. IF you build this as a real world A/c do yourself a favour and get aftermarket decals as the Academy ones are CRAP I think you'd have to use white glue to get them to stay on the bloody thing. Thankgaod all I used were some minor stencils. As for the Heller decals, they we commendably thin but quite a few were out of register. Link to comment Share on other sites More sharing options...
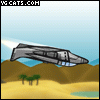
damian Posted July 21, 2008 Author Share Posted July 21, 2008 Hi All!! She's done. The only thing left is to put her on a base which will have to wait for the weekend as payday is on Friday The last one is in becasue I took all the other pics and then realised that the blade antenna behind the 'pit wasn't painted Now she is though! As always crits and comments most welcome! D Link to comment Share on other sites More sharing options...
hatchet Posted July 21, 2008 Share Posted July 21, 2008 Looks great D! Link to comment Share on other sites More sharing options...

Recommended Posts
Create an account or sign in to comment
You need to be a member in order to leave a comment
Create an account
Sign up for a new account in our community. It's easy!
Register a new accountSign in
Already have an account? Sign in here.
Sign In Now