Search the Community
Showing results for tags 'vietnam war'.
Found 22 results
-
Here’s my diorama I’ve made it is of a rescue of a Huey crew gone wrong the uh-1s are a b and c both from italeri and the figures are too but the guy on the ground was made from a italeri us soldier crouched with a hasegawa ground crew head glued on paints are Vallejo, humbrol and Tamiya I hope you enjoy the secret bunker Aerial view Another view of the blown up huey Wrecked Huey that was previously shot down that’s all folks and sadly there is no wip as I forgot to do that
-
The M41 Walker Bulldog, officially known as 76-mm Gun Tank M41, was produced by the Cadillac Motor Car Company division of General Motors from 1951 to 1954. Originally built as a light tank replacement for the WWII-era M24 Chaffee, it was initially called the “Little Bulldog”, but the name was changed to honor Gen. Walton Walker who was killed in a road accident in Korea in 1950. There were 5,467 M41s built, and while the United States never used it in combat, it was bloodied in several engagements in both Western and Eastern hemispheres. In the Bay of Pigs “invasion” of Fidel Castro’s Cuba on April 17, 1961, the CIA provided a brigade of anti-Castro exiles with 5 M41 tanks and while they did have early success against Communist T-34/85 tanks, they eventually ran out of ammunition, and all were either destroyed or captured. The Republic of Vietnam was the largest user of the M41 Bulldog. Provided to the Army of the Republic of Vietnam (ARVN) in 1964, they were first used in combat in October 1965. Notably used by ARVN forces in the Tet Offensive of early 1968, they also saw combat in many other theatre actions. In February to March 1971, M41s led a cross-border incursion into neighboring Laos called Operation Lam Son 719. The ARVN Bulldogs destroyed NVA (North Vietnam Army) T54 and PT-76 tanks in tank vs tank duels, but the operation was not a success with ARVN forces entering Laos with 62 tanks and 160 M113 APCs and returning to Vietnam with only 25 M41s and 64 M113s. Other nations that used the Bulldog include Brazil, Argentina, Uruguay, Lebanon, New Zealand, South Africa and West Germany, where the M41 was the Bundeswehr's first post-war tank in 1955. Specifications: Weight 23.49 Tonnes (51,200 pounds or about 23,220 kg) Length 19’1” (5.81m) Width 10’6” (3.19m) Height 8’11” (2.72m) Top speed- 45 mph Range- 110 miles (180 km) Engine- Continental air-cooled, opposed six-cylinder, gasoline powered, with 500 HP Main gun-M32A1 76 mm canon Auxiliary armament-.30 cal coaxial MG and .50 M2 Commander’s MG Reference links of interest: https://en.wikipedia.org/wiki/M41_Walker_Bulldog https://mikesresearch.com/2019/03/24/m41-walker-bulldog/ The Kit It’s Tamiya’s venerable 1/35 M41. This kit appeared first, in this form in 1975, with an earlier version released in 1964! I started construction about one year ago and have worked on it sporadically since. It was painted with Humbrol and Model Master enamels, through the old Paasche H. Quite a few products were used for weathering effects including AK and Vallejo muds of various sorts and Vallejo Earth Oxide pigments. Vallejo acrylics were used for the rust effect on the three mufflers, while Flory washes and pastel chalks were also employed. I used diluted oil paint on the fuel fillers. In a few spots, Cyber Top watercolor pencils also came in handy. Uschi’s Trinity Splatter stencils helped weather the paintwork. Resin stowage came from Value Gear and Squadron Dioramix. The resin M2 is an Eduard product. The dried leaves scattered about are from AK as well, in three different types. The crew came from a vendor in China, via Ebay and they are painted with Vallejo acrylics too. Oh, and I also made a pair of "shades" for the tank commander. I also used some Evergreen sheet to make bottoms for the sponson boxes and to fill the holes in the hull’s bottom. I did a fair amount of scratch building on this project, including the three supports for the driver’s opened hatch cover, damage to the headlight guards and the cleaning rod staffs (brass tubing) seen attached to the turret’s rear. I removed the pioneer tools and bracket from the front right fender, (often done by the ARVN tankers) replacing them with “field improvised” parts from brass angle and a strip of thin, sheared sheet-metal. The gun mantlet cover is made of tissue soaked in diluted PVA glue with the cover hold-down made from plastic rod, strips cut from an aluminum can and detailed with Grandt Line nut/bolt heads. The characteristic reinforcing stampings seen on the sponson’s sides were replicated with stretched sprue. The three rolled tarps on the turret's side were also made from PVA-soaked tissue. Tamiya completely disregarded the auxiliary muffler, so I was obliged to make one from an ancient model car muffler, aluminum tubing and electrical wire. The ropes are various sizes of thread soaked in diluted PVA and the two radio aerials are just stretched sprue. Another omission by Tamiya were the two lifting rings seen just beneath the headlights and those were done with copper wire. Balsa provided the wood for the “road barrier” pressed into use between the headlights. I also had to use Evergreen to replace a lost hinge for the cupola’s hatch cover. The driver’s vision blocks were filled with Microscale Krystal Klear, tinted with dark acrylic paint. So, there you have it! Much too much info I’m sure, but maybe there’s some interest in the details. It was a fun project with the biggest headache being that resin M2. I believe it was taken too green from the mold and that thin barrel always wants to curve upwards. It was nicely detailed but not a great fit in the kit’s pintle mount. Britmodeller build thread: https://www.britmodeller.com/forums/index.php?/topic/235108596-m41-walker-bulldog-ending-at-last/ Thanks for hanging in this far, and thanks for stopping by to have a look! I appreciate your interest in the Bulldog, and please feel free to leave your comments, good or bad! Lightbox photos: This M41 represents an ARVN tank operating in Saigon's (Ho Chi Minh City today) Cholon sector, circa 1968. These location atmosphere photos hopefully evoke that time and place: Photos by Richard W. Krall:
- 26 replies
-
- 39
-

-
 I've wanted to build the famous close air support workhorse for the long time but didn't want to go the usual way as most of the fellows around here, so I picked this peculiar camouflage and started to research the story behind it. I found out that US were transferring their surplus A-1H airframes to the Republic of Vietnam in early 60s. Some of these Spads found its way to the elite 83rd Special Air Group "Thần Phong" (Divine Wind). This unit was established in 1965 and drafted only the best pilots of VNAF. Nguyễn Cao Kỳ who later became a prime minster and vice president of Democratic Republic of Vietnam personally handpicked unit's elite members. 83rd SAG personnel wore all-black flight suits which became a trademark of the unit. Skyraiders used dark green/dark brown camouflage. Only the bottom plane surface, serial number and eventually some spare parts wore original light gull grey paint in which it was delivered from the USA. Due to the nature of its missions unit didn't use any of the VNAF insignia except of the Flag of South Vietnam on the tail, which was also dropped later. 83rd SAG emblem depicting white dragon under five white stars was used instead. Most of the airframes used a yellow Chinese symbols as a nose art. According to unit's members, there was at least four different symbols used, all originating from the traditional Vietnamese card game called BAT. The symbol on my model reads "Cửu Sừng" which means The Best of the Best. Missions were flown over Laos and Cambodia where Vietcong insurgents were on the move. Usual ordnance loadout was up to 8 Mk. 82 bombs, 6 rocket pods or 6 napalm canisters and 4x 20 mm cannons. VNAF Spads had some interesting quirks in comparison of its American counterparts. Most of the antennas and aerials were repositioned or changed completely, Yankee Extractor seat was removed and replaced with the original bucket seat while Yankee Extractor mechanism was kept intact, tailhook was removed and main gear was equipped with taxi lights. All VNAF Skyraiders had their airbrakes deactivated, so they couldn't be used in flight but could be opened manually on the ground. I've used good old Tamiya kit as a base for this project along with a bunch of aftermarket detail sets from Master, Reskit, Aires, ANYZ, HGW and Brengun. Handful of decals came from AOA and the rest was a spray mask designed by Vietnamese fellow modeller and cut by Miryoku. I also used some 3D printing and scratch building in order to bring the model as close to its real life counterpart as possible. All painted with Mr. Paint colors and weathered with Rembrandt oil paints.
- 22 replies
-
- 54
-
-

-
- vnaf
- vietnam war
- (and 1 more)
-
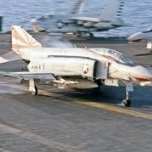
Hello All I am currently building an Hasegawa F-4B and I would like to finish it as an early VF-84 plane, when they had the flag on the tail instead of the full tail painted black. I have a few questions that I hope you can help me: in Osprey combat aircraft 116 US Navy F-4 units of the Vietnam war 1964-68 there is a profile of a jet that is very similar to the one I am planning to build, it is armed with MERs on the outer pylons , do you know of any aftermarket where I can get the pylons without the tanks? CAM 72-006 the decal sheet I would like to use, has newer ejection warning triangles with red center triangles, from all the pictures I saw of phantom of that era the triangles should be the first version, full of writing. Do you know where I can find a set in 1/72? Last question, from all the pictures I saw the 4 lumps on the underside of the wing, two just below the intakes and 2 at the back close to the flaps, should be removed for planes so early in the Phantom story, am I correct? Thank you Paolo
-
Hello dear modellers, First of all the building process: I actually listed the pros and cons of this kit from my point of view at the earlier topic, so overall I can say that this kit is 8/10. The worst part is rubber tracks. And I also looked for a little bit more interior details. One more thing, armor plate (?) details are missing around the hatches. So I gave an 8 to this kit. So first I added some interior details like driver seat, commander seat etc. from scratch. And I also added some tarps from epoxy putty, a wooden box and spare road wheel were casted with blue stuff. Lastly a rolled wire fence was obtained from an old broken french press Here is the end results. Please have fun and happy modelling.
- 11 replies
-
- 16
-
-
- Trumpeter
- Vietnam War
- (and 1 more)
-
Hello dear modellers, I started a new 1/72 project for a group build. The kit is this one: https://www.scalemates.com/kits/trumpeter-07238-m113a1--104706 As far as saw, I want to address some pros and cons of the kit. Pros: - Has nice engine detail even if it won't be seen after assembly. Also, has some interior details. - Nice details on the surface for the scale. - Good fitting. No need for fillers. Cons: - Interior details are not enough for me. - Lots of pin marks on the interior surfaces. - Rubber tracks. 😡 So, I started with the interior. This is what it is looks like w/o additions. So I felt like, I need some interior details, maybe I'll represent it with open back ramp. Then I finished the assembly painted the base color, and also some highlights for modulation. I need to tell you something here. This was my first AB experience. Until that, I was a brush painter. I think I'll stick with the brush because cleaning the AB is a pain in ... and I don't like the noise of the compressor. Maybe I'll use AB for quick projects like this. And I made some stowage from epoxy putty. That's all for now. Happy modelling.
-
'evening folks, Having just thoroughly enjoyed building Robin Olds Phantom F-4C 'SCAT XXVII' (1/72 Hobby 2000, Hasegawa re-box) in the F-4 Phantom II STGB, I was keen to do another Phantom. The Hasegawa kit is very good but goes back 30 years, and is showing it's age. So this time I wanted something a bit more up-to-date. The Fine Molds F-4D came out as a new tool F-4J released in 2020. This is a re-box with new parts for the 'D'. It's had lots of positive reviews which, being from Fine Molds, is unsurprising. But where to get it? Fine Molds kits just don't seem to get stocked in the UK which considering their excellent reputation is very odd. I finally took the plunge and ordered it from Japan (Hobby Search) which worked a treat. Here's what I got; The box art depicts Richard Stephen "Steve" Ritchie's F-4D in which he achieved his 1st and 5th MiG-21 kills. The only U.S. Air Force pilot ace of the Vietnam War, Capt. Steve Ritchie destroyed five MiG-21s during Operation Linebacker in 1972. On the flightline at Udorn Air Base, Thailand, Ritchie stands next to his F-4 Phantom displaying five stars to reflect each of the MiG-21s he shot down during the Vietnam War. (Photo: U.S. Air Force) Sprues, or 'trees' as Fine Molds call them; The molded detail looks really excellent. The way the kit assembles is different to any Phantom I've ever made and looks like it may be less hassle with the fuselage and jet intake joins, we'll see. You also get a very detailed cockpit, wheel wells, jet intakes and exhausts which makes a real change (less aftermarket £££s). Ailerons look as if they can be depicted with a usual droop of a parked Phantom, and the Aux intakes under the belly can be also be modelled open. Oddly, the air-brakes - which also droop on unpowered aircraft - are molded shut, so possibly a bit of surgery when I get there. Decals; Look very like Tamiya decals, well printed but quite thick. Plenty of stencils but Fine Molds have chosen to group them in bunches, which should make application less painful but may result in the dreaded 'silvering' over panel lines. I'll worry about that when I get there. Like Hasegawa, Fine Molds don't give you weapons with the kit. So at the same time as ordering the kits I bought their air-to-air missile set, bombs and seat belts sets. I added these to the 3 kits I eventually bought from Plaza Japan and Hobby Search Japan, trying to spread the load so I wouldn't get stung for UK import tax. They offer tracked/insured air shipping from Japan Post which works seamlessly with Royal Mail, and no tax! . And all far cheaper than UK (eBay ) prices, what a weird world we live in. The missile set was very useful as it contains the various ECM pods F-4s carried in the Vietnam War. The plastic seat belts are supposed to be 'bendable' or 'moldable'. Makes a change from trying to attach wretched etched metal belts with superglue, again - we'll see. Back soon...
-
Good evening colleagues. I plan to make an armed version of An-2 from the famous attack on Lima Site 85 and I have some doubts about that... In the first place, I'm not sure which box of hobby boss An-2 in 1/48 best suits this particular topic? An-2 or an-2m? Thank you very much, Bojan!
-
Good Evening Ladies and Gentleman, Greetings from COVID Stricken Prague, mater urbium. As an employee on air travel and cargo industry I have a lot of time now, so after long time of persuation I decided to return back to scale modeling for the time being as a sidequest from Wargaming - you can see some of our gaming endeavours in gallery and blog. Introduction is behind us, let's talk about the models. The Crusader will be my 2nd model after as long as 15 years I believe. I found out that the hobby changed a lot. As a figure painter you do not need all those fancy photo-etched parts and specialist tool for this or there, nor you care about the perfect hue. But I love aircrafts. I love scalemodels and I need diversion from battalions of tsar’s Infantry and Fantasy elves. And I am not the only scale modeller in Prague Wargames Club fortunately . Deks encourage me to start again and help a lot with all those new toys. So we decided to go for mutual build. So we opt for Academy 1/72 F-8E Crusader VF-162 Hunters. I like The Last Gunfigter very much and I tempted to buy one. Now returning back its time to fullfill my wishes 😄 as I always wanted one. I am not so strong believer in my skill for Eduard 1/48 so 1/72 is a good start. As I have experience with resin and detailed painting from all those 28mm minis, I purchased resin cockpit from our homeland company Aires. And on its ways are Aviprint decals (It seems it was a Czech company as well?) for MiG killer Crusaders. I would build aircraft of Cdr. Dick Bellinger who shot down a MiG-21 with it (VF162 BuNo149159 AH210). Probably some additional tools will pop up later on. You can watch Dek´s WIP here: We will start tomorrow. I will build up the cockpit, preshade it and start to paint it very slowly... Any advice is more then wellcome
- 1 reply
-
- 1
-
-
- F-8 Crusader
- Vietnam War
- (and 1 more)
-
 1/72 Airfix C-47, Air America, Bangkok, Thailand 1971 Anything, Anywhere, Anytime, Professionally. Air America was a covert operation run by the CIA which delivered items, goods, people and whatever else was necessary to places that the US Military could not openly go. Built using the Airfix D-Day C47 Skytrain kit. Airbrushed using Tamiya acrylics and lightly weathered using Flory dark wash. Wolfpak decals for the Air America scheme. I am delighted with how this has turned out - better than I imagined. Cheers gang, Phil
- 14 replies
-
- 47
-
-
-
- Secret War
- Gooney Bird
- (and 1 more)
-
Another started way back last year and finished earlier this week. EB-66 Destroyer, 42nd TEWS, 388th TFW, Korat RTAFB, 1973 Italeri mould, airbrushed freehand with Tamiya acrylics, Flory wash and Xtracrylix flat varnish. Builds into a cracking sized model, was difficult to photograph especially in lousy light (have tried different settings on some frames). Has great presence on the shelf. Size comparison with die-cast 1/72 F-4 Phantom: And with a Trumpy 1/72 F-105G: Cheers gang, Phil
-
 Hello Britmodellers! 👋 While the Vigilante is under the leisure sanding work, I decided to build and paint some figures in parallel. Actually, I was a big fan of the Dragon’s «Nam» series back in the late ‘90s, so it’s not a surprise that I chose this kit. I’m not so hurry with this build, but I want to have some fun and recall my painting skills. The box art: An «instruction» along with the painting scheme: Sprue A: Sprue A (backside): Looks not not so bad in comparison with the Dragon, I think it’s an excellent sculpting work here. Sprue B: I love the basic M16A1 on the left side of the sprue, but these on the right (along with M203) is something not so good in my opinion - I need something to replace these later. Sprue B (backside): This time I choose the water-based paints and get a two interesting sets: I’m not so experienced with this kind of paint, but I’m looking forward to try it (tasty pics, isn’t it?): Thanks for looking! 😸
- 73 replies
-
- 11
-
-
- Master Box
- 1/35
- (and 1 more)
-
Hello, Britmodellers! 👏 Last night I finished the work with the «Patroling» kit from Master Box and decided to put the final photos here, instead of the «Figure Ready for Inspection» section. I made an attempt to build a small vignette with only the two figures from the kit and some diorama materials. Actually, this was my first work with a diorama in the last 20 years and my first ever work with a pigments. Anyway, I hope you’ll like it! 😉 View 1: View 2: View 3: View 4: A closer look at the ground: And the Lady: For those who interested I have a thread in «Figure Work In Progress» section of our site: Thanks for looking! 😺
- 9 replies
-
- 10
-
-
- Master Box
- 1/35
- (and 1 more)
-
Having started land and waterborne elements of the Vietnam war, it was inevitable that I would want a flying machine as well. And in my view nothing symbolises the Vietnam war more than the ubiquitous Huey, the UH-1. Ideally I'd like to do a slick, as the real Hueys I've seen have all been the longer body version. But apart from the Panda/Dragon effort, I'm not aware of any slicks in 1/35, and the Pandagon versions are seemingly both as rare as rocking horse poop, and reviews are not very complimentary. Kitty Hawk bottled out and went 1/48, so the field is still.open for someone to step up. How about it Airfix? However, as uncomplimentary as the Pandagon reviews are, reviews of the Academy UH-1C are very positive despite its age, and the recent Revell boxing is available fairly cheaply. D3 by Jon Gwinnett, on Flickr D3 by Jon Gwinnett, on Flickr This is just a placeholder until I reach a point on the other builds where I need some rotary wing relief. There's a lot of plastic in the box.
- 6 replies
-
- 3
-
-
- 1/35
- Vietnam War
- (and 1 more)
-
Over in the armour forum I started a thread on my current Vietnam war builds. However the PBR feels out of place there, so this thread will follow the PBR build. There might be a hiatus while I crack on with the M151 on the other thread, but as a taster here's the bits before I begin work: Untitled by Jon Gwinnett, on Flickr Untitled by Jon Gwinnett, on Flickr
- 11 replies
-
- 9
-
-
- 1/35
- Vietnam War
- (and 1 more)
-
I wasn’t sure where to put this, since it’s a thread with both military vehicles and a boat! (And if Kittyhawk ever release their UH-1 in in 1/35 it might end up with a chopper too!) 1 by Jon Gwinnett, on Flickr The Vietnam war was still underway when I was born, and growing up our local library was a source of endless fascination – I don’t remember all the titles but among them there was Air America; another book about a Brit serving in the US army, and many others. The poignancy of many of them was probably lost on me as a kid, bit as I grew older I read other works, Dispatches, Chickenhawk and others, which gave me a different take on what was, then, recent history. Looking back now, I have to wonder if the war was unwinnable, and if the US, and its allies, ever really had a strategic vison, or were they just (as I suspect many saw it) “holding the line”. None of which takes away from the very real suffering of the Vietnamese people and the troops (mainly US, but other allied nations as well) who fought over that land for so many years. If Korea was a continuation of WW2; Vietnam was, by contrast, the first truly modern war. (I’m no historian, so all of this is my personal impression only.) Anyway, enough preamble. I haven’t done any plastic bashing for months, so before I make a start on the main event, I thought it would be a good idea to “get my eye in” on something less expensive or challenging. The Tamiya M151A1 seemed a good place to start – I built this (in the A2 version) when it was first released in the early 1980s (the main sprue mould date is 1982, when I was 12). 1 by Jon Gwinnett, on Flickr 1 by Jon Gwinnett, on Flickr I’ve ordered the Legend Productions set (mainly, daft though it sounds, for the pedals, but I felt they were likely to be better than anything I could scratchbuild, but meantime I’ve made a start on the tub. I’m aware that the front suspension is oversimplified so will probably try and do something about that as well. 1 by Jon Gwinnett, on Flickr @Procopius will be pleased to learn that I have already made (and hopefully repaired) the obligatory thumb glue print. He's less likely to approve of the lack of wings, but at least its modelling!
- 24 replies
-
- 3
-
-
- 1/35
- Vietnam War
- (and 1 more)
-
1/72 Trumpeter North American RA-5C - Vigilante, RVAH-13. USS Enterprise 1972. Task Force 77. With the increasing U.S. military involvement in Vietnam after 1964, RVAH-13 was added to the mix of RVAH squadrons participating in combat operations in Southeast Asia. In conducting pre- and post-strike reconnaissance, the RA-5C would incur the highest loss rate of any U.S. Navy combat aircraft during the Vietnam War, and RVAH-13's experience would more than reflect this. On 28 December 1972, during Operation Linebacker II, RA-5C BuNo 156633 was lost in combat when it was shot down by a Vietnam People's Air Force MiG-21. The pilot, LCDR Al Agnew, successfully ejected, was captured by the North Vietnamese as a POW and repatriated to the United States on 29 March 1973. The RAN, LT Mike Haifley was listed as MIA until his remains were returned to the United States in August 1985. Here is my 1/72 Trumpeter RA-5C using Print Scale decals. The only thing I've added is the prominent brake lines on the landing gear. A very nice kit, overdone rivet and panel lines for some but I dont mind them. A slight wash really springs this to life for me. Airbrushed using Vallejo Model Air, Flory Dark and Grime Wash and sealed using Xtracrylix Satin Varnish. A massive and impressive looking aircraft, very pleased that I have added one to the collection. Phil. Thanks for looking. Phil
-
 When the 353rd TFS & 355th TFS of the 354th TFW deployed to Thailand for operations over Vietnam, their aircraft retained all their identifying unit markings, which seems to have been fairly rare among units in Southeast Asia. There are a couple of items regarding these markings that I'm still unsure of, but I'm sure someone here knows what I'm trying to find out. Basically, I have two questions: (1) The aircraft displayed a red or blue band at the top of the fin, which typically identifies the squadron within the wing, but which was which? (2) The Wing badge (the white shield in the photo above) was applied to both sides of the fuselage on most aircraft, but occasionally, the squadron badge was displayed on the port side instead. Was this done throughout the wing at a certain time, or did have some other significance, or was there no real pattern to it? In fact, were squadron badges applied at all while the wing was in Thailand, or were they only used at home? 355th TFS insignia: 356th TFS (3rd squadron of the 354th TFW, not deployed to Thailand) Thanks in advance for any help.
 -
Hey everyone, I'm thinking about building a few 1/144 kits for the first time in my life. I did some random googling and I was pretty disappointed due to the inaccurate shapes of the kits. Some looked more like cartoon drawings of the airplanes than realistic models of it. Which are the most accurate kits in 1/144? I prefer Vietnam era fighters but I'm okay with bombers (as long as it's something like an Intruder, not a B-52) and later eras as well.
-
Hey everyone, I have two quick questions about Vietnam era UH-1Bs. What colour would you use to paint the helicopter? According to the conversion charts, Italeri suggests 887 (I use Vallejo, that's "brown violet"). However, I find this a bit too light compared to some of the pictures I have found (for example this http://www.globalsecurity.org/jhtml/jframe.html#http://www.globalsecurity.org/military/systems/aircraft/images/uh-1c-p273.jpg||| ). I tried 889 ("US olive drab") which seems to be too dark compared to other pictures. According to a discussion on a different forum, the army used a darker colour before 1965 and lighter after 1965. This might explain the differences but it doesn't help me because the decals are for a helicopter in 1965... Also, if the tail section of a Huey was replaced where was the "cutoff" point between the body and the tail? I'm trying to make the "everything olive" paint scheme a bit more interesting and I read it somewhere that booms were replaced occasionally and their colours was different from the rest of the chopper.
-
Hello Guys, Below are the images of my "Final Reveal" for the Tamiya 1/48 Douglas A-1J Skyraider. After the images, I will include some notes regarding this build; my opinions of the kit in terms of quality, cost, value for money etc and any points to look out for if you decide to buy and build this kit. I hope you like the following views, and, forgive me for all the photos, but I always have a problem trying to decide what to show! I bought this kit for $32.00 from Hobbylinc.com last year, but it is now for sale from their website at $33.29: http://www.hobbylinc.com/tamiya-douglas-a-1j-skyraider-usaf-attack-aircraft-plastic-model-airplane-kit-1:48-scale-61073 Quality of molded product: The parts are molded well, zero flash on the majority of parts and if there was flash, it was very little. There were no warped parts and ejector pins were away from seen surfaces. The parts are molded with finely recessed panel lines to aid highlighting them when painting, and every parts details are crisp and faultless. The clear parts were very clear, not thick and there were no blemishes or distortions to disrupt the visual transparency. I give the Quality of molded product a score of 10/10 Quality of Engineering/Fits: This kit literally falls together, and without a shadow of a doubt, this has to be the best kit that I have had the pleasure to put together, out of the 15 I have built to date since starting modeling in January of 2014. The molded parts come loaded with nice details within the cockpit, on the undercarriage and the exterior surfaces. I give the Quality of Engineering/Fits a score of 10/10 Assembly and Painting Instructions: The assembly instructions come in black and white and they are clear, concise and easy to follow with each part clearly numbered along with the Tamiya color code for that part to be painted in. There is a separate sheet for painting guides for two Squadron markings. A full size view sheet is included that can be used as a paper mask for when painting your model. I always take a few photo-copies of this sheet and use the copies for this task. I give the instructions a score of 10/10 Decals: There is one sheet of decals that do not include the smaller stencils such as "Danger", "No Step" "Caution" etc and therefore, there are only 28 decals to put onto this model. That includes the 4 decals that go onto the propeller- one on each blade. The decals are thicker than normal, take a long time to release from the backing paper and some are delicate when applying to the plane. I had one tear on me, but I managed to position the two torn parts together to hide the tear. Be careful and patient when using these decals. I give the decals a score of 6 out of 10. Packaging: There are four bags of light grey/beige sprues and a bag with a clear sprue inside. These are within a card exterior box base and lid which is pretty sturdy, has great artwork and some images of the finished model in the two different color/marking schemes on two opposite sides of the box. I give the packaging 9/10 Value for money: 10/10! Would I recommend this kit...a resounding YES, ABSOLUTELY!! It offers a great looking build with two full sprues of weapons/ordnance and options for layout of those weapons. It includes a nicely detailed cockpit that looks great built OOB! There are options to have the rear canopy open or closed, the two fuselage and one ventral air-brake doors open or closed, the ailerons posed up or down, a detailed radial engine and a Pilot figure to finish it off. There are after-market extras that can be purchased for enhancing this kit, such as resin cockpit tub and ejector seats, PE parts and resin bombs and undercarriage, should you feel the need to "enhance" this kit further, although in my opinion it looks great built OOB. My only two "issues" with this kit are; 1) The decals; if Tamiya were to include Cartograf decals into this kit, it would have a perfect score of 10 out of 10. 2) The artwork on the box illustrates a "Whip Antenna" on the port-side of the fuselage next to the rear sliding canopy, but this isn't included in the kit. I therefore scratch built the Whip Antenna" mounting block by carving/sanding the end of a piece of sprue and cutting it off. I then stuck this to the end of a cocktail stick and painted it black. I then made the Antenna by using the "Stretched Sprue" method and cut a piece to length, stuck it to the mounting block and painted that black. When it was dry, I mounted it to the plane. If you're thinking of buying this kit, think no more, go ahead, make your day, you won't be disappointed!! Below is my "Final Reveal" YouTube video link for this build: https://www.youtube.com/edit?o=U&video_id=hzqeA71uvB4 Thanks in advance for taking a look and commenting, much appreciated! Cheers, Martin
- 17 replies
-
- 22
-
-
 Tamiya M48A3 depicted as US Marines in Vietnam. The kit is from the 1970's with part of the the Legend M48 Stowage Set added and the AFV Club Indy Track (the black stuff). Weathering with MiG Vietnam Earth pigments
- 15 replies
-
- 6
-
-
- M48A3
- Vietnam War
- (and 2 more)


-0.thumb.jpeg.27419bf01c40cfb2c3a2133bd1110726.jpeg)