Search the Community
Showing results for tags 'uss enterprise'.
Found 12 results
-
 Star Trek Galaxy Class Upgrade Sets (for AMT) 1:1400 GreenStrawberry Whether Star Trek or Star Wars is your preferred method of Sci-Fi entertainment, you can’t help but acknowledge that Trekkies have some great ships, one iconic vessel being the USS Enterprise in its various incarnations. After The Original Series (TOS) hung up its Phasers, there was a substantial hiatus before Star Trek the Next Generation (TNG) came to our screens, giving Sir Patrick Stewart the captain’s seat as Jean Luc Picard, and a bridge full of diverse and peculiar crew that went off on an open-ended cruise through the galaxy. The Enterprise D was a Galaxy Class starship with a saucer section that could separate if needed, although this happened less and less as the series progressed. It was also faster and larger than its predecessors, with whole families accompanying the crew members on their travels, which was a nod to the less jingoistic “we come in peace – shoot to kill” mantra of Captain Kirk’s era. Starting in 1990, the show ran for seven series until 1996, with Enterprise D making its first big screen appearance in the 1994 cross-over with The Original Series Star Trek: Generations, where Kirk and Picard meet toward the end of the film. Several more cinematic outings followed from the Enterprise and her crew, some better than others, before they too hung up their Phasers to make way for other series, spin-offs and potential movies. Whether you like those next, next generation offerings is entirely down to you, but you can probably still remember the hate when TNG first arrived, and although there is still much love for TOS, TNG also benefits from the rose-tinted glasses we tend to don once a show has been and gone after a long run. In the modelling world, AMT have long produced kits from this lucrative property where no man/one has gone before, and they have a range of ship kits in 1:1400, of which the Enterprise D has been one that was first issued in the 90s, and has been re-released in many different boxes over the years, with new parts and decals added along the way. GreenStrawberry have been watching, and have created a number of sets to upgrade the detail on those ageing kits, whilst also making the lighting of the model a much easier and painless proposition. We have three sets in for review, and they are a feast for the eyes that will move warp-speed once you have woven your chosen lighting method into the upgraded kit. Galaxy Class Warp Nacelles (19923-1/1400) This large set arrives in one of GreenStrawberry’s shallow top-opening black boxes with a captive lid that is kept closed during transit by the overlapping sticker on the top that gives the modeller information upon what is inside. Once opened, there are eight parts in grey resin, two more in translucent red resin, and a further two parts in translucent blue resin. That doesn’t sound a lot until you see the size of the parts. The entire Warp Nacelles are replaced by new resin units that are made from upper and lower halves that are separated by a translucent blue part that wraps around the sides and rear of the nacelles. At the front, a corrugated section is fitted between the main nacelle and the forward Bussard Collector fairing, which then receives a translucent red ‘tongue’ that projects from the collector, which has pre-prepared holes moulded-in, and the hollow nacelle further assists in this regard. There are two of these of course, as no-one wants to go round in circles at warp 8, and each one is handed, with a helpful part number on a raised plaque inside the nacelle halves to avoid confusion. These parts have been 3D mastered, then further prepared to be traditionally cast for incredible finesse and smoothness of the parts throughout. Galaxy Class Impulse Engines (19723-1/1400) This set arrives in a small black box, and upgrades the Enterprise’s sub-light Impulse Engines with four grey resin parts, plus three translucent red resin lenses for lighting, and a small sheet of Photo-Etch (PE) with three grille parts. The simplistic kit engines are first cut from the back of the saucer and the base of the neck, as indicated in red on the instructions, then the three Impulse Engines are cut from their bases, have the translucent red parts slipped into the centre, taking care to align them correctly, using the chamfered end to achieve a snug fit, and remembering to flatten and smooth the cut surface. A PE grille is then glued over the red resin to increase detail, and a long spine insert is supplied for the central engine at the bottom of the saucer’s interhull neck, using hot water to subtly bend the resin part to the curved shape of the hull in that area. The engines have a crisp grooved outer, and are hollow behind so that a light source will make the red resin glow from behind the PE grille. Galaxy Class Main Deflector (19623-1/1400) This smaller box contains three grey resin parts, a clear resin lozenge, and a PE sheet with two parts included. The kit defector can be discarded, as this is a drop-in replacement when complete, and the set has again been mastered in 3D, then worked on further to improve the detail. Only one resin part is used on the model, which is the deflector dish, complete with ribbed detail within, and a central recess into which the clear resin part is glued. This is to disperse a light source from behind, the dish having a hole marked out in its base to assist with this, but the light is further muted by adding a PE part over the top of the clear resin diffuser, which is surrounded by another larger PE part that has a hole in the centre. You might baulk at having to curve the PE part to fit the contours of the dish, but you don’t need to worry, as the other two resin parts form a jig to curve the surround to the contours of the dish with very little effort. It may be wise to anneal the brass first by heating it in a flame and allowing it to air-cool to soften the metal, then place the part centrally on the concave section of the jig, pressing down with the convex portion to press it into shape. Then it can be carefully glued into place around the centre, and the completed assembly can be pushed into the front of the lower hull to complete. Conclusion If you’re building an Enterprise D in this scale, you will want to consider these upgrade sets, and choose which ones you feel you want, based on your needs and budget. If you don’t yet have a kit to suit the sets, we understand that the kit is being re-released in 2024, so you may wish to plan ahead. Very highly recommended. Review sample courtesy of
 -
 This is going to be a long term and potentially tricky refurbishment program. Around 24 years ago, I received the AMT Ertl 1/1400 USS Enterprise kit as a present for my 16th birthday. I was eager to get going and to build the iconic Enterprise D, ad with limited tools and paints I set about it. Roughly 8 years later it was very carefully placed into storage until recently where I decided that my home needed something spectacular, something to fill a corner above the TV and to be a talking point perhaps....? To my surprise I was given permission by the lady of the house. So a recent visit to to the folks place to drag out the kit in question. Considering it had been in storage for the past 16 years, its fared pretty well. As you can see, my attempts at hand painting the Aztec patterns was not too bad at the time, though it certainly could be better. The base parts were in OK condition with everything still there. I was even surprised to see that the 1/1400 scale Runabout shuttle was still there - Though this has no gone missing.........hmm.. The instructions were still in the box too, and in good condition too Just in case you didn't know already? With everything in place, I set about very very carefully taking apart the components with a few house each into the freeze to release the glued sections. All parts came apart well with a few issues with the rear of the neck section where it refused to separate. however the split is fixable and once everything is reassembled all will be OK. the next 3 days was spent in a 1:1 "dettol" solution in both a bucket and the commandeering of the kitchen sink to release the paint from the polystyrene. With some finer working of the details with Q-tips and acetone free nail polish remover.....a superb idea from my good lady, who even spent 2 evenings volunteering to help in the clean up. I am indeed a VERY luck chap This is the result....The clear sections are not too bad, but this is the best I could do. The clear sections for nacelles and bussard collectors will be painted with a clear blue & red, so I am not overly fussed by these. The rest of the drive section is as clean as I am going to get it. Primary Hull sections Upper primary hull Lower primary hull The next step in the plans is to use a rotary tool and a very fine drill bit to carefully drill out a select number of windows to then back illuminate. How the lighting will be done as yet, I do not know? I don't have the expertise to include the flashing nav lights, so a static light show may be as good as it gets for the moment. Lighting the warp nacelle's will be tricky as a trench along the drive section supports will need to be dug and then back filled once the power cables are installed. Finding the right gauge will be tricky too. Replacement decals have been sourced from an American company called JT Graphics - JT Graphics which should be on their way in the next few weeks. I am also looking to source the Polar Lights aztec decals for the 1/1400 scale Enterprise, though they are increasingly difficult to locate. If anyone knows of a reputable supplier of them, I would be most appreciative. Thats it so far with the refurbishments. Much more to follow over the coming months I feel?
- 58 replies
-
- 19
-

-
- USS Enterprise
- NCC-1701D
- (and 1 more)
-
Recently finished up Airfix's new tool F4F-4. Essentially OOB except for the stand, and painted with Tamiya acrylics and AK Real Colors. The livery is purportedly from a Wildcat from VF-6, on the USS Enterprise, perhaps during the Doolittle Raid. Some more photos are here.
-
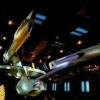
 Hi everyone - I finished my USS Enterprise build this weekend. This has been my first model after 30 years and even though I think it turned out ok, I wish I could go back to change these things: - Get rid of the silver shine on the larger decals. Stock Revell decal softener had no visible effect. Any tips ? - The nacelles seem to droop to the rear slightly too much. I found no way to easily correct this. Link to a video and more images: https://geekjournal.ch/uss-enterprise-model-build-part-13-endgame/
- 6 replies
-
- 8
-
-
- USS Enterprise
- Star Trek
- (and 1 more)
-
Hi Everyone Welcome to my first build. This is to be more to be precise my first build of this type. I am currently doing the Eaglemoss Delorean and the Deagostini R2D2. These though do not require much modification and are partworks . I decided to do this model to generally learn the art form , so expect a lot of mess ups and experimentation . I am not the sensitive type so please feel free to Laugh and poke fun at what I am doing. Criticise as much as you want . However if you can also find it in your heart to give some constructive suggestions that would be fantastic. Please have fun. My intention is to learn the skills need edto do the 1/350 polar lights Trek Models. This is a practice as I would love to to do those to a very high standard. I gained a lot of inspiration from Smiffy's build of the same model I am doing. Very impressive work. Please don't expect work of that quantity from me at this stage . I am doing mine a little different. I do want panel lines on the model but painted on . so I an going to have to use the filler rough too . I will however try to make the best model I can . I am a Trekkie but I also love Star Wars and other franchises. So Welcome to my First Ever ' Non Partworks' Build
- 4 replies
-
- 5
-
-
- Star Trek
- USS Enterprise
- (and 1 more)
-
I think this is the first new ship kit from Academy in quite a while. Interesting that they are going with 1/700 instead of 1/350: https://www.cybermodeler.com/news/academy.shtml
-
Revell USS Enterprise (Original)
chris1984_99_99 posted a topic in Work In Progress - SF & RealSpace
Hey guys, well its been a while since I last did a physical model (been getting a bit carried away with the 3D renders lately!) So today I got stuck into the Revell USS Enterprise for a client. I don't normally rush things, but once I started this kit today I couldn't stop, so I persevered and managed to get this done in a single day! Its been a while since my last 1 day build! (well, I started after lunch!) I'm putting it in the WIP Thread as its not TOTALLY finished as I will give it a quick gloss coat tomorrow once the decals have totally dried! Hope you like! I'll include a link to my page where there are more pics including some more WIP and "finished" pics. https://www.facebook.com/chriscardwellmodels/ -
This going to be the first Star Trek model I have built in a few years, and the first build of 2016. It is a commission of the AMT 1/2500 USS Enterprise C. These photos are upon completion of the first day. Enjoy! What you get in the box Another image of the kit unboxed After grey primer (Halfords grey primer) Some detailing work And another. So after opening the box and looking at the decals, I decided I would rather paint than use the decals supplied. The reasons for this are I think they are too bold and not very screen accurate. I also think "wallpapering" decals like this cover up a lot of the detail on the kit, so instead I will be painting the various shades and tones on the hull as well as some of the detailing.
- 2 replies
-
- 1
-
-
- amt
- enterprise c
- (and 2 more)
-
 Hi everyone. Here is my attempt at the refit USS Enterprise from Star Trek: The Motion Picture. I have used a flat white base and mixed up Pearl Ex pearlescent interference powder with clear acrylic to airbrush on the detailing. It will not be finished for a very long time but here is the progess so far.
 -
Well after over a year in the making, im calling this one finially done (well until I decide to tinker with her again!) Ive build about half a dozen other kits since starting this one, but at long last I got around to finishing her! (and just im time for a model show tomorrow, which may or may not have been the kick up the backside I needed to finish her!!) Anyway enough of this chit chat! Here she blows..
- 6 replies
-
- 2
-
-
- polar lights
- uss enterprise
- (and 3 more)
-
 The much anticipated Revell USS Enterprise from the forthcoming "Into Darkness" film is now in stock. http://www.wonderlandmodels.com/products/revell-1500-star-trek-uss-enterprise-ncc-1701-dark/ At 1/500th scale this is 58.8 cm long and , according to the instructions, is capable of being adapted for internal lights. Best of all we are currently offering the kit at 20% off the 29.99 RRP at £23.99
 -
We have seen a lot of interest in the new Revell 1/500 kit of the USS Enterprise from the new "Star Trek Into Darkness" film. The kit is due for release in May and to celebrate the launch we are giving away one of these kits. Just follow this link http://woobox.com/t9cjnj to find out more and enter the competition.