Search the Community
Showing results for tags 'rebuild'.
Found 8 results
-
 IPMS Scale Model World (2022) show in Telford there was the "Give an Old Model a New Home" table with abused and neglected models available for a donation to charity (Marie Currie in this case). I love the challenge of re-building a kit so I picked up the first model that came to hand, dropped some cash in the bucket and stuffed the sad unfortunate thing in my bag..... This is what I got (including a day of clattering around in my bag etc): It's clearly a Hawker Hunter in 1:48 scale and seems to be an F6 At first glance the registration XE597 flags up the new Airfix kit.... but that blue plastic and a hunt through sprue layout photos shows it's certainly not an airfix. A bit more detective work and I've determined it is the 1997 Academy #2164 kit (which also provided decals for XE597 which the Airfix kit now does as well) Lots of broken pieces and cracked seams already and they didn't take much to extend those to help disassemble it a bit more. The nose is full of black plasticine to stop it being a tail sitter (yuk! old plasticine smells rancid!) Next step will be into the paint strip for this thing whilst I formulate a plan of what to do with it.... My grandfather was an aero engineer at Armstong Siddley working on the development of the Sapphire engine that later went on to power the F2 variant so that might be a nice option. But I'll need to do some research on what would be entailed in converting it from an F6 to an F2. As I didn't spend much on this a resin cockpit would be nice - the SBS did one that also provides some detail in the wheel wells so that might be an option.... The jet pipe is a bit rubbish and missing some parts so that may need some scratch detailing too. This is not going to be a fun but slow build I think.
 -
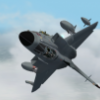
I built this back in the late 80s after seeing it the Fairford airshow in 1985 using the Italeri kit and Modeldecal markings. Fast forward many years, the paintwork had suffered and the the wing was cracked following a short flight so I decided to rebuild it using the Xtradecal markings. The original Modeldecal markings came with a 50th anniversary sticker which I managed to find again Thanks for looking. Steve
- 14 replies
-
- 43
-

-

-
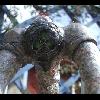
Last week my son pointed out the left hand warp nacelle had fallen off my Enterprise model onto one of my 1/32 Spitfires (don't be alarmed - it was fine!). Getting it out revealed the whole model was badly in need of a visit to spacedock. The fillers had cracked open and the varnish I used to use as a sealer had yellowed substantially. I subsequently pulled it apart a it more to bring it up to a more reasonable standard. I made this over 20 years ago and my skills have advanced a little since then. It is badly-fitting and will need some decent filling. I'll also need to work out a way to support the warp nacelles better as the tiny tabs used are plainly insufficient to support their weight for extended periods. I remember the kit decals were rubbish and I needed to bathe them in PVA glue to get them to adhere. I've ordered some nice but expensive replacements from JT-Graphics in the US (postage to Oz is almost as much as the decals themselves) and will attempt a better shading look to the overall appearance. Hopefully, she'll come out much nicer this time around. The Hasegawa Neptune under it is next on the shelf...
- 35 replies
-
- 5
-
-
- Enterprise
- AMT
- (and 1 more)
-
Vs Pip (looks cute but still has that Killer instinct) decided to have a go at the Pup over the weekend and the result was this> So seeing as I didn't post a WIP for the build I'm going to do a WIP for the rebuild. As the carpet monster has intervened and taken the lower port wing the undercariage needs a few new struts and I was never happy with the rigging anyway there'll be a fair bit to the restoration. Mostly the thread will be about the Pup not ending up in the spares box (for a brief moment it was going to be the makings of a Sopwith Mouse
- 27 replies
-
- 6
-

-
- 1/48
- Sopwith Pup
- (and 1 more)
-
Time for the RFI thread on my 1982 Dodge Charger. If you would like to see the build thread it's here: To summarise, this was the first 1/24 kit I ever built, over 30 years ago when I was about 9 or so. It's a snap-together kit, so no glue first time around, nor paint originally and it was the first ime I every used water-slide decals. Needless to say, the build was pretty typical of a car built by a child, not helped by the silver paint added 3 or 4 years later: After five months building a Trabant, I decided it was a good time to look at rebuilding this since it's a much simpler kit (about 40-50 pieces). Despite that, it's actually quite well detailed and seems quite a nice kit for its age. The body is finished in Halfords Ford Signal Yellow with the lower body being done in Halfords Ford Signal Black left over from the Mustang build clearcoated with Revell rattlecan spray. The original decals were obviously past it, but I was able to find replacement decals from Rays Kit Decals in the Netherlands. Despite a few minor issues (such as polishing through the clearcoat into the decals), I hope you'll agree that the end result is an improvement on what I built in the mid-'80s, it's amazing what a bit of paint can do! First up the engine bay, which is fairly simple, but at least the engine is there: The interior was also quite simple, and included the worst bit of the kit in the shape of the door cards which are so flat as to be almost 2-D, for example the grab handle doesn't even stick out any more than the rest of the door. And now, a succession of body shots (hope there aren't too many for you). I've included some from a high angle to try to give an indication of the underside, although there isn't really a lot to show under there as everything is moulded in apart from the single piece front and rear suspension. And my favourite shot: Hope you like it, thanks for looking
-
Hi folks! Last year I built the wonderful Airfix Defiant as the famous N1801 "Coimbatore II", a nightfighter of 264 Squadron RAF, complete with lots of extras including Eduard photoetch, Barracuda wheels, Xtradecals, etc. You can see that build here. This left me with the quandary of what to do with my old MPM Defiant, built something like 9 years previously while I was still doing A-levels! I did take a photo of the model last year but it's gone astray so you'll have to make do with this one from 2008: As you can see, same scheme. I'll hope you'll agree it's not as good as the one from 2016! Anyway, having thrown all that AM at the Airfix kit left me with a lot of bits left over, including most of a decal sheet, a complete set of undercarriage doors, and two spare canopies. So I elected to strip down and repaint the MPM kit, and finish it as a Dunkirk/Battle of Britain machine - attempting to fix some of the worst inaccuracies of the MPM along the way. These chiefly involve the turret and canopy (both 2mm or so too high, the turret is also too large in diameter), and the undercarriage legs, which I'd already shortened by about 2mm back in 2008 shortly after the above photo was taken - but still looked too long. A quick test fit confirmed the Airfix closed canopy made the model look vastly better, and I combined this with sanding the turret down from the bottom. The undercarriage legs were quite badly damaged from being cobbled back together before, so I attached the Airfix door parts directly to the wing undersurface as a height guide and a solid anchor point, then having reattached the cleaned-up wheels I pieced back together and cut down the legs until the right amount of tyre showed underneath the bottom of the doors. This was another 2mm at least removed so the MPM legs are a grand total of 4-5mm too long. That's about a scale foot. I also had to scratchbuild some replacements for parts lost or too far gone to save, such as the rear undercarriage struts, radio masts etc. As usual it's brush-painted, although the Sky and the flat varnish come from a rattlecan. Decals were from Xtradecal stock, stencils I'd saved from the kit first time around (MPM helpfully provided two complete stencil sets, one in red and one in black!), and the fin flashes from the Airfix sheet. Scheme represents L7006 of 264 just after the Defiant's brief period of glory over Dunkirk. Hope you like it! I think this proves the the MPM kit can be made to look pretty like a Defiant without major surgery, although with the Airfix available it's almost certainly not worth the bother! Lastly a brief comparison shot. I think the MPM may still be touch plump around the centre fuselage, and it lacks some of the subtle shapes Airfix capture well, but the modifications make it look a lot better in my humble opinion
-
Hey Guys, 'thought I'd cure my 'Modeling Mojo' by re-commencing a major re-build of the Tamya Enterprise. here's how she looked during the strippdown....... ......along with the new airwing I had modeled her in her 1982? refit (most commonly seen) but as a bit of a challange I decided to remodel her in her late 2000's configuration, with all the 'grey mushrooms' and Superbug's. *edit -this photo must be ~2007, due to the presence of S-3 Vikings on deck, and the last refitt of 'mushroom' radars* I have no perticular connection to the "Big E" other than being an ex-(RAN)sailor. And I did concider building afresh an HMS Ilustrious. Certainly, this would have cost a lot less than the $$$'s I have put into this project. I have aquired; Gold Medal models decals - 350-8d Tom's Modelworks carrier catwalks - 3518 Tom's Modelworks Enterprise Floatation baskets - 3569 Modelmaster brass whip aerials x6 Flyhawk grating mesh (for seasparow platform) White Ensign - 'The Ship' PE-3522 White Ensign - Modern USN 'carrier anchors Additional railing packs x2 Trumpeter's Carrier Deck Equipment x2 with Trumpeter aircraft, to do Carrier Air Wing One (2010 deployment) 06233 F/A-18C hornet (+ 8 Tamya hornet) 06221 F/A-18E hornet x 2 06235 F/A-18F hornet x 4 06222 E-2C hawkeye 06237 EA-6B Prowler 06239 Oceanhawk 06240 Seahawk I just couden't get away from the iconic presance of the "First and Finest" 'Nuke' carrier. The first step was to re configure the running gear, with support for the inner shafts. currently I am drilling out the catwalks to implace the perforated ones installed in 2009 ? -anyway, its a start. And I have a BIG project to re-inspire me.
- 26 replies
-
- 2
-
-
- 1/350
- Enterprise
- (and 2 more)
-
This is a Revell easy kit on sale for half price due to a crushed box. I would love to say it went together easy but it didn't. Since all the parts were pre-painted great care was taken trying to "snap-fit" pose-able joints. Paint had to be carefully scrubbed off in most places and I finally gave up the chase and went for a full re-paint. All the open socket/joints were filled with milliput and smoothed over, an allen key was pressed into the centres just to tart them up a bit. The pilot is some kind of vinyl with some noticable seams, could'nt do much about it, even with brand new blades, so a new paint job was as much as I could do. The base was from an old toilet roll holder and a bit of polyfilla and a very light blue wash. I also added a little bit of scenics water resin.