Search the Community
Showing results for tags 'Tornado F3'.
Found 22 results
-
Hello everyone, today I would like to show you my attempt at having a go at Revell's 1/48th scale Tornado F.3 ADV. Much has been said about the kit so I'll keep it brief. I got it in a moment of nostalgia a few years ago because as a teen I used to have Revell's 1/72 scale Tornado ADV and the short nose IDS as well and even I knew about the kits problems I grabbed it anyway. The build was quite alright, although the back of the fuselage gave me nightmares. The construction, being rather complex because Revell has several Tornados on offer so it had to be modular, collapsed while being built. The rest was quite straight forward and apart from the air intakes the putty mostly stayed where it belongs. It was painted with Vallejo colors, weathered with Ammo washes and sealed with Tamiya semi gloss varnish. That said the layer was either too thin or the decals are super evil because they still silver through and look really glossy. It was built strictly out of the box, I really like the dropped flaps and slats and open spoilers, I can live with the crude pitot tube and tires but my understanding really ran out with the Sidewinder missiles, which are just annoying on so many levels. The look nothing like the real deal and lack any details. Even worse, they are correct on the box art For a quick and mosty relaxing weekend build during Covid, I'm quite pleased with the result. Hope you like it, too. Have a nice weekend!
- 12 replies
-
- 47
-

-

-
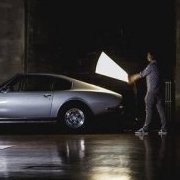
 Hi all, Hope you're enjoying the bank holiday and incongruous good weather! Thanks to the days off and good conditions I was able to finish this beast of a conversion which had been sitting almost finished for about a month. This is the Revell 1/32 GR.1 kit (well, a mix of two or three Revell IDS/GR.1/ECR kits all donating various parts!) The F3 conversion was done using the Heritage conversion set plus a lot of scratchbuilding, extra details and plenty of filler and swearing! The build thread is here: The subject is ZE763/DG, one of two 11 Sqn F3s converted to EF3 status and capable of carrying ALARM anti-radiation missiles with chaff and decoy dispensers on the outer pylons. The fit was trialled for possible use as a SEAD platform for Op Telic, but although the aircraft was well-suited for the mission the mud-moving community threw a fit and the concept was shelved. The biggest headache with the build was finding decals - none of my kits had any, the Heritage set decals were good quality but limited, while the available aftermarket Tornado stencil decals didn't have the required pink stencils carried by the aircraft at the time. Basically everything but the white stencils came from donor kits and spares, with Xtradecal lettering and numbers from various sets. The Phimat pod was from the Revell/Italeri Mirage, the drop tanks and BOZ decoy launcher were modified from the Revell kit, the ALARMs were from Flightpath and the ASRAAMs were the excellent new releases by Eduard Brassin. The BOL rails were included in the Heritage set and looked very nice. The pilot figures were by PJ Productions, although they needed modifying to give them a bit of individual character! I intended to mount this in a dynamic pose and the job was made much easier by using a 5mm carbon fibre rod rather than the equivalent 14mm acrylic the weight of the kit would have needed. I would thoroughly recommend the carbon fibre mount, being stronger than plastic but easier to work than metal. Anyway - see the build thread for top tips on building an F3 conversion from the Heritage, or any similar set. It's not a straightforward cut'n'shut but a very satisfying result. Very difficult to photograph due to the size and the pose, but here's one in natural light. I reckon with a photoshopped background this would look pretty cool! Couple of extra shots from earlier in the build: How the conversion set was put together: An attempt at photoshop background, woeful effort but I'm no expert! I've built a lot of 1/32 jets in the 15 years since I took up modelling again, and I'm really proud of this one, It's the pinnacle of what I can produce at the moment and came out exactly as I'd hoped. All the best, Alan
- 51 replies
-
- 108
-
-
-
- Heritage Conversion
- Revell 1/32
- (and 1 more)
-
I'm considering a long-term build at the moment - a 1/32 Tornado F2/3, using the Revell GR1 as a base kit (mainly as the Italeri one is above my budget). Does anyone know of any conversion kits that would allow me to create an F3, noting that the availability of the Heritage one seems to be like finding Bigfoot wearing the proverbial hens teeth? I've seen a couple of good threads of people on here that have converted a 1/32 kit into an F3 - just wanted to do one myself.
-
 OK, it doesn't matter how much I try I can't make the title say F33; hopefully this doesn't set the tone for this thread from the get go!!!! Anyways my Lightning T4 build in this GB has stalled, due to the simple reason that the CMK resin cockpit that I was using in conjunction with the Aeroclub IM Fuselage conversion bears absolutely no relation to any picture of a 2 seat Lightning that I can find, and I found loads believe me! Reminded me of Blackadder's attempts to draw the German defences in the WW1 trenches of Blackadder Goes Fourth. Go off and draw me an image of a Lightning Trainer Cockpit Baldrick!!! As an aside the opening credits for that series were filmed just round the corner from Chez FC on the Parade Square of the Cavalry Barracks in Colly which have since been upgraded to high-end housing, such is progress eh?!! I've therefore ordered the Neomega Lightning set that was specifically designed around the Aeroclub conversion, but as any of you that have read any of my recent build threads will know I have developed an obsession with making silicon moulds of my resin parts in order to cast my own home-brew copies. As I have 3 of John's Lightning T-Bird conversions then the copies will get put to good use. Now what to do in the meanwhile whilst waiting for the postie eh? Twiddle my thumbs; do some DIY; talk to my family (last time I did that I found out my wife no longer works at Woolworths, so to avoid nasty shocks like that I'll swerve that I think!) or just plain veg out on the sofa to see off the end of this car-crash of a year? No those ideas are far too sensible. Whilst looking through my resin stash, just in case I already had the Lightning set, I came across the Neomega Tornado GR1 resin set. Now this got me thinking. I have quite a few examples of the three 1/48 mainstream versions of the Tornado F3 in the stash, Revell, Italeri and that Airfix Inbred Cousin that nobody in the family talks about! What about a compare and contrast build of the three? There lies madness................. Now that's an Interceptor too I thought, plus I was a bit miffed that I'd missed the Tornado Warning STGB TBH! So the cogs whirred a bit more and the Revell and Italeri kits were hunted down to have their plastic fondled to see if there could be any mileage in this. Now I was aware enought to know that: 1) all 3 of these kits have cockpits that either in the whole, or just in part, bear no relation to any F3 cockpit I again have seen piccies of (these piccies are rarer than the Lightning ones though!); and 2) that there are subtle differences between the GR1 cockpit as per this set and the F3 cockpit. The main area of change as far as I want to acknowledge in my builds are the rear Nav's consoles and main instrument panel and the different square screen, front centre of the driver's instrument panel. If not covering other cockpit differences will upset you, please look away now. For starters I copied the Neomega parts. And what good's an obsession if you really can't go to town on it............... OK I will admit to having 9 or 10 GR1/4 kits from the same Holy Trinity that these will get used on too!! Where's the 12 step programme for us nutters then eh??? I found that the Revell kit had the most convincing "between cockpit console deck" area, but it was still a little bit shy of detail, so I used this as a basis to scratchbuild a buck to mould further copies from. I am not what you'd call a competent scratch builder yet. I've had a couple of goes over the past few builds as my confidence grows, but it's no master-modeller stuff!! This is what I was aiming at....... https://www.globalaviationresource.com/v2/wp-content/gallery/tornado-f3/5.jpg?i=670343893 https://www.airteamimages.com/pics/10/10178_800.jpg https://www.tornadosig.com/uploads/4/2/0/0/4200523/8968798_orig.jpg https://imgproc.airliners.net/photos/airliners/8/2/4/2256428.jpg?v=v40 You'll have to click the link on this one as it's Airliners . Net and I don't want them having a paddy!!! I also removed the detail from the centre part of the Navigator's panel and rebuilt this using Evergreen sheet and swearing. At the time I only had enough Silicon to mould these 2 pieces and when Mrs FC found that I had had a re-plen come through the post this was duly confiscated, wrapped up with a nice bow and put under the Christmas Tree as she didn't have a clue what to get me for the big day that I'd actually want and use!!!! So I can't even copy my Lightning bits either until the Big Man's been down the chimney tomorrow!!! Although I moulded and cast this together with the consoles I wasn't happy with the result of the panel as the details were far too soft .......... More than happy with the consoles though............. So although I was now out of Silicon until after the Turkey gets stuffed I had another go at the Nav's panel..... Not perfect but a step up on the first attempt..... I also removed the round screen from the pilot's panel and made a square one. Hopefully by this time tomorrow the revised nav's and the pilot's panels will be safely ensconced under a layer of pretty pink latex and will be curing nicely in my airing cupboard!! Well not a normal start to a GB build I know, but I've now done the leg work that will allow me to make a fair stab at a proper F3 cockpit, and this should fit both the Italeri and the Airfix plastic. I may even be able to squeeze bits in to improve the Revell Nav's panel. Next up will be some usual box top and sprues shots and then hopefully we can get down to some proper plastic mangling! Wishing you all a very Merry Christmas and I hope you all have as good a day as Boris (insert you own leader's name here if not in UK) will allow! Stay safe until next time. Chris
- 25 replies
-
- 6
-
-
- Tornado F3
- 1/48
- (and 1 more)
-
This is my latest creation, as it typical for me an OOB build. Paints are a combination of Model Master, Gunze and Tamiya. This is Revell's 1/48 kit number 3925 of the Panavia Tornado F.3 ADV, No. 111 Squadron, Royal Air Force, Leuchars, Scotand July 2002. I have to thank some fellow Britmodellers for the heads up regarding the fit. The fit is great provided you pay attention to the fuselage and snug it up as the assembly goes along. Also, given it is swing wing you need to plan ahead and in my case the wings were painted before they were attached as it would be near impossible to do this after the fact. Overall I think this is a great kit for the money provided you can get the fuselage parts to all match up. Some silvering of the decals but I think that is partly my fault. I don't have another kit with trust reversers as an option so I thought I would deploy them just because. But it is fidley to get them to work and I would not do it again. The last picture I have paired it with a really great kit (at least to me it is a great kit but partly because I love the plane), which is the Airfix 09179 BAC/EE Lightning F.3 111 XR711 which was flown by the CO in 1965 out of RAF Wattisham. Although the pictures don't really show it the two planes are almost the same size.
- 17 replies
-
- 30
-
-
I'm trying to research Tornado F3's during Operation Deny Flight in the mid-90s, but cannot seem to find much information on units / markings. Does anyone know where I might find (any) information on this? Happy Christmas
-
 Well I thought I'd best join now the #BoB80 build is drawing to a close. I over extended a bit on that with lockdown, working from home so no commute etc, a couple of builds not finished and I have 2 helicopter builds still to get done on the next KUTA build. So lesson learned, I will do 2 builds, starting with this, pretty much OOB with crew from elsewhere. I am looking at what subject, I may go out and get some aftermarket decals - I have some Model Alliance Op Telic decals ( I was on the ground and never saw the RAF!) which give me a personal connection. Seems to have stencils included - I could use the kit ones depending on year Stencils I am taking it the F3 general colour schemes are as per the Tornado Sig: Upper surface: Barley Grey (BS4800.18B.21) now known as Camouflage Grey (BSC381C:626) (satin) Undersides: Light Grey (BSC381C:627) (satin) Radome: Medium Grey (matt) in the mid 2000's F.3’s were repainted in overall Medium Sea Grey with a slight variation in the radome colour. I did build the 1/48 Italeri GR1 in the last STGB. Will follow @col for advice !
- 59 replies
-
- 3
-
-
- Italeri 1.48
- Tonka
- (and 1 more)
-
Having just ordered Revell’s F3, I’m looking to go down the route of making a 1435 QRA example of the Tornado. To that end I have two questions for those more knowledgeable than myself. 1. Are there any decal sets for 1435 Tornados in 1/48? 2. What was the standard QRA weapons load for the F3? Many thanks
- 15 replies
-
- 1
-
-
- Tornado F3
- Falklands
- (and 1 more)
-
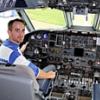
Time to bite the bullet. Back in May I was asked by a friend of mine to build a Tonka for him. There was one on 56Sqn that he worked on regularly and that's the one he wants built, but could I actually do 2. 1 for him, 1 for someone else on the Sqn. "Not a problem" Said I. "What scale??" Errrrrrr. I'd like So big, Right, 1/48. Never having built that scale, this is going to be fun. I managed to track down 2 and was about to go extras shopping when the offer of the Eduard kit happened, so now, I have 3 - 1 for me! So, here we go! The last Revell I build was their 1/72 Lancaster, and I was mighty disappointed, but I had been advised that this was a good kit (and fell within budget) and looking through the boxes, I was nicely impressed with the detail and mould quality Starting with the seats, as you do. I was quite happy until I'd finished and looked into the Warpaint book (and the GR4 at Duxford) Great Reference - Working on the cockpit, going to be the kit one. and only the one done on day 1 (as I was off to play with the Southend Vulcan) I sanded down all the raised controls on the sides and screens, because I wanted the decals provided to sit flat. Sadly, I'm not great on the fine detail, so rather than muck it up. I decided onto a flat part would be better. Hopefully its not too bad; I then couldn't resist adding the seats for a quick idea of how it would look (Still need to be de-blacked)
- 28 replies
-
- 8
-
-
- Revell
- Tornado F3
- (and 1 more)
-
Hi all, Whilst my university dissertation looks at me disapprovingly for continuing to make models whilst there are a wealth of research papers on the enlightening topic of geological passive margins I will write this post as a brief introduction to the build. I bought the Revell Tornado F3 kit 3 years ago and started it around that time. Due to other commitments it has been an ongoing project for far longer than I would have liked, but in that time I've learnt a lot about airbrushing and the weathering processes primarily from YouTube when I ought to have been studying! I'm considering it as my first 'advanced build' where I use complex airbrushing techniques and oil washes to make the kit look suitably weathered so any advice or criticisms is welcome. I made several mistakes in the build right the way from sanding to re-scribing, painting and weathering not that it is all entirely my fault. There are some fit issues with the kit around the engine intakes, lower rear section of the fuselage and I still have to get my head around fitting the flaps in the down position in combination with the under-wing pylons (anyone with experience please say how you did it as the dry fit highlighted a severe issue). As a result the kit is by no means perfect but only having returned to modelling recently after a long hiatus and it being my first advanced one I am overall happy with the result so far. I am sure that some of you when the kit is done will notice the inaccuracy of a Falklands War Harrier pilot shoved in the back cockpit to act as the radar operator but he has been painted as best as possible to resemble a Tornado crewman, money on the student budget for resin figures is tight afterall. The kit is nearly done but I will post some progress photos in any case. All that's left to do is fit the final parts, leave the oil wash to dry for a few weeks, seal the paintwork and wait for the PJ production figure to arrive. Having learnt from the experience of building this kit and loving the Tornado I intend to build the GR.4 'Farewell' Revell kit as a tribute to the plane of my childhood alongside all the other kits and restorations I have on the go at present. Any feedback is always welcome, enjoy the photos. All the best, M
- 10 replies
-
- 6
-
-
- Tornado F3
- RAF
- (and 1 more)
-
I was going to do the 1/48 Italeri Hunter next, I even splashed out on Xtradecals to do a 79 sqn one, but for some reason I just wasn't feeling it for my next kit. After much deliberation amongst the stash in the loft, this Tornado F3 appealed. Possibly because it'll be a break from grey/green camo and blu-tack snakes! Plus I need something fairly simple before I go to Taiwan for three weeks. So, out of the stash and into the light. Being another ebay bargain, it looks like the fuselage halves come from two different kits! I did offer them up though and they appear to fit well, so it should be ok. There are three sides of tail fins in the kit too! Plus I have two from the GR1 kit in the spares bag. Any words of advice from those who've made this? I'm assuming the kit is quite old and will need all sorts of filling and extras to make it accurate, we'll see as I progress. One thing I will be doing is trying to find some cheap decals as I'm not a fan of the kit options. I don't do special colour schemes, or anonymous ones with no squadron markings at all. Might see if I can find 23 sqn decals. If anybody would like the fancy Italian Tiger Meet decals let me know and I'll post them to you free of charge.
-
 Well I did my best with this old kit, and despite my somewhat limited ability and the age of the plastic it hasn't turned out as bad as it could have done. Thanks to @At Sea for the 11 Sqn decals, superb! It fought me all the way this, ill-fitting parts, mismatched fuselage halves and big gaps around the tailfin root to name a few. Oh and terrible fitting intakes. To top it off I ruined the canopy with thinners when trying to clean off paint, so I'm waiting for Airfix's spares team to send me a replacement, hence I didn't bother adding the ejection warning triangles on this canopy. I made my own little forward fuselage aerials and a gun muzzle from bits of wire, and added that tiny aerial on the scoop in front of the fin, other than that she's oob.
- 11 replies
-
- 28
-
-
Can anyone tell me what the store is in the photo please? Would it have been carried by the F3 in the late 1980s? If they did carry it, could they also have had an ACMI pod underwing at the same time or did this thing replace it?
-
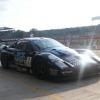
Ok so over the last couple of weeks I have been finishing off projects that I started some time ago and this is one I started over 2 years ago! It is the HobbyBoss 1:48 Tornado F3 which I had given up on as the fit was poor and I got bored of it. Anyway I decided to have another go at it and this is the result. Its not bad but far from perfect but 'in flight' it looks pretty good in the special scheme. It was largely out of the box with resin seats and Xtradecal decals. Paints were Gunze and Tamiya with some Alclad. I love the Tornado F3 and am eagerly awaiting build reviews on the Revell kit which I am hoping is much better than the HobbyBoss one cheers chris
-
I'm currently attempting to build a selection of post-war RAF aircraft (Tornado F3, Lightning, Phantom FGR2, F4(UK), but due to a combination of events I am lacking stencilling, particularly for the Tornado. I don't really want to have to search for (non-existent) decal sheets with walkways / NO STEP / Funny upside-down hooks - or rely on well-known auction sites to overpay for stuff. Is there a way to cleanly produce white stencil markings in 1:72? I'd prefer if I could do this, whilst retaining some sort of calmness, though prepared to make a bit of effort if I can see the end result. I did think that the combination of white ink / draughting pens, and a master decal sheet, I could transfer the markings to a clear decal sheet, cutting, sealing and protecting as much as I can. Am i heading in the right direction, or is there an alternative process I can follow?
-
So here it is, warts'n'all. WIP is there : Hope you like it, S.
- 13 replies
-
- 27
-
-
- Tornado F3
- RSAF
- (and 1 more)
-
I'm keen to model the units that an individual aircraft (in this case a Tornado F3) has been in from inception to disposal. Is there a way of finding this information out? I've sent a couple of emails to the RAF Museum at Hendon, to their heritage section, and so far nothing.. Are there any other ways to collect this info?
-
Hi, Despite reading how bad the Tamiya F3 is, i still found myself picking one up due to stupidity/pig-headedness/nothing else on offer! I should have listened!! It starts off quite nicely, the cockpit goes together well, the wings, tail and other bits all do likewise. Then It came to putting the 2 fuselage halves together......UGH. There was about a millimetre overlapping on the top half either side, which meant tonnes of filling and sanding, which, in the end i just got fed up of and decided to leave it before i put into "flight mode" Then comes the decals. "Basic" would probably be building them up a bit too much, no RAF tail flash, very very pale colours on the roundels, and the most awkward ones i've ever dealt with trying to put on the aircraft so again a lot never made it! So in the end, i found some old xtradecal and very old airfix ones to finish it as i saw as "Maple 19" at RAF Coningsby in 1990. I was going to panel wash etc, but as there aren't really any panels of note to use, i just went for a bit of weathering on the tail!!!! I really do hope Revell/Airfix etc produce a new tooled Flickknife soon Anyway, enough of my troubles: Tamiya 1.72 Tornado F3 ZE292 by Jonathan Francis, on Flickr Tamiya 1.72 Tornado F3 ZE292-9 by Jonathan Francis, on Flickr Tamiya 1.72 Tornado F3 ZE292-14 by Jonathan Francis, on Flickr Tamiya 1.72 Tornado F3 ZE292-10 by Jonathan Francis, on Flickr Tamiya 1.72 Tornado F3 ZE292-11 by Jonathan Francis, on Flickr Tamiya 1.72 Tornado F3 ZE292-4 by Jonathan Francis, on Flickr Im sure you guys could probably get some good results with it, but it certainly tested my patience!!!!! Jon
- 13 replies
-
- 10
-
-
- 5SQn
- Tornado F3
- (and 1 more)
-
 I built a 92 Sqn Lightning in that STGB, and am building 92 Sqn Phantom in that STGB, so I thought I'd continue the theme with this one. However, there was a slight hiccup in that 92 Sqn didn't convert to the Tornado from the Phantom. So, this is going to be a bit of a whif: a special scheme for the inaugural Tornado F3 to enter service with 92 Sqn in the year of the 50th Anniversary of the Battle of Britain. I'll be using the 1/72 Hasegawa kit, which apparently fits nicely but has lots of shape issues. I started by reshaping the vertical tail, which is too square on top. It's not much, but it's a start. Thank you Mish for starting this Group Build in Merv's honour. I never got to meet him, but the loss of any Britmodeller is a loss to us all.
- 38 replies
-
- 7
-
-
- Hasegawa
- Tornado F3
- (and 1 more)
-
I built this back in Jan/Feb of this year but never took any photos, build thread or even and RFI up to now! So here are some photos from the IPMS Farnborough website... This is another entry in my project associated with my Father in the RAF, namely building the aircraft that were in 5 Sqn before and after he was attached to that squadron while in Burma in 1943-45 Previously I've built a Curtis Mohawk which was flown by 5 Sqn from 1941 to 43 and a F6 English Electric Lightning that was flown by 5 Sqn in the 70 up to the mid 80s. This brings the story further into the modern era as 5 Sqn flew the F3 Tornado from 1987 to 2003 Larger pic here Larger pic here Larger pic here Larger pic here This was the Italeri kit plus the Eduard PE with 5 Sqn decals sourced from elsewhere - I can't honestly remember where. The pilot figures are from PJ Productions - its the same figure but modified for front and back seat One of the reasons I do build threads on here is so I remember what I've done!
-
Here are a few negative and slide scans from 20 years ago. These were taken on the 4th May during a large NATO Exercise 'Resolute Response'.
- 7 replies
-
- 4
-
-
- Tornado F3
- Canberra
- (and 4 more)
-
 "Italeri 1/48, resin, PE details, some srcatch" Hi below you will find some recent photos of my Tornado F3 from 43(F) squadron. I used quite some AM products, not all of them really made for this kit but with some work i could make them fit namely: Eduard interior set for the cockpit Paragon Seats Paragosn flap set Paragon wheels Decals are from now regrettably defunct Aviation Workshop/ Model Alliance I tried my skills on integrating Aires wheel bay for the Hobbyboss kit (no big hassle) and the definitely better detailed landing gear from SAC that perfectly fits the aires set. the icing on the cake where Aires new nozzles that required some surgery to the Italeri fuselage but compensate with exquisite detail. now some photos: Now I am looking forward to your comments/ critics Thanks everybody on britmodeler, a lot of inspiration and detail photos, links etc. were used! Without this great reference compendium this project would not have been so much fun!!!
- 20 replies
-
- 2
-
-
- Tornado F3
- 43(F)
- (and 1 more)