Search the Community
Showing results for tags 'Riich Models'.
Found 6 results
-
And this is why it all started ... The Universal Carrier (aka Bren Carrier, or Bren Gun Carrier) had the largest production run of any AFV, yet, finding a GB that could accept the type was ... hard. Of course, after years of no possibility, we have (at least) two builds this year that could take the carrier. The box: And its contents : Sprues shots Lower hull Upper sides and engine compartment. Wheels, tracks and suspension. Crew, tools, weapons and engine. Lots of etch, springs, some rope & chain, and decals Colour options, and instructions
-
Wow what a kit! This is an exceptionally detailed offering from Riich. Comes with an extensive set of PE and accessories. No need for any aftermarket with this one. Even the suspension has real double coil spring! There are a couple of bizarre omissions such as the radiator which leaves a whacking great hole into the empty engine compartment but not to worry, an easy scratch fix. I think after building this I can strip and rebuild a real one blindfolded at night. I thought I would do it justice and put a bit of work into it. 😁 First off there are two points 1. There is nothing wrong with the Tamya offering so I don't want anyone dissing it. It's stood many a modeller well over the years. 2. I have to give a big shout out to these guys; https://vickersmg.blog/ As you'll see, this builds rabbit hole was the Vickers machine gun and I could not have done it without the help of them. So much info! I owe it all to them so check them out and maybe visit or donate. So on to the build. It depicts a Medium Machine Gun Carrier just come back from duty and having a bit of a tidy up,maintenance and re stock. They've found part of an old sign and used it as a work bench on top of some random ammo boxes. While the No1 is disassembling the gun and changing the barrel and jacker the driver is sweeping up the spent shells which as you can see get everywhere. All the helmets are kit with the inner liner on the 1st scratched and the webbing on the 4th one added. The rear bin and basket are scratched as the kit one couldn't be shown open. The brush is from the kit but the bristles added. Right then, The gun is 99% scratch. Tools are from the Miniarts set, petrol can from the kit. Tins and barrels and canvas covers are all scratch. I'm not sure if they ever changed the covers but I'm going for a refurb kit issued. There is a new cover, old cover, new barrel and old barrel still to be removed from the rest of the mechanism plus a barrel cleaning rod. The spring and casing I'm particularly proud of 😎 I did the fire extinguishers as painted but worn through to show off the brass. I was worried about the black leather seats but they seem to look ok. I'm also happy that you can see a lot of the linkages in the floor. Made it worth doing after all🙄 Those 303 shels get everywhere! I know they are a bit bright but I wasn't going to paint them! They are chopped up 0.3mm brass tubing. The barrels are 0.5mm brass tube so the bullets will actually fit 😁. The brown leather tube in the bottom right propped up next the the gunners seat is the spare barrel and cleaning rod case. Standard issue. The ammo boxwes are blue/green as was the case pre 45 and most were repainted before NWE campain however I'm going for some that slipped the paint shop for added colour. I put all the kit hanging from the side. I wasn't until it had all been made and ready for fitting that some know-it-all called @Mike Starmer 😉😁 Pointed out that no kit was hung like this as it would all get ripped off by bushes etc in the narrow lanes. They only did this in North Africa. Well these boys have either been very lucky, have a very good driver or just haven't learnt yet. The kit bags are all scratch as well btw. Bit of sustenance hidden from the Sergeant 😉 Bit out of focus but theres a cork hanging from the chain for bunging the water jacket. Had a bit of a nightmare with the ammo boxes. They are all kit with added webbing for handles but the main thing is the lack of decals for them. No one makes them. I even tried 3D printing stamps but that didn't work out. I was going to scribble some yellow paint but thought that would spoil it. The cammo netting is aftermarket stuff with strips of Rizla. WIP is here: Thanks all Andrew
-
Another ridiculously detailed little kit! 12 spru's, 3 sheets of PE and a bag of springs. What could possibly go wrong! I seem to remember reading that Riich (How do you pronounce that??) are an offshoot of a mainstream company producing higher quality kits. This is definitely true in the quality. An absolute beauty for detail. Perhaps too good. Some of the parts are ridiculously thin. Reminds me of Mini Art stuff. A random instruction page All the bits! For such a small model! The best bit so far? You get a hand brush 😁👍🏻 Oh but wait, Riich models spoil you with this kit. Not one.......not two...... not three....... but FOUR (Count them!) FOUR hand brushes 😎 You don't get that sort of luxury in a Tamya 😂 Having said all that and despite all this detail there's no engine! But you do get all the connecting rods from the pedals to one so swings and roundabouts I suppose. Plan is for a maintenance break so a few things disassembled and in bits. Lets see how it pans out. 🤔 Cheers Andrew
-
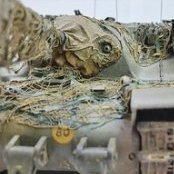
 Another one getting attention on the bench this month is Riich Models excellent Skoda RSO Radschlepper. These look increasingly difficult to get hold of these days, at least from my tinterweb searching abilities from the UK, and I wish I had purchased another. It is beautifully moulded with sharp detail and a real snap together Tamiya-esq fit. This monster metal wheeled goliath comes with a complete engine, two load-bed options and a fret of PE to replicate the more delicately sized parts. Care is needed drilling multiple holes in the wheels and the only fit issues I found was the fuel tank sat a touch high on the chassis impeding the cab fit. Easy fix to shave a little off as the connection is hidden. Even easier if you know about it beforehand😉 A Notek headlight was sourced from the parts bin and some fine copper wire was used to simulate the engine pipework. The white putty strip on the fender is the filled in locating slot for the missing drivers side engine panel This is almost at the same stage as the Ferdinand because I mixed a bunch of different Dunkelgelb paint mixes knowing both kits would not receive any camo. I figured a monochrome finish would benefit from a slight colour modulation to spice things up. Both this and the Ferdinand received a Red Oxide primer (Tamiya fine rattle can) and the wooden areas of the RSO a fine coat of grey to simulate the wood underneath. Then a couple of coats of hairspray were sprayed to allow me to chip and scratch down to the primer. The paint surface always appears very 'scratchy' dry and flat during the hairspray chipping stages but once a varnish coat and a pin wash applied it comes to life. For both this and the Ferdinand I am using Tamiya acrylics. The Ferdinand received a far greater degree of modulation although both went through the same painting process. I started with a Red Brown for the lower hull and running gear, then a mix of Red Brown and Dark Yellow a little higher up. Dark yellow was the next coat that just concentrated on the lower casemate area and all upper surfaces. This was followed by a Dark Yellow 2 lightly sprayed on higher areas of the hull and horizontal surfaces. To finish up a Dark Yellow 2 and Flat White mix highlighted just the horizontal surfaces. As each of the mixes often received more than one coat, they were deliberately kept light so I could still agitate the hairspray and get right down to the primer with some of the scratches and chips. Various light sand coloured Vallejo paints were then brushed on to raised surfaces like bolt heads and handles so the detail would pop once a pin wash was applied. A couple of light coats of satin varnish were then applied. Although the modulation is hardly noticeable on the above pics, they are a lot more pronounced in reality. Overall, I thought the colour looked a little too sandy, so I added a little Clear Yellow X-24 to the X-22. Various mixes of Abteilung oils were then carefully applied as a pin wash and left to dry for a few days. Happy it was dry enough any overspill oil work was carefully blended in. The contrast of the pin wash, the slight modulation and the brush painted highlighted areas can now be seen to greater effect. Progress so far
- 6 replies
-
- 13
-

-

-
- Riich Models
- Skoda
- (and 1 more)
-
 Riich Models is to release a 1/32nd Polikarpov I-16 Type 10 kit - ref. RA32001 Source: http://www.moxingfans.com/new/news/2017/0324/3454.html V.P.
- 1 reply
-
- 1
-
-
- I-16
- Polikarpov
- (and 1 more)
-
Riich Models /Combat Armour Models catalogue programme 2017 Sources: https://www.facebook.com/permalink.php?story_fbid=1340055762725187&id=394351507295622 http://www.moxingfans.com/new/news/2017/0324/3454.html V.P.