Search the Community
Showing results for tags 'Picture heavy!'.
Found 5 results
-
[First of all I'm afraid this one is a little picture heavy - 23 pics - so if you have a slow internet or don't like lots of photos of averagely built models you may want to skip this one! But I did enjoy a bit of a photoshoot with it last night, even if it did take the best part of two hours to get done.] It's taken a while to get here, nearly 6 months, but I've finally got this one finished. I've yet to see a badly built version of Tamiya's 300SL, and having built this I can see why - it's a very detailed kit with few flaws, even though some of the tolerances are a bit tight. But there's nothing in there that's wrong, so very little I can blame Tamiya for the issues as opposed to myself. If you're in the market for a 1/24 Gullwing you can't go far wrong with this one. Unlike some of the superbly built versions I've seen on here mine is very close to being as you get it from the box, the only additions being embossing powder to represent the carpet and Bare Metal Foil where there wasn't kit chrome (e.g. window surrounds, door handles etc.). The only bit about the kit which was annoying were the bumpers which had a prominent mould line at the ends, especially annoying for a chome part so I ended up sanding that down then covering the bumpers in Bare Metal Foil. Anyway, enough about the build, if you want to see the whole thing it's here: So onto the photos. First of all, a snap of what you're missing when the model is complete - Tamiya have you build the entire spaceframe chassis which looks complicated but actually assembles very nicely. It's all hidden though unless you leave the undertray clear (I didn't) so let's move onto a trip around the car: And back to the beginning with a more stylistic shot Of course, the most striking feature of the real car is the Gullwing doors, and the kit accommodates this by allowing you to pose them in the open of closed positions. You've seen them closed, now for the open pose: Unfortunately, in the latter parts of assembly some of the embossing powder came lose and static clung to the rear window. It's barely noticeable until the camera decides to cruelly highlight it Of course, one of the benefits of having opening gullwing doors (and bonnet) is that you can get a half-decent shot of the interior. Can't get any closer - the camera was tucked under the doors for these shots. There's also quite a nice engine under the bonnet. This is what you end up with out of the box, other people have made a more complete job by adding additional wiring etc, but that's just not for me. And finally, onto the arty shots. First of all I decided to try my hand at a 'real-world' style shot. I wasn't going to bother putting this one up as I think it's fair to say I need to work on getting the backgrounds right, not to mention it was late and I didn't check that the camera had focussed on the front of the car rather than the windscreen so it's actually a bit of a rubbish shot. But we all have to start somewhere and hopefully it gives the idea of what I was aiming for. (in fact, the more I look at this, the worse it becomes So onto some better shots. First up the 'angles' And to round things off the 'reflections' I think this one is my favourite. Thanks to everyone who has waded through all of these, and apologies to all who lost the will to live, but I did enjoy both building and photographing this one so I hope and least some of you enjoy the pics too. And especial thanks to all who liked, commented and encouraged through the build.
-
So, whilst browsing for 1/1000 scale aztec decals on etsy for an Excelsior refit and Oberth class I happened across a seller that did 3d printed star trek ships in 1/1400 and smaller, including an Akira class. Now the Akira class is my holy grail of wants in 1/1000 but I'll be damned if I am going to pay £300 to 400 for the Starcrafts one and then ship it from the US. So chancing my luck asked the seller if they could scale their 1400 kit up and how much would it damage my bank balance. Lo and behold they could and for the princely sum of £52 delivered!!!! So roughly a fortnight later i come home to a rather large box and in it sits a lovely 1/1000 Akira class! Now the kit is printed in two parts but is delivered to you fully assembled and is printed in white nylon. The layers are really really tight and so only some minimal clean up will be required before I butcher it with my painting skills. For the price I can't recommend this kit enough. So here are the pictures prior to clean up: I have no affiliation with the seller, just wanted to share something that it is hard to get in 1/1000 without paying a shed load. Seller is CookieMonsterModels on etsy and they will do other ships as well. Most likely going to go back to them for a 1/1000 Enterprise C
-
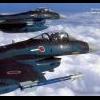
 Hello everybody... Rather than do two separate RFI's for these I'm throwing them together here. I must warn you this RFI will be picture heavy. First up is a 1/72 Accurate Miniatures (Monogram) F-4C in the markings of 64-0852 of the 122nd TFS from the Louisianan Air National Guard. This was built for the Phantom single type build. The Camouflage scheme was a temporary one from Red Flag March of 1983. The Squadron along with Phantom's of both the USN & USMC wore similar schemes in similar colors. The next Phantom is a Hasegawa 1/48 F-4EJ. It is an F-4EJ # 87-8407 from the 306th Hikotai in aggressor markings from Komatsu Air Base in 1982. This was built for the 1980's Asian group build. I do hope these both meet to your liking. Please feel free to ask questions, comment, or pass on your thoughts ? Dennis Build logs:
- 20 replies
-
- 24
-

-
- Picture heavy!
- F-4EJ
- (and 1 more)
-
I mentioned a few days ago that I was sorting and sifting through my older builds with a view of parting with them. Here are Three Buccaneers that needed all kinds of repairs before photographing them. Only one will part from me at this time. XT277/320. Airfix older retool. Modeldecal decals. Some work done with scratch made dive/air break details and a bit of refinement in the cockpit and main wheel bays. XN982. CMR Resin kit. Built this one for a SAMI review some years ago. A bit of a pig to build really and equally so in trying to repair it the other day!!! What was nice about this kit that among the myriad of stores supplied was the 'buddy' refueling pack. So I opted to make this one . This view kind of make sme think of a Penguin thats keeled over! XV361/FF, 12 Squadron. Matchbox kit. With some bits from the Airfix kit for the stores and chaff packs underneath plus Airfix Decals. Aeroclub canopy and whatever I did with the seats. One of the obvious omissions on the Matchbox kit is the top wing vortex thingies. Too much for me to try at the time I built this one. I lost the wing mounted pitot while building this kit all those years ago and it still lacks it! Well thats it for now. I do have another Airfix Bucc on the go from the 1989 release and I'm trying to make use of some of the tons of resin from the CMR kit in improving this one. I also have the Freightdog nose and tailplane to fit to it among other stuff. A lot of the other resin bits I have sent out to a couple members here overseas.
-
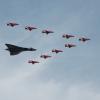
First few were taken at Blackpool Airport on Saturday... ... and then at Southport on Sunday: Thanks for looking! I do have some video of the Lancesters/Spit/Hurri but I have no idea how to post it...
.thumb.JPG.3498f40362ff13ebfc4b2e45abbd545e.JPG)