Search the Community
Showing results for tags 'King Tiger'.
-
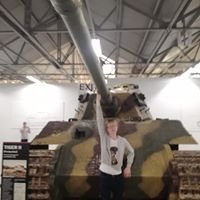
 Hey All, I just finished my latest model, the 1/35 Dragon King Tiger with Zimmerit. Although this is not a "new" kit, it's one I've had in my stash for years and always a huge fan of the KT, so I was excited to build and finish this big cat. I decided to do a small diorama and figure for this one along with some creative work with some putty. Info below... The Build In general, this an out of the box build with some add on FriulModel tracks (always a plus) and some resin pieces here and there. This is the premium kit, so comes with metal barrel and some other small goodies. The figure is of course Alpine and as usual a superb example of well done figure. Whether or not I brought it to life is another story. Like most Dragon kits, this was very well done and in general, hassle free. Ha, usually not a thing most of us repeat when we speak of Dragon. The Zimmerit is already applied and although it's nice to not have to roll my own, it does have some draw backs as it's the same mold for everyone and if you want any battle damage, you have to get creative with it and bring out the scalpel. Not a huge fan of doing that, so I kept it pretty limited in scope. The Inspiration and the Camo I have done many KT's in my day and there are of course many ways to paint it with the Zimm on. However, I was inspired by the SS KT 104 on display in Bovington. Although this camo is a little bold for my taste, I thought I'd do something different and give it a go. I'm glad I did as it proved to be a really fun camo. I used much more yellow than I normally would in my can. Usually I dull out my yellow, but the KT I was referencing had much more yellow, so there I went. I usually use Tamiya paints and I simply added more yellow to the Dark Yellow. It worked well. Nice and bold. The camo was super fun to do. More geometric in shapes and bold hard lines for the camo. Nice change from my usual faded out looks I tend to lean towards. I wasn't a huge fan upon first completion, but I thought with weathering and some handy work, I could make it my own. The Weathering I used green stuff for the blankets and torn sheets on the model. In general it works well. When it does dry out however, it tends to lift a little. Nothing major, but requires some work to get back down. I kept some lifted to represent the tank in motion. Lots of times in city environments, with bold three tones camo, you can see reference photos of tanks using sheets and blankets to tone down their color and blend in. Plus, it just looks cool. I used pigments mostly for the weathering. Always a risk if you ask me. Pigments are great, BUT can get out of control quickly and although we should be able to remove them if no fixer is applied, I find on most models that is not always the case. I didn't go over the top on the weathering. I kept it relatively neutral as I didn't want the great coloring of the tank to get covered up too much. The Diorama, Figure and Cobblestone Street The diorama is a combo of wood as the base and styrofoam. I used a ruler to carve out the cobblestones and then hand painted them with various colors. I wanted to keep them bright in some areas and grey in others for good contrast. I have never done a dio like this, so I'm not really sure how good it is, but it was a learning experience and fun to do and I think compliments the model well. The clock, bench and drainage is the Street accessories from Miniart. A really cool add on and something that really adds some fun to the model. I like the storm drains and man hole cover the most. Not sure why. The Alpine figure is just magnificent. Yah, I know...looks like he's saying hi to his favorite leader. But you know, he could just be ordering a beer from the local pub on his way through. I did the best I could with the painting and the face. In general I am pretty happy with it. He looks tired and ragged. Just as he should be. Finished and Fun! Well, that wraps up this great model. I had fun. I tried new things. I enjoyed the process. What more can a modeler ask for huh? Look, even the figure is waiving, Bye Bye! Told ya he wasn't doing the, you know....the thing. Cheers and please feel free to comment, criticize, and share your thoughts. It means a lot. Graeme Street P.S. Always good for a few Black and White/Sepia parting shots...
- 7 replies
-
- 30
-

-

-
- king tiger
- tiger II
- (and 1 more)
-
Pz.Kpfw.VI Sd.Kfz.182 Tiger II Henschel 105mm (84559) 1:35 Hobby Boss via Creative Models Ltd The King Tiger needs little introduction to most armour aficionados, as it became one of WWII's truly iconic AFVs, even though it saw only limited action in the closing months of the war, and had serious flaws that were never fully resolved due to its short time in service before the factories and then the Reich were over-run. As with any new equipment, Hitler was insistent that he was involved and always wanted bigger (compensating much?), which resulted in a heavily armoured tank with a massively powerful gun, but weight problems that put undue strain on its engine and transmission, resulting in a high preventative maintenance burden and frequent breakdowns on the battlefield. It has been said that more King Tigers were lost by crews having to abandon and scuttle a broken-down vehicle during a fight than were knocked out in battle. The design was complex, and although the simpler later turret design was chosen over the alternative and more complicated early offering to ease construction, it still took far too much time and valuable resources to create one, especially when compared to the comparatively rustic T-34s that the Soviets were churning out in huge numbers. The initial turret design was more complex to produce, and can be identified by their curved sides to accommodate the commander’s cupola, which was difficult to produce as it demanded high levels of accuracy in shaping thick armour-grade steel. This is the turret we usually call the “Porsche Turret”. They were fitted to the first tanks off the production line, and as such the later simplified design that we call the “Henschel turret” should by rights be the "second production turret", as the initial turret design was a common element of both Porsche and Henschel designs. Upgrades were proposed to solve some of the more pressing issues with the type, which included a replacement fuel-injected engine that would add around 100hp to the power available, although a new gearbox and transmission unit was discarded due to negative experiences during testing. The main armament was also to be upgraded to a 105mm KwK L/68 unit, but the army had not yet accepted the design, so it would have been a risky upgrade. As it happened however, events conspired against the Nazis and the war ended before any significant improvements could be made to the already impressive capabilities of the Königstiger, which we interpret literally as King Tiger, but actually refers to the Bengal Tiger in German. It took bravery on the part of Allied tankers to tackle a King Tiger, as they had to get well inside the killing zone of the mighty 88mm gun in order to penetrate the frontal armour, and even the flanks weren't easy to breach, having 80mm of sloped armour on the hull and turret sides. The Allied tankers developed a technique whereby a squad of tanks would attack a KT from various directions, hoping that in the confusion one or more would be able to flank their target and get close enough to penetrate the side armour, while the others dodged incoming rounds from the devastating main gun. This task was made a little easier by the introduction of the ‘Jumbo’ Sherman with high velocity gun, and the Pershing heavy tank, although these were also only available in limited numbers before the war ended. The Kit This is a new boxing of the base kit from 2018 with additional parts to depict the larger gun, building on their well-detailed rendition of the behemoth. The kit arrives in a large top-opening box with a painting of the 105mm equipped KT that is presumably rolling through the debris of Berlin in a last-ditch attempt to stave off defeat. Whether any up-gunned KTs were taken from the testing ground into action we’ll probably never know for certain, although that doesn’t mean it didn’t happen. The fact that one of the decal options has a red primer covered turret certainly implies that the designers of the kit think they did, but I can’t remember seeing any evidence in my wanderings. Inside the box is a small divide to keep the sprues from moving about unnecessarily, and there are plenty of them to be kept still. There are fourteen sprues of grey styrene, ten in brown, a single clear sprue, a sheet of Photo-Etch (PE) in a small bag with the decal sheet and a card backing, the instruction booklet that is printed in black and white, and a single sheet of glossy A4 printed in colour that depicts the two markings options. Detail is very good, especially on the armoured areas of the tank, where there is a nicely restrained depiction of the texture common to rolled armour-grade steel of the era. The sand-cast texture on areas such as the exhaust armour and the mantlet is present, although it would probably benefit from being accentuated by stippling with liquid glue or Mr Surfacer and an old brush to ensure it doesn’t disappear under paint. Construction begins with the lower hull, adding the armour covers to the front of the final drive housings, then threading the swing-arms and torsion bars through the hull from both sides, followed by the road wheels, which must be applied in the correct order to achieve the interleaved effect. The four-part idler wheels and two-part drive sprockets with the final drive bell-housing incorporated are made up in a confusing flurry with arrows everywhere, then they too are installed along with long and short caps to the centres of the road wheel stacks. The tracks come next, and they’re an interesting part of the model as they have good detail, and with a little care can be made up to be workable. Each track run is handed, and every link is made from the main part that has the tread detail moulded-in, and has an insert added to the inner face, with another overhanging behind it un-glued. This then forms the insert for the next link, with another insert added to the rear, a process that continues until you have a run of 92 links per side. The main link has two sprue gates on the hinge-points, while the inserts each have two sprue gates on edges that are easily sliced away, so shouldn’t take long to prepare. There are also three tiny recessed ejector-pin marks on the exterior face, but with paint and a little bit of mud they probably won’t be noticed, so fill them if you’re inclined or hide them later. Attention shifts to the rear bulkhead, which is detailed with twin exhausts in armoured shrouds, adding two track tools, Notek convoy light and a large shackle between the exhausts, which is something I’ve not seen before. The bulkhead is slotted into the rear of the lower hull and has a pair of towing shackles clipped on with no glue, allowing gravity to do its work. The upper hull has the domed kugelblende armour fitted to the glacis from the outside, adding the pivot and socket from inside, and a clear periscope through a slot in the front deck. To fill the hole in the ball-mount, the machine gun is made up with sighting and grip mechanisms, plus a twin saddlebag magazine, and a domed cap on the left that allows the top of the gunner’s head to take some of the weight of the breech and assist with movement. The rear of the upper hull is open at this stage, with just two rails joining the front to the back, which will help support the engine deck insert when it is completed. Work starts on this by adding the large maintenance hatch in the centre with triple mushroom vents mounted on top, then detailing it with lifting hooks, more mushroom vents and hinge-covers, applying PE meshes over the grilles to prevent debris and grenades getting into the engine bay, followed by mounting it over the bay. The front hatches are usually moulded in an insert on King Tiger kits, but Hobby Boss have elected to mould it into the upper hull, having a small insert with a clear periscope in front of the driver’s hatch, fitting armoured covers over it and the other periscope that was installed earlier, plus simple hatches. The pioneer tools are installed all over the deck and side of the upper hull, the hand-tools having PE clasps, while the fully styrene towing cables with moulded-in barrel-cleaning rods are mounted on pegs on the sloped hull sides, surrounded by more pioneer tools with PE clasps. At the front, a cyclopean headlight is mounted on a central bracket on the glacis, with the wiring snaking away aft, adding some PE details for effect. The fenders are moulded as single lengths on each side, and these have been thinned at the edges to give a more realistic look. At first glance, the instructions seem to imply that adding the fenders should be done over the small rectangular PE mounting blocks, but a short text to the side states (using mostly part numbers) that you either fit the fenders or the mounting blocks. If you cut sections of the fenders out to depict lost portions, you can apply the blocks in the missing area, and depending on whether you think that the area behind the fenders would be left in primer, that gives some leeway for a little bit of fancy painting. In action, these fenders were often casualties of incautious or hurried manoeuvring, and were bent, mangled, or even torn from their mounts, as evidenced by many photos of the type. A pair of front mudguards of the later type are pushed onto rectangular holes at the front of the hull, adding separate sloped sides, and two more towing shackles are clipped over the torch-cut ends of the hull sides below. The texture of torch-cut armour isn’t replicated at the front or rear, so check your references and have a go at recreating that if you wish. It’s not too difficult, and can be achieved with a file or sharp blade. Speaking of the rear, simple sloped panel mudguards are fixed to the rear, with small PE eyelets added to the mounting point. Turret time! The turret build starts with some of the ancillaries, first of which is the commander’s cupola, which has seven vision blocks inserted into the two-part surround, with seven frames glued to the interior, plus six armoured covers and one that has a pin moulded into the top, attaching the three-part hatch with a long pin from below so that it can raise and turn to open, adding a PE backup sight to the front of one periscope. The mantlet shroud is next, which is specific to this variant, made from three interlinked cylinders of varying sizes and lengths, plus a PE part folded and glued on top of the widest section. The gunner’s hatch is a simpler radiused rectangular affair, having grab-handles inside and out, plus a locking wheel in the centre and a curved hinge-guide on the underside. The rear turret hatch is built from two layers that trap another part in between, then a pistol-port is inserted into the centre from both sides (I thought these were deleted on later production?), adding grab-handles and hinge-points, which are partly covered by either a styrene inner layer, or alternatively, a PE part that is bent to the curve shown next to it in the instructions. The outside also has a grab-handle fixed to the top edge. The larger 105mm barrel is particular to this variant, and is made from a full-length section that has the wider portion fleshed out by adding the other half of the cylinder to the hollow half, fitting a four-part muzzle brake to the dangerous end. With careful fitting and sanding of the mould seams, no-one will know it isn’t made from turned aluminium. As it’s an exterior kit, the turret interior is absent, the gun pivot made by fixing a short cylindrical socket to the two-part floor by a pair of trunnions, using no glue on the pegs if you want to pose the gun later, or just leave it mobile "for reasons". The upper turret is slide-moulded as a single part minus the front, adding two bent PE parts to the forward roof, positioning them with the aid of two scrap diagrams nearby. More detail is fitted to the roof in the shape of mushroom vents, a shell ejection port and some lifting eyes, then inserting the two-part mantlet in the open front from both sides. Surprisingly, there are detail parts inside the roof of the turret, carrying the external details inside, and adding a periscope and more details just in case humanity gains the ability to see round corners later in our species’ evolution. The gunner’s hatch, commander’s cupola and yet more details are installed over the following steps, including multiple cleats on which to hang spare track links, adding three to the rear and two to the front of the side armour. All the location points for these small parts are marked on the hull texture as very fine, almost invisible shapes to help you, which also extends to the strange blister-shapes that are applied to the top edges of the turret sides. I must find out what those are, as I’ve not seen them before. The spare track links have small portions removed because they are hung individually rather than as a run, showing where to cut in more scrap diagrams. The gun shroud slots over the tube projecting from the mantlet, and that accepts the rest of the barrel, adding the rear hatch at the same time. Incidentally, this was the only way the gun could be removed from the turret after completion of the real thing, which explains its presence and comparatively large size, as well as the fact that it can hinge almost flat against the deck. The completed turret drops into position on the hull, and as it doesn't have the usual bayonet fitting to hold it in place, you'll need to remember that if you ever turn it upside down. Markings There are two options on the profile sheet, and as usual Hobby Boss’s designers aren’t forthcoming with information on their veracity or otherwise, but as this particular variant wasn’t officially involved in combat, you can take them with as many pinches of salt as you wish, or just go your own way and paint it how you see fit. From the box you can build one of the following: Decals are printed in China, and have decent register etc., but as none appear to be used on the profiles, they’re only there in case you’d like to use them. The shaping of some of the blue-on-white digits is unusual and would probably send a font-designer into apoplexy, but the vehicle codes were often hand-painted by crew members, and could be pretty amateur. Conclusion I have a fair few Tigers and KTs in my stash, and this appears to be a decent model of the beast that terrified Allied tankers whenever it turned up on the battlefield. It’s unusual because of the gun, and detail is good all over, even down to the texture on the hull parts. The tracks will be time-consuming, but that’s tracks for you, plus there’s the easy get-out of slapping some muck on them to hide any seam lines or ejector-pin marks you didn’t get round to. Highly recommended. At time of writing these kits are on heavy discount with 30% off their usual price at Creative Review sample courtesy of
-
Hello all. I present you my last build 1/72 king tiger from revell. I liked the kit. The build was flawless. No need for extra efford. The paint scheme was choosen to be ambush camouflage used in the battle of the bulge. All painting process was completed with brushes only. The weathering was completed with oils and acrylics. All comments will be welcomed. Happy modelling
- 12 replies
-
- 28
-
-
-
- Revell
- King Tiger
- (and 1 more)
-
Hello fellows, Let me show some pics of my last model, the Tamiya King Tiger (Porsche Turret). I've tried to reproduce the camo scheme that is shown in the Tankmuseum... Here, the real thing: All the build was easy, as is usual in Tamiya, and the only problem I had were with the zimmerit. Applying it was a mess...; but, honestly, it was my fault...🤫 Apart from this, I'm pretty glad with the whole result, I hope you like it! I left out the right front fender. As you can see, I put and extra chain in the left side of the turret. ...and one slight layer of mud in wheels ans fenders. Your comments will be welcomed. And thanks for watching!! Josep
- 6 replies
-
- 16
-
-
-
- King Tiger
- Tamiya.
- (and 1 more)
-
 TopDrawings #99 Panzerkampfwagen VI Ausf.B Tiger II (9788366148703) Kagero Publishing via Casemate UK Hitler's obsession with "bigger is better" is well understood, and that coupled with his constant interference in things he knew little about hampered their attempts to take over Europe. The Tiger tank and its even larger sibling the King Tiger or Tiger II were both part of that escalating size battle, and even before the Tiger design was completed the original drive-train that was used in both tanks was under too much strain that would result in many abandoned or scuttled Tigers and Tiger IIs on the battlefield due to mechanical breakdowns. When either tank wasn’t broken however, they were a terrible foe for the Allies with the Tiger II having almost impregnable sloped frontal armour and a powerful 88mm cannon that could out-range almost every tank on the battlefield. It played havoc with the poor Shermans until the British 17-pounder was fitted to the Firefly, but the Sherman's thin armour was still no match for it and they had to use a tactic of sending several Shermans to try to outflank them and penetrate their thinner side and rear armour. Thanks to a complex design that was never fully streamlined, they weren't able to put Tigers or Tiger IIs into the field in sufficient numbers to halt the tide of defeat, with a small number of the beasts prominently displayed in propaganda films to terrorise the enemy, and very few reaching the frontline. Overall, it could be argued that the Panther was a more successful design than either Tiger when every aspect was taken into account, but they were the most feared on the battlefield despite their shortcomings. Most manufacturers with AFV kits in their range have offerings of this iron beast in all the main scales, as other people's King Tigers don't make money for them, and it's still an amazingly popular subject today as my stash in 1:35 will attest. The TopDrawings series majors on scale plans, which is the main thrust, but also includes a little background information, some pertinent profiles, and often a bonus of decals, loose-leaf plans or masks targeted at the subject matter in hand. With this edition, you get an A3 sheet of double-sided isometric drawings of Porsche and Henschel turreted King Tigers from various angles. The book is written in English on the left of the page, with Polish on the right, which translates to top and bottom for the captions to the various drawings within. The book itself is bound in a card cover with 22 pages, and the rear cover devoted to additional profiles of two tanks in interesting Dunkelgelb-based late war schemes. The first half of the plans begin with the Henschel turreted production machines, then the more complex Porsche turreted tanks that had the curved sides and tubular commander’s cupola side panel. The Porsche turrets were dropped after the simpler Henschel design was implemented, which leads to them sometimes being referred to as “Early”. After this the colour profiles show eight vehicles in differing ’44 dark yellow-based schemes, most wearing the mine-resistant Zimmerit coating that was initially applied from the factory, and includes a mix of Porsche and Henschel turrets. After the break there is another set of plans that focuses on the turrets both inside and out, then the complex wheel arrangement that also plagued the Tiger I, but without rubber tyres to reduce reliance of the scarce rubber of earlier designs. There are also cross-sectional drawings of the turret, detailed scrap drawings of the various aspects of the hull, as well as a detailed view of the running gear from below, showing the orientation of the interleaved wheels. The larger drawings are in 1:35 scale, but some are printed in 1:48 and 1:72 for convenience, and there are numerous front and rear views as well as some overhead and the aforementioned view from below to give a better look at the King Tiger's form. Conclusion These books are essential for the modeller that enjoys comparing their models against scale plans, and wants them to be as accurate as possible, with the loose drawings a pleasant addition. Review sample courtesy of
 -
So, a King Tiger appeared down the chimney for Christmas 🙂 It has been suggested that I should keep it for the Tiger Tank STGB in May. However, as this is currently my only kit, I couldn't wait that long, so here it comes (maybe I'll just get another Tiger for May 😉) I've read and watched loads about potential suspension problems, so it was with some trepidation that I cracked open the box yesterday. First impressions: the dark red plastic is slightly strange to start with. However, detail is very good. There's a nice little bit of PE for engine grills, and they've helped out with the tracks by including some 'ready-build' straight sections. No metal barrel for me 😞 However, really looking forward to it. Also, coming straight from a Panzer IV build, this feels huge 🙂 Here goes... Straight into the chassis and wheels. The wheels come with poly-bushes which enable them to be taken on and off the chassis, which is really useful. Just sprue-attachment cleanup really. Despite the horror stories, the suspension sat really well, and the wheels are nice and flat on the surface. Maybe I just got a 'good kit'??? So I'm always learning. If you want to learn about the different Tiger II variants, then I can recommend this excellent video from the Tanks Museum: That's all for now... I'm not a quick worker, but will keep you all posted 🙂
- 47 replies
-
- 5
-
-
- 1/35
- King Tiger
- (and 1 more)
-
Here is my second lock-down build and essentially my second scale model ever. The Tamiya King Tiger 1/35. All questions, criticisms and advice welcome.
- 2 replies
-
- 11
-
-
- tamiya
- king tiger
- (and 1 more)
-
Battle of Berlin (April 1945) (DS3506) 1:35 ICM The battle for Berlin was a bloody one between the advancing Russian Armies and the defending Germans fighting street by street, and sometime room by room. The main tanks for the advancing Russian was the T-34 while the Germans just made do with what ever they had left, these could include the odd King Tiger. While on a one to one basis the T-34 was out classed, the Russian had many more of them then the Germans had King Tigers, and the T-34 was a far more reliable Tank, Pz.Kpfw.VI Ausf.B King Tiger With Henschel Turret There has been a proliferation of Tigers and King Tigers of late, and this is ICM's take on this behemoth of WWII. This was a new tooling back in 2016. The successor to the much vaunted Tiger heavy tank instilled more terror in the Allied forces due to initial encounters lending an almost invincible air to the design. It was soon found that although it packed a formidable punch, and could absorb a lot of punishment, it was in fact a flawed design from an engineering point of view. Stressing the transmission even further than the Tiger I, they suffered terrible attrition due to breakdowns, leading to many examples being captured or scuttled by their crew if these breakdowns occurred under fire. When it worked, it was very difficult to kill, and could seriously outrange almost everything on the battlefield, but as with the Tiger I before it, the Allies worked out a strategy to take them out by cooperative attacks between multiple Allied tanks. As well as the reliability issues that were never fully addressed due to the state of the war, the complexity of the design was such that they were never available in sufficient quantities to make a difference, and even when they were, Hitler's obsession with micro-managing every aspect of the war led to some poor placement of resources. Many King Tigers were captured by the Allies and taken back for analysis, with a few remaining intact long enough to find their way into museums, such as the one at Bovington. The Jagdtiger was a development of the King Tiger, using the chassis to mount an even more powerful gun in a casemate, but again very few of these saw action too late in the war. Now for the hull. There isn't a traditional "tub" for the hull, and you start by building up the sponsons, final drive housing and the torsion bars for the suspension. The hull floor is a sled to which the lowest parts are added before being partially covered by the torsion bars that extend across the hull floor. The addition of the sponsons finishes off the lower tub The King Tiger was designed with overlapping pairs of road wheels, learning from the mistakes of the Tiger I which had interleaved wheels to spread the vehicle's weight, which could result in taking off up to 14 wheels if an inner one needed repair or maintenance. The all-up weight increased substantially between the two vehicles, so there are a LOT of pairs of wheels on a Königstiger, with nine axles each side, plus the idler and drive sprockets, all of which are assembled from two parts each and fitted to their respective swing-arms. These are capped off with hubs, and later in the build the tracks are wrapped around them. The upper hull is supplied as a traditional main part with a hole in the rear for the engine bay, turret aperture and the lift-out front section that encompasses the hull crew hatches. The radiator vents are moulded-in, giving no opportunity to display a radiator bay without surgery to the hull, which is a minor negative IMHO. Periscopes are slotted into the front of the hull, hatches are added to the front insert, mushroom vents to the engine insert, and the Kugelblende armoured blister surrounding the bow machinegun is backed with a box to receive the gun stub in preparation for installation, with a small forest of lifting lugs littering the engine deck and lift-out hatches. Armoured covers are fitted to the periscopes and the vents on the engine deck, which leaves it ready for adding to the lower hull in advance of adding all the various smaller parts such as track and pioneer tools, mudguards, armoured exhausts, towing cables,& shackles. The turret secures with a bayonet fitting, and an aerial is glued into a socket on the engine deck, completing the build phase. Markings There are four decal options included in the box, with enough variation in finish from white distemper through Dunkelgelb to two Ambush schemes, that will please most folks without resorting to aftermarket decals. From the box you can build one of the following (which strangely enough none are from Berlin?) Pz.Kpfw.VI Ausf.B, Tank black 300 Feldhernhalle Winter distemper over Dunklegelb , Hungary 1945 Pz.Kpfw.VI Ausf.B, Dunklegelb overall ,Pz.Abt. 503 Danzig March 1945 Pz.Kpfw.VI Ausf.B, Tank blue 332 Pz.Abt. 501 3 tone camo Ardennes Dec 1944 Pz.Kpfw.VI Ausf.B, Tank Red 008 Pz.Abt. 501, 3 tone camo Ardennes Dec 1944 This is an AFV, so the decal sheet is modest in size, with only a few markings on the sheet. The registration is perfect the sample, as is the colour density and sharpness, T-34 Here ICM have re-boxed their 2015 new tool T-34. It arrives in their usual box with the extra flap over the lower tray. Inside are six sprues and two hull halves in green styrene, tracks and towing cables in flexible black styrene, decal sheet and the instruction booklet, which is printed in colour and has profiles at the rear for painting and markings. From the description above, you'll note that these are rubber-band tracks, which suits some and not others, and if you're a fan of metal or individual link styrene tracks, you've probably got your favourite brands already. The detail is nice with a little room for improving the detail with some etched grilles etc., but for most of us the detail is pretty good out of the box, and even though this is an exterior only kit, you get an almost complete breech if you want to pose the turret hatches open, plus a driver's position. For a change the build begins with the upper hull, detailing it with bow machine gun installation with a movable ball, the armoured vents and filling in the other cut-outs on the engine deck, plus the driver's large hatch at the front, which is best left closed unless you're planning on scratching a full interior to back up the seats! The rear bulkhead, armoured exhaust spats and the pipes themselves are all added at the back, and it is then put to the side while the lower hull is prepared with some holes that need drilling, the suspension boxes gluing in behind the hull sides, and the fender extensions added at the rear. After saying there's no interior, there is a pair of control levers and two comfy seats to fit inside the lower hull, but unless you're crowding the area with some beefy figures, there's still a big gap behind them that might be seen. The axles with their swing-arms are all fitted to the hull after the two halves are joined, with two attachment points, the final-drive housing is built up at the rear, and the idler axle slots into the front in preparation for the road wheels, which are supplied individually to make into pairs before they are glued onto the axles. The same happens to the idler and drive sprockets on both sides, then some light detail is applied to the hull in the shape of towing shackles, tie-down bars, and the tracks are joined, then installed. The tracks are in two parts each, which link together seamlessly, but don't react to liquid cement at all, so use super glue (CA), although the instructions are mute on the subject. Aligning the joins at the centre of the track run should hide any visible seams, especially if you're going to paint and weather them with some mud and grit. There is a simple round plug with a built in hatch to replace turret. The hull is then finished off with additional fuel tanks and tarp rolls, plus two tow cables. Markings Again with the T-34 there are no Berlin specific markings. You get 4 options, the colour is any you want as long as it Russian green 1. Tank 242 7th Guards Tank Corps, Germany 1945 2. Tank 201 7th Guards Mechanised Corps, Germany Spring 1945 3. Tank 315 4th Guards Tank Army, Germany Spring 1945 4 Tank 5, unknown Unit, Germany 1945 Conclusion It is good to see ICM bringing us a double boxing like this. Highly recommended. Available in the UK from importers H G Hannants Ltd. Review sample courtesy of
-
 Pz.Kpfw.VI Sd.kfz.182 Tiger II (Henschel Feb 45 Production) (84532) 1:35 Hobby Boss via Creative Models Often called the King Tiger (incorrectly) the Tiger II was a German Heavy Tank of WWII and was the successor to the Tiger I tank. The tank still had the thick armour of the original Tiger, however this was sloped like the Panther. The Tiger II weighed in at 70 tonnes putting increasing pressure on the drive train which was based on the original design, The tank featured a long barrelled 88mm gun. Even though orders were placed for 1500 tanks production was severely disrupted by allied bombing with only 492 being produced. Henschel won the design contract for the Tiger II and all the examples were produced by them. Two turrets were designed for the Tank; the rounded Krupp design (erroneously called the Porche turret), the second was the easier to produce angular turret (again erroneously called the Henschel turret). The Kit This is a re-boxing with additional parts of HobbyBoss's King Tiger from 2018. The kit arrives on 14 sprues of plastic for the tank, 11 track sprues,; separate upper & lower hulls, the turret casting, a small PE fret and a metal gun barrel. Overall a nice looking package. Construction starts with the lower hull; the torsion bars for the suspension are attached connectors for the wheels There are 10 pairs for road wheels for each side which are interleaved. Idler wheels, drive sprockets, and return rollers are also added. The tracks go on next. These are individual links which clip together, however care must be taken as the different sides build up slightly differently, this is not helped by the instructions not saying how many links are need for each side. Next up the rear bulkhead for the tank is built up with the exhausts being added. Once complete this can be added to the lower hull. The front MG and mount are then added into the upper hull. At the back the engine deck is made up and added along with tools and towing cables. PE mesh parts are provided for the intakes. The front hatches are then added along with the side skirts. The top hull is now added to the rear hull. Once its on the front mud guards are put in place along with a pair of towing shackles. At the rear another pair of mud guards go on. Moulded cables are provided for the sides. Work now moves to the turret. The commander copula is built up, next up the comprehensive main gun and breach are constructed. There is no interior in the rest of the tank, but the internals for the main gun are pretty good. The barrel is attached and HB provide an open muzzle, or a cover one for you to use. The Gun is added to the turret base and the main part of the turret added over it. The rear hatch is added along with the command copula. Spare track links are provided for mounting to the turret if the modeller wants. The turret is then joined to the hull. Markings Despite this being a big model, it has a smallish decal sheet. markings are provided for 6 different tanks, however there is nothing on the painting guide to indicate anything about them at all. Conclusion There is no doubt this will make up to a great looking model of the King Tiger. It is a shame HobbyBoss cant put in anything about the markings at all. Highly recommended. Review sample courtesy of
 -
Hi friends, here you have my last build, a big project: the King Tiger from Takom. Tanks are not my preferred subject, but this one I think turns out quite well. I like specially the interior of the model. It's been difficult to me to ensemble the tracks, since this are separated and I don't know how to calculate how much of each goes for each side. I added some rifles and an MP40 in the interior and three used munitions. I'm think in sell this model... Thanks Ricardo https://flic.kr/s/aHsmHGoht5
- 16 replies
-
- 40
-
-
- King Tiger
- Takom
- (and 1 more)
-
Hi everyone, first time poster here. Recently finished a 1/72 scale King Tiger from Dragon. Thought I would share the results. If you think this should be moved to the diorama section, let me know. Thanks! Photos taken on my phone and square cropped for instagram, sorry about that!
-
So i want to upscale a king tiger (ive just bought a tamiya king tiger 1:35 model) most likely to either 1:16 or 1:10 scale and make it rc. I couldn't believe the price for 1:16 rc or non rc model so i decided i would make my own. I am fine with the programming and putting in the motors in etc. I could do with any advice or tips you would know on how to upscale it and then how to make the actual model. I dont really want to 3d print it if i can help it. I would like to injection mold it but i would have thought you would have to by a large quantities for manufactures to do so. Once again if you would know anything that would help that would be really helpful. Many thanks in advance!
-
 Hi all, Might seem quite late in the day, but as I went away on a break with my family to Lincolnshire for a few days, I took this with me to work on over a couple of evenings. My Tiger construction history is somewhat limited - Failed to complete a 1:76th Fujimi Tiger as a child (Think the tracks defeated me) then more recently a couple of Zvezda wargame tanks and Meng's Cartoon Tiger. No "proper" efforts in that lot then... This is Airfix's recent King Tiger which I hoped would be a simple build despite there being 46 wheels! Do you know what? It has been so far - A couple of evening's work is all that it has taken to get here. The only thing to note is that the tracks are a bit of a pain - rather than the classic welded pin approach, these have had to be glued with CA but would recommend sewing the joints with invisible thread for good measure. I also stretched the tracks a little to relieve strain on the joint. Brush painted with Humbrol primer base coat, I then realised that the shade of Humbrol that I was using to represent Dunkelgelb wasn't correct. I had a pot of Vallejo Dark Yellow but find the greenish cast it displays a bit unpleasant - The only replacement I could find was Revell 88 Ochre so went with that for the topcoat. Vallejo Chocolate Brown and German Camouflage Green completed this phase of the painting. I was truly thankful to discover that the wheels on King Tiger's didn't have rubber tyres 🙂 Hopefully more progress tonight now I'm back home. KR's IanJ
 -
Hello All, Normally I only do 1/72 or 1/144 scale stuff and rarely venture beyond this. Even rarer, is a diorama attempt. Tamiya 1/48 King tiger (Porsche Production) figure from the Tamiya Wirblewind kit and a Black dog resin building + a custom made base. Just have to fiddle with getting her to sit properly on the base. Happy Modelling all. Ian
-
Wow. What a build. The final reveal: The build thread is at: Apologies - it's a bit long, and possibly a bit dull 🙂 I've really enjoyed this one. The kit is excellent. I replaced the barrel, but that was just personal preference... The King Tiger. What a beast. Coming from from the Panzer IV, it is huge. I stuck with the kit tracks. and found them really good. To ensure that I could see the tracks, I left the side skirts off, and cut down the front mudguards. Tools were fiddly, as always, but loads of great definition from Meng. All good 🙂 I'm really pleased with how the rear came out. Overall, a really good kit. Hard work (on my part), but worth it. Always learning... for this build: 3-colour hard edge camo is tricky, but doable. I like Panzer Putty 😀 Never try to do chipping with a sponge on a gloss coat, Duh 🤪 A £2 box of artist pencils is better than expensive pigments 🥳 Never ‘just give it a final coat of Dullcoat’... Just leave it as it is 😀 This model is broadly based on a number of photos/drawings, but does not try to ‘be’ a certain example. Comments happily received 😎 A bit of a rest now before the Jagdpanther!
- 7 replies
-
- 21
-
-
- King Tiger
- MENG
- (and 1 more)
-
Finally getting started on my first kit of 2019.Had this Meng Tiger II sitting around for a while and thought it was about time to get it done. Meng did a fantastic job with this kit and I'm really looking forward to seeing it complete. Also this is going to be my first time using Mig Ammo paints so we'll see how that goes... I have decided to go with the following camo scheme That's all for now but I will post a build update tomorrow.
-
Well I'll give this WIP thing another try..... Not an AFV builder at all really (last one I did was the Tamiya Tiger I 30 years ago) But a mate who is into tanks got me interested and the I saw the Takom 2047 at the lhs and next I was outside with that big box! A period of research followed/ continues, but my inspiration is Liejon Schoot's awesome build of the Trumpy 1/16 kit. I'm really hoping i'll push trough with this one, as i'm prone to getting stuck on details, and chasing my tails in research.... This means I jump about on subassemblies for the most part, modding anything that takes my fancy. some random stuff I have done so far, as i'm a random person... AAggghhhh...google photo's won't play nice...postimage it is.... tbc
-
Hi friends Here i want share to you my Academy King Tiger, which i built last year, i hope thats ok with you that i posting also models from my past. It was my first AFV from Academy, before i built always Tamiya, Dragon, Italeri and Revell. But the Academy kit was really a nice kit, even some parts have to many pieces, example the front machine gun holder have 6 pieces, where the Tamiya one have just 3 pieces, but the fitting was really well and it was a joy to build this kit. As you can see i am not a huge fan of tons of mud, maybe thats could be good for a diorama, but if i build my models just for the shelf then i dont make it so much dusty or muddy, coz i want show the model and not the mud. I wanted build a late version, so i paint it in a very light Dunkelgelb, the green is lightening NATO green from Tamiya even the brown too. so here we go Cheers Werner
-
Hi, Can anyone tell me please, how many sprues are included in this set? cheers, Peter
-
Panzerkampfwagen Tiger Ausf.B Construction & Development Peko Publishing The longwinded proper description of the Tiger II, King Tiger, Sd.Kfz.182, or Konigstiger as it is sometimes otherwise known might leave some potential readers a little confused, but the picture underneath the title leaves no doubt whatsoever that this is a book about the King Tiger. The subtitle is the Construction & Development, and this is exactly what the book is about. It arrives in a hard cover with 236 pages of glossy paper inside. Authored by Alexander Volgin, it is a detailed technical reference of the design history, construction methods and manufacturing of the largest and heaviest tank that saw service in WWII. The text starts with the gestation of the type, and traces its roots back to 1941, and the back-and-forth that led to the final design, after which it moves on to discuss the manufacturing in great detail, using German technical documentation, Allied forensic opinion, and lots of unusual photos from the factories that show the process in-depth, many of which I haven't seen before. There are also many technical drawings and general arrangement sketches relevant to the text surrounding them. The initial production is described in detail in chapter 3, and the adjustments to the design are noted in chapter 4, based upon their experience in the field. The problem there was that the whole drivetrain was over-taxed due to the massive increase in weight during design, which was at the heart of the vehicle, so extremely difficult to remedy. Fortunately for the Allies it was never satisfactorily resolved, which led to many King Tigers being abandoned due to breakdowns, rather than enemy action that would have cost lives and tanks. There were other factors holding back production such as the wholesale destruction of Nazi manufacturing by Allied bombers during this period, which is also touched upon, showing some of the factories and the state they were left in after carpet bombing missions by the USAF and RAF. When Allied command heard of the new tank with the 88mm high velocity main gun there were attempts to find out as much about it as they could, which continued after the war with extensive testing of captured examples. The Field Trials section contains information gleaned from these tests, and there are a number of interesting pictures of the vehicles used, as well as some of the weapons tests that were conducted against the armour, with each type of round used being assessed for potency and effectiveness. Tests of the KT's gun were also conducted against their own armour, showing the some catastrophic damage to a Russian IS-3 that was probably kept very quiet at the time. The final page gives a list of references that were used in compiling this very useful volume. Conclusion This is a serious book about the King Tiger, and isn't just about the pictures. There is a lot to read, some of which is quite technical, so will keep you entertained for a while. The photos, diagrams and drawings are of great interest to armour aficionados, and whether you're a modeller or not, it will be a good read. Review sample courtesy of
-
King Tiger, Initial Production Takom 1:35 Hitler, and therefore Nazi Germany was obsessed with bigger which they equated with better, and this was reflected in almost every aspect of arms production in the run-up to, and throughout World War II. After the Panzer IV had been matched by Allied designs, the Tiger addressed the balance back in their favour, becoming the most feared combatant from any force, despite several draw-backs of its design, such as a weak transmission, and a level of complexity that meant it was slow to manufacture, prone to break-downs and expensive to repair. Expecting the Allies to bring heavier tanks to the field before too long, the King Tiger, Tiger II, or Königstiger as the Sd.Kfz.182 was known came into existence, having begun development even before the war started. Porsche's ground-breaking and complex design was unsuccessful for this reason, while the Henschel proposal was taken forward to production, using the same underpowered Maybach engine that was barely adequate for the Tiger I, and taking on the sloped armour of the successful Panther to significantly increase the effective thickness of the armour whilst keeping weight down to a staggering 70 tonnes. The initial turrets had curved surfaces that were difficult to manufacture, and a redesign was necessary to cure this and remove the shot-trap under the mantlet, with the new design being known today as the Henschel turret, while the old design became the Porsche turret, although both were designed by Krupps. A weak transmission design, coupled with the underpowered engine ensured that many vehicles broke down in the field, and plans were in progress to improve both aspects with fuel-injection and a new drive-train, but were curtailed by the end of the war. Most of the initial order of 1,500 units were built under difficult circumstances due to bombing of the factories and the encroaching Allied forces, and despite its problems it became one of the icons of German tank design of WWII, with a number surviving to be placed in museums, with some still running. The Kit We have had a few King Tiger (KT) kits in 1:35 over the years, but nothing new for quite a while, and at times the preferred brands have been hard to come by with prices reaching silly levels on eBay. Takom's new range of KT kits aims to provide a full set of these imposing tanks, with and without Zimmerit anti-mine coating, with Henschel and Porsche turrets, and with or without interiors. This should cater for almost every possibility, and if you like your tanks buttoned up, you won't be wasting the interior if you buy wisely. The type included from the box is that of the initial production, it therefore includes the Porsche turret and no Zimmerit. It is this and the paint schemes that are represented that make it one of the plainest King Tigers built. Inside the box are a lot of sprues, taking up almost all the available space. There are ten sprues, two hull parts and upper turret in a grey styrene, one sprue of clear parts, one small sheet of Photo-Etch (PE) brass, and a very small decal sheet. The instruction guide is in the by-now-familiar Takom format, in landscape A4, with a separate booklet for the painting instructions. All the parts are beautifully moulded with no sign of flash or other imperfections, but there are quite a few moulding pips, and for those modellers who have an aversion to indie link tracks, look away as, although these are link and length, each individual link is connected to the sprue by no less than ten gates which will require the nice tedious job of cleaning them up before fitting. Before building can begin, you will need to decide which of the four versions you wish to build as certain parts of the front glacis plate and hull deck need to be removed, as well as some holes to be opened up. Construction begins with the the road wheels and the sprockets are made up from two parts whilst the idlers are three part units. Once the gearbox covers and axles, which you will have to be careful in getting the parts fitted int eh right order, have been fitted to the hull all the wheels can be attached to their relative axles. There is a separate lower glacis plate to be attached as well. With all the track links and lengths cleaned up it’s just a case of patience and following the build guide carefully, ensuring it sags in the correct places. Work then begins on the upper hull and the fitting of the towing cables, pioneer tools, and the separate panel for the drivers and bow gunners hatches. Inside, there is a large panel glued to the inside of the glacis plate, along with the two periscopes. The three piece bow machine gun is then assembled and glued into the ball socket in the bow plate. Then, on the outside the rest of the ball mechanism is fitted, along with the armoured hood. The track guards are also added at this point, although I’d probably leave them off until the entire hull is complete and the tracks fitted. Once you’ve decided which version you are building he rear bulkhead is fitted out with the engine gearbox cover, a smaller access hatch, the alternative exhausts and exhaust covers, track puller, the two rear mudguards and rear mounted towing shackles. The completed bulkhead is then attached to the rear of the hull. On the rear upper hull alternative centre engine covers, one is fitted with three individual engine hatches each fitted with a ventilation style dome and two other access hatches. The alternative centre hatch is fitted with a single large hatch each with two ventilation domes. There are also alternative radiator covers, attached each side of the centre hatch, there have different grilles and on one style the grilles are covered by armour plate. Each of the centre mounted circular opening is covered by PE grilles. Each assembly is then glued into position. The upper hull is then glued to the lower, then the upper bow mounted track guards are fitted, followed by the three piece bow mounted light and lower, inner gearbox covers, to which the towing shackles are attached. The turret is assembled next, with the single piece centre section of the turret fitted with the roof, inner rear bulkhead, gunners internal hatch framing, inner section of the commanders cupola, outer rear bulkhead gunners hatch actuator, in open or closed position, three piece gunners hatch, periscope cover, small access hatch and grab handles. The large eight piece rear mounted hatch is then attached with its hinge covers, along with the roof mounted ventilator cover or alternative cover plate. The turret base is fitted with the gun trunnion section via two trunnion mounts and then glued to the turret. The outer commanders cupola is fitted with the seven periscope covers before being glued into position. There are two types of gun barrel, dependent of which version is being built, each made up from five parts before being fitted to the mantlet and the breech end within the turret. The completed turret is then attached to the hull, completing the build. Decals There are four paint schemes, one for each version. All the paint codes are for AMMO paints, but with the German names for each colour. There are six schemes with vehicle numbers; the other two just have generic crosses etc. The decals have been printed by Takom and although only a small sheet they are nicely printed, in register with good opacity. Three of the options are from November 1943 when at the Henschel Factory, each in the same Dunklegelb overall with Panzer grey barrel and red brown muzzle. The one different scheme is for a vehicle from January 1944 at the Henschel tank proving grounds, Houdenbeck, Germany, in Panzer grey overall Conclusion This is a very nice kit, as we have come to expect from Takom. The track links could cause some modellers sleepless nights, but with a bit of patience they should be fine. Other than that a fairly easy build and will look great in any collection. Review sample courtesy of UK Distributors for
-
Last year I purchased the meng king tiger and full interior set. While I was preparing for the build I noticed that I couldn't find many sites showing a step by step guide in construction (I have recently found out that there are many and I just wasn't looking), so I have decided to log the build on this feed. I am aiming just to build the kit straight out of the box. I hope everyone enjoys my work. I will post more pictures as and when I manage to get bench time.
-
 Hey Everyone, A new tank has found it's way onto my workbench, The mighty King Tiger Background The German Tiger Ausf. B, or King Tiger was arguably the very best tank that was put onto the battlefield during WW2, as well as the most costly. With each unit requiring some 300,000 skilled man hours to complete, the King Tiger went into serial production in December 1943 at the Henschel factory in Kassel. At the peak of production it took only 14 days to complete, and by the end of the war 492 examples were ultimately produced of the 1500 units ordered due to the intense Allied bombing campaign. With frontal armor reaching up to 150mm thick and side armor 80mm thick, this nearly 70 ton tank was built around the famous dual-purpose semi-automatic 88mm canon firing armor-piercing or high explosive rounds, the KwK 43 (L71) production by Krupp, with the T.Z.F.9b/1 binocular gun sight (later followed by the monocular T.Z.F.9d) built into the cradle. This set-up allowed the tank to engage virtually any enemy tank before it could come within firing range. The Henschel production version carried 86 rounds of internally stored ammunition for the main gun. Additional armament came in the form of 3 Rheinmetall Machinengewehr 34's with 5800 rounds; one mounted in a kugelblende on the right bow position; one mounted coaxially to the main gun; one mounted externally to the commander's cupola. This massive tank was mobilized by a OLVAR EG40 12 16B mechanical transmission with 8 forward and 4 reverse gears powered. The only other variant of the King Tiger was the Hunting Tiger, or Jagdtiger. With the exception of the initial prototype, all King Tigers were coated with zimmerit until September 11, 1944. The King Tiger dominated the battlefield in terms of capabilities, but often suffered from shortages of lubricants & fuels. These tanks proved themselves in battles ranging from Normandy, the Ardennes, Lake Balaton, and Berlin. Although they lived up to the expectations of the 'Wunderwaffe', the King Tigers were ineffective in stopping the overwhelming numbers they faced on the battlefield. Today there are a total of 11 King Tigers preserved around the world, with the rest having been long lost to the scrap yards. The Kit So I have decided to go with the Takom King Tiger Sd.Kfz.182 1/35 Henschel Turret with Full Interior. The Build So on with the build, Looking at the parts there is very little flash and the parts are detailed and well formed. Here is some shots of the Hull: This is where I decided to start the build, It made sence to start at the bottom and work my way up and after a few painting mistakes I made with my other Tiger build the lesson had been learned. So some progress: I have since given the base a coat of Mig-014 Rotbraun and im waiting on it drying before adding some details and Mig-017 Cremeweiss to the side sills: That's as far as I have got today, more to come over the weekend Chris
 -
I have been working on the Trumpeter Tiger II for almost half a year now (yes I have pictures of the progress). But I've run into a problem with the Turret basket, on the real Tiger II there is the diamond plating at the bottom of the basket and in the kit the basket is bare. I also noticed that the diamond pattern around the turret basket is also incorrect and they are missing the diamond pattern for the drivers' feet. I am curious as to where one could acquire the correct diamond pattern and size. I have been looking around and couldn't find anything that is correct.
-
Mengs 1/35 scale King tiger or Bengal tiger as the correct translation from German word Königstiger. And that animal name was the reason to start this. As “Beast of Nature” was the subject for a scale modelling show in Friesland and also for the upcoming IPMS euro scale modelling on 25 November. However my last tank build experience was over 25 years back. Thought it would be an relative easy build. I was totally wrong! By that I meant the painting and weathering job. Not the superb plastic fit. Only one intervention was needed to align the suspension (those axis were the wheels are mounted on). From late 1944 the Tigers camouflage scheme were (factory dilivered) hard edged patterns. At SennelÄger (Germany) Schwere Panzer-Abteilung 509 (sPzAbt 509) received their new Tigers ausf. B in the last months of 44 till January 45. It was then hastily send to Hungary where they were partly white painted for the operations in winter conditions. From 18 January to 9 May 1945, sPzAbt 509 was continuously involved in offensive fighting in Hungary and (until the surrender to Americans) in Austria. So instead of using simple hand airbrush spay technics a lot of effort was done to simulate the hard edge pattern. To give the model more colour appealing I did not paint the tooling on the hull sides white. But I suspect that in real those tools were also white. The tracks are from Dragons mini tracks series and the tank crew figures from MiniArt. The display is made from wood, filler and bakers flour. Some steps from the construction process followed with final outdoor photographs . Thank you for watching.
- 10 replies
-
- 24
-
-
- sPzAbt 509
- King tiger
- (and 1 more)
-0.thumb.jpeg.27419bf01c40cfb2c3a2133bd1110726.jpeg)
_opt.thumb.jpg.be9c1e22e34c329b51268dfacc8614e0.jpg)