Search the Community
Showing results for tags 'JAGUAR'.
-
The Revell etype is now finished. I made a small WIP thread with some WIP photos also if anyone is interested. Painted in Ammo Mig polished metal and clear coated with Mr. Super Clear. Interior painted in Mr Hobby Russett. Silver/red in my opinion is a colour scheme that always comes out well. It’s a new tooled kit so everything fitted well for the most part. Plenty of details out of the box for the engine bay and a lot of decals to dress it all up. Recommend this kit for anyone else wanting to build a 60’s classic.
-
Hi, Here are some WIP pictures from the etype I'm building at the moment. It is actually near completion but I thought I would put the WIP photos separate from when I upload the finished kit. A great kit, with a lot of parts and decals and it fits together really nice. I went for Ammo Mig polished metal and clear coated with Mr Clear glossy. Interior was painted in Mr Hobby Russet. Some of the potential problems I found are the chrome pieces which are actually a bit fragile, i broke the rear view mirror support piece just by handling it. I also broke one of the rear bumpers in half although it was superglued when i pulled it off because it didn't fit right. Only fit problem I really had was the dashboard, I had to sand down the pedal attachment which goes on the back of it so it could click into place. These are niggling problems however, overall goes together very well generally. Apologies if some of these pictures are not showing the right way, I think the image hosting is setting them all in one fixed ratio.
-
 XX970 was delivered to the RAF in January 1976 and served much of its time with 6 squadron at the home of the Jaguar, Coltishall in Norfolk. It served in the Gulf War, receiving a temporary sand colour before reverting back to green and grey, then being converted to GR3 standard in the mid 1990s. This Jaguar is still complete and currently used for technical training at RAF Cosford. This is the 1/48 Airfix kit, and needed a bit of scratch building to display with the flaps and slats down. I used the Eduard etch set and Air Master probe, plus a mix of Xtradecals and Kits World decals for the markings, serial and tail code. All comments and suggestions welcome! Here is the WIP:
- 25 replies
-
- 59
-

-

-
Hi all Here is the kitty hawk 1:48 two seat Jaguar I brought this part built off a friend a couple of years ago (first picture) and decided to get it finished I decided early on that I wanted to finish it as a Nigerian Air Force Jaguar BN I already had Model Alliance Decals Sepcat Jaguar international sheet (48138) in my stash of decals I replaced the kit ejection seats with a resin set and the boarding ladders I purchased off eBay I used xtra colour enamel paints I’ve heard horror stories about kittyhawk kits and I totally agree this was a shocking kit with ill fitting parts and did test my patience ( probably not the best kit to build after loosing your modelling mojo) but I fought through it and got it done finished this in May 22 enjoy
-
 Icelandic Fine Art is working on a 1/32nd SEPECAT Jaguar GR.1/3 resin kit. Source: https://www.facebook.com/flyingSmodels/posts/pfbid0eVLkgsg3zvkTNDpHnQBKbvsmj4NFpKqcjy27NMS5W5EnWv59Vp9PXyVWoq5os2Zdl See also: https://www.britmodeller.com/forums/index.php?/topic/235074316-temporary-closure/&do=findComment&comment=3778356 V.P.
 -
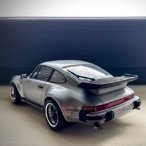
So my second entry for the GB and I'm finally building something other than an aircraft this year! Hopefully suitably big and British - 7 litre, V12, 720HP monster, 4.8 metres long and loud as hell. I prefer the look of the open rear wheel Le-Mans version but this is what I have in the stash and I'm going to build it OOB. I'll be adding the cancer stick logos for historical accuracy (I think they come supplied in the kit) - hopefully I'm OK posting those logos/pics on BM? Build to start / sprue shots / etc. once I get the two tiny MiGs off the workbench!
-
 Here's my attempt at the 1/72 special livery Italeri "Big Cat" kit. Also used for some photographic practise, hence the variety of shot styles (sadly a memory card failed, so I've lost a chunk of the 'plain' model shots, and haven't the patience to go back and redo them all!). Mostly built OOB but an aftermarket seat, Eduard etch airbrakes/brake pipes/nose probes/nosegear door, and the ladder is from Flightpath. I scratchbuilt the removable intake FOD covers and the fuselage beacon, and also modified the main gear quite a bit to better represent the complicated cylinder arrangement. I also cut and re-set the flaps/ailerons/slats to try to better represent the usual 'droop' when the aircraft systems are shut down. Hataka acrylic grey paint, then those rather tricky decals over half the airframe. Loads of setting solution required! Italeri Jag kits don't have the best rep but I'm fairly pleased with this one. Thanks for looking! Here's a quick look at the evolution of the main undercarriage legs, in case anyone's interested: I've been frustrated that no kits (or 1/72 aftermarket parts) seem to have the correct look for the really complex multiple cylinders and rods on the real thing. The first view is the kit leg with the Eduard etch brake lines attached, at which point I decided to try improving a bit...the incorrect thin cylinder/pipe was removed, then various bits of plastic tube, filler and copper wire were added before painting and oil weathering (plus a couple of tiny bits of decal for the placards). Hard to make out much detail at that scale (each leg is only about 1" or less).
- 42 replies
-
- 74
-
-
-
 Hi I thought I'd start this one and try and get it finished by the time I next get to see this at Cosford in June. Am going to add some aftermarket wheels, but I think otherwise it'll be OOB. I had a go at dry brushing in the cockpit, it's still new for me, but seems to have added a bit of interest to the interior. Thanks for looking Steve
 -
Afternoon all, Has anyone built this kit? It's a strange scale (1/38) and is rudimentary though the moulding is crisp and captures the shape well. I bought it at Silverstone 30 years ago whilst wandering around between GP and Touring Cars. I tried to upload a picture but am only able to do so from a URL, the photo is on my phone. Steve
-
Here's the box art from de future KittyHawk 1/48th BAe Jaguar GR.1/GR.3 kit - ref. KH80106 Source: http://s406.beta.photobucket.com/user/KAGNEW-71-73/media/brvbar-brvbar-_zpsb4058b3e.jpg.html?sort=3&o=0 Waiting now the Italeri new tool 1/48th Jaguar GR.1/.3 (ref.2714 - see herebelow) for a product comparison... V.P.
-
I've had a couple of false starts with models I wanted to build, I hope this project will yield a couple of decent vehicles. I've had a couple of Revell Jaguar XK120s in my cupboard for a while, I bought two because I wanted to try building this kit two different ways. The vision: One car built as factory standard. This is based on a car I saw in an old magazine; light blue with a navy and grey interior, with rear-wheel spats. One car built as a bit of a tuned-up, example with a set of Dunlop alloys and no spats. This one will be Tamiya British Green with a tan interior. Here's a mock-up, the wheels and tyres came from K&R Replicas. It might take a bit of ingenuity to fix them to the axles. You can also see that the body needs a lot of cleaning up, those mould lines are just about the worst possible place. On the early XK the ventilation flaps in the front wings need filling in, as these were never fitted as standard (although I think some owners added them later). For the tuned up XK I want to replicate the look of a later car, where the sidelights were integrated with the front wings, rather than being separate, chrome parts. This is a nicely detailed kit, but the copyright information moulded into some parts shows that it is a Monogram moulding and it feels like it might be almost as challenging as the old Monogram Maserati 3500 kit I built last year.
- 74 replies
-
- 16
-
-
I intend building a RAF Germany based Jaguar for the forthcoming GB. Most of photos show tanks on the inner pylons and a practice bomb carrier on the centre line pylon. As this is not really in keeping with the theme of the GB, please do those of you with experience in this area know what a likely operational stores fit would be on Jaguar at that time? Thanks Martin
-
 Many negative things have been written about the KittyHawk 1/48 Jaguar GR.1/GR.3 kit and I have to report that I have nothing to add to change any of them. With the exception of the Tailerons and the under fuselage strakes which both fitted beautifully, every other component required some sort of adjustment. Anyway, I managed to get the thing together and my assessment was that I would get a better result than using the Airfix kit which was sitting forlornly in my stash. I did however resort to a number of modifications and additions as follows: Replaced the misshapen pylons with Airfix ones. Used part of the Neomega cockpit. Used a Flighpath fuel tank. Used Flightpath missile rails on Airfix mount. Used part of SAC main undercarriage legs (experience with the KH Fitter taught me that the legs would sag and distort with time) - embedded in Araldite Used Reskit exhausts (mainly because they were with the kit when I bought it). Used Flightpath AN/ALQ-101 and Eduard Phimat pods Used Eduard CB-87s Scratchbuilt AN/ARC-164 aerial (shown on boxtop but not included in kit), new larger anti-collision light and replaced a number of aerials and probes with resin replacements. Added Master nose probe. Used replacement wheels (Also Reskit I think) which were in the box when I bought it. I'm sure there are more - it's a dog! Perhaps I should have just built the Airfix kit after all! I was determined to eradicate the wing joints which was trying, and succeeded reasonably well in closing all of the panels which don't fit too well here and there. I wanted to model XX725 "Johnny Fartpants" because when I visited Coltishall in June 1991, this was the one I saw most and got the best pictures of - and I am an ex Viz fan tee hee. Decals came from Kits World 48050 and were excellent but I couldn't quite get the artwork to sit at quite the right angle - probably because the panels and panel lines are not quite in the correct places? After a few trials with various mixes and manufacturers attempts at the ARTF Desert Sand I settled on the Mil Spec version, lightened a little. Weathering was with oils. Anyway - it was a struggle and I'm glad it's finished. We desperately need a new Jag kit and the way things are going it won't be by the woeful Airfix thankfully so come on ICM or Modelsvit - I'll buy a few for sure! Cheers Malcolm And finally one of my shots of the real thing some 3 Months after returning.....
- 12 replies
-
- 47
-
-
So I'm contemplating a second 1/48 build (after my Meteor for a mate, RFI elsewhere) which will therefore be my second 1/48 build, in probably almost 48 years! This is not a "soon" build, but a near future lets say. I have built many 1/72 aircraft and have many of those on the go. I'd love to build an RAF Jaguar, as I worked with these aircraft wayback, in the MOD Jaguar project office in the early 70's. Yep, I'm that old! A beautiful aircraft, Trouble is, I am not a seasoned 48th modeller, and i hear the Airfix kii is perhaps OK, and the Kittyhawk kit is very scarce, and maybe not that good. This build won't be quick, but I want it to be good. I'm prepared to use much aftermarket if necessary. So the question is, am I better starting with the Airfix 1/48 jobby, or finding a Kittyhawk release and starting from that? All ideas, opinions and such like very welcome, Terry
-
Finally done.. my Jaguar in 1/48 scale. Built OOB, except for the Model Alliance decals and the Master pitot tube. I wanted to build a 6 sqn machine, since those were the last operational Jaguars I saw. Never saw this anniversary bird, but was inspired by a picture by Chris Lofting on Flickr. Painted with Vallejo and AK acrylics. Kind regards, Gerben
- 18 replies
-
- 48
-
-
-
I needed a break from grey RAF fighters! The ETPS schemes are always a nice change. Here's the old Italeri 1/72 kit with a slightly hybrid livery - I don't think XX145 was ever in this (newer?) version of the scheme, but if she's ever restored and repainted, who knows! Mostly built OOB but with a little aftermarket etch from Eduard, and resin seats and wheels (can't remember where from though, as I started the build ages ago). Decals were from the Air Decal "Raspberry Ripple" sheet which I found on eBay, over Hataka Red Line acrylic airbrushed paints. I'm not sure if the various shortcomings in fit and finish are from the kit or my lack of skill, although it was certainly much more of a struggle than the last kit (the fantastic Airfix GR9). Don't peer too closely! Thanks for looking (from a distance). And with a previous T.2 (Hasegawa kit)...
- 19 replies
-
- 48
-
-
 Hi all, these are the final pictures of the E-Type, I spent quite a bit of time on this little kit, mainly trying to upgrade some of the parts such as the drivers rear view mirror mounting post. I also scratch built a new door mirror as I did not like the bullet style ones provided in the kit. The front headlamp frames were made from silver solder, bent into shape and flattened with a tea spoon. I did manage to throw away the tiny door handles when having a tidy up, I found one of them, so I had to make a copy in solder and PVA glue. I found a way to pivot the bonnet by pushing heated metal pins into the front chassis cross bar and sliding on some plastic bushes. These were glued to the lower portion of the bonnet and a wire restraint was super glued to the chassis to limit the travel so that the chrome bumpers did not touch the ground. The US cars had clear indicator front lenses and all red tail lights, I liked the look of that, so found an Illinois rear plate in my spares box and added that. I gave the car a wash with AK dirt/dust enamels to give it a used cross country dusty drive look. Overall, for a kit dating back to the early 60's I was impressed with the quality of the fit and shape. I look forward to building Revell's latest release and hope you all enjoy the photos. The outside ones were taken in biting -8 degree winds and after 5 minutes my fingers were numb! Paints used: Zero Paints - Jaguar Cotswold Blue Mr Surfacer 1200/1500 black primer 2K Clear coat Mr Color super metallics Abteilung oils/matt thinner UV Resin
- 10 replies
-
- 12
-
-
Hi everyone, having seen that Revell have launched the new tooled E-type, I thought I would give this re boxing a go. It's been in my stash for 5 years or so, the instructions are dated 2011, but the moulding dates back to 1963! I was born in 1962 and my dad was in the car trade in those days and owned a few MK 10's. He had a red hard top E-Type in the 70's which I got to ride in. I still remember the aircraft style cockpit and switches and dials that looked amazing and the push back into the seat as he floored the accelerator pedal.
-
I've been working away bit by bit on this since I finished the Chinook, but I thought that the time had come to start a WIP and get y'all caught up. So, what are we looking at? It's Kittyhawks GR.1 / GR.3 kit which I think will build up into a pretty good shape. There are some gotchas to be aware of though. The kit is really designed to be made with avionics and gun bay doors open and airbrakes too. It's not my usual style to build like that, but I've heard it's can be a struggle to build this kit with those parts closed. Also when I dry fit the two halves of the fuselage, they touch each other at exactly one point, so making something straight and true out of two curves is going to be "fun". As far as after market goes, I have the resin cockpit from Aires plus their replacement airbrake set. Also the SAC metal undercarriage, the Flight path RAF tanks and pods, some pitot tubes and the Kits World decals. Following on a Recce theme from the GR.1A Tonka, I want to model a Jag in the reconnaissance role, so I'm making XZ358 W of 54 squadron. Pictures coming soon. Chris
-
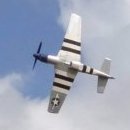
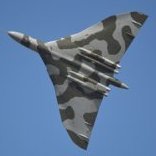
Whilst sorting through a few old photos the other day I came across a couple of negatives taken on my dads old Zeiss Nettar camera that is older than I am. They were taken at the RAF Battle of Britain Display at Finningley (now DSA) I know now to be 1975 The photos are cropped off a 6 cm by 6 cm negative. Pretty sure it was an Ilford FP4 film (Roll film with eight exposures) and I developed it myself Lightning F.6 XS925 'J' of 11 Squadron RAF Binbrook Jaguar GR1 coded '20' of 226 OCU Lossiemouth, I have the lost the bit of paper with the serial on (doh!). The Jaguar was the latest thing in 1974, which is why I probably photographed it. The Vulcan in the background is XM597 used in the Black Buck missions and currently preserved at the Scottish Museum of Flight at East Fortune. I hope you like the bit of nostalgia. There should be some more negatives from the same display
- 10 replies
-
- 13
-
-
- Lightning F.6
- Jaguar
- (and 1 more)
-
Well following my disappointment with the amount of detail of my Hasegawa Jag I bit the bullet and managed to win a Tamiya one on Ebay courtesy of British Red Cross so I might of paid a bit of a premium but hopefully theyll benefit from a few of my pounds. So I hope I can do this beast justice, this is my first Tamiya kit and I must say they are fantastic, dry fitting everything together and it all stays together, I am very impressed. There is a fair few items on order so progress is slow BUT I really want to build this as detailed as I can, the cars hold very fond memories as a kid, i got to meet Martin Brundle a few times through his racing career and have been lucky enough to be photographed sat in a few of his sports cars and F1 cars. As such as I have a couple of die cast Le Mans '88 winners this will be built as Martin Brundles car that failed to finish. I have added all 12 HT leads to the distributor cap, I was going to find the firing order but once the air intake box was added you couldnt see them so their all fixed in numerical order instead. Lots of pipework will be fitted but i need to add most of that to the floor pan so my aim was to get the engine as detailed as i could first. I'm lucky enough to have about 1000 photos of these magnificent cars and virtually every book ever published on these and TWR, i really admired Tom, he had plans for everything and MOST came to fruition, I'm sure he could sell ice to eskimos with the amount of big money backing he got through his business and racing career and I'm sure a weekend in a bar with him would of been hard to beat.!!! So I've added brake lines and as many various leads I can decipher from the photos, most of them just run to the floor around the sump but hopefully will give a good impression. The exhaust is only dry fitted but the wiring for the lambda sensors have been fitted. So huge amounts to go and will be extremely slow but I cant afford to rush it, the disappointment would be too much to bare. Any advice or tips would be greatly appreciated, it is only a few hours into the build and nothing is final where it is, just mostly mocked up at the moment.
-
Here it is, some fancy photos of my Airfix 1:32 Jaguar E-Type Open Two Seater. I was going to build it as it came from the box but had to change the wheels and add a few extra details. The colour scheme is inspired by Jaguar E-Type registration 77RW, which is the first OTS E-Type although this isn't quite an exact replica. Added bits are: Mitoos Classic treaded 20x6mm tyres and 16.5x6mm wire wheels supplied by Pendle Slot Racing (very happy with their customer service). Nickel silver wire gear lever, hand brake lever, windscreen stay and windscreen wipers. Plus a rear-view mirror from a bit of sprue and a whole lot of styrene sheet underneath to close off the under bonnet area and cabin. Link to the WIP thread here. This it the first build that I've both started and finished since joining the forum. Enough chat, enjoy some photos. The backdrop for some of the photos is a picture of the British Motor Museum Collections Centre taken from the builder's website and the car is sitting on a sheet of wet and dry paper as the roadway.
- 26 replies
-
- 18
-
-
-
I was given this kit today by my team at work as an early birthday present. It was such a lovely and thoughtful gesture that, despite vowing not to start another build until I'd completed one that I'd already got in progress, I've decided to make it a project to get it built in the course of my week off next week. I'm sure the Airfix Jaguar E-type Open Two Seater needs no introduction. I built one of these in my adolescence and so I'm quite keen to go back and have another bash at it. It seems somehow appropriate that the bits come in a plastic bag, even if they are contained within a cardboard box. Limited set of decals but they look pretty nice. And the parts themselves, very much a case of "flash! Aaargh!" As recommended by the instructions, I've given the parts a wash in warm, soapy water. I'll leave them to dry overnight before attempting to start the build properly. I'm not quite sure how to tackle this build as you can't assemble the body without also assembling most of the interior and suspension. The various parts of the body don't seem to mate terribly well, so it's going to be a challenge to get it all together to paint. I'll probably use an airbrush rather than spray cans and I think I'll go for green, rather than the red finish that the box art suggests.
-
Hi folks, A model I finished a short while ago. I am still quite new to model building, having done many years of miniature painting previously. A few notes on this one. - This is my fifth build and first Italeri kit. This will be the last time I buy a kit without reading a review. A lot of the pieces were ill-fitting and required a lot of sanding and filling. I would say compared to the other kits I have built (a Hasegawa, a Revell and 2 Airfixes) this was the most difficult and very nearly took a maiden flight directly into the bin! 🙂 - I went a bit overboard with weathering and dirt in part to cover up some of my attempts at correction. A misfiring airbrush then splattered Tamiya smoke in thick quantity - upon trying to wipe it off I actually quite liked the effect and so discovered it by accident (although I'm not sure any Jaguar in service ever looked like it had such a had life! 🙂 ) - Am not sure about the final colour - I had followed some advice I read online and used Mr Color 313 Yellow, but don't think this quite matches photos I have seen of the aircraft. - I still think the Jaguar is a lovely looking aircraft, and now that it is displayed on the wall was definitely a learning exercise! Any comments very welcome!
-
 Here are my two Jaguars that were worked side by side. The Revell Disbandment 'Spotty' Jaguar GR3A of 6 Sqn, XX119 from 2007 and a Hasegawa Jaguar GR3A of 41 Sqn, XZ103 from 2005 which was the display aircraft for that year. The 'Spotty' Jag was built OOB, the decals were hard work and took a lot of Micro-Sol and touching after afterwards to fill the gaps. Despite the reservations of attempting this, it's not turned out too bad. The 41 Sqn Jaguar was also built OOB apart from the correct aerial behind the cockpit and has Model Alliance decals applied. Both were painted mainly using Xtracolor and Humbrol enamels and finished with a Humbrol Satin Cote. The only difference was the tail on XZ103 which was a pearlescent white that I got the local car parts place to mix for me. The picture doesn't quite do it justice but there is a slight sheen in the correct light.