
Search the Community
Showing results for tags 'Huey Cobra'.
Found 3 results
-
AH-1Q/S Cobra US & Turkish Army Service (SH48232) 1:48 Special Hobby The AH-1 Cobra was the first production Gunship or Attack Helicopter to see US service as a new type of weapons platform. During the Vietnam war the US Army began to see the need for armed helicopter to escort its unarmed UH-1 Hueys into combat. Fortunately, Bell Helicopters had been independently investigating helicopter gunships as early as the late 1950s, so in 1962 Bell was able to display a mock up concept to the US Army, featuring a 20mm gun pod, and a ball turret mounted grenade launcher. It was felt by the Army to be lightweight, under powered and unsuitable. Following this the US Army launched and Advanced Aerial Fire Support System (AAFSS) competition, which gave rise to the Lockheed AH-56 Cheyenne heavy attack helicopter that proved to be too technologically advanced and therefore risky for its time, eventually being cancelled in 1972 after 10 years of development (some things never change). Despite the failure of the AAFSS programme, Bell stuck with its idea of a smaller, lighter gunship and invested its own money developing the AH-1 further. They used as many of the proven components they could from the UH-1 platform, adding these to a newly designed slender fuselage that had a minimal front profile. When The US Army later asked for plans for an interim gunship for Vietnam, Bell was in a fortunate position to be able to offer the ready-made AH-1, or the Bell 209 as it was then called. Given the work Bell had already done, the programme was completed in a relatively rapid eight months and won the evaluation battle against the competition. In 1966 the US Army signed an initial contract for 110 aircraft. Some slight modifications were made to the production airframes. The heavy armoured glass canopy was replaced by Plexiglas with an improvement in performance. Wider rotor blades were fitted and the original retracting skids were replaced by simple fixed units. The G model was the initial 1966 production model gunship for the US Army, with one 1,400shp (1,000 kW) Avco Lycoming T53-13 turboshaft. Bell built over 1,100 AH-1Gs between 1967 and 1973, and the Cobras would go on to fly over a million operational hours in Vietnam, losing approximately 300 to combat shoot-downs and accidents during the war. The U.S. Marine Corps would use AH-1G Cobra in Vietnam for a short period before acquiring more damage resilient twin-engined AH-1J Cobras. The AH-1Q/S was basically the AH-1G with the addition of a more capable Telescopic Sight Unit (TSU) and the facility to mount a four-pack of M56 TOW missiles under each winglet. The AH-1S is the same basic airframe but with a more powerful T53-L-703 turboshaft engine that was of benefit to the Turkish army because of their hotter climate. The AH-1 went on to serve the US Army until it was replaced by the AH-64 Apache. The last one leaving active service in 1999. The Kit This is a reboxing of a new tool from Special Hobby that brought us a long-overdue update to some of the older kits of the type on the market, plus more varied boxings as time goes by. This edition depicts the American airframes used in Vietnam, and arrives in a standard top-opening box in Special Hobby’s Hi-Tech black theme, and inside are eleven sprues in various sizes in grey styrene, a large clear sprue with a choice of canopies for upcoming versions, a decal sheet and their usual glossy A4 instruction booklet with spot colour throughout, plus colour profiles of the decal options in the rear. There are several red Xs on the sprue diagrams, as they have been tooled with future boxings in mind, so after you’re done building it, you will likely have parts left over. I’d also recommend checking the sprues for parts that have come off the runners during shipping, as a fair few were loose in past boxings, so don’t go tossing the bags in the recycling before you’ve checked for lurkers. Detail is excellent, as we’ve come to expect from SH, especially in the cockpit, the exterior surface and the rotors, while the instruction booklet takes you through the build process with colour and scrap diagrams used to clarify the process. Construction begins with the cockpit, which will be highly visible through the crystal-clear canopy parts, and this starts with the cockpit tub along with foot pedals front and rear, cyclic and collective sticks, gunner controls, filling a small depression in the floor, and the quilted rear bulkhead. The instrument panels receive dial decals to complete them along with coamings and HUD for the rear pilot, and the completed panels are applied to the appropriate crew station. The two seats are built up in the same manner but using different part numbers, starting with the L-shaped seat pan, and adding the sides then cushion to the base, inserting them into their slots between the side consoles and behind the instrument panels. The next step is to start prep of the fuselage halves by adding the nose cone and tail fin, taking care to align them carefully as well as choosing the correct one, as there are two tails provided on the sprues for the different decal options. The rotor-head is installed on a flat plate, allowing the head to rotate if you’re careful with the glue on the outer sleeve, then it is inserted into the fuselage along with the cockpit tub and the short internal exhaust trunk, closing it up after adding nose weight, and leaving it to set up so you can deal with the seams. The cockpit is then outfitted with armour panels on the internal sidewalls with an optional L-shaped part in the port front. What little there is of the underside of the fuselage is blank until you add the two armoured panels under the cockpit, and glue an insert into the hole in the underside around the rear of the turret. Two narrow intakes are added to the sides for three decal options, followed by two styles of main intakes further forward that slot into recesses on the fuselage sides. One of two types of tail stabiliser fins are slotted into the boom, and further forward the winglets that carry weapons are built from two halves plus hollow tip fairings, gluing two small sensor fairings to the nose for one decal option. The boom is covered in well-rendered raised rivets, as is correct for the type, and two appliqué parts are fitted either side below the exhausts, either filling the hole over the exhaust with putty, or fitting a curved baffle into the hole on top. There is a short or long exhaust ring for the decal options, then the winglets have pylons fitted under them midway, and in the tip fairing, allowing munition carriage on any of the four pylons. The fuselage is flipped on its back to create and insert the nose turret, with a pair of fairings added into the main turret part, and a 7.62mm Gatling gun in one aperture, plus a 40mm grenade launcher in the other, and glazing for the smaller turret in the tip of the nose. Four thick eyes, a blade antennae, pop-up searchlight and the rotating gun turret, plus the tail bumper wire under the tail are all installed around the airframe, plus a choice of skids with thicker or thinner supports finish off the main fuselage for now, after which the two-bladed tail-rotor has its crown fitted and is inserted into the hole in the side of the tail. The main rotor sits on a chunky axle, over which an angular washer slides that is joined to the base by a pair of actuators. The two main blades are moulded as a single item, and are first detailed with additional parts before they are glued to the top of the drive-shaft, and are supported by a pair of long control rods linked to the blades to adjust their incidence. A scrap diagram shows the various parts in false-colour to help you get everything correctly aligned. It is lowered into the top fairing later and glued into place. The Cobra’s crew exit on opposite sides, and the long narrow top is fitted first after fixing an instrument cluster to the edge of the moulded-in windscreen, gluing it onto the fuselage at the front and rear of the cockpit cut-out. After the fixed sloped starboard section and port rear section are fixed in place, the two openers can be mounted in the open position and are supported by rods to achieve the correct angle for them. A wire-cutter fin is fitted into the roof of the cockpit for two decal options, and a small styrene part is glued to the bottom frame of the windscreen. Although it is best known for its Gatling gun, the Cobra could also carry rocket pods, and four of the 19-shot M200 pods are included on a separate sprue, as well as the XM26 TOW missile pods that are cylindrical and mounted in a pack of four per side. An optional ground-handling pack is included that consists of a pair of strap-on wheels that attach to a pair of pegs on the upper rear of the skids, lifting them off the ground, and it is towed by a pair of bars that also have castors at the base near the skid to facilitate movement when levelled out and when they’re off the airframe. The bars attach to the front of the skids, then it’s down to you to find a suitable towing vehicle if you wish. Markings There are four markings options in the box, three painted in green, plus a camo scheme for the Turkish option. From the box you can build one of the following: AH-1S 71-21024, 503rd Aviation Company, US Army in Europe, Hanau, Germany, 1979 AH-1Q, 68-15086, converted from AH-1G, different camo in 1970s AH-1S, 68-15204, Massachusetts National Guard, 1991 AH-1S, 10636 (68-15071) delivered to Turkish Land Forces to supplement their AH-1W airframes The decals are printed using a digital process and have good registration, sharpness, and colour density, with a thin gloss carrier film cut loosely around the printed areas. This means that the carrier film on their decals can be coaxed away from the printed part of the decal after they have been applied, effectively rendering them carrier film free, making the completed decals much thinner and more realistic, and obviating the need to apply successive coats of clear varnish to hide the edges of the carrier film. It’s a great step further in realism from my point of view, and saves a good quantity of precious modelling time into the bargain. Conclusion Another variant of the Cobra broadens the range again, and the colourful Turkish option is a little out of the ordinary. Detail is excellent, and should be simple enough to build. Highly recommended. Review sample courtesy of
-
 This is a 1973 Kit and was in the first batch of kits released by Matchbox. It was probably the 2nd or third Matchbox kit I bought, I'm sure the first was the Zero. Less than a 100 yards from where I lived there was a row of neighborhood shops. Supermarkets as we know them were a new concept and the range of local shops included drapers, hardware, grocery, pharmacy and newsagent. The local newsagent was also the sweetshop, toy shop and tobacconist. We had two locally and one of them, Martins, had the ubiquitous spinning rack of Airfix and Frog Baggies, Behind the glass counter were the Airfix boxed kits. One Friday myself and my cousin who lived locally, headed to Martins to spend our two weeks pocket money (2 shillings which had recently become 10p but was always called a florin here in Ireland). This was a little more than we needed for a baggie and the shopkeeper wanting to get all our money showed us this new range of product from Matchbox, which was in coloured plastic and only moderately more expensive than Airfix baggies and it was in a box.... we were hooked. The biggest drawback was that there was only a very limited range and we quickly ran out of choices over the following month. We still built Airfix but Matchbox became a big part of those years. When I dabbled again in kit building in the early to mid 90s the whole industry was in decline due to the developments in computer games. I bought a lot more than I built back then and managed to accumulate a few Matchbox along the way. The kit plastic in great condition, not confident about decals, canopy will be dipped in Gauzy glass agent.
- 14 replies
-
- 15
-

-
- 1/72
- Huey Cobra
- (and 1 more)
-
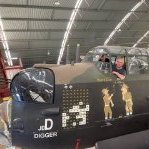
While I was waiting for the paint to dry on the Cessna 172P and Chengdu J-7G, I thought I'd start my next project. It's Monogram's venerable AH-1S kit but I'm modelling it as 76-22592, the AH-1P that is now at the Historical Aircraft restoration Society's annexe in Parkes, New South Wales. When I worked on it in Bankstown during the early 2000s, we were close to getting it running again. As the P differs from the S in a number of areas, I'm using the Cobra Company's AH-1G conversion for the Fujimi AH-1J as it has the turret, pylon and engine cowlings and exhaust I need for the P. I'm also using the seats as I like them better than the kit versions. Most of the cockpit is suitable enough for the AH-1P but I need another cyclic stick as I've lost the gunner's (yes, I do need to keep better track of the parts for my models!) I've got one at home but I won't be back there until early next month to get it. I'll probably need to scratchbuild some tail rotor pedals, too. It'll be finished in the scheme it's in now; US Army Helo Drab all over with the usual stencils.
- 23 replies
-
- 3
-
-
- Huey Cobra
- 1/48
- (and 1 more)
