Search the Community
Showing results for tags 'Fighter'.
-
Curtiss-Wright CW-21B Interceptor (DW48046) 1:48 Dora Wings This little-known light-weight fighter was developed as a private project by Curtiss-Wright with a similar ethos to the Japanese Zero, which was under development almost simultaneously half-way around the world. It was intended to be unbeatable to altitude, outclimbing anything from the era, in order to take down bombers or reconnaissance aircraft before they could reach their target. It was supposed to climb away from its attackers so had little in the way of protection for either the pilot or the fuel tanks, and wasn’t all that heavily armed either, with just two guns in the nose of either .30 or .50 calibre, synchronised with the rotation of the propeller. As expected, the US Army Air Corps were disinterested, but the intent had been to export the type anyway, so Curtiss were unconcerned, although one tester was less than complimentary about the difficult landing characteristics of the aircraft, stating that it took a genius to land it safely. In 1940 a small shipment was sent to China as part of an export agreement, with three transported pre-assembled, the remaining airframes to be constructed on arrival, totalling 30 in all. The Chinese liked them a lot more than the Americans, and put them into limited use where they claimed a few kills. Curtiss were looking to improve the design to gain wider appeal, so two additional sub-variants were created, one dropping the Wright R-1820 Cyclone engine in favour of a V-12 Allison motor, which remained a paper project. The other variant was the CW-21B, which changed the retraction of the main gear from rearward to inward, removing the need for fairings under the wings, and giving the gear a more traditional look. The tail-wheel was also made semi-retractable, remaining in the airflow with a fairing surrounding it to minimise disturbance. An order of 24 was made by the Netherlands, but after the country was overcome in short order by the Nazis Blitzkrieg tactics, the order was transferred to the Royal Netherlands East Indies Army where they served valiantly, but were overcome by sheer numbers of Japanese aircraft. Before long they were all either destroyed or no longer airworthy, save for one that was used as a liaison hack, the eventual fate of which is unknown. The Kit This is a brand-new tooling from Dora Wings, and it’s an awesome achievement for them to continue to release new products while the Ukraine is still at war, and Eugen is doing his duty for his country. The kit arrives in a small top-opening box with a painting of the type on the front, having just downed a Japanese fighter. Inside is a resealable bag with six rectangular sprues in a medium grey styrene, a small sprue of clear parts, a decal sheet, vinyl canopy masks, a small fret of Photo-Etch (PE), and the instruction booklet in A5, printed on glossy paper in colour, with profiles on the rear pages. Detail is excellent, continually improving since their debut, with fine panel lines, raised and engraved details, and inclusion of aspects such as PE and masks that many companies consider extras. Construction begins with the instrument panel, which has a decal for the dials, and is applied to a C-shaped frame, adding some small PE toggles to the dash. A lower stack of instruments is installed between the legs of the frame, from which the rudder pedals hang, and another C-shaped frame glues on behind it, making it free-standing like an easel. The pilot’s seat is a single part that has a pair of PE lap belts slung over the sides, and both assemblies are joined to the floor, which has the control column and a lever installed, plus a bulkhead behind the pilot’s seat. Preparation of the fuselage begins with detailing the insides of the cockpit sidewall on the starboard side with a throttle quadrant and a few levers, and adding more details to the port side. The area around the tail-wheel is a separate insert with ribbing moulded onto the inner faces to allow the original CW-21 to be made from the same fuselage halves. The halves remain separate for now, as the engine must be built first, as it resides inside, so let’s get on with that. The input pathway for the engine is moulded almost complete, but has two missing L-shaped tubes glued into place to finish it off, as is the push-rod wheel, which also has the bell-housing moulded into it, and magneto fixed to the top of it. The 9-cylinder radial engine is made of front and rear halves, with the gaps filled between the cylinders by inserts moulded into the front. The two halves are closed up around the prop-shaft, allowing the propeller to rotate if you don’t overdo the glue. The intake array attaches to the rear with a cylindrical spacer behind it, and the exhaust collectors are made up from two parts each side, with the impression of a hollow lip given by clever moulding. You could deepen the hole to add realism, or just paint the inner black. The two assemblies fix to the engine at the rear, one each side, with the push-rods at the front, and another ring at the rear, joining the three N-shaped mounts that fix to a D-shaped bulkhead behind. Even now, we’re not closing up the fuselage yet. There are wings to be built. As is common with low-wing monoplanes, the underside wing surface is full-width, and the various segments of main gear bay walls insert into position within, performing the additional task of strengthening the shape, accompanied by a short T-shaped spar that also follows and reinforces the dihedral of the wing. The upper wing halves are glued on top, and a central ribbed section covers over the rest of the gear bays. The ailerons are each separate parts, and two small U-shaped ribs are inserted into the bays, and now you can close up the fuselage, trapping the cockpit and engine in position as you do so. A small section of the cowling lip is a separate insert to facilitate adding the gun ports, and a little intake is backed by a trapezoid insert before it is added to the fuselage and the wings are joined to the underside of the fuselage. The fin is moulded into the fuselage, while the elevator fins are fixed by slots and tabs, joined by the separate elevators and the rudder panel, plus a pair of gun barrels that are slipped into the ports in the nose at the same time. The three-bladed prop is a single part to which you add the spinner, and then glue it to the drive-shaft, and the canopy is a single moulding with a spot for the PE ring that has a PE bead inserted into the fuselage in front of the canopy. A pitot probe slides into a hole in the port wing, after which the model is inverted to deal with the gear. The main wheels are each two parts that you can sand a flat into to depict weighting if you wish, and each one mounts on the bottom of the strut, which has a separate oleo scissor-link, and a captive bay door. The inner bay doors each have an L-shaped PE retractor added, and glue to the centreline between the bays along with a retractor for the gear, one part styrene, the other PE. The tail-wheel has a single-sided yoke to which the tiny wheel fits, and the model is completed by adding a clear landing light under each wing, aileron fairings near the wing tips, and a small horn-shaped “thing” between the main gear bays. I don’t profess to know what that is, but is could be a horn, a fuel dump or even a little whistle so people know you’re coming. I’m kidding, by the way. Markings There were only around 50 airframes made, so having three decal options makes for the depiction of a decent proportion of them. They all wear the same basic camouflage, but the operators’ markings help to differentiate them. From the box you can build one of the Following: ‘White Patrol’, Perak Airbase, Java, 2-VLG-IV, September 1941 ‘Yellow Patrol’, Perak Airbase, Java, 2-VLG-IV, September 1941 Ex-Dutch, captured and flown in Japanese markings, Singapore, 1945 I don’t know who prints Dora Wings’ decals, but they have good registration, sharpness and colour density, with a thin matt carrier film cut close to the printed areas. The instrument decal is printed as dials only with a clear film that allows the modeller to paint the panel without having to match colours. Conclusion I’m a fan of Dora Wings, as they’re not frightened of portraying types that you might not have heard of before, and suggest that amongst many other reasons to buy their kits, that’s one of them. This little fighter looks like a baby Corsair with straight wings before its prop grew in, and it will confuse the heck out of anyone that hasn’t heard of it before. The fact that it is also a well-detailed kit is a bonus. Don’t forget that the Ukraine is still not the safest place in the world for anyone, so if you decide to purchase this kit (why wouldn’t you?), it’s possible you might have to be patient due to the vagaries of the situation. Very highly recommended. Review sample courtesy of
-
FIAT G.50 Initial Series (MKM144127) 1:144 Mark.I Models The G.50 was Italy’s first all-metal monoplane with retractable undercarriage, and was in-service by 1938, performing well amongst its contemporaries. It was somewhat short-ranged, and had issues with its initial armament being a little light, originally consisting of two .50cal equivalent machine guns in the wing. The Hawker Hurricane could out-fly it however, and was faster by a good margin, and as time went by the shortcoming became more apparent. A number of attempts to remedy them were made, including improvements to the engine, more fuel and armament changes, but even the installation of a Daimler Benz 601 didn’t give it enough improvement. By this time the G.55 was designed and underway, taking full advantage of the DB engine and at the start of its journey to obtain an excellent reputation as an all-round fighter. Under 800 of the G.50 were made, with a number of two-seat trainers amongst them, and over half as the G.50 Bis, that took the airframe as far as was practical. The Kit This is a brand-new tooling from Czech-based Mark.I Models, and for all you 1:144 aficionados out there, this should be a welcome sight. The kit arrives in a diminutive yellow-themed box, with a nice painting of the type on the front, and the profiles on the rear. Inside are two sprues of a grey styrene, two tiny spruelets in clear, a decal sheet and the instruction booklet, which has colour profiles on the rear pages. The sprues permit you to build two examples of this aircraft, so pick two of the decal options and away you go. Despite the scale, there are recessed panel lines, cockpit detail and plenty of landing gear parts, but that’s the level we’ve come to expect from Mark.I over the years. Construction begins with the tiny cockpit, which has a seat on a rear bulkhead, floor, control column, and instrument panel, which has a couple of decals for it. How cool is that? The painted cockpit is placed inside two fuselage halves, and after adding the thicker centre section of the wings, the two subassemblies are mated to create the basic airframe. There is a two-part engine included that represents both cylinder banks, and that slips inside the two cowling halves, then onto the flat front of the fuselage along with an exhaust insert. At this stage the decal option require different fitments around the underside, namely the intake between the main gear bays, the location of the tail-wheel, and the shape of the spinner slipped over the one-piece prop, be it pointy, curved or absent? On the nose the gun barrels fit into their troughs, and a pair of humped fairings are added further back, then the landing gear is made up, with separate leg, retraction jack, wheel and captive bay door for each one. The tail-wheel is a single part, with the aforementioned caveat of the different location for one decal option. Markings There are four options on the included sheet, with a wide range of colour schemes that will test your airbrushing skills if you go for the mottled options. Two are Italian, while the other two are Finnish, and only one of the latter options is painted in solid colours. From the box you can build two of the following: FIAT G.50 Srs.IV (CMASA-built), Black 352-Red 13 (MM 5403), 352 Flight, 20th Fighters Sqn., 56th Wing, Italian Air Corps, Italian Air Force, Ursel Airfield, Belgium, Autumn 1940 FIAT G.50 Srs.IV (CMASA-built), Black 354-Red 3 (MM unknown), 354 Flight, 24th Fighters Sqn., 52nd Wing, Italian Air Force, Tirana Airfield, Albania, Jan 1941 FIAT G.50 Srs.III (CMASA-built), FA-27 (MM 4944), Black FA-27, 3/LeLv 26, Finnish Air Force, Kilpasilta Airfield, Finland, 1942 FIAT G.50 Srs.I (CMASA-built), FA-17 (MM 3599), Black FA-17/White 1, 1/LeLv 26, Finnish Air Force, Lunkula Airfield, summer, 1941 The decals are printed with the Mark.I logo, and have good register, sharpness and colour density as you would expect, plus a thin glossy carrier film. Given the scale there are no stencils, but it was pleasing to see prop markings as well as the instrument panels for both the kits. Conclusion This isn’t my scale of course, but I have a lot of respect for Mark.I and their kits, which they constantly squeeze detail into, to a far higher degree than many in this scale. Couple this with sometimes unusual subjects, and it’s not surprising that 1:144 modellers watch their every move. Highly recommended. Available from all good model shops Review sample courtesy of
-
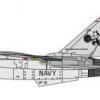
What is the best MiG-19 kit in 1/72nd scale? I know of the old Heller and KP kits, and Mastercraft do one. Are there any others? I'm specifically looking for the cannon-armed version, as opposed to the missiles-only version. Any help would be greatly appreciated! Thank you! Best Regards, Jason P.S. This is an aeroplane that cries out for a new-mould kit. Airfix? Zvezda? Anyone?
-
 Hello for everyone. When an idea is presented, we analyze the feasibility and design technician solution containing all basic elements of the new product and new models project. I have the pleasure to welcome all modellers, guests, participants and friends to the fourth of my WIP here on a forum and to the new one topic. I am looking at the watch, getting a bit worried because I think it is necessary to inform you today about how I intend to approach the work on for the triple AVRO 707 assembly. To tell the truth, I really like a British aircrafts and jet fighters also. The first step is still created in the traditional way: - Open boxes; - Spare parts inspection for the general condition; - Read the manual; - Close the boxes and forget all above (especially text instruction content)... To be continue... Best regards. Andrii
- 61 replies
-
- 12
-

-
 Hello all! I recently purchased a 'Special Red Squadron X-Wing Starfighter' from Amazon, however; it was taking forever to arrive, I even had to re-order it. Thankfully when i was in gamestop i saw a cheap model on the clearance rack. I was a Resistance X-Wing fighter. A simple clip together model for children that makes battle sounds. The same model that can be seen in this older threat from this site... .. I saw that it was a simple model for kids and never intended to be glued, painted, decked out, etc. Challenge accepted. Unfortunately, I didn't take pictures or anything before the stage I am at now (about half way done) however you can see from the old thread what it looked like before I have it a white base, black wash and detailing. This is what the fuselage looks like right now (the least finished part) with just the white base and the black wash. Here is the cockpit/R2 (bb8)section. I have had to take a few liberties with this model. As it is a level 1 model and not intended to be super accurate, just enough, BB8's head is largely oversized (also in part to it being the button to push to make the battle sounds) so I am taking it upon myself to reshape and recolor it to make it look like an R2 unit (which in my opinion it already looks much closer too). I have squared out the eye lense and will update you with more progress about THAT challenge. Here it is Thirdly is just a bookmark on my progress. Literally a simply cannon that has all the detail except the battle damage. With this model, as I said before, certain details are ignored. For instance the 4 cannons have the ability to be attached to any of the 4 spots on the wings because there is 2 holes on every cannon. Sounds convenient in theory. Super annoying in practice, because that means that there is a gaping hole on all the cannons. It's okay if u don't get it, just know it's annoying. So I've had to fill those in the best I can, hence the gritty uneven surface on part of the cannons. Lastly the pièce de Résistance << pun intended haha. The wings... of ..my .. X-Wing. Intended to be heavily battle damaged (as they are resistance fighters). I used a nice metallic paint for the engine part and stayed true to the colors of the original, so far. I had to mix my own blue. I wanted it to stand out so that's why there is alot of detail. I find that some of these x-wimg models are great but are only okay to look at. Every scratch I've painted I try to put a story or moment of impact behind it. Please let me know what you think and if you have any pointers (within reason, don't get too critical I put alot into it) thanks again and I hope you enjoy! Top Bottom Back/Side Both parts Close up Engine (with exhaust built up) I'll post back with more pictures after I have more done. Thanks all! Happy New year!
 -
Hi, Here are a couple of pics of a propeller blade. The aircraft it was mounted on was shot down near Hamburg. Can anyone tell which typy of aircraft it was? TIA, Sebastien
-
It's been a long time since I actually wrote something here on Britmodeller, but here I am... :-) I'm going to build the new resin kit of the Swedish Air Force fighter J 22 in 1:48 scale from Planet Models. The FFVS J 22 is probably not very well known outside of Sweden. I'm not going to tell the entire story behind this little neat looking aircraft. For those who wants to know more I can recommend this site: https://web.archive.org/web/20120213150808/http://www.hobbybokhandeln.se/j22/index.htm Back in 2008 I visited the "Spielwarenmesse" in Nuremberg. I went there with a plan to convince some of the manufacturers to produce some kits of my favourite Swedish aircraft. I had a large pile of books filled with references about the SAAB J 21, the FFVS J22 and Swedish stuff in general. I ended up with the nice people at MPM/Special Hobby who showed great interest. I donated all my books to them... I'd like to think that I'm some way involved in at least this kit I now am going to build here. :-) I'm going to start by saying that I'm sorry if my language is lacking (I'm from Sweden) and for my photos are somewhat of poor quality. I mainly use my mobile phone which has a very bad camera. I forgot to take pictures of the kit before I started to build... Here are some of the main resin components after cleanup. Although it is not apperant in this lousy photo the quality of the resin parts is excellent. The first impression is that the fit also is very good. The canopy is vacu and is very clear and you got an extra spare if you fail with the first one. The undercarriage is in white metal and you get a small etched sheet with some nice details. I mentioned a book about the J 22 earlier and it's excellent. It's "FFVS J22 - Flyghistorisk Revy" and is from around 1990. The book contains some very nice, detailed drawings. I tried to match the main parts to the drawings and the actually match perfectly! I suspect that Planet Models used this book when they designed the kit... :-) Note the matching detail on the rudders and flaps! My only complaint so far is that the detail on the rudders and flaps are a bit overstated. A few swipes with the sanding stick fixed that without any troubles. I also have the Kora FFVS J 22 which was the only J 22 in 1:48 prior to this release. The Planet Model kit is a much better kit. However I'm going to use a few pieces from Kora, for example some of the etch is better. I'm also replacing the engine with a C-47/DC-3 one from Quickboost. Not that there is much wrong with the Planet Model one but the detail is a little sharper and I got a few of those Quickboost engines very cheap at a local swap meet. Here is the Quickboost C-47/DC-3 engine with some detail from the Kora etched sheet. I know it's a bit pointless since the J 22 had a rather big spinner in front hiding most of the engine. Well, I already had the engine lying around on my bench so... Here is it after applying some paint. It will do... There were a few airbubbles in the resin at the very front of the cowling so they had to be filled. I splashed on a litte Tamiya silver spray paint to see if I suceeded in removing them. To be continued... Andreas
- 19 replies
-
- 6
-
-
- Sweden
- World War 2
- (and 1 more)
-
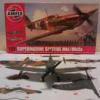
Hello everyone Just recently finished this after a year out of the hobby. Got to say its a fantastic kit. Painted with Tamiya acrylics and used the their Decals which with some micro set and sol settled down rather well. Hope you enjoy the photos. Comments and suggestions appreciated Thanks for looking
-
Kit: Bandai Tie Fighter Scale: 1/72 Paints: Tamyia xf-82 Ocean Grey, xf-54 Dark Sea Grey, xf-63 German Grey, xf-85 Rubber Black, Vallejo 71120 USAF Medium Grey, other Vallejo colours for hand painting, water based grey oil paints for weathering, Tamiya XF-86 Flat Clear finishing coat. Extras: None, not even glue! Build link: http://www.britmodeller.com/forums/index.php?/topic/235005473-172-bandai-tie-fighter/ So, another Bandai Tie fighter. The kit? Well, as good as any Bandai Star Wars Kit. Glue not required!! Simply undercoated with xf-82, top coat 71120, base is xf-54, the wing panel things(!!) are rubber black and dry brushed with various Tamiya greys. Quite a lot of time went into the cockpit which is now invisible!! But it's in there!! Here are the pics: And here he is chasing that pesky x-wing around! That's about it, hope you like them! There will be more... Many thanks, Val
-
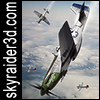 Here's my current WIP project, the famous "wooden wonder": the De Havilland Mosquito. This is actually my first British WW2 project since I started doing 3D some fifteen years ago! About time too, as I lived in the UK for the better part of a decade! I've started with the most common version, the FB Mk VI. The Mosquito served in no less than two dozen countries and about 60(!) pilots made ace on the Mosquito, so it's a nice and versatile subject! Some more images of its current state: Still some modelling left to do, but it's starting to look like a Mosquito! As per usual there were no "perfect" drawings available, so it's a combination of known dimensional data, scale plans, engineering drawings, manual drawings, DH fuselage lofting data generously supplied by Mark Gauntlett (many thanks Mark!), AAEE reports, NACA reports and hundreds of photographs. I.e. plenty of research! Mark's drawings are the most accurate around, by the way, and form the basis of this model, though especially on the tail, wing and engine nacelles I've deviated from them were necessary. My goal is to make this an absolutely accurate 3D Mosquito. The Mosquito will go well with the Junkers Ju 88 I made last year. These two aircraft are perfect adversaries and during the course of WW2 they fought eachother around the clock, over sea and over land, in all bomber, fighter and recce roles. Interestingly the battle between the Ju 88 and the Mosquito started even before the prototype was finished! On 3 October 1940 a well-aimed attack by a single Ju 88 flying at just 60 ft destroyed most of the jigs and killed 21 De Havilland staff, while injuring another 70. The prototype escaped major harm luckily, and as a sign of things to come, the Ju 88 was shot down by small arms fire... I should be rounding this up this month, so stay tuned!
- 34 replies
-
- 2
-
-
- de havilland
- mosquito
- (and 8 more)
-
In order to warm the hearts of the 1/144th scale community, we decided to develop a brand new injection-moulded kit of this lovely aeroplane. The “Beau’s” have never been released before in plastic in this scale, so this is their first appearance. These kits have been made using high-quality moulds, produced by one of the best Czech moulding companies. To whet your appetite here we present you the images of the test shots and the first test build. The finished kit still lacks the clear parts, but otherwise it is complete. Here are some pics depicting how the model master was made from scratch. Each kit contains 53 parts and six clear parts (cockpit and rear gunner canopies, aerial cover and wing-tips with position lights). Naturally, a comprehensive instruction leaflet and a decal sheet are included, the latter offering four options for each Mark. The kits will be available by mid-June. More info about the forthcoming kits and camouflage options can be found here: http://www.4pluspublications.com/en/scale-model-kits/mkm14434-beaufighter-if http://www.4pluspublications.com/en/scale-model-kits/mkm14435-beaufighter-ic http://www.4pluspublications.com/en/scale-model-kits/mkm14436-beaufighter-vi KR Michal Ovcacik, MARK I
- 20 replies
-
- 12
-
-
 All Eagle Keepers, Really looking forward to this. It is my first Group Build and also my first Work in Progress, the standard pics below of the kit and aftermarket zacto goodies (well impressed with these), I may also use Ozmods pilots and will add a pic of them if I decide to use them. Still thorn on what one to do hence the dragon decal sheet, but think it will be the Tigermeet version as I have a serious short fall in spare weapons.
 -
Hey guys. I figured i'd post my Galactica and Viper Mk II, both are battle damaged. These were finished around christmas time and i haven't really posted the pics anywhere. What do you think??? They were the first battle damaged models i ever attempted. Ignore the date on the camera, also the canopy for the Viper is now looking a bit better that in the pics.
- 1 reply
-
- 4
-
-
- Battlestar
- Galactica
- (and 4 more)
-
A fairly pain free build, A good one for anyone who wants to get their mojo back! Here she is... Kit: Academy Scale: 1/48 Type: F117a Stealth fighter Extras used: Two bobs decals Paints used: Vallejo and Tamiya
- 15 replies
-
- 19
-
-
Hello lads, I'm new to this forum and this is my first model build ever, I hope you like it. As a newbie, any suggestion or comment will be gladly received.
-
 Lockheed P-38J-5-LO, 42-67291, “Haleakala”, 459th FS, 80th FG, USAAF, Chittagong, India, 1944 Pilot: Lt. H.H. Sealy 1/72 model built using parts of Hasegawa and Dragon kits (done before the Academy kit became available) with some scratch building/reshaping. The only correctly shaped drop tanks I could find were borrowed from the Frog/Novo kit. Detail sets ( used completely or partially): Aires P-38J/L cockpit set, Eduard P-38J/L detail set, Squadron P-38 F(due to the early style windscreen on J-5) vacu canopy Decals: Aeromaster (all individual a/c markings were inaccurate and had to be corrected or replaced) Dragon/Italeri kit decals, Travers, Revell (P-51B) - for technical markings
- 29 replies
-
- 17
-
-
My gesture of self-sacrifice for the modelling community - finished just in time Sword and then RS Models released their state-of-the-art Sagittario kits. Well, at least I wasn't then spoilt for choice and yes, I still managed to use a few Pavla parts (however, modified)... Some in-progress pictures:
- 13 replies
-
- 13
-
-
- Reggiane
- Sagittario
- (and 7 more)
-
 Hi Everyone, With 2 out of my 3 part built kits nearly finished now, I am picking kits out of my stash to work on while I am off work. The 2nd one I have picked is the Revell 1:48 P-47N Thunderbolt. The kit has the following features - Finely detailed surfaces with recessed panel joints - Detailed cockpit and instrument panel - Cockpit canopy optionally in the open or closed position - Detailed undercarriage - Detailed 18-cylinder twin radial engine - Under-wing pylons with 10 missiles - 2 bombs - External fuel tank Decals for 2 USAAF versions: - Republic P-47N-1-RE Thunderbolt of 318th Fighter Group, 19th Fighter Spuadron at le Shima, Japan, May 1945 - Republic P-47N-2 Thunderbolt of 318th Fighter Group, 73th Fighter Spuadron at le Shima, Japan, May 1945 The kit contains 106 parts over 4 sprues of grey plastic and 1 clear sprue. I haven't decided which decal scheme to build this kit as. Anyway here are the grey sprues. 1 thing I have just noticed about this kit (that I didn't before) is that it has a pilot figure with it. Anyway more photos once I get something to show you. Rick
 -
Bristol F.2B Fighter 1:48 Revell History The Bristol F.2 Fighter was a British two-seat biplane fighter and reconnaissance aircraft of the First World War flown by the Royal Flying Corps. It is often simply called the Bristol Fighter or popularly the "Brisfit" or "Biff". Despite being a two-seater, the F.2B proved to be an agile aircraft that was able to hold its own against opposing single-seat fighters. Having overcome a disastrous start to its career, the F.2B's solid design ensured that it remained in military service into the 1930s, and surplus aircraft were popular in civil aviation. After only 52 F.2As were built production switched over to what became the definitive Bristol Fighter, the Bristol Type 14 F.2B which had first flown on 25 October 1916. The first 150 or so were powered by the Falcon I or Falcon II engine but the remainder were equipped with the 275 hp (205 kW) Falcon III engine and could reach a maximum speed of 123 mph (198 km/h). The F.2B was over 10 mph (16 km/h) faster than the F.2A and was three minutes faster at reaching 10,000 ft (3,000 m). F.2Bs often carried a second Lewis gun on the rear cockpit mounting, although observers found the weight of the twin Lewis gun mounting difficult to handle in the high altitudes at which combat increasingly took place in the last year of the war. A number of attempts were made to add forward firing Lewis guns on a Foster mounting or similar on the upper wing - either instead of, or in addition to the Vickers gun. Unfortunately this caused interference with the pilot's compass, which was mounted on the trailing edge of the upper wing. Some F.2Bs were fitted with a Lewis gun offset top starboard to minimise this effect. The Model The kit comes in a nice looking top opening box, with a picture of an aircraft in the process of dropping bombs, whilst another aircraft chases off the opposition in the background. On opening, all the parts are fairly well protected in a single poly bag. The four sprues of parts in light brown styrene are nicely moulded with no flash and only one or two pips on some of the smaller parts. Strangely there is no clear sprue as the aircraft definitely had a windscreen, albeit a small one. The cockpit is a complex affair with several sub assemblies constructed first before the whole lot is brought together. Beginning with the cockpit floor, onto which the rudder bar and joystick are attached, followed by the engine priming pump handle, front bulkhead and fuel tank. The engine exhausts are then shown to be painted up and addition parts fitted. The instrument panel will need some careful painting and the instrument decals added. Onto the panel the bracing struts and machine gun are attached. The fuselage interior has some nicely moulded representation of the internal structure will also need to be carefully painted to bring out the details. The moulded internal detail is complemented by the fitting of the spare Vickers drum magazines, various pump handles and fittings along with the exhaust panels. Before the fuselage can be closed up the cockpit sub-assembly is fitted, followed by the pilots seat and supporting structure over the fuel tank, the gunners seat pad, rear bulkhead and instrument sub-assembly. With the fuselage closed up the exhausts can now be attached, as can the scarf attachment panel ring over the gunners position. The pilots windscreen frame and the external control fixtures for the rudder bar. The horizontal tail plane is then fitted out with the two elevators then the fin and rudder is also attached. The whole tail assembly is then attached to the rear of the aircraft. Moving forward the lower wing struts are attached to the fuselage and put to one side to set firmly. The upper wing is then assembled with the addition of the pilots compass, gunsight, ailerons and their associated control horns. The lower is also assembled at this point, with the addition of the ailerons, control horns, what look like either grab rails or representations of the control lines. The lower wing is then fitted to the fuselage via the struts fitted earlier. The cabane and inter-plane struts are attached to the fuselage and lower wing respectively onto which the upper wing can then be fitted. The undercarriage struts and axle are fitted to the lower forward fuselage, and the wheels attached. To the rear the tail skid, with bracing struts is attached to the rear fuselage just forward of the tailplane. There three pairs of bomb rails fitted to the lower wing centre section onto which the modeller can choose to fit either the two 100lb bombs, (on the centreline), or eight 25lb bombs, four per side on the outer rails. The engine front is now assembled, with the fitting of optional style radiators which are surrounded by the nose cowl and the two bladed propeller is attached via a pin passed through from the rear of the radiator. The completed assembly is then fitted to the fuselage. The single Vickers machine gun, scarf ring and elevating fittings are assembled and attached to the gunners position, completing the build. Well, perhaps not quite complete, as there is an awful lot of rigging on this aircraft and it would be a waste to build the model without it. Take great care to read and digest the rigging diagrams, which are quite complex, but should be ok if taken one step at a time. Decals The decal sheet has been printed in Italy, so no doubt that it’s by Cartograf. So naturally you’d expect them to be pretty good, and they are. Apart from the twin fuselage bands there is very little sign of carrier film. The decals appear to be nice and thin, slightly matt, with good opacity and in register. The blue of the roundels and fin flash is nicely muted as per the orders of the day. The modeller has the option of building one of two aircraft. Bristol F.2B, C=4630, No. 62 Sqn RFC, Spring 1918 Bristol F.2B, B1134, “19”, No 35. Sqn RFC, France, February 1918 Conclusion This is a great looking kit and Revell have done themselves proud with providing enough detail for all but the most ardent modellers with AMS. It will build into quite a reasonably sized model and should be a great addition to any collection, especially fully rigged, which I’m sure all modellers who buy it will be diligent enough to do. Please note we have walkround photos of the Brisfit HERE Revell model kits are available from all good toy and model retailers. For further information visit
-
 Well thats another finished, I think! Maybe just 1 or 2 more things to add to it at a later date, but thats it 99% complete! Had a bit of an issue with the varnish effecting the decals, as in it started to melt them for some reason, didnt have that problem with the previous kit, but I managed to salvage it just!
- 4 replies
-
- 1
-
-
- battlestar galactica
- viper
- (and 4 more)
-
I built a MkII Viper a few months ago and a friend ended up buying it, so I couldnt do without one myself as I think they are among the best looking fighters in Science Fiction, so ive ended up building another. I recently completed the MkVII version in under a day to set myself a challange to see if I could do it, this time however, that was not possible, there is simply too much work involved in the MkII. So instead its taken a leisurely 2 days to complete minus weathering which I shall do later today! More pics to follow!
- 2 replies
-
- 1
-
-
- battlestar Galactica
- viper
- (and 5 more)
-
 Well, this is the first of my builds that I have posted on Britmodeller. I'm aware that it does not come up to the standard of most of that posted here but I feel that building it has brought me on as a modeller, and we all have to start somewhere! The kit I chose to make is by Czechoslovakian (as they were then) manufacturers KP (Kovozávody Prostejov) and represents an Avia B.534* fighter aircraft which was one of a small number which, as part of the Slovak Insurgent Airforce, provided air support to the 1944 Slovak National Uprising. A fine fighter in its day (in fact, I have seen it described as the apogee of bi-plane fighter design), following the Nazi dismembering of Czechoslovakia it had largely become a second-line aircraft by 1944 when Slovak patriots rose up against the puppet Slovakian Government. In default of more modern types becoming available, owing to large parts of the Air Force remaining loyal to the regime, the B.534s were nonetheless pressed into service. Based at Tri Duby (now Sliač) airfield in Central Slovakia, white S-12 was one of four B.534s which, alongside an initial complement of a couple of Letov S.328s and Emils, made up the full complement of the Combined Air Squadron. From comparison of the box art with that on Scalemates, I would say that this was probably a 1980s boxing. The state of the decals would certainly seem to support this! The moulding had quite a lot of flash on it too and in a couple of cases I had to make a call as to whether an aperture had been flashed-over, or part of the moulding had failed. I'm not sure in all cases I got that right! I loved the Slovak National Uprising markings; unfortunately the decals were very fragile and a bit yellowed. I decided to tolerate the latter if i could sort out the former. It took two coats of Hu49 varnish, but I managed it! This was my first foray into rigging (and stretched sprue more generally), but I wanted to give you all something to look at, so I thought I would give it a go. I have skimped slightly, but I think the overall effect is there. It was also my first foray into the use of vacform parts (in the form of the cockpit transparency, the kit one being missing). Overall, I think it went reasonably well, although my painting could certainly be better, and the positioning of some of the struts leaves something to be desired. But I enjoyed the build! Thanks for looking. * A IV I believe
 -
I originally posted this in the Aviation Art section, but I'd really like some feedback as I go along so please treat this as any other work-in-progress build Here's my current project, a digital 3D model of the famous "wooden wonder": the De Havilland Mosquito. This is actually my first British WW2 project since I started doing 3D some fifteen years ago! About time too, as I lived in the UK for the better part of a decade! I've started with the most common version, the FB Mk VI. The Mosquito served in no less than two dozen countries and about 60(!) pilots made ace on the Mosquito, so it's a nice and versatile subject! Some more images of its current state: Still some modelling left to do, but it's starting to look like a Mosquito! As per usual there were no "perfect" drawings available, so it's a combination of known dimensional data, scale plans, engineering drawings, manual drawings, DH fuselage lofting data generously supplied by Mark Gauntlett (many thanks Mark!), AAEE reports, NACA reports and hundreds of photographs. I.e. plenty of research! Mark's drawings are the most accurate around, by the way, and form the basis of this model, though especially on the tail, wing and engine nacelles I've deviated from them were necessary. My goal is to make this an absolutely accurate 3D Mosquito. The Mosquito will go well with the Junkers Ju 88 I made last year. These two aircraft are perfect adversaries and during the course of WW2 they fought eachother around the clock, over sea and over land, in all bomber, fighter and recce roles. Interestingly the battle between the Ju 88 and the Mosquito started even before the prototype was finished! On 3 October 1940 a well-aimed attack by a single Ju 88 flying at just 60 ft destroyed most of the jigs and killed 21 De Havilland staff, while injuring another 70. The prototype escaped major harm luckily, and as a sign of things to come, the Ju 88 was shot down by small arms fire... I should be rounding this up this month, so stay tuned!
- 37 replies
-
- 4
-
-
- De Havilland
- Mosquito
- (and 8 more)
-
This is my second entry: the older release of the Whirlwind. First released in 1958 it was replaced by a new mold in 1978, also by Airfix. This one would also qualify, as there are more recent kits by Pavla and Special Hobby. It was built when I was a kid and survived with almost all the parts intact because it was glued with a multi-purpose glue that doesn't dissolve the plastic. My purpose is to build it as accurate as possible (taking the plans from the Kookaburra booklet as guide) without resource to resin or PE. You may compare bellow the main parts of the older and newer Aifix releases. The later kit has less parts - 34 vs 37. I'm not sure if I will go for the civil registered aircraft - the first prototype is also an option. I have an almost entire week to decide. Carlos
-
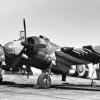
Nakajima A6M2-N Type 2 Fighter Seaplane Hasegawa 1:48 Japan was the only nation to produce and deliver into service float-equipped single-seat interceptor fighter seaplanes (the British Spitfire float adaptation did not progress beyond the experimental stage). When in 1940 the Japanese navy initiated the design of a new interceptor seaplane (the Kawanishi N1K1 Kyofu, or 'Rex'), the need was also expressed for a stopgap aircraft and the Nakajima Company was instructed in February 1941 to develop a float-equipped version of the excellent Mitsubishi A6M2 Zero naval interceptor. As evidence of Japan's long-standing plans for territorial expansion through the Pacific, it had been recognized that in the inevitable 'island-hopping' war there would be few ready-made air bases from which to provide air cover during the occupation of the smaller islands, and that the construction of runways would be impractical. Although equipped with almost a dozen aircraft-carriers, the Japanese would be unable to use them in support of every single island invasion. After removing the wheel landing gear and fairing over the wheel wells of a standard A6M2, Nakajima mounted a large float under the fuselage by means of a forward-raked central pylon and a pair of V-struts below the cockpit; two cantilever stabilizing floats were also mounted under the wings. The standard Zero gun armament was retained, and the first prototype was flown on 7 December 1941, the day on which the Japanese navy attacked Pearl Harbour. Entering production as the Nakajima A6M2-N and codenamed 'Rufe' by the Allies, the new fighter still displayed a creditable performance, being first issued to the Yokohama Kokutai and deployed to Tulagi in the Solomons where the Japanese had first landed during the Battle of the Coral Sea. However, almost all the 'Rufes' were destroyed in a strike on the seaplane base by 15 Grumman F4Fs from USS Wasp on 7 August 1942. Better success attended the 'Rufes' which fought in the later Aleutian campaign, but losses soared as soon as American fighter strength could be built up. During the final year of the war, when American heavy bombers and naval aircraft opened their great attacks on the Japanese homeland, 'Rufes' of the Otsu Kokutai, based on Lake Biwa, were thrown into the battle as interceptors in defence of Central Honshu but suffered very heavy losses. Total production of 'Rufe' amounted to 327 before being halted in September 1943. The Model The kit, the third re-issue, comes in a very attractive box, that Hasegawa seem to be very good at, with an artists representation of the aircraft in flight. Inside, the main sprues of grey styrene are all contained in a single poly bag, which, whilst not the best way of protecting the parts there doesn’t seem to be any noticeable damage. Fortunately the clear parts are contained in a separate bag. The parts are very well moulded, with no sign of flash and only a few moulding pips. It appears that since the real thing is based on a A6M Zero, Hasegawa have used their Zero to be the basis of this model. This means that there are quite a few spare parts, such as the lower wing, engine crankcase, undercarriage, drop tank and numerous smaller items. The build naturally starts with the cockpit, which is very nicely detailed, with the floor, fuselage sides, rear bulkhead, seat, rudder pedals, and joystick. The instrument panel has raised detail, but the dials are each provided as separate decals, which, with a blob of Kleer or gloss varnish will make them look quite realistic. Onto the panel the breaches of the fuselage guns are attached along with the gun sight. The completed assembly is then sandwiched between the fuselage halves as they’re joined together. The upper forward fuselage decking is then fitted, along with the machine gun muzzles. The construction of the engine is next. This is built up with the rear exhaust ring, the two banks of cylinders and the crankcase at the front, complete with pushrods. The engine is then attached to the front fuselage and covered by the one piece cowling onto which the two exhausts are attached. At this point the two single piece horizontal tailplanes are fitted. Before fitting the wing parts together, the holes for the bomb racks, if desired, need to be opened up. The instructions also say that the trim tab recessed panel lines, and a couple of other panel lines need to be filled on the upper wings. With the two upper parts attached to the single piece lower section the separate, clear navigation lights can be attached, along with what look like horn balances. The completed wing assembly is then attached to the fuselage. The two halves of the main floats are joined together with, according to the instructions, 16g of ballast in the nose section. The two, two piece wing floats are also assembled. The floats are then attached to their respective positions on the lower wing and fuselage, the main float, along with its support struts and boarding ladder. If the bombs are to be fitted and these are constructed of the bomb racks, crutch plates and the two piece bomb halves with separate horizontal fins. Once complete these can be attached to the lower wings. To complete the aircraft, the propeller, made up of separate hub, blades and spinner, is attached and the three piece canopy is fitted along with the aerial mast, which passes through the rear Perspex. TO complete the model there is a very nice dolly for the aircraft to sit on, this is made up of the main horizontal beams, support cradles, suspension mounting, axels and main wheels. The aircraft can then be posed on the dolly. Decals The decal sheet is nicely printed, in good register. Along with the standard Japanese markings there are the individual instruments and identification numbers for four aircraft from the Yokosuka Flying Group. Conclusion No matter that the kit has been released before it is still an interesting subject and will build into a very nice model. I imagine it will be subject to severe weathering for those that like that sort of thing, but that’s up to the individual modeller. Recommended. Amerang Hasegawa Review sample courtesy of UK distributors for