Search the Community
Showing results for tags 'F-86D'.
Found 14 results
-
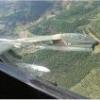
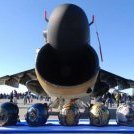
Good evening guys, new summer, different work place, a bit difficult times with this new virus. Well i try to overcome with my favourite hobby with new subject, this time a jet one from the cold era, the very good revell 1/48th scale F-86D. First of all ihave to thank a member here in the forums, Duncan a.k.a. ''Sabrejet''. for his valueable help, explaning details, providing info and clarifiying things regarding this beautiful aircraft and my build specifically. I was going to build this model OOB in order to test an approach to Bare Metal Finish, but...... Here is the profile i want to build, is one provided with the kit... which in fact is a F-86D-35. Revell provides an instrument panel correct only for models D-1 to D-5. So i turned to eduard and i was lucky enough to find the aftermarket Also i needed new wheels, different rim pattern on my profile for the nose wheel and of course better detailed...eduard again... And i always prefer the resin seats to the plastic ones, so i got a true details one... So much for the OOB build, hahahaha Anyway, cockpit first...be aware that the kit provides the seat frame with the catapult triggers up, in fact untill D-35 models there was only one trigger to the right. That means that the seat has entered into the ejection sequence which is wrong. A minor detail of course, only for rivet counters hahaha. I added some levers and painted the cockpit carefully and it really turned out very beautiful i think. Good thing that eduard provides the instrument panel unpainted, i never liked the painted ones, bad thing that it does not provide a painted film for the instruments. Instead it provides a printed one, so i added a thin transparent film to the sandwich! I added some stencils, as you can see, to the fuselage sides and i glued the two halves. I am happy to report that if you are careful with the gluing procedure you are going to need no filler!! I cut off the plastic portion of the dashbord and added a PE one from eduard. Here i painted from the inside the anticollision light, added chrome and i glued it on the fuselage as, according to Duncan, this is a clear panel!! Here i dealt with the wheels and the rocket launcer I glued the wings, flaps, slats, pylons and masked and painted the wheel wells... and last for this post, the canopy, i tried to enhance it masked and painted inside... Thats all for now lads, hope you like it, open to any comment, remark etc!! John
- 20 replies
-
- 15
-

-
 Academy is to rebox the Revell F-86D as 1/48th North American F-86D Sabre Dog "ROKAF - 108th Fighter Interceptor Squadron" kit - ref. 12337 Source: http://www.academy.co.kr/6q/board_news_main.asp?pMenuId=BOARD00002&pCode=12112&pCategory=NEWS5 V.P.
 -
F-86D S/N 51-6168
- 23 replies
-
- 10
-
-
 Hi guys, Can someone please help me with a scan of the decal placement instructions for ProModeler's F-86D Dog Sabre? I have mislaid my own instructions... 😰 What I really REALLY need is the placement of the stenciling. The kit-decals feature quite extensive stenciling, sadly the numbering on the Revell re-pops is totally different. Thanks in advance! Cheers, Erik B.
- 4 replies
-
- 1
-
-
- F-86D
- Promodeler
- (and 1 more)
-
I finished this a couple of weeks ago. First thing - a big shoutout of thanks to theplasticsurgeon who very kindly sent me a replacement set of Airfix decals This was languishing on a shelf waiting to be finished. It just lacked the decals. Despite two (or more coats) of Liquid Decal Film my original Airfix decals just splintered into pieces.
- 15 replies
-
- 34
-
-
Concerning NMT F-86 Sabre... ...is there any "rules" in what parts of the aircraft that should be in darker or more "greyish" aluminium (except from gunplates and the rear part). Looking att pictures for example it's hard to see any differences in shade between slats, flaps, ailerons and other parts of the wings. Sometimes some parts have been more polished than other. But in the long run it's hard to detect that some parts on the wings of the fuselage should be moore dark or greyish aluminium than other parts on an F-86. Or where som parts factorypainted in silver as on the P-51D? http://www.saairforce.co.za/forum/viewtopic.php?t=7972 (Thinking of the picture of the SAAF aircraft with some plates on the fuselage in an different shade) Cheers / André
-
The first scale model was completed this year. The old Airfix models, very dear to Me. The scale model represents the plane of the Yugoslav Air Force, used 60-ies. Here are pictures, enjoy.
- 11 replies
-
- 17
-
-
 Gentlemen, Frankly spoken, Sabres are my favourite jet aircraft with a particularly soft spot for the Sabre Dog variant. Accordingly, it was more than a happy event when both Monogram/ProModeler and Revell of Germany released a new-tool F-86D in 2001. Monogram released the earlier "round tail" version and Revell the later version featuring a distinctive parabrake housing introduced with the F-86D-45. 53-1001 in its 1956 livery when being deployed to Yuma AB for live fire training. "Texas Terror" was the personal mount of Col. Grover Wilcox. Later in 1956 53-1001 was converted to an F-86L. The kit offers a wealth of finely recessed surface details and overall fit is outstanding, safeguarding an enjoyable build right out of the box. Nevertheless, I replaced the kit's cockpit with a Black Box office. IP and IP coaming came from an Eduard PE set. The decals came from an Eagle Strike sheet. Item #48069. In order to replicate the natural metal finish, I used three different shades of Alclad II: Duraluminium, Airframe Aluminium and Semi Matte Aluminium. In order to highlight individual panels and joints I used Gunze Smoke. The model was finished with a final coat of satin varnish "à la maison" consisting of Polly Scale flat varnish, TAMIYA X-20A thinner plus a whiff of Future floor finish at a (by approximation) 60:35:5 ratio. Having another dozen of these kits in my stash, definitely not the last Sabre Dog taking off from my workbench. Thanks for looking! Cheers, Erik
- 30 replies
-
- 27
-
-
Royal Danish Air Force F-86D, pics by Hans J
- 1 reply
-
- 1
-
-
- North American
- F-86D
- (and 1 more)
-
 Photo Etch & Mask sets for Kitty Hawk F-86D 1:32 Eduard The Big Dog from Kitty Hawk is a great kit, and it was only a matter of time before Eduard gave it some of their sets. F-86D Interior Self Adhesive PE For Kitty Hawk Kit Set 3835 1:32 Eduard This set comprises of one colour self adhesive fret, and one small brass fret. The colour fret contains colour self adhesive parts for the instrument panel, side consoles other cockpit placards. Raised area on the panels are made up from smaller parts and the throttle parts complete the set. A couple of small parts of plastic rod will need to be supplied by the modeller. The smaller plain fret contains parts for the canopy rails, and canopy rear view mirror. There is one part for the rear decking area. F-86D Interior Self Adhesive PE For Kitty Hawk Kit Set 38147 1:32 Eduard This set just contains the Self adhesive colour fret from the above set. F-86D For the Kitty Hawk Kit kit Pre-Cut Masks 1:32 Eduard In keeping with their other pre-cut mask sets, this set contains masks for all of the transparent parts, as well as all landing gear wheels. F-86D Exterior Set For The Kitty Hawk Kit 1:32 Eduard As its name would suggest this fret contains many parts for the exterior. The front & main landing gear bays have some replacement parts for access holes, as well as new parts to enhance these areas. Parts are also provided for the landing gear doors. New front and back plates are provided for the rocket tray. The rear one complete with the firing nibs. A complete set of vortex generators for the wings and tail are provided, along with plates to ensure they are placed in the correct positions. Replacement parts for the scissors on the main landing gear legs replace the moulded plastic ones. New access plates are provided for the leading edge slat area. New interiors are provided for the inside of the airbrakes. Lastly new filler caps are provided for the external fuels tanks, and rear fin areas are provided for the kit sidewinders. F-86D Ejection Seat for The Kitty Hawk Kit 1:32 Eduard This set contain parts to address the kit ejection seat. The main plastic parts are retained but most of the other parts are replaced. New complete side parts are supplied, along with the foot rests. A lot of smaller detail is supplied which is not on the kit parts due to the limitations of injection moulding. A complete set of colour seat belts & buckles are provided, along with coloured "Remove Before Flight" tags. F-86D Fabric Seat Belts for The Kitty Hawk Kit 1:32 Eduard If the modeller does not want to use the metal seat belt parts supplied in the ejection seat set, then this set supplies the seat belts in fabric material. A small metal fret then supplies all the buckles for the belts and these will need to be threaded onto the fabric parts. This might be easier than threading metal parts onto metal belts in the seat set. Conclusion The new Kitty Hawk Sabre Dog is a great kit. Eduard have provided many options with these sets to help the modeller enhance their model. Recommended. Review samples courtesy of
 -
F-86D Sabre Dog 1:32 Kitty Hawk The F-86D Sabre, or "Sabre Dog" was developed by North American Aviation from the highly successful F-86 Sabre. Surprisingly the F-86D only has a 25% commonality in parts with the "Sabre". Along with other projects at the time such as the F-84F from the F-84E it was easier to get funding for a development of an "existing" aircraft as opposed to a new design! The F-86D was to dispense with guns as its armament and it was designed around the then new 2.75 inch Folding-Fin Aerial Rocket (FFAR) or "mighty mouse" as it was known. These would be housed in a ventral tray which would deploy under the aircraft for firing. The F-86D would feature a nose mounted AN/APG-36 all weather radar in the nose which would force the engine air intake to be relocated under the nose. Compare to the original Sabre the F-86 would be longer and wider. A clamshell canopy was introduced in place of the rearwards sliding canopy of other models. Thrust was provided by a General Electric J47-GE-17 which featured afterburning, this would later be replaced by an uprated J-47GE-33. A total of 2504 D models would be built. The design would be exported with the Mighty Mouse replaced by four 20mm cannons under the F-86K designation. The D model design would later be upgraded with new electronics, better wings (in the form of extended wingtips & leading edges), with an uprated engine. This would be designated the F-86L. In all the USAF, Japanese Self Defence Forces, Royal Danish Air Force, Hellenic (Greek) Air Force, Philippine Air Force, Republic Of South Korea, Republic of China (Taiwan), Turkish Air Force, and The Yugoslav Air Force would use the F-86D. The Kit The Kitty Hawk F-86D is the first time this iconic aircraft has been kitted in 1:32 scale. The kit arrives in a smaller box than you would expect, however it is crammed full of parts. You get seven sprues of light grey parts, a clear sprue (thoughtfully packed in its own card box for protections), a small PE fret and 2 sheets of decals. Shockingly enough the construction starts with the cockpit. The first item to be made up is the ejection seat. This is a complex affair with a total of 11 parts being used. The seat looks to be a good representation of the unique seat made for the Dog. Following construction of the seat, the electronics area behind it is assembled and attached to the main cockpit tub. Decals are provided for the panels in the cockpit, though the modeller can choose to paint them if they wish. Following this the control column and rudder pedals are installed. The next step is to complete the front landing gear and its wheel well. This is formed on the underside of the engine intake trunking. The wheel retraction gear forms part of the walls of the well and these are glued to the underside of the trunking. The well for the mighty mouse rocket tray which sits behind the wheel well is then constructed along with the rear section of the intake trunking. The two sections of trucking with their sub assemblies attached are then joined up. Construction then moved onto the engine. Even though most of it will not be seen a full engine is provided in the kit. The engine is a model in its own right. The forward inlet cone and fan are constructed. The individual burner cans (8 of them) are constructed and then added to the engine section. The rear fan section can then be constructed. The front engine system is then attached to the intake trunking and the completed cockpit from earlier attached to the top of the trunking. As mentioned a lot of the engine will not be visible. It could be left out as model in its own right, however it seems to provide a lot of structure for the supporting fuselage, and if left out the modeller would need an intake blank and rear blank as well. Next the instrument panel is built up. Again decal is supplied if the modeller does not wish to paint this area. The instrument panel is attached to the front fuselage sections which are then closed around the completed engine/trunking section. A rear bulkhead mounts the engine section inside the fuselage, while the cockpit mounts the front section. Next in the construction sequence is the building of the main wheel wells. These are 5 parts each, and once built they attach to centre section of the underside for the main fuselage section. This section and a front underside section are then attached to the previously constructed main fuselage section. The next item to be constructed is the mighty mouse rocket tray. This can be shown in the deployed or retracted position, though it would be a shame to hide the detail in what was the main armament of the Sabre Dog. If the modeller wants to display the model with the nose radome open than a radar scanner is provided for this area, and needs to be built next. The rear engine section can then be added to the now nearly complete front fuselage section. The rear fuselage sections 9left & right) then join around the engine section. Construction then moves onto the wings, tail-planes, and vertical tail. These are of a convention upper/lower for each side, with left and right for the tail. The main wings feature separate flaps, and the all important leading edge slats. At this time the main landing gear units are also constructed. These items can then be added to the fuselage. Finishing touches are adding the landing gear, pilot entry steps, and rear mounted airbrakes. The radio gear shelf is added into the large canopy and canopy rails added also. Drop tanks are provided, along with rails for sidewinders, for those options which were so armed. Canopy The large clamshell canopy is one of the distinguishing features of the F-86D and Kitty Hawk have done it proud. For a large clear part it is clear and free from distortion or moulding problems. As mentioned a nice touch is that the clear sprue is packaged in its own separate box. Decals Decals are provided for 6 examples. 82nd Fighter Interceptor Squadron, USAF. 325th Fighter Interceptor Squadron, USAF - The "Sabre Knights" Aerobatic team. 181st Fighter Interceptor Squadron, Texas Air National Guard. Japanese Self Defence Forces Republic Of South Korea Air Force Republic Of China Air Force There is no manufacture listed for the decals. They are matt, well printed, in register and look colour dense. Kitty Hawk give the modeller a split decal for the tail/rudder but surprisingly don't give a multi-part decal for the national insignia which go over the air brakes. All of the decal options feature the National Insignia over the airbrake. This will be difficult but manageable to cut the decal out for this, however a split decal would have been appreciated. Similarly the USAF and US Insignia for the wings are not cut where they overlap onto the leading edge slats, though this will be a lot easier to fix. Conclusion Many of us have been waiting for a Sabre Dog to be made in 1:32 scale, and this kit does not disappoint. Highly Recommended. Review sample courtesy of and available soon from major hobby shops
-
F-86D Sabre Dog 'J.A.S.D.F COMBO' Hasegawa 1:72 In 1948 following an intelligence warning concerning Soviet long range bombers the USAF was prompted to accelerate the development of an all-weather interceptor to protect the US. This interceptor was to be based around the new 2.75 Mighty Mouse Folding Fin Aerial Rocket (FFAR). It was felt at the time that a salvo of such rockets would be more effective against a large bomber formation than cannon fire. These were fitted to the F-86D in a ventral tray which extended under the airframe. North American designed the interceptor around their already successful F-86A, although the D model only actually had a 25% commonality of parts with other F-86 variants. It had a larger/wider fuselage, a larger after burning engine, a clamshell canopy; and a nose radome hosing an AN-APG-36 all weather radar. The prototype (then called the YF-95) first flew on 22/12/49 becoming the first night fighter with only a single a crew member and a single for the USAF. Following WWII Japan was denied any military at all. Following the Self Defence Law of 1954 Japan was able to form a Military for Defence of the Japanese state. The newly formed JASDF wanted to procure 150 F-86Ds from the US. Initially pilots went for training in the US with the first 3 aircraft being handed over in January 1958. In the end Japan only received 122 Sabre dogs, 98 went into service with the remainder being used for part. Part shortages posed a big problem for the JASDF, and in its final days only about 30% of the aircraft were serviceable. 4 squadrons flew the F-86D in JASDF service, 101st, 102nd. 103rd and 105th Hikotai. The Kit This kit from Hasegawa has been around for a while yet but is still the best F-86D in 1/72.The kit represents the later model F-86D with the parachute housing. The moulds are starting to show their age a bit as there is a lot of flash on some of the parts, that being aid its great to see the kit being re-released as its been hard to find of late. Construction of the kit follows the usual steps starting with the cockpit. This is not as detailed as some F-86 kits with the base of the ejection seat being moulded into the cockpit tub. Following this you need to make and add the intake, and exhaust to the fuselage before closing it up. No mention is made of having to add any nose weight, however its pretty sure this will be needed. With the fuselage complete its time to add the wings. These are conventionally moulded with the slats as deeper panel lines. Hasegawa missed a trick here, the aircraft is rarely seen on the ground with the slats retracted and the kit would have been so much better had this feature been included in the kit. Following this, it just remains to add all the detail parts to the airframe. The undercarriage is very nice, as its close to scale thickness care must be taken at this stage. If wanted, a complete tray of the mighty mouse rockets can be built and placed under the fuselage, in the down position. The drop tanks are two halved, but the fins are provided as separate parts which will enable the seam to be removed without any trouble. Hasegawa have done a credible job in moulding the rear vortex generators, some additional ones are provided for above the tailplane which the modeller will have to apply themselves. The canopy is very clear and you can see the antenna lines moulded into the plastic which is good. Decals Decals are included for 101st, 102nd, 103rd & 105th Sqn aircraft of the JASDF. Separate code letters are included to model near enough any code lettered aircraft you want. Conclusion Its great to see this kit out on release again from hasegawa. The double boxing's are a great way of getting more value for your money from Hasegawa; overall recommended. Review sample courtesy of UK distributors for
-
F-86D Sabre Dog "Shark Teeth" Hasegawa 1:72 In 1948 following an intelligence warning concerning Soviet long range bombers the USAF was prompted to accelerate the development of an all-weather interceptor to protect the US. This interceptor was to be based around the new 2.75 Mighty Mouse Folding Fin Aerial Rocket (FFAR). It was felt at the time that a salvo of such rockets would be more effective against a large bomber formation than cannon fire. These were fitted to the F-86D in a ventral tray which extended under the airframe. North American designed the interceptor around their already successful F-86A, although the D model only actually had a 25% commonality of parts with other F-86 variants. It had a larger/wider fuselage, a larger afterburning engine, a clamshell canopy; and a nose radome hosing an AN-APG-36 all weather radar. The prototype (then called the YF-95) first flew on 22/12/49 becoming the first night fighter with only a single a crew member and a single for the USAF. The Kit This kit from Hasegawa has been around for a while yet but is still the best F-86D in 1/72.The kit represents the later model F-86D with the parachute housing. The moulds are starting to show their age a bit as there is a lot of flash on some of the parts, that being aid its great to see the kit being re-released as its been hard to find of late. Construction of the kit follows the usual steps starting with the cockpit. This is not as detailed as some F-86 kits with the base of the ejection seat being moulded into the cockpit tub. Following this you need to make and add the intake, and exhaust to the fuselage before closing it up. No mention is made of having to add any nose weight, however its pretty sure this will be needed. With the fuselage complete its time to add the wings. These are conventionally moulded with the slats as deeper panel lines. Hasegawa missed a trick here, the aircraft is rarely seen on the ground with the slats retracted and the kit would have been so much better had this feature been included in the kit. Following this, it just remains to add all the detail parts to the airframe. The undercarriage is very nice, as its close to scale thickness care must be taken at this stage. If wanted a complete tray of the mighty mouse rockets can be built a placed under the fuselage in the down position for the tray. drop tanks are two halved but the fins are provided as separate parts which will enable the seam to be removed without any trouble. Hasegawa have done a credible job in moulding the rear vortex generators, some additional ones are provided for above the tailplane which the modeller will have to apply themselves. The canopy is very clear and you can see the antenna lines moulded into the plasic which is good. Decals Decals are provided for two US aircraft from The 498th Fighter Intercept Squadron which feature the Sharks Teeth as the boxing would suggest. The first is FU-866, this aircraft has "Kings Queen" on the side and a crown. The second is FU-997, unlike the first aircraft this hs the "US AIR FORCE" titles on the side. This second aircraft has wing stripes, plus the character "BIG VIV" on the side. I am not sure who she was, or whether she appreciated being on the side of this F-86! The decals appear well printed and not as thick as some of Hasegawa's normal offerings. The tail and tank decals come as two parts, they can be applied as a whole; or painted and the individual decals applied separately. The same can not be said for the canopy decals as you only get the complete sets with the white stars not being supplied as a separate. Conclusion Its great to see this kit out on release again from hasegawa, despite some flash showing on the parts, this is not great problem for the modeller; overall recomended. Review sample courtesy of UK distributors for