Search the Community
Showing results for tags 'F-104G'.
Found 22 results
-
So: Hasegawa F-104G, still bagged Paulus Victor decals Master pitot tube New Ware mask Humbrol 116 Some images from the net Should give me a model of RDAF F-104G R-699, US serial 63-12699 first flight June 5 1964, to Denmark November 1964 (NMF?) painted green October 1 1969 and a bit (a lot?) worn at RAF Gutersloh in September 1975, which fits the theme? Just waiting for Quinta 3D cockpit decals but we've got 11 days still? Chris
- 28 replies
-
- 16
-

-
Having just started one build in the WWII Twins GB, why not start another one here? I'll be building a Luftwaffe-operated F-104G 23+92, construction number 683D-8102, in the colors of JaboG 34, out of this Revell kit (currently OOB, no extras.) According to 916-Starfighter.de this plane had its first flight on May 30, 1963 so it should be good to go. /Jari
- 28 replies
-
- 12
-
-
 Good morning all! Its about time that I launched my next project on WIP. The poor old F-84F and Mig-23MF are still slowly edging their way to completion but in parallel I have been contemplating my next build(s). Having chewed over a number of other subjects, all of which I will get to at some point (Drakens, F-51D, Ouragan, F-84E, etc) I have settled on the machine that I hold dear in my aviation and modelling heart - Kelly Johnson's superb, elegant and fast F-104. Over time I have been building the store of these, of aftermarket and, more recently, I have been getting decals prepared. I am indebted, as always, to Giorgio @Giorgio N for his knowledge of the subject and drawing skills, while also to Mika at Arctic Decals for his faultless service and generosity. For these builds - a F-104G, a production F-104A and a YF-104A - I will use the Hasegawa 1/72 kit as a base and will add the appropriate parts from Esci/Italeri (Esci) F-104A/C kits. In addition I will use Master pitots and Aires seats. For the G-model I will pull the dart and winding gear from a Hasegawa weapons set (Weapons V number X72-4). Essentially the Esci/Italeri will provide the rear end, the door and the wings. Some may question the extra work in amalgamating the Hasegawa and Esci kits. The reason is that the Esci has an obviously overblown canopy. It does, though, have more detail on the wings. I guess it is swings and roundabouts and personal choice. To me the Esci doesn't look right. This will be a slow burn project, as are all of my builds, and will probably take me across the next 12 months given my normal speed! I hope you will all be interested enough to keep going and to follow me along the way. Anyway, I guess a few photos are in order? Well, here are the three subjects: Credit: Public Domain It will be "4241" Credit: Public Domain Credit: Public Domain For references I have a lot of Starfighter stuff. Here's a selection. Of course, the web helps a lot! For the decals I have already got the Taiwanese sorted by using the Best Fong (for 4241) and Frontpenny (for 4356) sets: and for 55-2963 (clearly not the FAU and F-84F stuff!) : The kits: Aftermarket: If it all goes okay I then have a TF-104G to build! Back soon!!! Martin
- 44 replies
-
- 21
-
-
Hello guys, Second build for this year, the Hasegawa 1/48 F-104G in the markings of the Belgian AF 349 Sq. Paints are Gunze and AK real colors acryls, while decals are from an Eduard reboxing of the Hasegawa kits. This build is a gift for a fellow belgian modeller. Post split as there's qui te a lot images Hope you'll like her.
- 18 replies
-
- 37
-
-
 I'm pleased to present my most recent build, Kinetic's 1/48 F-104G, their initial tool from 2019, representing aircraft 26+60 from Marinefliegergeschwader 2 towards the end of its service life, in the two-tone Norm 76 camouflage scheme. The Starfighter is displayed on a pre-made Zoukei-Mura base and features Eduard's resin Kormoran 1s. Like many of you, I imagine, when I sit down at the workbench, I just want to melt some plastic together, push some paint through an airbrush, and use some Japanese chemicals whose workings I don't entirely understand. But sometimes, my thoughts turn to that one kit in the stash. You know the one: filled with aftermarket goodies, with a full weathering approach and paint scheme already lovingly planned out, just waiting for the right moment, when you think your skills and confidence level can handle it. This is that kit for me. I wanted to just go for it. The build was mostly painless, though not without its quirks and hitches, most of which are my fault. Kinetic's engineering has really improved since my last kit of theirs, the 2013 tool Alpha Jet, which fought me severely a few years back. My main issue was with the wiggle room I had with the wing dihedral. I would have preferred a tighter fit with the wing tab inserts to avoid any uncertainty. I think I got the dihedral close to correct and, more importantly, set the same angle for both wings! I still find that if something can be posed open on a Kinetic kit, it's going to be work to show it closed. That said, I opted for closed airbrakes on this build, and it wasn't too bad; the interior brake detail just needed to be sanded down a bit, and I needed to build shelves from sheet styrene to keep them from falling into the openings. I kind of wish I had sealed up the electronics bay behind the cockpit, though. There's not enough detail on the included parts to really justify having it open without adding significant detail work. Too, the fuselage behind that bay is open to the hollow center of the model; I believe it's open on the real aircraft, leading to yet another bay, but I blanked it out with sheet styrene. I used a fair bit of aftermarket on this build: Eduard T-Face canopy masks; Eduard LooK instrument panel; Quinta 3D cockpit decals (for the close-enough F-104J, sourced before the invasion); Master Model metal pitot; Wolfpack resin Martin Baker Mk 7 ejection seat; and the aforementioned Eduard Kormoran 1s with launch pylons. The cockpit accessories were pretty much superfluous, since there's almost no visibility into the front office. The Eduard panel is fine; the Quinta 3D decals are a bit lackluster. I am, however, rather pleased with the Wolfpack ejection seat. My detail painting suffers from the harsh truth of the macro lens, but from RVD (respectful viewing distance) it looks the part. I used very thin strips of Tamiya tape, cut on an Infini cutting mat, to "paint" the yellow ejection handle stripes. I have a love-hate relationship with the Kormorans, I must confess. I hadn't worked with resin at all before this build, and though with the right tools (and proper safety precautions) I was able to wrestle them into shape, they're not actually both the same shape at this point. One is ever so slightly longer than the other, as they were rear-mounted on their casting blocks and I learned my resin sawing techniques on the fly. They look properly intimidating on the aircraft, but there's a catch. The Eduard Kormorans are, I believe, designed for the Hasegawa F-104; in fitting them to the Kinetic wing, I modified the existing hard point wing holes, with the result that the missiles sit too close to the main wheels, something I didn't anticipate while dry fitting everything. No way a crew chief lets my version of the Starfighter take off with the Kormorans' fins tearing into the tires. . . Paints were a mix of lacquers for overall coverage and acrylics for detail work. A black primer base of Mr. Finishing Surfacer 1500 Black went down first, and I used a black basing technique to attempt to create surface variation and the impression of wear. My source photos of 26+60 and its stablemates all show significant fading and scuffing of the paintwork, particularly the Basalt Grey (RAL 7012) top half. I used AK Real Colors Basalt Grey (RC212) for the upper color, and it thinned down very nicely for the mottle coat. I purposely tried to let more of the black primer show through in the blend coat to get that faded look from the source photos. The nose cone received a blend of Real Colors ADC Grey (RC211) mixed equally with Insignia White to represent heavy fading. The White Aluminum (RAL 9006) underside was painted with Hataka Orange Line White Aluminum (C190), and I used the same restrained mottle/blend approach as with the top color. One note about the Hataka version of RAL 9006, though -- I was under the impression that RAL 9006 was a color name rather than an actual metallic tone. The Hataka paint has metallic flakes, not so many as a "real" metallic lacquer but enough to be noticeable. The final dull coat with Winsor and Newton Galeria Matt knocked the shine down to a more or less acceptable level. For the high visibility RAL 2005 orange on the wing tip tanks, I used Real Colors Luminous Orange (RC207) with a hint of their Insignia White (RC222) for fading, laid down over my new favorite primer, Mr. Finishing Surfacer 1500 Pink. It's not just for anime figurines anymore! The pink primer covered the existing black primer quite readily, and the thin coat of orange I laid down on top of the pink really popped. I'm completely sold on using pink primer for yellows, reds, and oranges at this point. They'll be vivid, but I figure it's easier to tone down a too-bright red or orange than it is to pump up the visual volume of a dull and dark shade. I decided against an overall panel line wash for this build. I've certainly employed the technique before, but my source photos don't show significant panel line definition. I picked out a few significant panel lines using a thinned Paynes Grey oil wash. I used a slightly thinned Warm Grey oil paint to attempt additional fading and wear on the upper half of the aircraft. The effect turned out more like a filter than the Rinaldi "oil paint rendering" technique I was going for, but the end result is sufficiently run down for my purposes. The in-box decals come courtesy of Cartograf, and they behaved as one expects them to, given their provenance. Not too many stencils were provided, but there's still sufficient busy-ness about the aircraft to break up any surface monotony. I laid down an Alclad Aqua Gloss coat before placing the decals, and employed copious amounts of Micro Sol and Set, but I still got a bit of silvering on some of the smaller stencils, and I fully attribute that to my own error rather than the decals. The larger decals went down without much fuss, and artful photography and angles eliminate most of the unfortunate silvering issues for the smaller decals. If you've made it this far, thanks for reading and for taking a look! I'm pleased overall with the outcome. I feel like I stretched my skills a bit and I have to consider this one of my best efforts since I picked the hobby back up four years ago. Definitely room for improvement, but from an appropriate distance, it certainly looks the part of an imposing Baltic Sea enforcer, ready to complicate the day of a Warsaw Pact frigate, and it has nice shelf presence. To anyone associated with the Marineflieger, I apologize for the inaccuracies but hope you can see it as the earnest tribute I intend. Chris Baer
 -
 Model Art : http://www.modelart-shop.jp/ & https://www.facebook.com/modelartjapan/ http://www.modelart-shop.jp/?mode=srh&sort=n&cid=&keyword=NF-104A&x=13&y=14 Source: https://www.facebook.com/modelartjapan/photos/a.278517849179941.1073741828.266008607097532/310769515954774/?type=3&theater V.P.
- 10 replies
-
- 3
-
-
- Starfighter
- F-104G
- (and 1 more)
-
Hello, Begin of a new build, the Hasegawa F-104G, which will be a Zipper of the Danish air force with the faded, abused, green scheme. I have recently purchased the new Kinetic kit and the only difference is that Hasegawa has been litteraly bombing the kit with recessed rivets, which would be a blessing on any other kit, but the Starfighter skin was as smooth as a baby butt .... so , I have to fill in these rivet, especially on the tail and fin area. I first elected to use Mr. Surfacer, but the damn thingies won't fill, the Surfacer remaining on the rivet circumference. Well, plan B, filling with CA glue, one rivet at a time ..... As the wings and stab are also totally pock marked, I've been electing to go go the lazy path and ordered the DACO wing set, void of rivet. More about it when received. Tedious ! but worth the effort.
- 26 replies
-
- 11
-
-
I would like to take part in this GB with the 1/48th Monogram Lockheed F-104G Starfighter. This is the 1986 #5447 version of this venerable kit that was first released in 1978 and last in 2013. This version was released as the specially painted "Buschel Canary" operated by Jbg 33 and was retired in 1985. I paid £4.39 for the kit on eBay 11 years ago and I almost sent it back, the box smelled of mildew and sadly the decals are unusable. Not sure how I am going to paint her yet, maybe a 'Tiger' scheme but I have plenty of choices. Whilst looking around in the stash I found some Eduard photo etch detail sets which must have been in a sale so I might use some of them on this build. Michael
-
 Lockheed F-104G Starfighter Visual Modellers Guide - Wing Series No.1 Ammo by Mig Jiménez The F-104 Starfighter (or missile with a man in it) was Lockheed's & Kelly Johnson's attempt to reverse the trend for large more complex fighters then being developed. It was basically an engine with very little airframe surrounding it. The aircraft had a short life in the US with them going towards heavier and more complex aircraft. The Starfighter did have much more success with NATO nations, though it would later transpire that this success was gained someway by Lockheed bribing officials in some of those countries. The G model was the most numerous model made with over 1100 being built, many under licence. This new venture of walkaround books from AMMO features the F-104G, and in particular an example which has been restored by the Spanish Air force Museum in Madrid. The book is A4 landscape softback format with 70 pages. It is packed with high quality photos showing every aspect of the aircraft and its systems. Conclusion While walkaround books are not new this one is a top quality. We look froward to seeing the following books from Ammo Highly recommended. Review sample courtesy of
 -
Hi, Here is the little egg plane that I finished a few months ago. This is a F-104G Starfighter from AFV. I have build this very cool kit in belgian colors like the one preserved in Beauvechain air base in Belgium. For the metal finish, I tried the Rub n'Buff before doing the same on the Kinetic F-104 I have on my workbench. For the flags and the roundels, my friend Patrick helped me with decals from Retrokit for the Mirage. The codes are Decadry. Well, an easy assembly kit I recommend! See you Lolo
-
-
Hi! I had the old but nice Esci/Italeri 1/72 scale F-104G laying in the box for some years painted and for most much of the parts assembled. When I got the Hasegawa kit at "Svedino's Car and Aircraft Museum" here in Sweden I thought it was time to dust of the box and start an "comparizon build". As the local shop also had the Revell F-104G I put my hands on that one to as what I knew these three kits are the best when it comes to 1/72 scale Starfighter kits. I built some Airfix kits since 1974 and the Airfix kit i still an favourit kit by "nostalia". I have also built the Matchbox kit some 30 years ago. I never seen the Academy kit nor the Frog. And the old Revell F-104 was in 1/64 scale wasn't it? But for now, here is what I found in the dusted box with the Esci/Italeri kit... Cheers / André
- 33 replies
-
- 5
-
-
- Starfighter
- 1/72
- (and 1 more)
-
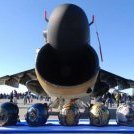
Hi, Concerning the F-104G marinefliegers what is the tan coloured panel behind the cockpit for and why isn't that part painted grey as the rest of the aircraft? Cheers / André
-
 Ready for inspection. My first gallery on Brtitmodeller. This is Lockheed F-104G Starfighter on Matchbox kit PK-28.
- 7 replies
-
- 18
-
-
- Starfighter
- F-104G
- (and 1 more)
-
May 1982: The Ladd Company was at Edwards AFB to shoot some local exteriors and the interiors of the Test Pilot School, control tower and some hangars. An F-104G also came in from the 69th Tac Fighter Training Squadron out of Luke AFB. They wanted the '104 to play the role of the NF-104 "aerospace trainer", re-enacting Chuck Yeager's mishap where he had to bail out after missing the re-entry attitude after the high-altitude zoom climb. The Luftwaffe and the USAF agreed to supply an F-104 from the German training unit at Luke. I think the squadron sent their flagship, hoping to get some screen time for the squadron. The tech advisor noted they couldn't do anything to simulate the rocket motor at the base of the NF-104 vertical tail, but the large "69" on the F-104G tail had to go. Here we see a technician removing the "69" from the tail of 63-13269 on the Edwards AFB transient ramp. Thanks for looking, Sven
-
 "Hey, Ridley!" "Yeah?" "You got any Beeman's?" "I might have Mystic." "Well loan me some, would ya? I'll pay ya back later." "Fair enough!" "I think I see a plane over there with my name on it!" The film was "The Right Stuff" back in 1983 and this was the cue for Chuck Yeagar's flight in the F-104 Starfighter which. for me, is still one of the most thrilling aviation sequences ever filmed. I started this kit three years ago and it depicts 63-13269, one of the two Lockheed F-104G Starfighters used in the film. It is unusual in being mainly covered in silver foil to try to give an accurate metallic effect. She measures 22 inches in length. The kit is the old 1980 vintage Revell 1/32nd scale F-104G Starfighter, I think I got it on eBay for about £8! It is a very straightforward build, not too detailed, goes together fairly well. It does have raised panel lines which is perfect for 'foiling' and as you can see here I have been able to add different shaded panels especially at the 'hot' end of the plane. Overall the foil went on well, I also used Humbrol 27001 metallic paint in a couple of areas, also a rattle can of Halfords Aluminium spray. The white wings upper surfaces were sprayed Halfords Appliance White. The decals were a mix from the original kit, the spares box, and a few from a Victory decals set. She first flew on 2nd March 1962 and became the 69th TFTS Commander's aircraft at Luke AFB in Arizona in 1980 wearing "Fighting 69th" tail art. She starred in the film "The Right Stuff" in 1982; the pilots were Lt Col Robert Patterson (USAF) and Oberstleutnant Heinrich Thueringer (GAF); she was flown until end of operation at Luke AFB on March 16, 1983. She was struck off charge order July 19, 1983 and transferred to Taiwan (ROCAF) in 1983 coded "4383" under project "Ali Shan No.8" to 2 Wing. She was withdrawn from use August 6, 1996 and written off in 1st Depot at Pingtung AB, then scrapped. And this is her in the sun. Have to say I am really pleased with this build and I want to dedicate it to Major Mike Vivian (USAF Retd) who helped train German pilots as an Instructor Pilot with the 58th Tactical Fighter Training Wing at Luke AFB in the early 80's. As always all inaccuracies and mistakes are purely mine! Michael
- 26 replies
-
- 40
-
-
 I've always been fascinated by the Starfighter, it's such a beautiful (and weird) looking machine and I've never build one - so I decided to put that right. I opted for the Eduard "Bundesfighter" kit as I saw it reduced – superb Hasegawa plastic, with 10 decal options and plenty of PE and resin goodies included - what's not to like! I chose the Bavarian scheme because coincidentally I saw the actual aircraft at the Luftwaffe museum at Berlin Gatow quite a few years ago. It's been repainted and stuck on a pole since it's glory days in the 80s though. It's a great kit but probably at the extreme end of my skill level with some tricky (and very small) detail work in the cockpit - I left the canopy loose as I couldn't bare to seal up all the work, hence it doesn't fit in some of the photos. Anyway, here's some pictures, hope you enjoy them!
 -
My first build on the forum, Eduards F-104G "NATOfighter" - a starfighter to you and me! I will be building the Dutch varient, of the Royal Netherlands Air Force, flown by famous Dutch pilot "Capt. Hans van der Werf" - partly because of the decals (I love the shark teeth nose art!) and its more colourful and interesting design. Detailed in box reviews can be found elsewhere but I can say the plastic is of a high quality, with no injection flow issues or other. PE and Resin is very nice, and decals to be expected of cartograf. More to follow.
-
Hi, What would be the best Tamiya paint references or mixes for a Marineflieger F-104G in the 2 tones camo (RAL9006 Weißaluminium and RAL7012 Basaltgrau) ? For the white alu, it seems that the color oxidised quite easily into some kind of light grey so I guess any reference will do. For basalt grey, XF-66 seems to be a good start. What do you think ? Cheers, Antoine
-
The kit is the 1/32 F-104 Starfighter from Revell in a special decal edition box. This kit caught my eye in the poor, pathetic, castoff section of one of my local hobby shops. It is from a purchase of a kit collection and I bought it solely because of the decal option. I normally focus on WWII aircraft and prefer propellers on my kits. However, of late, I have gotten on a Tiger Meet theme. Now, strictly speaking this is not from a Tiger Meet. But, it is of a similar vein. I have no real information as to the actual aircraft other than a few pictures I found on the web. I also do not know how accurate this kit is, but it looks like/resembles a Starfighter to me. On opening the box, the first thing I noticed was the decals. They are old. How old? The instructions and wonderful trademark on the port wing indicate the kit was made in 1980. I made a few modifications to the kit to more closely resemble an F-104 G at the suggestion of a fellow Britmodeller who knows far more than I about F-104s and this particular plane. The WIP thread is here http://www.britmodeller.com/forums/index.php?/topic/234959637-f-104-hunting-cat/. Another reason I chose this model is I am learning how to use an airbrush. Since this scheme is so colorful and combines a flat camo scheme on one side with a glossy bright color scheme on the other side, I thought it would be ideal. I thought this kit would kill me as to painting it. Most of the errors were from my own inexperience. What I did learn was to more appreciate you people that have seemed to have so effortlessly mastered the black, evil and sadistic art that goes by the name airbrushing. For your perusal: Not a whole lot left visible inside of the cockpit, but here goes: As always, all comments welcome.
- 12 replies
-
- 11
-
-
We've all been there with our mental colour cards trying to figure out which is the correct green, peering at every conceivable book and internet resource. Even blindly following the recommendations of a bloke you ever met or heard of before. Painting strips of slightly different shades of green again and again slowly becoming mad and even more unsure of your choice. So after my little rant which Tamiya XF- green is the correct one or nearest to an Italian camo Panavia Tornado from the 80's. Hopefully one of you Tonka boys will help me out. thanks, Wayne
-
A new 'work in progress', this is the ancient Revell 1/32nd Lockheed F-104G Starfighter. This kit has been around since the 80's I am sure and gets reissued every now and then, usually with a bright and interesting colour scheme. It is an easy simple build, is cheap (this cost me a total of £6.90 on eBay) and best of all has raised panel lines I started this build about 18 months ago, it was going to be in Canadian markings but I lost interest and moved on to yet another Phantom so it has languished in a box since then. I am taking a break from an HB F-111A so this is a nice one to pick up and play with again. I want to return to using metal foil to try to continue to learn from the Revell 1/48th F-89C Scorpion which I completed a couple of years ago. This is the state of the build as of last weekend: The idea - at this stage - is that she will be completed as this: She is F-104G 63-13269 which 'starred' in the film 'The Right Stuff'. I have wanted to build this for years and she will be a good opportunity to try out applying metal foil to achieve a polished metal finish as well as differently shaded panels. These are the raw materials: Both sheets are ordinary confectionary foil, most likely chocolate bars from Lidl. The sheet on the left has been pressed and cleaned with white spirit, the sheet on the right has been likewise cleaned then polished with Brasso, then cleaned with white spirit, this has given it a slightly darker and more blue appearance. Some of the tools and discards of the foiling process: The foil is applied with Micro Metal Foil Adhesive. I use cheap disposable knives from B&Q to cut the foil because they go blunt very quickly! This is where I started, I had already constructed the fuselage and sanded the joins then applied Halfords grey primer which seems to help give the foil better contact. You cannot expect to apply foil to every surface because it will cope with some curves but if over-applied it will wrinkle which will spoil the smooth metal effect. I therefore airbrushed some areas with Humbrol Metalcote 27002 'Polished Aluminium, for example the tail fin leading edges, the ventral strake and the grilles around the undercarriage doors, also the inside of the doors. I have also applied Humbrol 85 Satin Black to the air intakes and the nose area. The dielectric panel behind the cockpit is yellow mixed with a drop of olive green. And then start applying foil! I started with the least visible panels underneath, if I make mistakes I want them to be here: Fortunately the technique quickly comes back to me and I develop the confidence to start foiling the more visible panels on the upper fuselage. The result to far is not perfect but the different metal hues are clearly visible. This is achieved by cutting panels from the two foil sheets, also placing some panels at right angles which also gives a slightly different effect. I wanted the airbrake to stand out so I used a piece of kitchen foil for this area. Kitchen foil is thicker and a slightly different hue so I hope this has the desired effect. You are looking at an afternoon's work here: I am encouraged so far... Going to keep at it. One good thing about the Revell kit is that it does have the 'short' tail fin for the F-104C so I can keep my options open. Also, if it is not good enough for my preferred option I can make her into an early silver Luftwaffe F-104G. Will post more when I get to the air intakes. Michael
- 3 replies
-
- 4
-
-
- Starfighter
- foil
- (and 2 more)