
Search the Community
Showing results for tags 'El Salvador'.
Found 2 results
-
Couldn't decide which scheme to go for, so had no option but to build two. This is an AT-6 from 1980 which puts it right at the start of the Contra rebellion against the Sandinista government in Nicaragua. Based again on the Revell issue of the Heller kit, with decals by Blue Rider. I wrote this intro second, so less daft comments. Sorry This one has two tone olive wrap around camo, with the upper wing schemes being unknown so it looks like I have free reign to muck it up as I see fit. This is what I'm aiming for though: Going to be fun carving those stripy decal to the right shape for the rudder, but it shoud look authentically used when I'm done Andy
-
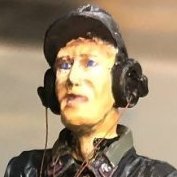 I guess that this topic will depart from the mainstream. It is not often, that a small country like El Salvador, develops an armored vehicle. Back in the mid 80s, a Salvadoran army officer designed an APC/AV based on the chassis of the Dodge M37 3/4 truck, of which several units were out of use and readily available in country. The concept contemplated the use of the Dodge M37 3/4 ton trucks chassis, added armor to drivers´s cockpit and cargo area, new diesel engine and transmission. The prototype was built completely in El Salvador, but the armor lacked ballistic protection. Additional help was received from the US Army Tank Automotive Command's RDE Center's Design and Manufacturing Technology Directorate, who proposed an improved armor / welding design, providing units already cut and welded in Detroit, sending them afterwards to El Salvador as kits to finish the vehicle assembly in country. Plan went on and in total, 44 vehicles were assembled in APC and AF versions, entering into service in 1985. The "Cashuat", from the old local nahuatl word meaning "Workhorse", proved to be practical vehicle, mobile, versatile, and it served as troop carrier and fire support unit throughout the second half of the civil war. A "Cashuat" during more peaceful times. And this brief introductions brings me to my project: a Cashuat in 1/35 scale. Right, there is no kit for this, it needed to be built from scratch mostly. I started by getting the original plans as drawn originally, and buying the most logical thing to start with: a Dodge M37 kit in 1/35. This happened several years ago, and I have been working on this one longer than in any other model I have, and am still working on it. Of the Dodge kit, only the chassis, wheels, transmission and other small things were needed. I started by extending the length of the chassis, according to the blueprints: Then I followed a procedure similar to the real one, cutting and gluing together the vehicle floor and armor. Armor plates were cut from plastic sheet (0.7mm): Started working on the cargo floor supports and details under it, like the electrical motor operating the turret. After this I could join the chassis to the floor. Other details were added as work progressed, as it would be more difficult to start later. Seats and steering wheel from the Dodge truck came in handy! And nothing else! I used metal sheet to issue the instrument panel. Then printed the instrument dials from one of the real Cashuats, and the result was quite convincing. Here compared to the real vehicle. Details like the radiator grill were scratchbuilt using metal sheet. The armored 0.50" turret was built according to blueprints, frame was built with Evergreen plastic rod, the armored cover with plastic sheet. Started experimenting with the way I would build the engine. I think that we are into 4 years of built already… I had the complete shape of the vehicle. I wanted to be able to open the hood and show the engine, so I issued the hinges using thin wire and syringe needles. And of course the "Cashuat" emblem was issued using plastic sheet, nice touch. And started working on the cargo area. The M-60s are mounted on tubular structure on the walls. I used syringe needles for the pipes, and metall sheet for the other details. The Kevlar covering the walls was simulated with Kleenex soaked in white glue. Notice the firing ports fitted with sliding doors (they don´t slide…) The M-60 gunners sat on two sliding seats, I issed these with plastic sheet and syringe needles. The 0.50" turret got additional attention as well. Using kleenex again, the external Kevlar cover of the turret was simulated (never mind the blue paint, it will be overpainted anyway). I added Tasca 0.50" and a figure adapted from the Tamiya Figure (Legs, arms, torso, head all repositioned). There will not be much that you can see of the figure once the turret is assembled. Entering into year 6 I guess, I worked on the engine, paint. Protective frames for the headlights were issued using metal sheet. Bolts and other structures were added to the front bumper. And I was finally able to paint! Cashuat had a wide variety of colors and schemes, I chose the 4-color scheme seen on early vehicles. Only markings on the vehicle are yellow "1/2" numbers, designating their unit: 1st Squadron of the 2nd Mechanized Batallion. Aaaand I will stop here, there are still couple more years of assembly ahead of this, HA! Marco

