Search the Community
Showing results for tags '48th scale'.
Found 5 results
-
.thumb.png.6e11fc11af5645499ae76cb59fcfb788.png) Hi Guys Here is my latest completed model, I thought it would be a 'quickish' build and paint, but it took a little longer, I will add some more detail and a few pictures to look out for a few trips and snags, not all kit related there were some of my own. The kit is good but I found a few little niggles that I could have done without, or the manufacturer could have taken a little more care. Would I build another....YES but would certainly do a few things differently. Straight out the box, and painted mainly with Vallejo Acrylic 'Metal Color' cheers Ali The tail plane is not shown very leerily on the instructions as to what is top side and what is bottom side, I eventually with totally smooth elevator on the TOP side, I think it is correct. I think that there should be a few extra lumps and bumps (control horns) but I did not add these. When decals are applied for this scheme, there are two separate decals that fit the side that has the additional detail (on the bottom of my kit) but the one for the top is supplied in full length, when that is applied to the kit it is fractionally too short, so I had to make a quick slit through the decal while it was applied so I could get it to fit correctly. Additional pictures and some guide lines and things to look out for when building the kit. If doing this scheme the black strips for under the wing do not quite fit. The decal gives a cut out for the pylon be placed within, if that is done then the decal will not fit between, the flap and the aileron area, so I positioned the cut out correctly for the pylon, but then had to add small additional black strips just inboard of the aileron, look carefully at the picture, and you will see a faint joint line in the decals. The undercarriage doors on the front wheel bay are not shown clearly on the instructions, in one picture (15) they are shown with the cut out areas at the back, this is correct next stage 16 shown at front, it is just confusing. Also I would try and think of making a small modification to allow for a more positive attachment of the doors, when all painted up it is quite tricky to get the wheel assembly and the doors securely in place. Great care needs to be taken on getting all the decals correct on the fuselage, the black decals and the 'roundels' I found that it quite tricky to get the cockpit to fit correctly and the instrument panel is very week in the narrow areas, and I broke mine a few times. Some of the fit may have been down to me, but I would advise that you take care and possibly have a trial run before it is all painted. I painted most of the parts individually and then tried to assemble and fit, next time I would do more of a dry run fit first. Note the sliding canopy does not have any 'metal frame work' on the front edge Note these are the parts for the intake, well as can be seen above and below the 'turbine face' is JUST too large to go at the end as they would have you assemble so I shortened the pipe as shown. As can be seen there are even small slots there in the tube for the turbine face to clip into, makes you wonder??? I am not 100% sure what this clear lens is to be honest BUT I could not get it to look right by just painting the inside face, so i coloured the small dot in the middle as shown and then added a piece of plastic card with some chrome foil on behind the lens, see picture a few above, I think it worked quite well. The area for the landing lights does not have any backing, so I added a small piece of card to block that in. The exhaust is not great, so I replaced the kit parts with a one piece tube. A few general notes and things to be aware of or to look out for. There are some areas where the rivets, have gone altogether, especially top and bottom of mid to rear fuselage, also some have been stretched, I did some repairs to these but if you really want a much improved model you will need to spend time on these to make these a lot better. The main undercarriage doors should also have some rivet detail added, they are very bare compared to the rest of the kit, and it show's, I will add them next time round. I found the 'coloured' decals quite thick and they needed warm water to remove them from decal paper but once on the model they were quite difficult to move and certainly needed a strong deca solution to bed down onto the detailed rivet surface, I use the DACO strong decal solution. I was tempted to spray the black areas, but then went with the decals, I thought these maybe tricky to apply BUT they are more pliable that the colour decals, but they need to handled with care, and as mentioned earlier the alignment of six black decals and the roundels on the fuselage is tricky. I found a very good sight with amazing pictures that are really good, and inspirational, you can see all the rivet and marking details and panel colour variations. here is the link http://www.jn-photo.se/Browse-my-images/By-Type/SAAB/SAAB-J29F-Tunnan/i-jw8Kt24/X3 Hope all this helps, cheers Ali
Hi Guys Here is my latest completed model, I thought it would be a 'quickish' build and paint, but it took a little longer, I will add some more detail and a few pictures to look out for a few trips and snags, not all kit related there were some of my own. The kit is good but I found a few little niggles that I could have done without, or the manufacturer could have taken a little more care. Would I build another....YES but would certainly do a few things differently. Straight out the box, and painted mainly with Vallejo Acrylic 'Metal Color' cheers Ali The tail plane is not shown very leerily on the instructions as to what is top side and what is bottom side, I eventually with totally smooth elevator on the TOP side, I think it is correct. I think that there should be a few extra lumps and bumps (control horns) but I did not add these. When decals are applied for this scheme, there are two separate decals that fit the side that has the additional detail (on the bottom of my kit) but the one for the top is supplied in full length, when that is applied to the kit it is fractionally too short, so I had to make a quick slit through the decal while it was applied so I could get it to fit correctly. Additional pictures and some guide lines and things to look out for when building the kit. If doing this scheme the black strips for under the wing do not quite fit. The decal gives a cut out for the pylon be placed within, if that is done then the decal will not fit between, the flap and the aileron area, so I positioned the cut out correctly for the pylon, but then had to add small additional black strips just inboard of the aileron, look carefully at the picture, and you will see a faint joint line in the decals. The undercarriage doors on the front wheel bay are not shown clearly on the instructions, in one picture (15) they are shown with the cut out areas at the back, this is correct next stage 16 shown at front, it is just confusing. Also I would try and think of making a small modification to allow for a more positive attachment of the doors, when all painted up it is quite tricky to get the wheel assembly and the doors securely in place. Great care needs to be taken on getting all the decals correct on the fuselage, the black decals and the 'roundels' I found that it quite tricky to get the cockpit to fit correctly and the instrument panel is very week in the narrow areas, and I broke mine a few times. Some of the fit may have been down to me, but I would advise that you take care and possibly have a trial run before it is all painted. I painted most of the parts individually and then tried to assemble and fit, next time I would do more of a dry run fit first. Note the sliding canopy does not have any 'metal frame work' on the front edge Note these are the parts for the intake, well as can be seen above and below the 'turbine face' is JUST too large to go at the end as they would have you assemble so I shortened the pipe as shown. As can be seen there are even small slots there in the tube for the turbine face to clip into, makes you wonder??? I am not 100% sure what this clear lens is to be honest BUT I could not get it to look right by just painting the inside face, so i coloured the small dot in the middle as shown and then added a piece of plastic card with some chrome foil on behind the lens, see picture a few above, I think it worked quite well. The area for the landing lights does not have any backing, so I added a small piece of card to block that in. The exhaust is not great, so I replaced the kit parts with a one piece tube. A few general notes and things to be aware of or to look out for. There are some areas where the rivets, have gone altogether, especially top and bottom of mid to rear fuselage, also some have been stretched, I did some repairs to these but if you really want a much improved model you will need to spend time on these to make these a lot better. The main undercarriage doors should also have some rivet detail added, they are very bare compared to the rest of the kit, and it show's, I will add them next time round. I found the 'coloured' decals quite thick and they needed warm water to remove them from decal paper but once on the model they were quite difficult to move and certainly needed a strong deca solution to bed down onto the detailed rivet surface, I use the DACO strong decal solution. I was tempted to spray the black areas, but then went with the decals, I thought these maybe tricky to apply BUT they are more pliable that the colour decals, but they need to handled with care, and as mentioned earlier the alignment of six black decals and the roundels on the fuselage is tricky. I found a very good sight with amazing pictures that are really good, and inspirational, you can see all the rivet and marking details and panel colour variations. here is the link http://www.jn-photo.se/Browse-my-images/By-Type/SAAB/SAAB-J29F-Tunnan/i-jw8Kt24/X3 Hope all this helps, cheers Ali- 23 replies
-
- 31
-

-
- 48th scale
- Tunnan
- (and 1 more)
-
Hello All, This was a bit of an experiment and I usually do the occasional 72 scale armour kit. This is the third attempt at a larger scale. I would describe the build pretty good but the paint and weathering was a lot of blundering around in the dark. The scheme is from the Kagero mini top colours volume on the 'Panther in attack and defence'. Happy Modelling all Ian
- 16 replies
-
- 11
-
-
Hi fine folk of Britmodeller land, I'm gently battling toward the end of my latest build, the Tamiya 1/48th scale Spitfire. I'm calling this one a practice run for a possible 1/32nd scale version if ever one comes out. During the build I have experimented a little with some alternative techniques that one or two folk might find challenging. Nothing out of this world you understand but a few things that fly in the face of modern modelling techniques. I hope that by including them here I might give some food for thought. So, I'll begin conventionally enough with the interior. This is not totally OOTB but I deliberately chose to keep any additions or modifications to a minimum. I opted to include the pilot figure to reduce what could be seen in the cockpit tub. With "Ginger" at the controls very little sidewall detail is visible. The cockpit interior is sprayed with Citadel Miniatures colours with the details picked out using a fine brush. I sprayed a darker shade at an oblique angle from the bottom upward then a lighter shade from the top down. Finally I used the lightest shade for some moderate dry-brushing. The silver is Humbrol metalcote Aluminium with a dark wash for the recesses. As you can see, I added straps using Tamiya tape. This was continued through to the rear of the fuselage once the fuselage halves were buttoned up. In the image above one or two may have noticed my first deviation from the norm. I decided early on to fill many of the panel lines on the model. I don't want to give the wrong impression. The panel lines on this Tamiya model are beautifully restrained. However, after looking at plenty of on-line images I felt that they might look more accurate if they were even less apparent. I used the Valejo mica based tube filler which is easy to wet sand. It shrinks a little so the panel lines are still visible in the right lighting. Hopefully, under paint, they'll look ok. Finally for this initial post a quick look at the windscreen. Whilst browsing images on the net I was struck by how green the bullet proof portion of the screen looks from certain angles. This is not any kind of tint, purely the thickness of the glass. So, as an experiment, I used green ink to colour the edges of the glass just in case it added anything to the finished article. Chances are, this mod won't be visible but if that's the case then there's no harm done is there? More soon.
-
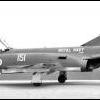
Hi all, In the middle of cutting the grass in this great sunshine had a bit mess about with the camera and took my first outdoors model photo's.....oops the missus is playing hell!! Brian
-
Sorry if this is in the wrong bit, but i posted in the wanted section yesterday but not had any luck so far so thought i would try here. I'm looking for a couple of SNEB pods to go on a FGR2 Phantom. Has anyone got a pair they would part with, or dont need??? Any help would be appreciated. Again sorry if i shoudnt post here for such items. Many thanks Martin