Search the Community
Showing results for tags 'zvezda'.
-
This will be the project for my next trip away. Straight out of the box with no additions.
-
Hard to believe but its been 25 years to the day since the Mig-29 crash at IAT Fairford. I still have vivid memories of that day as it was my first visit to Fairford. I've been wanting to make a model of one of the Migs for years but never quite got around to it. I figured the 25th anniversary would motivate me to build it. The kit is the Zvezda 1/72 Mig-29S with decals from the Hasegawa special. The yellow, blue and black were all masked and sprayed as the Hasegawa markings didn't fit the Zvezda kit. The build went together really easily and my only complaint about the finished model is that it seems to sit far too 'nose up'. Some surgery is needed on the front u/c leg I feel. The biggest challenge was the heat, its too hot to spend any extended time modelling at the moment. As i only finished this yesterday I only had time to take a couple of photos outside. I'll do some 'studio' photos when its a bit cooler! For added symmetry the base its on is one I made 25 years ago out of an old cornflakes packet! Any comments or questions welcome John
- 11 replies
-
- 20
-

-
In the framework of the recent toy tradefair Mir Detstva 2017, held at Moscow, Zvezda is reported having announced, as follow up to it's Il-76 kit (link), a 1/144th Ilyushin A-50 "Mainstay" for 2018. To be followed. Source AlexGRD: http://master194.com/forum/viewtopic.php?f=3&t=100171&sid=b7252e4ad3d849de8e26c4c009281a81 V.P.
-
Another finish for 2018, the lovely Zvezda 1/72 BF109F built as one of Hans Joachim Marseille's planes. Paints were Mr Color and Alclad. Markings were a mix of aftermarket and tail kill markings from a truly horrible Mistercraft "kit". For this one I threw everything at it, resin guns, oil dot weathering, paint chipping with a prismacolor pencil, a funky way to simulate armoured glass and even tried to replicate yellow sand on the undercarriage. WIP is here. And finally, in a "I bought it so I'll use it" moment, a little plastic model, going round and round, just like a Zamboni... Cheers and a happy weekend to all. A
-
Ahh the end of another brain wrecking contract means I can indulge in the Zen that is 1/72 aircraft. First up in the new workspace(s) is this simple , snap fit but nicely detailed 109F: Markings will be Marseille's F courtesy of this truly horrible pile of misshapen styrene, got for 2 Euros! Well did you expect them to spell his name right for that? Pit has been assembled, given a good blast of Mr Paint RLM 66, bit of detail painting and some Eduard belts popped on: The sun is still shining, so I think it's dejeuner sur l'herbe time as we say in Basingstoke, a barbecued wagyu burger and cold Estrella are calling , mazeltov! A
-
 Decent little kit that should be ready to paint soon- I need to paint and assemble some sub assemblies before I can get on with making the two crew figures.
 -
Hopefully got this photo sharing thing sorted, so I'd like to join with a Zvezda -800 kit finished with a set of Nazca's Monarch decals. Dave
-
 At the request of 172flogger (http://www.britmodeller.com/forums/index.php?/topic/235011702-zvezda-2017-catalogue/&do=findComment&comment=2536118) I've the pleasure to open a thread for the Zvezda's future 1/72nd Yakovlev Yak-130 "Mitten" - ref.7307 Source: https://vk.com/doc49818189_438784290?hash=63b43d8bea7b22204e&dl=624ebb4a6e12f7f2a1 V.P.
 -
So this is going to be a first for me as I've never built an airliner model before. Therefore, when I saw the 737 GB I thought 'why not - let's give it a go'. As I haven't built an airliner before, I had nothing suitable in the stash so decided to treat myself to this: Even with the little amount of knowledge I have of airliner models, I can tell this kit is a belter! The parts are perfectly moulded with no flash, crisp fine panel lines and excellent decals make for a perfect baptism of fire. I've decided to go with the scheme on the box which is the only one in the kit as I want to keep my first airliner build as straightforward as possible. Within no time I was following the instructions with gusto and she was just falling together. I can honestly say this is the fastest I've ever started putting a model together - it almost builds itself. I made a start on the wings and underside of the plane: Within 30 mins I had made so much progress I had to stop and take stock - as I said I've never built this quickly before which is testament to the ease of the kit. So within no time this is where I was: I'm really impressed with this kit and it has certainly made me keen to make more airliners in the future as I've really enjoyed working on a completely different type of aircraft. So next steps are to get the cockpit glazing masked and fixed and to tidy up the fuselage with the odd bit of sanding. Engines will be next so hope to have some progress on these for you soon.
-
Hi everyone! Here's my first finished build of 2018. Yeah, I'd normally have 3 or 4 finished by now, but life got in a way a bit You can find the full article and photogallery at my modelling blog.
- 17 replies
-
- 41
-
-
I'm going to build the Zvezda 737-800 as HS-TYS of the Royal Thai Air Force, using Siam Scale decals. Box shot: I made a start this evening. In not much more than an hour I've got the fuselage and wings assembled. The fit is superb, I don't think this is going to need much filler! The perfect kit to build in parallel with the Amodel Mil Mi-10 I'm building in the BM 10th anniversary GB. Here it is with the wings dry-fitted to the fuselage. If I get any modelling time tomorrow I'll take the wings off and clean up all the seams, which won't take much work. The bit that'll take longest is the clear cockpit roof, which stands slightly proud of the fuselage so will need to be blended in, but doesn't look like it'll take long. Thanks for looking Z
-
Here's my Zvezda 1/144 737-800 in Royal Thai Air Force markings, using Siam Scale decals, built for the Boeing 737 STGB. WIP is here. The Zvezda kit is very nice, goes together very well indeed. The Siam Scale decals worked pretty well, only issue was with the winglet decals which seem to have been designed to fit the Revell kit's inaccurate winglets, so needed a bit of trimming to fit. thanks for looking Z
-
Placeholder while I wait for the postie. I've built the 1/100 version of this in Red Army colours so I'll be exploring paths less traveled with this build. The kit is of the more common late version (with the stowage boxes on the rear fenders for the tracks that could be used to convert it into a half track) so I have quite a choice of potential schemes to choose from. I got a good deal on the kit so I spent some of the saving on a metal gun barrel. Now I'm seriously looking at the Swedish version which had the main armament removed. Life, eh? Andy
-
Hi, This is my next entry in the 737 STGB. Here's the Zvezda kit, merely to show it's not started. and here's the intended colours As others have mentioned in this group build and elsewhere, the Zvezda kit is very nice and goes together easily. Options I'll choose for this one will be split-scimitar winglets, possibly later CFM56-7BE engines (if the kit engines can be modified) and a WiFi antenna on top of the fuselage. Due to the placement of the "Southwest" titles, I'll fill the windows and use the included photo real decals. This is a particular favourite colour scheme of mine and I'm looking forward to building it. Jeff
-
 Hi all, Second Entry is the M3 Lee I'll not bother with a running commentary on the construction of this one, it all went together with no trouble and fitted well. As I said, there were no real issues building this but I now need to decide on the end user - The box artwork shows the subject in Soviet service, then there is always the option of American or British markings. These two would, according to photos, require the addition of some extra stowage boxes on the rear hull and, if going for the 8th Army option, the addition of sandskirts. Probably have a sleep on it... Kind Regards IanJ
 -
Hi all, Quick little one to start with - Courtesy of the "Art of Tactic" series produced by Zvezda... This is what you get in the box - The engineering is a bit different from what they've done in the past in that the hull is built up around a frame. And as regards building - let's get on with it! Don't blink or you'll miss it Here's the frame that I mentioned - To this attaches the baseplate, diff housing, glacis plate and all the rear gubbins. Add the hull sides and top - It's all snap together but the manufacturer suggests that it can be glued if you like, TET used in this instance. Humbrol paint pot for size comparison. And it's built - Nowhere near my PB of 12 mins for a Zvezda tank but I took a bit more time with this one - couple of gaps to fill and some filing before priming. I now have to consider colours - Would I be right in saying that it's meant to be an M4A2 76(W)? In which case who used them? Thanks for looking IanJ
-
Tank T-90. As is customary to me, it is planted in the field. It's my first model camouflaged with a spray gun. I tried to spray different shades and light up according to the instructions. The patina is formed by filters and washes, a few pigments. The kit was very good.
-
Had started this one quite a while ago and was planning to do it for the recent MiG-29 group build but did not get around to finishing it up until a few days ago. Great kit, which builds much better than the 9.13 which had some fit issues. As with the 9.13, my main gripe is the separate wingtips which are very delicate and hard to get a perfectly smooth fit. Fit is still worse overall than the Trumpeter but it is more accurate, and includes the characteristic "pinch" behind the canopy. What's best about the kit, however, is the weapons. It's a veritable weapons set in its self with plenty of AA and AG goodies of which the only omission are R-77 missiles. Tired of the overuse of Kh-31s, I decided to arm this Fulcrum with a pair of Kh-29s along with KAB-500s. It looks menacing. I also built the fuel tank but I doubt that the aircraft could have taken off with this weapons load. Note that the Trumpeter only includes just one Kh-31 (!) which is quite lame, although it does come with R-77s. For painting, I was disatissfied with the Akan SMT paint set when I built the Trumpeter, and so used my own mixes. For this one, I used the Akan paints for the T-50. They came with a greenish rather than blueish hue which I think was appropriate. My bet paid off, as I think they look spot on. Up to you to decide! Overall, highly recommended kit.
- 12 replies
-
- 29
-
-
Zvezda is to release in 2013 a 1/72nd Sukhoï Su-27SM "Flanker-E/-F" kit Sources: http://vk.com/wall-29859496_160278 http://aeroscale.kitmaker.net/modules.php?op=modload&name=News&file=article&sid=13474 V.P.
-
Russian MSTA S Detail Sets Eduard 1:35 It always seems to be a busy schedule at Eduard with several releases every month, this month being no different. The Zvezda MSTA S seems to have been well received and comes well detailed out of the box. But for those modellers who really need to have an ultra detailed model these three new sets will be just the ticket. MSTA S Turret set (36366) This single sheet set contains, naturally, all the fine detail parts for the vehicles turret. To begin with you get all the tread plates for the turret roof as well as a tread guard in front of the commander’s sight and bracket plate on the right hand front of the roof. The set also includes and new stowage basket, lots of small items such as new brackets, supports, a new saw, tool brackets, shields, jerry can holder, and gun cleaning rod holder brackets. There is also a new grille for the air filter unit and ammunition box lid, handle and rear sight for the heavy machine gun Hull Set (36367) This single sheet set contains a host of grilles and fittings for the hull. The grilles include those for the engine intakes, both large and small, and air conditioning intake. The set also includes additional detail for the gun travel lock, new heat shields for the exhaust, plus a host of handles, brackets and fixings for around the hull, including all new items for the unditching beam. Fenders (36368) Again, exactly what it states on the pack. Whilst the kit fenders are quite adequate, for scale thickness you will need to use these PE fenders. Before fitting the PE parts you will have to remove the front and rear mudflaps from the kit hull. These are replaced with PE parts, and there is an additional support plate to be fitted to the fronts. The fenders are then fitted with attachment clamps between each section, plus lifting handles on the bottom edge and a heat shield under the exhaust. Conclusion These three sets are great for those who like to have extra detail on their models, but, being separate it allows the modeller to pick and choose how much or how little they wish to add. Especially as the kit itself is pretty darn good already. Highly recommended. Review samples courtesy of
-
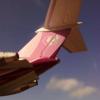
Hi guys I'm attempting to convert zvezdas 767 kit from a -300 to a -200. I think this model is the ER version which I think has the larger cargo door. The things I will have to do will be *cut out 2 pieces of the fuselage *remove the tail bumper -if theres anything else i need to change please feel free to tell me I wish to do this in a landing state, so I will be presenting it with *gear down *flaps and slats extended (ambitious....very ambitious for me) I haven't decided on the colours yet, I'm thinking either traditional Amercian Airlines or Britannia
- 47 replies
-
- 3
-
-
- conversion
- 767
- (and 1 more)
-
 MiG-29 SMT Photo Etch and Masks for Zvezda Kit 1:72 Eduard Trumpeter aren't the only model company releasing state of the art kits of modern Soviet/Russian subjects. Zvezda have a long tradition of producing accurate, buildable kits of these subjects, and their MiG-29 kits are no exception. Well received by the modelling community, the kits are accurate and compete well with the (also very good) kits from Trumpeter. Now Eduard have released a set of photo etched parts to complement the MiG-29 SMT variant. This set includes two frets of photo etched parts. The first fret contains pre-painted parts for detailing the cockpit and includes harnesses, pull handles and a cushion for the ejection seat, as well as details for the instrument panel, cockpit sidewalls, control column, rudder pedals, canopy and HUD unit. A range of pre-painted electroluminescent strips are also included on the fret. The second fret is unpainted and contains further parts for the cockpit, such as the rear cockpit decking, as well as details for the rest of the airframe. The landing gear gets hydraulic lines and a mud guard, there are the automated guards for the engine air intakes and afterburner flame holders for the other end of the engines. There are also details for the missile rails, which is helpful if you wish to finish your model without a full load of weapons. Smaller details include a host of small aerials and plates to dot around the airframe. MiG-29 SMT MiG-29 SMT Zoom Set MiG-29 SMT Pre Cut Masks Conclusion This is a sensible and worthwhile upgrade for Zvezda's rather excellent kit. It includes all of the extra details that you would want, with the added benefit of the cheaper Zoom set if you just want to jazz the interior up a bit. Recommended. Review sample courtesy of
 -
Hi, here’s my recently completed Zvezda 109F-2. Nice kit with plenty of details but a bit of a bugger to complete if wanting the cowling closed! Special thanks to Modelling Minion for the gratis Aeromaster decals, cheers mate. Anyway don’t overlook this kit now Eduard have theirs available as it can be built in to something much nicer than what I present below!
-
Hi all Panther Ausf.D from Zvezda 1/35. Painting for the customer. Best regards, Martin
-
Here is my bf 109 f-4z b,. W. nr 7473, flown by uffz Felix sauer of 10 (jabo) jg 53. San pietro sicilia March 43. On the 27 March this aircraft was belly landed on the beach near pozzallo could not be recovered before being swamped by the sea cousing it to be a 100% loss . Detail to the engine using lead wire, resin cockpit and wheels decals from kagero jg 53 "pik as" book painted using extracolor.