Search the Community
Showing results for tags 'zero'.
-
 Border Model is to release a 1/35th Mitsubishi A6M "Zero" kit - ref. BF006 Source: https://www.facebook.com/permalink.php?story_fbid=pfbid02xjrYidijzsjnochQZCQqPEKTS4JywDvG5jkRKCu1tmbgXwybWjLYJe33wamPYcvyl&id=100063663186491 V.P.
 -
Thanks HKR 👍 Eduard worked in secret on a new kit and tomorrow it will be announced 7PM (Warsaw Time) UPDATE - It'll be a family of 1/48th Mitsubishi A6M "Zero" Source: https://www.modelforum.cz/viewtopic.php?f=1&t=95280&start=33390#p2448351 V.P.
-
 Since I was, at best, mediocre in my build of a 1/48 Tamiya Spitfire as I am trying to get back into this modeling thing, I was trying to decide which kit I could mangle next. I just happened to be on this bid site (addictions are a hard thing to oppress) and there was this 1/32 Hasegawa Zero for a ridiculously low price. So, I bid on it and ended up winning. Upon receiving the kit and opening it to see if it was complete or not, I found a Quinta Studio 3D cockpit set for a Tamiya Zero that retails for more than what I paid for the kit. Bonus, huh? I just happened to have a Tamiya Zero in the stash so why not build it and use the Quinta Studio set to enhance it. Then I got the brilliant idea of build both and if I am using the Quinta Studio on the Tamiya kit, use the Tamiya kit parts on the Hasegawa kit. Hence, this build took life. I am comparing the 1979 issue of the 1971 Hasegawa Zero kit with Tamiya’s 2000 new tool 1/32 A6M5 Zero. (I know the Hasegawa kit is old, but has it really been over 20 years since Tamiya came out with this first superkit?) First the obligatory box and sprue shots; Tamiya first: To go with the Tamiya kit I have the aforementioned Quinta Studio 3d set and Master metal gun barrels. Next is the Hasegawa kit The scheme right now for the Tamiya kit is the 204th bird. The scheme for the Hasegawa kit is the A6M5 C version. Before I can start, however, some attention has to be paid to the work bench as these kits will take a lot of space, so messes have to be cleaned! I decided if I do comparison builds with the idea I might start to make a dent in the stash. The 1/32 and 1/24 group The 1/32 and 1/48 group The 1/48 group And the 1/72 group I just need to live to be around 175 to complete all of these at my current snail pace rate of build. Now the issues I see with this build. I picked up a list of corrections for the Tamiya kit at this other site devoted to Large Planes (sneaky how I described that one huh?). I don’t know how many I will actually do based upon my laziness and skill level. In regards to the Quinta Studio set, it is for a different Zero version than I have so adjustments may have to be made. (Or I ignore it and blissfully know that 99% of the people that might ever look at my finished model won’t know the difference. As for the Hasegawa kit, there are 3 choices for markings but each marking is a different Zero version. I haven’t really closely examined the contents of the Hasegawa box and instructions, but I kinda doubt all options for the three versions are included and clearly delineated on how to do each one in the instructions. I am just guessing the kit is a mixture of different Zero versions. Anyway, that is where the start of this build is; the bare planning stages and get myself motivated to clean the work bench. I expect this to be done at my normal sloth like pace so maybe once a week updates. My work schedule is a bit intense right now, plus we have this drought thing going on in Texas and there is a bit more work involved making sure the cows and horses have plenty of food and water. Have to balance the hay needs, the lack of pasture grass, and how much they colic so nothing bad happens. Anyone who wants to see if I can muck this up is more than welcome to come along and all comments and suggestions on the progress (or lack of it) are more than welcome.
- 62 replies
-
- 19
-

-

-
Greetings. The model was assembled several years ago. Briefly about the construction: of the ready-made additions, I used only a small set of photo-etching from Eduard, which applied almost exclusively to the cockpit, while the canopy was still made in a closed version, since at that time it was not ready to work with “vacuum” products, but “ native” lantern is thick. Well, the barrels were replaced with brass ones from Aber, although the latter are also far from ideal in terms of the fact that the wing-mounted 13 mm machine guns should be in a perforated casing; I couldn’t imitate these casings myself. Otherwise, the same cockpit was subjected to the greatest modifications using available materials. Significantly altered the landing gear struts and flaps - reducing the thickness of the flaps, rods from medical needles, jumpers of the flaps, cut off and made again, because relatives do not reach the landing gear, the brake pipes are made of thin wire. The riveting has been improved in some places, unrealistic sagging of the fabric on mechanized surfaces has been removed, and the rudder contour has been trimmed. The 7.7 mm machine gun port on the fuselage is plugged, as it should be on the 52c modification. I drilled out the exhaust pipes as far as possible and worked on their shape, cut ventilation windows for cooling the oil tank and removed the thickness of the fuselage side in this place. Navigation lights from the CMK set. The shape and details of the air intake have been corrected, as well as some other minor details. In terms of the quality of the kit, I can list several shortcomings - this is the already mentioned undercut of the rudder contour; poor fit between the wing and the fuselage (I removed the shelves above the wing, a gap along the bottom of the fuselage); These also include landing gear flaps. Painted primarily with Tamiya acrylics. I didn’t use Academy decals; they turned out to be very inconvenient to use; they were replaced with decals from AML. *Sorry for the automatic translation
-
On display at the 59th All Japan Model and Hobby Show 2019. Hobby Japan http://hobbyjapan.co.jp/ Sources: https://www.facebook.com/hobbyland.osaka/photos/a.1108794955873870/2512252288861456/?type=3&theater https://www.facebook.com/hobbyland.osaka/photos/a.1108794955873870/2512252245528127/?type=3&theater V.P.
-
In 2022, Academy is to release a new tool 1/48 Mitsubishi A6M2b Type 21 Zeke/"Zero" - Battle of Midway - kit - ref. 12352 Despite rumours It won't be a rebox from the recent Eduard kit (thread) dixit words from M. Vladimir Šulc, boss from Eduard–Model Accesorries ltd., as from M. Gustav Jung, boss from Wolfpack Design, who's closed ties with Academy Hobby Model Kits - see here: link Source: https://www.facebook.com/photo?fbid=4666693050091873&set=pcb.4666695563424955 V.P.
-
 Recreated the Zero type 52 piloted by Kageura from the movie The Eternal Zero. It's a movie about a fictional flight instructor Miyabe who committed a Kamikaze attack against the US Navy carrier during the battle of Okinawa. Kageura was the ace pilot who initially despised Miyabe's cowardness and challenged him in mock battles, but ultimately understood him. I find the idea of a former kamikaze pilot becoming a yakuza boss in the post-war era really cool, so I made the zero flown by him during the last desperate days of the pacific war. Aircraft paint from Nakajima in the late days of the pacific war was notoriously known for having very poor quality. Some of the naval pilots remembered that the paint on the zeros manufactured after late 1944 would simply peel off just by stepping onto it. Therefore I created this heavily-chipped finish for the zero, like the ones in the movie.
 -
 In 1982 this was my first kit as a kid. Did a crappy job building it back then. I didn't have paints then but it was in the characteristic 2 color Matchbox mold so didn't think about it too much as a kid but played with it a lot. This kit started it all for me. For whatever reason the Matchbox Zero rarely comes up on eBay in the US but a few yrs back I managed to get 2 at a reasonable price. I had started building one immediately and then abandoned it as I got busy with other stuff. This week as I was waiting for things to dry on my Spitfire builds I restarted this as a quick side build and here it is from 1982 the Matchbox A6M2. This was completely a 100% straight out of the box build. The 40 yr old decals held up really well. Note: the Kit first came out in 1972 so the decals might be 50 yrs old.
- 19 replies
-
- 56
-
-

-
- 1/72 Matchbox
- A6M2
- (and 1 more)
-
 Hello, fellow Britmodellers, First, my thanks to Rich @trickyrich who, with his ideas for GBs, keeps sparing me headaches when the time comes to decide what to put next on the bench. Well, OK I changed my mind two times for this one but it still helps. I built a Zero (Matchbox) once, back when a computer was the size of a set of grandmother wardrobes and all Zeros were white. High time for another one. I already had an A6M3 (Tamiya 1/48) in the stash but a captured A6M2b was the initial idea and I felt the need to build something in the gentleman's scale this time. So when I saw one of their 1/72 kits of the A6M2b at a discounted price ..... After getting the kit I changed my mind for a Pearl Harbor aircraft (all three marking options from the box are such planes - choice not done yet). Considering the scale, the kit matches it's bigger brother in quality, engraving and detail .... a little gem. Some tiny parts which I hope won't fall prey to the carpet monster (even as I have no carpet). As per my own immemorial rules, it shall be OOB except for seatbelts (Eduard superfabric) and canopy masks (Eduard too). Googling around several evenings (nights) for info about IJN/Pearl Harbor Zeros colours, THAT gave me headaches. Thus, it will be one step at a time. Maybe I'll keep it easy (interior Tamiya XF-71, exterior Tamiya XF-76) or go wild and do some paint mixes. Enough prattle, here are the pics of what I've on hand: The box art (the depicted aircraft is NOT part of the marking options) The usual Tamiya style clear instructions and a folder with info about the different types of A6M. Small but very nice decal sheet. 80+ parts. Option for a closed or open canopy. One part cowling with carburator intake moulded on. No option for folded wingtips and no moveable control surfaces. No pilot figure. Tomorrow, tomorrow .... Hey, keep calm, first the very last small touch-ups on the Tunnan you began 8 months ago. You don't put aside what's 99,9999999999% done. NO, you don't! (my conscience is quite loud, but will it be enough?) Have a nice week. Pat.
 -
 This is Tamiya's 1/48 Zero, (originally issued in the 1970's), with some extra detailing on the engine, exhaust from aluminum tubing, detailing on the landing gear, and an Eduard's photoetch cockpit set, with extra cockpit detail added. Antenna mast and pitot replaced with brass parts. Paints are Tamiya acrylics, weathering with oils and pastels, and a mix of kit (yes! 50 year old decals!) and Techmod. Thanks for looking, Colin
 -
 So here is one of my entries for the GB: I do like an oddity and an ugly duckling so I think this fits the bill, also I'm a bit of a Roland fanboy so it's cool to see some of their advertising back when they weren't the global company they are today. So the Dome Zero was a Japanese attempt at a super car, in true 1970s wedge styling. The 'RL' stands for 'Racing Le Mans' for this racing version. Unfortunately they didn't fare too well, with both getting the approvals for the road version into production or the Le Mans racing versions, This kit is a model of the 1979 entry, with decals for no. 6 and no. 7 cars, Neither had a great run and both failed to finish the race (no. 6 one running out of fuel at lap 40 and no. 7 with engine issues at lap 25) - but god loves a tryer as they say, and so do I. Finding reference material is a little on the hard side, but the company is still in existence working in racing, I'm not sure if the 1979 cars still exist, they were possibly recycled for the future Le Mans attempts with the wedge shaped Zero reappearing in 1980 and 81. I did find a few YouTube videos: https://youtu.be/VryFfXFG15Q https://youtu.be/Vo9w7Ci8vxA https://youtu.be/ZRaKzEqu3QI In terms of design it has an open cockpit at the front to aid driver visibility but testing showed large amounts of wind buffeting in the cockpit, so the roof was modified leaving a large gap to the back for ventilation. The main image shows the roof in the 'open' configuration (no it's not a growth out of the guy bending over) which I guess is how the driver would need to clamber in and out. Anyhow onto the kit... It's not an overly complex affair, Scalemates shows it dates back as far as the actual car to 1979, though it appears to have had a few tweaks along the way, being originally motorised, then a static model and at some point having some extra engine detail added (maybe then). This particular kit is from the latest reprint (2002). The instructions are a fairly typical old style folded paper sheet in black and white. The parts aren't too numerous given the age of the kit, nicely with most individually bagged... The chromed parts actually look quite nice too. There is quite a detailed engine (Cosworth DFV) though I think most of it won't be visible when finished, although it looks like the rear section will be hinged. The decals - I had worried they had yellowed with age but it seems it was just the greaseproof sheet that yellowed. There seems to be a bit of a crease in one corner and some scratches on the big spoiler decal but hopefully they are useable. I noticed there is some gunk in the shell (dried mould release?)... guess I should give it a wash before painting. The white plastic parts have yellowed slightly with age too. I decided to make a start, the chassis still bears the marks of being 'electrified' with a battery compartment and what appears to be some kind of slide switch for locking the front wheels (parts in top right of bellow image)? Annoyingly they left the battery cover which doesn't sit flush so I'll attempt to build something from plasticard to fill the two holes in the chassis more flushly. I glued the front suspension arms piece in place - hopefully I can gently bend them enough to fit the wheel hubs in later without snapping them. For the body I glued in rear spoiler as it might need a little filling before paint (actually from one of those video clips it shows that the spoiler isn't attached to the extended rear sides in real life). I also fitted in the small parts behind the light fittings and two side intake ducts - these will need a bit of filler towards the front edges. I've also 'protected' the rather fragile pointy bits towards the ends of the front body shell part from me damaging them with some bits of lolly stick and masking tape. The main part of the engine block I've built up too prior to paint (see above) and done some dry fitting. It seems that the whole rear wheels / section is attached to the front via 3 mounting points on the engine block so maybe a bit fragile (the rear shell has a hinge though attaching it to the front). I think I'll attach the inner tub to the chassis before painting (I generally like gluing stuff together before paint), though it seems I might need to add some additional sides to stop the inside of the side vents, etc. being visible from outside. It's hard to know what would be visible without any reference photos - I imagine it would be pretty bare bones for weight saving but feel they would have had some kind of sides to seal the cabin? The instructions aren't overly clear on colours - e.g. the interior of the shell isn't mentioned and the instructions seem to call out that the interior should be white and silver. Given the age of the car, clues in the paint guide and general modelling appearance I'd guess the construction would be an aluminium monocoque tub with space frame front/rear and sheet aluminium panels for the chassis/underside with a fibre-glass / GRP body. I'm not sure I agree on the instructions calling out white on interior (think this maybe more to reduce the amount of painting needed) I feel if the aluminium panels were painted they would be black to reduce any possible glare/distraction for the driver, also in one of the videos linked above it briefly shows it as black with some unpainted aluminium parts (though that is the later car).
 -
 Hi all. After placing the figure of the pilot in its position and adding an identification plate of the plane and its scale, I am finished with the realization of this model. The process of his painting can be seen here: Andrés.
- 22 replies
-
- 42
-
-
-
This is one of the earliest models I did upon my return to the hobby a few years ago - Hasegawa’s 1/48 A6M5c . This was before I decided that space (both storage and display) and finances meant that I settled on 1/72. It was all built OOB, and while the kit isn’t the newest and seems to have a mixed reception, I thought it was a delight to build, great fit, and nicely accommodating for someone looking to relearn some of the skills. This was my first go with an airbrush (at the time using a cheap Chinese brush) and also my first attempt at weathering. I used Tamiya Weathering Master which seemed to make it nice an easy, and Tamiya panel line wash (I now use Mig Ammo for a greater selection of shades) Painted using Tamiya acrylics, I definitely overdid the dry brushing (before I even knew about chipping!) but I had lots of fun. Thanks for looking!
-
 Good evening, just finished the Tamiya Zero (short wing version) in 1/48 as a very quick build. The kit is stil the old one dated back to the seventies with a lot of rised panel lines so I had to do a bit of rescribing. The kit is basically OOB with just few sratchbuilt details in the cockpit and on the engine. Painted as ususal with airbrush using Tamiya stuff. Despite the age of the kit and the "quick build approach" I'm quite happy about the outcome. Enjoy pictures and please feel free to comment. Cheers Andy
 -
 Afternoon everyone. I’m not one for posting WIP’s or RFI’s on here as I don’t build very often (In fact it’s mainly July and August when I get time) with other things taking up any free time and there’s never a guarantee I’ll finish something or it be good enough to share. However my confidence got a slight boost when Airfix put my K2Y up on their social media pages so I figured what the hell. Let’s get one done on here for a change. I’ve had a little Academy A6M5c Zero in the cupboard for a few years and having just built the first of the Eduard “Tora Tora Tora” set, and having a bit of a Pacific War thing going on this summer, now is as good a time as any to do this. As you can see there’s not massive amount to do and as this will be strictly OOB It’s easily doable within the timeframe. The plan is to start one morning and just work through. I brush paint everything (The big scale stuff is F.U.N) so the plan is to use AK’s 3rd Generation IJN Paint set. I’m slowly swapping out all my old Tamiya acrylics with AK’s as they’re just beautiful to paint with
- 16 replies
-
- 12
-
-
- 1:72
- Academy kit
- (and 1 more)
-
Hello all, This is my latest build, it's Tamiya's 1/72 A6M5 Zero. The fit of the kit was perfect, like all other Tamiya kits (in my experience). The model was painted with Ak real colors and Tamiya acrilycs, the yellow band on the leading edge and markings on the propeller were painted. I initially wanted to build Saburo Sakai's aircraft, inspired by his biography "Samurai!"; but I discovered that the Peddinghaus decals I had were wrong (dimensionally) and the other ones I had from an AJ Press Zero book were bad as well. So after some research I decided to do an aircraft from the 203 kokutai, at Omura airbase in Nagasaki, August 1945, from the Rising Decals sheet Zero pt.V, I decided to depict the aircraft with the tail number of it's first owner. The decals went on wonderfully. Some aftermarkets were used: Brengun Pe, a Yahu models instrument panel, master model 20mm canons and resin machine guns. The weathering was done with Tamiya enamel washes and powders, and a silver pencil for chipping effects. Hope you enjoy it! Next up is Arma hobby's F4F-4 Wildcat!
- 14 replies
-
- 51
-
-
 Hi Folks! It's been a while since my last post... parenthood takes a lot of my time nowadays... but -as I'm sure a lot of you do- I have become a "night owl" regarding this beatiful hobby. The legendary Mitsubishi Zero have been a pending model on my hangar, so I bought this classic Tamiya kit from the 90's and decided to give it a go. In the meanwhile, Eduard released their outstanding new tool, but I decided to keep on with the venerable Tamiya kit. So, I entered the twilight zone of the Japanese colours on these early models... you know what I mean. After reading and laughing a lot, and thinkin about the very special bunch of human beings we modellers are..., Nick Millman's research on his pdf (and a lot of the debate on its lovely page) gave me the last push to decided for AK REAL COLORS... RC 302 IJN J3 Hai-iro (grey, for the ailerons and fabric parts) and lighten RC 303 IJN J3 SP (amber grey, for the main fuselage). So, no more words, here is the finished model, representing the aircraft flew by ace Saburo Sakai in 1942, Bali. Happy modelling to all! Cris.
- 13 replies
-
- 40
-
-
Hello model universe, This is part one of my Mitsubishi A6M3 Zero. In this first part I created the cockpit section. I decided to make a nice video build thread, so everyone can see how I attack things. In my opinion better than pictures. I hope it's allowed on this forum. So grab a cup of tee and let's start! https://youtu.be/g3MFMRjaRgE Thanks for joining!
-
A6M2 Update Sets (for Eduard) 1:48 Eduard Brassin We’ve just reviewed the first boxing of this new kit, being the Dual Combo that goes by the name of Tora Tora Tora! here, and already Eduard have created a quantity of aftermarket sets for when excellent detail isn’t quite enough for you. Here are some of the first. A6M2 Seat (648698) This is another of Eduard’s new range of directly printed 3D sets, and it arrives in one of their usual shallow card Brassin boxes due to the shape of the seat. Due to their goal of lightening the aircraft as much as possible, the engineers provided the pilot with a perforated seat that offered no protection other than a mixture of thin stamped metal and fresh air. This set includes a 3D SLA printed seat that is attached by thin tendrils to a slim base at a curious angle that made photography a little difficult without the assistance of some Blutak. In addition, there is a set of STEEL pre-painted and nickel-plated seatbelts on a small fret in a separate bag that is backed by a piece of white card. After removing the fingers from the underside of the seat and sanding them flush, it is a simple drop-in replacement for the kit part that provides a fine and highly detailed seat that has more finesse than the kit original. A6M2 Wheels (648693) Kit wheels are generally in two halves, which means you have the resultant joins to deal with, possible mould-slip issues on single part wheels, and sometimes less than stellar detail due to the moulding limitations of styrene injection technology, especially in the tread department. That's where replacement resin wheels come in, with their lack of seamline and superior detail making a compelling argument. They are also usually available at a reasonable price, and can be an easy introduction to aftermarket and resin handling, as they are usually a drop-in replacement. This set arrives in a flat pack and contains two main wheels with integrated hubs, and a slight weighting to the bottom of the tyres to give the impression of the airframe pressing down on them. It also includes a tail wheel strut with moulded-in cylindrical wheel, which is cast in a tougher white resin. The icing on the cake is a set of pre-cut kabuki tape masks that allows the modeller to cut the demarcation between tyre and hub effortlessly. A6M Undercarriage Legs BRONZE (648695) Inside the shallow Brassin box, the primary parts of this set are the two cast bronze gear legs, which are of high quality with little preparation work to do before they can be painted and added to your model. In addition, you get a full set of outer gear bay doors, which are cast at near scale thickness to give your Zero a more realistic look. A small hole should be drilled through the supports of the narrow leg door to permit the threading of a brake hose from your own 0.3mm wire stock, and you are shown how to do this in a small diagram on the instruction sheet. Conclusion The base kit is already highly impressive, and with the addition of some or all of these sets your Zero will really stand out from the crowd. Very highly recommended. Review sample courtesy of
-
 F4F-4 Wildcat / Mitsubishi A6M2b Zero Dogfight Double Gift Set 1:72 Airfix A50184 This dogfight double from Airfx brings us their newer tool Zero and Wildcat kits. As well as the two kits there is a display stand to hold both models and a set of paints with glue and brushes. The infamous Mitsubishi Zero was able to dominate the early years of the Pacific air war through a combination of tremendous agility and endurance. Mitsubishi designed their fighter to be as light as possible in order to make the most of the relatively low power available from its radial engine. This weight saving became a major weak spot for the Zero, however, once heavily armed and armoured opposition such as the Grumman Hellcat entered the fray. The legendary British test pilot Eric ‘Winkle’ Brown flew the Zero in 1946. He found that it possessed superb manoeuvrability and a good rate of climb. He was less impressed by the constant ‘panting’ noise emanating from the aircraft’s ultra-thin metal skin in flight and the lack of a bullet-proof windscreen, seat armour and self-sealing fuel tanks. The Wildcat was developed in the late 1930s and came into service in early 1940s. While its performance was a little less than the Zero, however its ruggedness and better use of in with US Tactics gave it an improved kill ratio over the Zero. Lessons learned from the Wildcat were used to develop the much improved Hellcat. The Zero The Zero was a new kit from Airfix in 2011 The kit is part of their series one range. The painting instructions for the single example provided for on the decal sheet are printed in colour in the instructions. The kit’s 47 parts are nicely moulded and the panel lines are very engraved, the kit does include options for folded wings. The Wildcat This Zero was a new kit from Airfix 2015 The kit is part of their series one range. The kit is part of their series one range. The painting instructions for the single example provided for on the decal sheet are printed in colour in the instructions.The kit’s 58 parts are nicely moulded and the panel lines are very engraved, the kit does include options for folded wings. Markings The decal sheet from Cartograf (so no issues there) gives us one option for each aircraft. These are B11-181 From the Carrier Soryu, Battle of Midway June 4th 1942, and F-22 From the Fighting 8, USS Hornet (CV-) Battle of Midways June 4th 1942. Conclusion This looks like another winner from Airfix. The kits are well moulded, nicely detailed and if they build up as well as they look there should be no problems. As a keen modeller of 1:72 subjects I have to say I’m very happy with Airfix’s recent output and I look forward to more of the same. Review sample courtesy of
 -
Hi all This is my 3rd model for this year This time I choosed the classical Mitsubishi A6M Zero. I build this model for a friend who has choose the A6M2 early model The kit is the Hasegawa kit. No major problem on this kit. The sole advice is to glue the upper wing on the fuselage before glue the lower wing. Some othe photos in the link bellow Mitsubishi A6M2 Zero
-
Hi For my new build I decided to make a model for a friend. I let him the choose of the subject and he choosed the A6M Zero. Like he prefere the "light grey" scheme, I proposed him the A6M2 version When I searched a model, it is a suprise to find only few model by the kit maker for this early war version. In the 1/48th scale I find only two kit ; the old Tamiya who have more 30 years old and the Hasegawa kit Because the Hasegawa have more details than the Tamiya kit I choosed it. I start the kit with the cockpit I glued the panel side directly on the fuselage. I haven't have the "mitsubishi interior color". I seen some photo and try to capture the color with a mix of the H312 and H308 paint I painted some buttons in red/yellow I maked the seatbelt after have look the photoetched part by eduard. I drilled also the holes on the seat. I painted the engine. Hasegawa give a descent representation of the Sakae 12 Now I can verify the fit of the wing-fuselage and it is a big disapointement The gap between the two pieces is very great. I think, the best way is to glue plastic card on each upper wing part to fill the gap
-
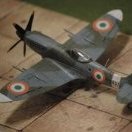
I'm aware that the control surfaces on the Zero were fabric covered (rudder, tail plane and ailerons) and that as such they appeared to be a slightly different colour to the rest of the airframe, (even though many builds I've seen just have the airframe the same all over), but not sure how the colour differed. I'm making mine in the standard grey colour scheme of the Pearl Harbour period courtesy of the correct paints from Colourcoats so using the correct 'grey' for a Mitsubishi version but as I think I need to make it different for the control surfaces I'm not sure which way to go. Was it just a lighter shade of grey so a little white will be appropriate or was it perhaps a different shade requiring possibly a little tan/brown/dark grey etc..to obtain the correct colour? All suggestions very welcome. Regards Colin.
-
 Hi there, well, here I am starting a third workbench thread! However, being something of a dilettante and changing my priorities at least as often as my socks, I thought it might be an idea to revise my idea so that each is devoted to a particular type. So this will be my first Japanese thread, and where better to start than with Mitsubishi's legendary A6M Type 0? This is Tamiya's 1/72 scale kit of the A6M2b Model 21 from their Warbird Collection, which depicts the type that saw action over Pearl Harbour and which built for itself a mystique bordering on invincibility among the Allied Air Forces. It will also have the honour to be the first Tamiya kit that I've built 🤯 I know, I can't believe it either! Obligatory box and sprue shots: http:// http:// Some small progress so far today, which is limited to the start of the assembly of the cockpit area. I've drilled through the lightening holes in the back of the pilot's seat (which are presumably there to allow the lightning to pass through?), carefully scraped and sanded the seat back, and then softened the edges of the holes with a wash of MEK. I've also used MEK to assemble the four parts so far put together. http:// http:// I know Tamiya has a reputation for shake-the-box kits, but having never before built one (Yes, really! 🤯) I have to say how impressed I am with the quality of fit, the degree of detail provided, and the thought that has gone into the breakdown of the kit's parts and the instructions! I'm glad I've got a few more in the stash, and I'll be ordering some more as well! So there we are! Its going to be almost OOB, but I'll probably substitute a set of Yahu etched belts in place of the kit decals, and I may also use a Yahu IP, depending on the colour.....Because, of course, the colour of Zeros both inside and out is the subject of much debate! I haven't yet decided whether this model will be finished as a Mitsubishi- or a Nakajima-built aircraft: a Mitsubishi-built example would be easier when it comes to painting, but I have a hankering to try my hand at the elusive aotake finish for the wheel-wells etc! I need to decide which way I'm going with that aspect of the build, as interior colours were also different according to manufacturer, and then I need to get some paint! Cheers for now! Mark For information on the thorny subject of Zero colours, one can do no better than consult @Nick Millman and visit his Aviation of Japan blog. And for anyone interested in the colouring of early Zeros, Nick's guide to Painting the Early Zero-Sen is an absolute must!