Search the Community
Showing results for tags 'ww2'.
-
Hi All, Not been on here for a bit, been pretty busy. This hasn't stopped my modelling, just made it a longer process. My last project just finished building the USN Bb55 North Carolina, as seen in the bottom of the pic. Reason these are like this on my table is that I've built a new display for them to go in. Have to say how different the camouflage changed over the years in WW2. Aircraft carrier USS Franklin with 1944 measure USS New York 1942 USS San Francisco 1942 USS Indianapolis 1945 ( not yet finished) USS North Carolina 1944 Why did they change them? I do like building them as the (Dazzle) camo does look good. I will do some better photos on the N Carolina in another post.
- 18 replies
-
- 38
-

-

-
Hi All, I've taken a bit of a battering in the mojo stakes lately, so I wanted something uncomplicated for my next build. I was perusing the stash and eyed up Airfix' 1:48 Mk.Ia Spitfire, and thought 'nah, boring'. I then happened to catch sight of Special Hobby's 1:48 Seafire F Mk. XV, and the germ of an idea was born. 💡 What about a build which spanned the wartime service of this iconic aircraft? As I thought about this, more interesting juxtapositions came to mind: - Special Hobby vs. Airfix - RAF vs. FAA - Merlin vs. Griffon - Cannon vs. machine gun So, here we go. Here's the box art of the Spit: Now I've never particularly been a fan of early Spit schemes, but my self-imposed bookending of WW2 directs me towards this scheme: FY*Q of 611 (West Lancashire) Sqn RAF based at Duxford in Autumn 1939 - perfect! Here's a photo of the aircraft: It's difficult to tell from the photo the shape of the canopy, but the kit shows a bulged version so I'll go with that unless I see some definitive evidence to the contrary. This aircraft also has the early windscreen armour, a lack of seatback armour, and the early pole-style antenna. Along with the distinctive lighter fuselage roundels, the aluminium & white/black undersides will surely add some visual interest - I'm liking it the more I look at it! Here's the sprue shots: You can see a selection of canopy options here: The decals look lovely: I have a couple of extras to add to the build, which will otherwise be OOB: My second subject will be Seafire F Mk.XV 13-9/T of 806 Sqn FAA, based at Trincomalee, Ceylon in Summer 1945 - perfect again! Here's the box art: I cannot find a photo of 13-9/T, but here's another aircraft from 806 aboard HMS Implacable, which clearly came to an ignominious end in early1946: Here's the scheme: In a bizarre twist of fate, NEITHER AIRCRAFT HAS A VISIBLE SERIAL NUMBER!!!! The comparisons in this build are going to be endless (and possibly tiresome). Here's the sprue shots (3 for SH vs. 5 for Airfix): There's a small PE fret: The decals look straightforward enough: That instrument panel looks distinctly dodgy - will avoid it, methinks. I may need to spray the wingwalk lines - did Seafires even have these? Anyway, off we toddle on A Tale of Two Fires - please feel welcome to join me on the quest! Thanks for looking, Roger
-
Valentine Mk.IX, 50 RTR, 23rd Armoured Brigade, Tunisia 1943 The Mk.IX valentine was made in answer to the need of a more powerful gun than the 2pdr. To accommodate the 6pdr gun the turret needed to be redesigned. Vickers engineers freed up space for the new gun by reducing the turret crew to 2 men and the coaxial machinegun and smoke bomb launcher were removed. The removal of the machine gun meant that the tank couldn't defend itself against infantry and so was unpopular with its crews. The bomb launcher issue was partially resolved by mounting two grenade launchers externally. But in essence the Mk.IX had turned the Valentine into a tank destroyer. The Bronco kit itself is pretty comprehensive and the only aftermarket I used was the RB Models metal gun barrel and the front fenders were replaced with brass sheet to allow some damage to be added. The model was painted in the Desert Pink ZI / Dark Olive Green PFI scheme with MRP paints. The sand/dust weathering effects were created with a mix of pigments. The thumb print on the front fender in the above photo has since been removed. A few detail photos. And finally the photo I used as a reference. Overall I'm pretty pleased with the way this one has turned out but as always there are things that I felt that I could have done better. The urge to get this finished so that I can start a new project has meant that some additional stowage and crew will have to wait for another day. The work in progress for this build can be found here; Valentine Mk.IX work in progress. Thanks for taking the time to have a look and feel free to point out anything I may have missed or that could be improved upon. Wayne P.S. Some of the photos appear a little too warm on my screen but I haven't profiled this monitor and really don't want to edit them again.
- 16 replies
-
- 38
-
-
-
- BRONCO 1/35
- WW2
- (and 1 more)
-
Hello dear modellers and aviation enthusiats, I recently found this nice forum and happy to be a part of it. Since february i found my passion in aviationart again. The love for pixelart is heavily influencing my current works, but i also enjoy rough sketching. If you like it you can find more recent updates on my instagram account (@saschaschindelholz). Here is a small collection of recent works:
-
Hi All, My latest completion is Tamiya's beautiful 1:32 Spitfire Mk.IXc. As many of you know this is a superb kit, and it's out of my normal 1:48 comfort zone. Although I was severely tempted to model the kit scheme EN398 JE*J, as flown by Wg Cdr Johnnie Johnson, I ended up modelling as MJ586, as flown by P/O Pierre Clostermann, whilst he was part of 602 (City of Glasgow) Sqn, which formed part of 2 TAF based at Longues sur Mer during July 1944. Here's a couple of pics of the aircraft: And here's Clostermann in the cockpit: Here is the WIP thread if anyone is interested: I added a few extras for this build: The Montex mask set depicts another of Clostermann's aircraft MH526, so I had to be a little creative in cobbling together the aircraft serial number! Anyway, on with the pics: Here's a couple of the engine from the WIP: I'm glad to have finally got this one over the line - it's a superb kit and I really don't feel that I've done it justice, but it's turned out all right! Thanks for looking, Roger
- 19 replies
-
- 39
-
-
Hi All, My next project will be Tamiya's lovely Spitfire Mk.IXc. The wife gifted me this as a birthday present 18 months ago - I've periodically pulled it out and had a little peek and rapidly put it away again, because I was frankly a little intimidated. I don't normally model in this scale, and I guess I didn't want to risk ruining such a lovely kit. However, with mojo in a healthy place I've decided to give it a red hot go! Here's the box art: This is a very high quality affair, and a very full box! Here's the sprues: That's a lot of plastic! Now although I knew that this would build beautifully OOB, as I did not buy the model (??) I thought I'd indulge in a few extras: The wheels look superb as does the cockpit door (and separately moulded crowbar, which will look lovely in red 🤣). On @shortCummins recommendation I've invested in a Yahu instrument panel (thanks for the tip John!), and I'll be trying out HGW seatbelts for the first time. The kit provides for a number of schemes, including the ubiquitous EN398, Johnnie Johnson's mount. Although I was sorely tempted by this scheme, I wanted to spray the markings, and therefore selected a Montex mask set: The lower scheme depicts MH526, as flown by Pierre Clostermann whilst part of 602 (City of Glasgow) Sqn. I actually want to depict this aircraft: This is MJ586, as flown by Clostermann whilst the squadron was part of 2nd TAF based at Longues-sur-Mer during July 1944. I'll therefore need to adapt the a/c serial and figure out how to represent the kill tally (the squadron and a/c codes also look more compact than the 'other' LO*D - hmmm). The partial worn invasion stripes will also present a weathering challenge! This will not be a quick project and I might have other WIPs running concurrently, but I'm now quite excited to be getting going on this icon - wish me luck! Thanks for looking, Roger
- 74 replies
-
- 11
-
-
Hi All, I'm about to embark on Special Hobby's 1:72 Boston MkIII 'Intruder'. I'm intending to model it as AL468 of 418 'City of Edmonton' Sqn RCAF, which was based at RAF Bradwell Bay in Essex, December 1942 to June 1943. SH depicts the scheme shown: SH call out Ocean Grey and Dark Green over Night, but my question is this: surely this type of aircraft would have worn the 'Night Fighter' scheme of Medium Sea Grey and Dark Green over Night? I can only find photos of this aircraft in overall Night, so I humbly beseech the hive mind for further clarification - surely @tonyot or @dogsbody will know? Thanks in advance for any assistance rendered, Roger
- 38 replies
-
- 1
-
-
- WW2
- Special Hobby.
- (and 1 more)
-
 Hi all, having just rolled the Canuck out of the workshop onto the apron, my bench is now heaving a sigh of relief... but that relief is to be short-lived as I contemplate the next phase of my stash reduction plan. So, I've done a tandem-build before, where I did an Airfix Hawk and a MisterCraft P-40K on the same WIP thread a while back - which was moderately interesting. Over the weekend I was perusing what I had left to build (don't go there!) and pondering what subjects I'd not done before, and what subjects tend not to be so common on here. It occurred to me that I had no less than 3 kits of Polish WW2 aircraft, all different designs from the drawing boards of PZL - Państwowe Zakłady Lotnicze (State Aviation Works), quietly maturing under a mountain of other boxes. One of them was quite simple, the other 2 less so. So I had the idea that I would try and document the builds of all 3 simultaneously. I mean, what could go wrong? Oh no, wait - the last time I said that was back in February 2020, so maybe I should just shut up and get on with it! So, what am I going to build? Well, there's this wee beastie: A P-11c. I have visions of this one finishing way before the other two! Which are, this: A P-23 Karaś, this will be first Heller kit I've ever attempted! Oh, and this: A 37A-bis Łoś ('moose'). OK that's great, but why 'Poles Apart'? Well, having looked at the OOB decal options, it seems that with the overrunning of Poland at the start of WW2 by the Germans and the Soviets, those surviving Polish aircraft were quickly put to work by their respective captors, and re-badged accordingly. Some were also taken on by the Romanians, who subsequently used them to attack the Soviet Union! Thus, it is my intention, at this stage at least, to apply 'foreign service' markings to each. No progress as such to report, apart from the ordering of a plethora of AM stuff - PE, canopy masks, decals and the like - from the Big H and an outfit in Poland, Super-Hobby, that I've used before and gave pretty good service. The P-11c I am going to do more-or-less OOB, as it's pretty simple and the cramped cockpit is unlikely to afford much of a view of any detail I might choose to add - having said that, watch this space! One add-on has already been taken care of: the kit-supplied engines on the P-23 and the 37B are rubbish, and the after-market 9-cylinder radials are way too rich for me, so I have raided my spares box and come out with 3 9-cylinder radials from my old Italeri Ju52 kit. I might need to bash them about a bit, but I'll take those for the win! So, buckle up folks! For now, though, it only remains for me to say, at this stage : 'Tally Ho, Yellow!'
- 101 replies
-
- 14
-
-
This has been quite a good kit so far. Nice and simple, tracks came moulded all as one which saved so much blood, sweat and tears as this is only a 1/72 scale model. All the parts have gone together so far with little to no sanding required. Paints look fairly good. Now it’s just time to paint it!
-
Hi all, this is the eventual set of pics I managed to take of the completed PZL P.11c, the second in my trilogy of PZL aircraft (WIP thread here). The 1st RFI, that of the PZL 23A, can be found here if you've not already seen it All in all I'm quite pleased with the outcome of this one - being a MisterCraft offering there were a number of issues to resolve, even before I embarked on my habitual course of self-inflicted stress! One particular highlight for me, though, was my first ever use of 3D-printed parts, to my own design, which were incorporated into the cockpit detail. Not that big or complex, but it's a start! Given that I opted to model the aircraft attributed to a particular person and event in history, I thought I would try to find out a little more about the subject. I've decided to add my findings, written in my own words, but on a following post to this one. I believe some people enjoy RFIs with a back story, others less so. So, I figured that adding it as a subsequent post gives people the option to read it, or not, as they see fit! Anyway, first up here are the pics - I hope you enjoy them: Thanks as ever for the support along this particular stage of the WIP. Any and all comments most welcome
-
Just finished Yak-1b and BZ-38, 1/48 Yak-1b from Zvezda (AMT) and BZ-38 from UM. My first time to use DIY flockator. More fotos https://photos.app.goo.gl/urt13fifiFYFuQT9A
-
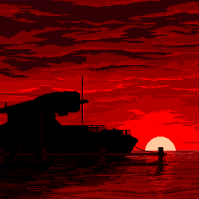
Well here it’s is HMS Hermes by Flyhawk. The detail provided by Flyhawk with this model is nothing short of outstanding quality and again they are setting the gold standard for 1/700 scale models. The only issue with Firehawk is there plastic is very soft compared to other companies in this scale. There has been a couple of occasions where I have accidentally snapped or have cut The plastic. Some of the small detail parts of the f’rd & aft on the flight deck are best to leave them to the last as I found out that they have a habit of being knocked or snapping off. The detailing inside the hanger is quite amazing with a more experienced modeller would be able to use a Perspex flight deck to show Swordfish aircraft inside hanger. Overall this model from Flyhawk is a real joy to build and is further enhanced by Sovereign Colourcoats paints. HMS Hermes & the Ark Royal I
- 14 replies
-
- 3
-
-
- 1/700HMS Hermes
- Flyhawk
- (and 1 more)
-
Hi All, My latest completion is Special Hobby's Fairey Fulmar. The Fulmar was a carrier-borne reconnaissance & fighter aircraft operated by the Fleet Air Arm during the earlier years of the war, eventually being replaced by single seat aircraft such as the Sea Hurricane, Seafire and Martlet. Despite being slow relative to these aircraft, the Fulmar acquitted itself well in combat throughout the Mediterranean theatre, and at its peak equipped 20 squadrons of the FAA. The SH kit allows for 5 schemes. I have chosen to complete as N2015 of 805 Sqn, which flew from HMS Eagle during 1941. Here's a link to a photo of N2015 (kindly added to the WIP by @Grey Beema - thanks GB!): https://www.iwm.org.uk/collections/item/object/205046496 Here is a link to the WIP if anybody is interested: This scheme was notable for a few reasons: - The white sunscreen applied to the pilot's glazing - The lighter covers for the wing machine guns (which I mistakenly omitted) - Most notably, the locally applied 'spaghetti' camouflage applied to the leading edges and lower surface of the cowling. This was applied in order to confuse enemy troops during ground attack sorties This was one of my most complex paint schemes to date - sadly, it is almost certainly incorrect! @iang supplied some information during the WIP (thanks very much Ian!), which strongly suggests that N2015 had a Sky underside, rather than the B/W & Sky as I've depicted. Furthermore, the leading edges would have been painted in Sky, and the 'spaghetti' elements applied with paints which would have been in store onboard Eagle, such as Roundel Red and Dark Slate Grey. If anyone is considering this scheme I would strongly recommend that you have a look at Ian's very credible advice. I did briefly consider respraying to the correct colours but decided that I would likely make matters worse so pushed on regardless. The kit is the usual SH fare, with vague fit and engineering, but lovely surface detail. The resin cockpit, whilst beautifully detailed, was a woeful fit so much cursing and sanding was expended in getting the thing to fit. With all that said, I'm not displeased with the overall outcome. Anyway, on with the photos: Here's a final shot with another FAA Merlin-powered stablemate: I'm glad I've given this kit a bash - although it's a little frustrating to have knowingly finished the scheme incorrectly, I still think it looks pretty good, and it's good to have the type in my collection! Thanks for looking, Roger
- 17 replies
-
- 36
-
-
- Special Hobby.
- FAA
- (and 1 more)
-
I have been blogging this build. This is the Hasegawa 1/48 kit, with some modifications.
- 34 replies
-
- 20
-
-
Hi All, My next project will be Special Hobby's 1:48 Fairey Fulmar. This aircraft was introduced into service with the Fleet Air Arm in 1940, and continued the tradition of two seat aircraft employed by that service, the act of navigation whilst flying considered beyond a mere pilot. Powered by the Merlin III, the Fulmar MkI was underpowered compared to its single seat RAF equivalents. Nevertheless, the aircraft saw combat in a variety of theatres and at its peak equipped 20 FAA squadrons. Here's the box art: And the sprue shots: There's also a couple of frets of PE: And a quite extensive collection of resin parts, mainly pertaining to the cockpits: The decals look to be in good register and are highly glossy (and a little bright to my eye?): 5 schemes are catered for in this boxing. I'm going to complete as N2015 of 805 Sqn FAA, HMS Eagle, which was operating in the Mediterranean in February 1941: I can find no photos of this aircraft, but have no reason to doubt the efficacy of the scheme. It is quite interesting as the leading edges and underside of the cowling are painted in a locally applied 'spaghetti' scheme, which was apparently employed to cause confusion during ground attack sorties. In addition, the pilot's upper canopy had a white sun shade installed. I have also seen a version of this scheme with a straight 'Sky' underside - does anyone have any definitive references for this scheme? I may choose to omit the night/white elements to simplify the scheme, but would appreciate any input on the accuracy as presented. Anyway, onwards and upwards with the build! Thanks for looking, Roger
- 65 replies
-
- 9
-
-
- FAA
- SpecialHobby
- (and 1 more)
-
 Hello all. This is the work in progress towards part 2 of my 'Grand old duke of York' diorama in 1/72 scale. I welcome all comments and feedback, please bear in mind this is my second dio. The idea for this piece is that its connected to the first diorama, of the same name, as a sort of before and after project. The Part 1 is in the RFI section: Part 1 is set during early autumn 1944 and the battle along the Tannenburg line ,in Estonia, is raging. The 3rd Germanic Panzer Corp, consisting of the 11th Nordland division and 11th infantry division, amongst others is fighting to defend against an entire soviet army. In reality the battle was at its height at the end of July and ended with German withdrawal in September. Part 2- is set on the same battlefield but the battle is now over, its early winter and the 2nd soviet shock army is clearing out the area, including engineers sweeping for mines, removing barbed wire, tanks pulling out obstacles and used almost as tractors hauling the wreckage away. Their are dead, wounded and surrendering troops scattered across the scene. The remaining Estonian SS are a hand full of stragglers, fighting more for their own country than for the Nazis. This is the idea where the title came from as Estonia was occupied first by the soviets and then by the nazis and then retaken by the soviets. On to the build itself: I have some left over parts from my first diorama which I will be using in this-First to start with is the large block of kingspan insulation, I savaged from a bit of waste land I was running past: Sorry for the blur! Then I drew out the outlines with a sharpie. I carved the block up into the shape I wanted. I then plastered the whole thing in my ground soloution: Polyfiller/pva/sand and paint: I used sandpaper for the road and rocks from the garden for guess what...Rocks! I have a bit of a mission on for this one as I have to try and replicate the original size and shape. After the initial covering I sanded it down and applied more of the same. I then made some of the items to go into the dio- the blue tac sand bags. I shape them, paint black, then a nasty yellow colour, This is a sort of shading. I then apply middlestone with a touch of brown. At this stage the colours don't really matter as all will be covered with snow. Below is are the cured vegetation from my garden, I wanted a alpine tree so used some of a shrub and hairspray to lacquer, for three days, hoping to keep some of it bright green colour. Next I started to paint, on mass, the tooth picks, carved pencils, skewers and cut up lollipop sticks which form my trench walls/fire step and anti tank obstacles: This is the result: I broke some of the trees on purpose and stuck them into place. I also crushed up brick and masonry from my yard to look like the remains of the farm house from the original which was burning down. I enjoyed busting out the trench wall and placing broken trench boards in places where it had been hit by a shell. Basically to be lazy and save time I put shell rounds into the areas I didn't want to have to replicate in their totality.... it is a battlefield after all. I chose the left over tufts of grass which were too garishly bright for the autumn scene to use in this one because it'll all be covered in snow and I still would like some colour to peek through from the foliage below. An IS-2 tank with riders and a Russian flag will run over the rubble section and a T34/85 will be burnt out and abandoned in the massive icy shell hole in the centre of the battlefield. From the opposite side another t34/85 will have a chain attached to pull out one of the anti tank obstacles. You'll see I used brown, grey and black on the ground for some harsh contrast of colour with the shell holes and recessesd areas. I have also added graves to this scene to tell part of the story, I will cover these up during the 'snow' process as want them to look freshly dug and not buried by snow flurry's. I have also got some left over airfix infantry from the original scene and will cut the helmets off them and place on top of the wooden match sticks to mark the graves. I may have some soviet solders standing/sitting on top of a grave, to show their contempt and hatred of the enemy. I'll see when I get that far. In the pic below you'll see the crater which I will try to portray as a denotation which the Germans left to blow up the road to slow the progress of the advance. They have left a few futile sand bags in this area, I will place a replica of the original half track burnt out and on its side in front of this crater as a barricade. From this area the 'stragglers' will be trying to protect their surrendering comrades (will make more sense once finished I hope).
 -
Built OOB in the provided markings of Michael Wittmann Built for the 2021 Airfix Darrell Burge Memorial Group Build over on the Airfix Tribute Forum (aka the ATF) ( the build record is here; https://www.tapatalk.com/groups/airfixtributeforum/2021-airfix-darrell-burge-memorial-group-build-fre-t55745.html ) I was lazy so I used the 'quick build' two piece track units.
- 2 replies
-
- 11
-
-
- WW2
- Tiger tank
- (and 1 more)
-
Hi All, This is my attempt at Special Hobby's Airspeed Oxford "Commonwealth Service" boxing. I've chosen to model LW926 of No.1 SFTS, Point Cook, VIC in 1943. Here's a photo of the aircraft (at the rear of the formation): According to the Australian War Memorial website, this photo was taken during a flypast for a wings ceremony. The model was pretty much OOB, and painted with Tamiya Yellow, and Lifecolors Earth Brown and Foliage Green. The kit was typical SH fare - vague engineering and fits, but overall I don't think it turned out too badly. On to the photos: I've also taken a shot with a Beaufighter for a couple of reasons. Firstly to show the difference between a training aircraft and a war-fighting brute, and secondly the pilot of this Beau, Mervyn Shiphard was an Australian, and could quite conceivably been trained in an aircraft such as this: Finally I couldn't resist a bit of Earth Brown & Foliage Green action, so here's one with a Boomerang: I didn't notice that the Boomerang's antenna wire had pinged loose - never mind! I'm glad to have this aircraft in my collection- although it was a trainer it saw widespread service and I'm guessing most multi-engine pilots would have flown these during training and was therefore an important contributor to the war effort. Thanks for looking, Roger
- 30 replies
-
- 52
-
-
-
- Special Hobby
- WW2
- (and 1 more)
-
Hi All, With my multiple FAA Grumman build soon to draw to a conclusion, I'm eyeing up my next challenge. After seeing @bigbadbadge's marvellous Ventura target tug build (awesome work Chris!!), I fancied a bit of twin-engined yellow action, so what better than the old Oxbox? I also spent a considerable amount of my younger years around the dreaming spires (and more importantly, the ale houses and live music dives) of that great city , so the Oxford has a distinct personal connection! I am going to be building the 'Commonwealth Service' version of the Oxford, which I have not seen built on this marvellous forum. Here is the box art: Here's the obligatory sprue shots: One thing that immediately jumps out is that there is no option to open the large side door - I may need to rectify that. The engines also look a little underwhelming, but otherwise surface detail and moulding generally looks pretty good. Here's the transparencies and assorted resin components: Nice! There's also a decent-looking set of masks (thoughtfully including a circular mask for a large yellow area around the roundels on one of the options), and a PE fret: There are 4 marking options: two RNZAF aircraft, one of which is the boxart scheme. The combination of yellow and red stripes frankly gives me the heebies , so I'm trying to decide between another RNZAF and an RAAF scheme. First the RNZAF: Here's a photo of NZ1222: Or this RAAF scheme: I've found this photo - the rearmost aircraft could be LW926, but the serial number is illegible: Both are attractive schemes - for obvious reasons I'm leaning to the RAAF scheme, but also because I think the combination of Earth Brown & Foliage Green over Yellow is a good one. We shall see - I may make a gentle start on this tomorrow Thanks for looking, Roger
- 37 replies
-
- 10
-
-
- Special Hobby
- WW2
- (and 1 more)
-
 Hi All, My next project will be Eduard's Dual Combo boxing of the Hellcat (so I'm moving in quick succession from the Stringbag to this beast!) The boxing allows for building a MkI and a MkII. Here's the box art: Here's the sprue shots: You can see that the MkI fuselage has a rear quarter window, whereas the MkII does not: There's also some beautifully cast resin wheels: Here's the transparent parts, the PE etch and some masks: Finally a most comprehensive decal sheet, which allows for 3 MkI and 3 MkII schemes. For the MkI I have chosen JV131, which as part of 800 Sqn FAA operated from HMS Emperor in June 1944 in support of Operation Overlord: I've turned up a couple of shots of JV131: Hmmm - can't quite place my finger on it, but something is missing . This will be finished in the standard EDSG/DSG over Sky, with the distinctive red cowling (and of course the invasion stripes!) For the MkII I will be modelling JX814 of 1844 Sqn FAA, operating from HMS Indomitable off Okinawa in April 1945. Here's the scheme: I can't find a pic of JX814, but here's another MkII from 800 Sqn: This will be completed in the ANA equivalent colours of Olive Drab, Dark Grey and Sky Grey - I will also depict the overpainted roundel on the starboard wing. These airframes became very worn as can be seen from this shot: I shall do my best to depict something similar. Anyway, on with the build! Cheers, Roger
- 91 replies
-
- 16
-
-
Hi All, My latest completion is Hobby Boss' Grumman Avenger, or the Tarpon as it was initially known in FAA service. Although the Hobby Boss kit is generally pretty good in terms of detail and fit, there are a few notable omissions to present an accurate FAA aircraft. I therefore made some modifications to the original, including the following: - Scratch-built the observer's position, including radar scope and chart table - Plunge moulded blister windows for the lower side positions - Scratch-built an instrument panel following a PE disaster Here's the WIP if anyone is interested: I've chosen to model the aircraft as JZ257 of 849 Sqn, which was operating from HMS Victorious as part of the BPF in January 1945. Although I have not found a photo of JZ257, here's a couple of shots of BPF Avengers: The cockpit and observer positions were painted Bronze Green, with the rest of the interior in Interior Green. I chose to complete the undercarriage in white, as I felt that there was sufficient contrast in the above photos to suggest that it was not the underside colour used. The kit decals were dispensed with and I used the lovely Xtradecal 'Yanks with Roundels Part 3'. Paints were EDSG Mr Hobby, DSG Vallejo and AK Interactives Sky Anyway, on with the pics: This one has sat idle for over a year, so I'm really pleased to have got it over the line. It's a beast of an aircraft and I'm glad to have it in the collection! Thanks for looking, Roger
- 28 replies
-
- 42
-
-
- FAA
- Hobby Boss
- (and 1 more)
-
Hi All, Hot on the heels of my finished Tarpon is this lovely pair! This was Eduard's Dual Combo, which allows the construction of a MkI and MkII aircraft, which have assorted minor variations. Both aircraft were built OOB, as the Eduard offering is very comprehensive with decals for 6 aircraft, masks, PE and resin. Here's the WIP if anyone is interested: The MkI was completed as JV131 of 800 Sqn, which flew from HMS Emperor during the D-Day landings. Here's a couple of photos of JV131: The MkII was completed as JX814 of 1844 Sqn, which was operating from HMS Indomitable off Okinawa in April 1945. Although I could not find a photo of JX814 here's another aircraft from 1844 Sqn: And here's another shot showing the battering these airframes withstood: Both models were sprayed using aqueous acrylics; Mr Hobby EDSG, Vallejo DSG and AK Interactives Sky. The MkII had the roundels oversprayed as per the convention for BPF aircraft. Anyway, on with the pics - firstly the MkI: Here's the MkII: Here's a couple of the pair: Finally here's a couple of shots with the Tarpon which was completed concurrently: This was a very pleasurable build, and the fact that I dragged the Tarpon over the line was an added bonus! Thanks for looking, Roger
- 15 replies
-
- 32
-
-
Dear fellow Britmodellers, here's my 1/72 Italeri M8 Greyhound, built with the addition of Brengun photo etch. Painted with Gunze/Mr. Hobby acrylics, weathered with artist oils and Tamiya pigments. The model represents a vehicle operating in France, 1944. Photographs by Wolfgang Rabel. The Italeri kit was originally released in 2004 and is still the only 72 scale injection-moulded model on the market. I upgraded the plastic parts with the Hauler/Brengun set (HLH72098), which contains both photo-etch and resin pieces. The kit decals seem to be slightly oversized, so I replaced the US star on the front with an aftermarket item from Peddinghaus. The antennas are from stretched sprue, the stowage items were included in the kit. Thank you for your interest.
-
A15 Crusader Mk.III 9th Queen's Lancers, 1st Armoured Division. El Alamein 1942. I have to say I have been very impressed by my first Border Models kit. The detail and fit of parts were excellent. Accuracy wise I can't really comment as I don't have any plans to check it against but to my eyes it looks right. Maybe the weld beads on the turret are a little prominent but that's about it. Most of my references show vehicles with the earlier sand shields that have two continuous ridges instead of the three broken ones as provided in the kit but as I don't have a photo of this particular tank I don't know which ones are correct. There is really no need for after market so I feel that the kit is good value for money. Hopefully there is enough interest in the kit to encourage Border to release a few different versions. The model has been painted with MRP paints and weathered with various paints, pigments and oils. A full work in progress can be found HERE. Overall I'm pretty pleased with the way this one has turned out. There are always a few areas that can be approved upon but as usual I didn't spot them until I had done the photography. At some point in the future I intend to build a base and will add some stowage. Wayne
-
Hi All, My next completion is Tamiya's mighty Stringbag, which I will say from the outset is a superb kit. I've completed it as LS276, which flew as part of 836 Sqn FAA from Merchant Aircraft Carrier (MAC) Amastra in 1943. Here's a photo of Amastra, which was a coverted oil carrier: I couldn't find any photos of LS276, but here's another aircraft from 836 Sqn: These aircraft were unusual in that the 'Royal Navy' above the a/c serial was overpainted with 'Merchant Navy', initially as a joke but eventually a source of some pride. As my grandfather served in the Merchant Navy throughout the war I feel a small personal connection - these aircraft could well have been flying as part of the many convoys he sailed across the Atlantic. Here's the WIP if anyone is interested: The kit was built OOB with the exception of the Tamiya rigging PE set, which was veeeerrry fiddly. This build nearly ended up on the Shelf of Doom due to decal disasters, so I'm glad I had a word with myself and pushed it over the line. Anyway, on with the photos: Despite a myriad of minor imperfections and errors I'm pretty pleased with the way she's turned out, and she certainly has shelf presence. I might move on to something a little simpler next time though! Thanks for looking, Roger
- 30 replies
-
- 53
-