Search the Community
Showing results for tags 'what-if'.
-
 We have a group-build comp on at the moment at Riverside model club where we can take the more-recent (1997!) Tamiya Jeep and do pretty much whatever we want with it as long as we end up with a single vehicle. After having so much fun building my 'Rommell's Uber-Halftrack' a couple of years ago, I though I would do it again with an M45 quad mount on the back of a Jeep with GMC running gear. All very nice and period. When I create one of these monsters I do try and keep everything at least contemporary. Donor kits sourced: Basic layout to make sure it will at least fit together: Believe it or not, I can get the GMC donk to fit in the Jeep engine bay without touching the grille or the firewall! The air cleaner will, however, be protruding through the bonnet. Quick dry run: After 4 or 5 mockups in paper, I found a gundeck layout I was happy with. And now the gundeck exists in plastic:
- 29 replies
-
- 10
-

-
When the Iron Duke class battleships commissioned in 1914 they were without doubt the best battleships in the RN, and arguably equal to any in the world at the time. Their ten 13.5-inch guns were superb weapons and although of a slightly smaller calibre to the 14-inch guns of the USN and IJN ships they fired a shell of equal weight, 1400lbs. But it was known that both the Americans and Japanese were building battleships with twelve guns, the Japanese had in fact launched one of theirs (IJN Fuso), and Britain was going to have to follow suit, and soon. The quickest way to do this was to repeat the Iron Dukes but with a stretched hull to accommodate the extra turret and this is what they did. As was now the norm four ships were authorized, the name ship HMS Culloden, with sister-ships Queen Elisabeth, Warspite and Valiant. Construction proceeded rapidly with Culloden but the others had to wait until longer slipways became available. Not long after, Vickers tested the first prototype of their new 15-inch gun and the RN immediately took an interest. After the second successful test the guns were ordered and while construction of Culloden continued the others were put on hold while the design was altered to accommodate the new weapon. As a result HMS Culloden like HMS Hood five years later was one of a kind. The remaining three ships had two others authorized and became the Queen Elisabeth class. HMS Culloden had the same beam but was fifty two feet longer than the preceding class to accommodate the extra turret. This was designated 'P' turret and was sited immediately aft of the funnels and super-fired over 'Q' turret. In nearly all other respects she was a repeat of Iron Duke. The power plant was almost unchanged except two extra boilers were fitted. The extra length allowed increased bunkerage and hence range, and despite the increased displacement her speed was actually 1/2 knot faster, again due to her length. Her tactical radius (turning circle) was slightly larger though. HMS Culloden fought at Jutland, and despite her shortened work-up period her gunnery was reportedly very good, her heavy six-gun salvos causing quite a bit of grief to her German adversaries. She was hit twice herself, and took a torpedo but kept her place in the line. The remainder of her war service was rather uneventful as it was for the remainder of the Grand Fleet. After the war she served in the Atlantic and Mediterranean. HMS Culloden was to be disposed of under the terms of the Washington Treaty. Due to her length she was considered for a conversion to an aircraft carrier but this didn't eventuate, and she was scrapped in 1931. The major modification was to lengthen the hull by 26mm. My preferred method is to use two hulls but on this occasion that wasn't possible, I only had one. So it was a case of cut the hull across at about midships and bridge the required gap. I did similar with the main deck. The superstructure was lowered a little, the reduction spread over three levels. This affected the tripod bracing legs so I replaced those. I also replaced the kit 6-inch guns and casemates with scratchbuilt and omitted the aft-most casemate. In reality it was found to be too close to the water and was useless in any sort of seaway. I replaced the 3-inch AA guns and the barrels of the light surface guns. I replaced the topmast and rearranged some of the boats. The full build log can be found: Thank you for your interest. And a special thank you to @Rob S who gave me the idea in the first place. Regards to all, Jeff.
-
Gidday All, a bit over a year ago a member here, @Rob S started a build thread of his conversion of two Airfix Iron Duke kits into a model of the battlecruiser HMS Tiger. To gain the extra length the two hulls were cut to give one long bow section and one long stern, then rejoined. I've used the method myself on occasion. He also did the same with the kits' weather-decks and a photo he posted on 9th November 2022 showed the midships Q turret repeated. This gave me an idea for a whiff, a six-turret twelve-gun version of the ship. Thanks Rob. 👍 For those interested here is a link to his thread. I gained his permission via PM some time ago to mention this. https://www.britmodeller.com/forums/index.php?/topic/235117299-1600-hms-iron-duke-x-2-to-hms-tiger/ The only problem for me making the whiff was that I didn't have a kit and didn't look like getting one, they're no longer in production AFAIK. However, my son managed to track one down second-hand and bought it for me for Father's Day. 🙂 I began the build last Monday for the annual What-if GB over on the ATF (Airfx Tribute Forum) and I'll be posting it here too. I've decided to name the ship HMS Culloden to commemorate the Third Rate 74-gun ship of the late 18th century that had quite a successful career. Here goes:- Firstly the traditional photo of box art and parts. The box is a bit battered but the bag inside was still sealed. I removed the parts though for the photo because the bag reflected the camera flash. Some of the parts were off the sprue, including one main gun and all five turrets but they all seem to be there. That other bag contains left-overs from my previous two builds of the kit, including the extra turret I'll need. And building has commenced. The two hull halves have been joined and the join re-inforced with scrap styrene bits. The two white squares of styrene with the holes are where I'll screw the model to a building block at the appropriate time, the extra styrene there to give the screws more to bite on. The next task will be to cut the hull athwartships (across the hull), pin the halves to a wood block with the required gap (26mm) between them and then rejoin the fore and aft sections. This has to be done carefully and accurately because I won't be able to get another kit if I stuff this up. You might be able to see the pencil line where I'll do the cut. I've also noticed that most of the fairleads have been knocked off. I trimmed off the remainder. I could possibly replace them later during the build. And so the butchering begins - I've begun cutting HMS Culloden's hull. I first drilled a series of holes down the centre-line, then took to the razor saw. Once the hull was cut I cleaned up the edges a bit then pinned both hull halves to a plank of wood, the required gap between them, a pencil line on the wood's surface marking the ship's centre-line to get the lengthened rejoined hull straight. Then it was a case of glueing joining 'girders'. These were simply lengths of heavy duty sprue of various sizes. I knew I'd kept them for a reason. I did one on either side of the centreline (the 'keel') first then one each side near the top of the hull. After that it was simply a case of adding more to get the hull shape ready for sheathing the gap. You can see the two joining girders on either side of the 'keel' already in place, the pegs are holding the girders just under the top edge of the hull. You can also see some of the pins holding the model to the wood plank, three pins for each half hull. The next photo shows all HMS Culloden's joining girders in place. The hull looks quite straight and rigid. I think this is enough for one post. I've done a bit more and will continue the thread soon. So stay safe and keep on modeling. Regards to all, Jeff.
-
Being currently a lot into Helos, it is almost inevitable that I come across the Boeing AH-64. Also, as it followed the AH-1 in the service of various armed forces and the related tenders around the world, it's only consequent it will follow it on my workbench. So it will be the Westland build incarnation of the AH-64, and Academy has a nice kit in 1/72 available, and since quite a while, me in my stash. It's this: It includes decals for the one Capt. Harry Wales, Prince of Sussex flew at RAF Cosworth Airshow in 2013, and I am tempted to do this. You know, a little bit of glamour on the shelf, not always just blunt plastic in olive drab without any personality, but some glitz of the real world red carpet airfields we so rare get close to. And here's the chance - what a rare occasion for us in the airplane section...
-
After the recent show in Glasgow, 21st October 2023, I decided to get around to building one of the TSR2's I have in my stash. Here is a picture for the items I am using that I still have boxes and the like for. There is also a CMK cockpit and exhausts that I am fitting instead of the kit provided items. The first TSR.2 kits I started, and still have part built, were almost thirteen years ago. I have also completed one since then which I can't find the pictures for. So far the only real work was on Monday evening when I removed the recomended plastic going by the CMK instructions to help fit the cockpit, as well as the casting block for the cockpit. The instrument panels will be cleaned up befor all the resin parts get a wash to remove dust and debris then they will get a blast of primer and work will continue. Gondor
-
“After its disastrous showing during the SS Leyton incident, the once lucrative export market for the MiG-28 dried up overnight. To increase confidence in the type, the Red Air Force ordered over one hundred of an improved MiG-28; which included an upgraded avionics package, support for newer Soviet ordinance options, increased pylon capacity as well as an IRST sensor. “—Jane’s, probably. I’ve been out of the hobby for awhile and have been getting the itch to get back to it. Looking through my stash, I decided I wanted something quick and easy to shake the dust off with. So, I decided on the HobbyBoss F-5E in 1/72. Looking over the marking options, I settled on the blue aggressor scheme. But that got me thinking about the ol’ MiG-28 from Top Gun and how fun it would be to—NO, remember “quick and easy”. I started assembly but kept coming back to doing a MiG. Speaking to a couple friends, they encouraged my depravity and mentioned I should do one with an Exocet. It was settled, MiG-28 it was. Never one to shy away from wasting time at work—and always putting my cart before the horse —I fired up Fusion360 and decided to model an Exocet to print. I scaled it properly, but when I’m 3D modeling, I kind of get divorced from the numbers—probably because I’m so zoomed in, everything looks huge anyways. After printing, I realized just how darned big it was. I know it won’t fit on the center pylon, which would be the only pylon remotely able to carry it, so I’m not sure what I’ll do there. I also wanted to swap out the “totally not a Sidewinder” AA-2 for something a little more Soviet looking so I settled on the AA-8 Aphid, which I also modeled and printed. However, I’m now not convinced it will look ok on the wingtip rail. Oh well, I’m sure I can find a use for them. Back to the kit! I had already started the cockpit when I decided to switch to the MiG route—so I had used the included seat. In hindsight I would have printed out a K36 ejection seat and slapped it in there. Eager to get more progress in, I decided to try to make an approximation of the Soviet interior turquoise using a recipe I found online. Approximation is a very, very generous description. Compared to: It’s fine, it works as a base coat, and I can do a mist coat of a better match. I also started on the landing gear and got the wheel wells painted white, which I don’t think is Soviet standard, but I like it, so… This week I would like to get most of the construction done so I can figure out the ordinance situation and work on building an IRST. I’m thinking it will be easier to build the mount/fairing with epoxy putty and find a glass ball for the actual sensor.
-
Morning All, I've just started building the Airfix Vintage Classics HP Jetstream which is modelled on the proposed USAF variant, the C-10. Rather than do the white/grey scheme I'm contemplating something a little more interesting - an SEA camo version as deployed for casevac and/or general transport duties in Vietnam. The camo is easy enough, standard colours, but I'm wondering about what markings I can use. I think I need a small full colour star and bar (these seem to be much more common than the outline black ones that I initially thought of). Based on pictures of TAC C-130s I've seen I'd quite like to have a white tailcode and TAC badge as well. I'm thinking I could model it as assigned to one of the C-130 units that was in theatre - does anyone know of a list of units and their tailcodes? Also, does anyone know of a decal sheet with suitably small star and bars and the lettering to make up the tail code - and even a TAC badge? The Jetstream fin is pretty small so I'm not sure if this bit's going to be possible. I could also do with some small white numbers to represent the serial.. Thanks for any input! Al.
-
 This Monogram 1/48 RF-101B Voodoo was built several years back. I had the kit in my stash for a awhile before deciding to do a "what if?" build. I wanted an all-black Voodoo in a pseudo Blackbird-type look. I don't think any recon Voodoos were painted this way, but it makes a striking appearance for these fast jets . The Voodoo was a fast plane before the area-ruled fuselage came in vogue (iirc); she did it with good ol' brute power! 😁 I used flat, semi-glass and gloss black enamels, as well as the same range in clear acrylics to paint it and weather it. The decals are from an 1/32 F-117 kit, iirc. I took these at the Cameron Airport, over the course of two different sessions. The wind was blowing way too hard during the first one and I watched the horizontal stab flutter up and down so much I was afraid I would lose it. I hope you enjoy having a look at my "One-Oh-Wonder"! Thanks for your interest!
- 50 replies
-
- 55
-
-

-
 After the busy period doing server stuff all the time I'm able, the run up to which caused me to stall my Su-34 build, I'm having a little break from that more serious subject, and doing a fun build of the new Amusing Hobby Triebflugel, which is the first styrene kit of the type in 1:48, and I just couldn't resist! The kit is fairly simple, and you can see the sprue pics on my review here. What's there is nice though, and I started off putting the cockpit together. It's made up of just a few parts, and with a little clean-up goes together well. I replaced the kit rudder pedals with some old Lion Roar PE ones, mainly because I've forgotten where my Eduard ones went. They won't be seen though, as the cockpit aperture is really narrow, so I'll just slap some @airscale instrument decals in there when I've painted it, and move along. I'll dig out some Eduard seatbelts on my way too, just to titivate the seat The fuselage is a work in three parts, starting with the nose, which I can't close up until I've put the cockpit in. I took the opportunity to remove the moulded-in guns and put some micro-tubing in there instead, just for a bit of added detail. The rotating centre section builds up from three parts, and needs a little bit of fettling to ensure it rotates freely, but isn't sloppy once the wings are on. The aft fuselage has a little bulkhead and tube into which the main wheel slides later on, and at the top it has a lip and an alignment pin, which have resulted in a small sink mark that you can see covered in putty above. Paint the wheel well interior with something dark, as no-one will see in there anyway. The three wings and four tail fins are all two parts each, with the wings having quite a bit of curvature along their length, and easily removed seams. I drilled a few lightening holes into the wing root just in case someone's looking against the curve of the fuselage with their magnifying glass. The engines fit at the other end, and these also go together well, with minimal clean-up if you take care of the alignment. I've left the centre "igniters" loose for now so I can paint them separately and to ease masking. They fit really neatly to the wings, thanks to some clever curves on the wing parts, and a shallow depression in the engine cowlings. The tail fins have a slot down the centre for the landing gear struts, which can be slid in later, and have two détente positions for in-flight (all the way in), and landed (1st click). That's about as far as I've got yet.
 -
Special Hobby have recently released a 1/72nd scale kit of the futuristic looking Bugatti 100 racer, as the real aircraft had no markings, the kit contains no decals which got me thinking what if the French turned the Bugatti into an interceptor aircraft? The real aircraft was designed in response to German advances in aviation, it was constructed from wood in a similar fashion to the superlative Mosquito and was powered by two 450hp Bugatti engines which drove contra-rotating two bladed propellers via a common gearbox (similar to the Fairey Gannet). Its calculated speed was a phenomenal 885km/h, that's an astounding 553mph to you and me! The aircraft never actually flew and was hidden away during the war but a replica powered by two motorcycle engines did fly in 2015 only to crash, sadly with fatal consequences in 2016. When I got the kit I recalled that the Caudron C.714 was a lightweight fighter based upon earlier Caudron racing aircraft, if they could do that with the Caudron, maybe they could do the same with the Bugatti... The Back Story In my alternative history... ...In 1938 with the storm clouds of war gathering the Ministère de l'Air was scrabbling around for modern aircraft types to re-equip the Armée de l'Air. The Ministère had become aware of Etore Bugatti and Louis de Monge designing an aircraft to win the 1938 Coupe Deutsch de la Meurthe aeronautical speed competition. Bugatti and de Monge were confident the aircraft could reach the unheard of speed of 885km/h, the Ministère de l'Air were extremely interested, like Caudron were doing with the C.714, could the racer be adapted into a fighter. Bugatti and de Monge being patriotic Frenchmen rose to the challenge and set about adapting their design. Cramming military equipment such as guns, a radio and some armour protection for the pilot into the same airframe would increase the aircraft's weight and it's top speed would be reduced but the two men were confident it would still be the fastest thing in the skies, estimating its speed to be in the region of 750km/h. By the time the work was done the 750km/h estimate proved to be somewhat over optimistic but it could still achieve a useful 700-720km/h (437-450mph), unfortunately, the aircraft was difficult to fly and by attempting to keep the airframe identical to the original racer concept, there was precious little fuel, a long sortie would last no longer than 45 minutes, typical combat sorties would use the fuel up in about 30 minutes or less. The Ministère de l'Air was desperate though and accepted the aircraft as a point defence Intercepteur. The aircraft would be stationed at strategic points and would be launched at the very last minute using their, for the time, phenomenal speed to climb and intercept incoming raids. A handful of aircraft were assigned piecemeal to units and only the most experienced pilots were assigned to fly the aircraft. Pilots praised the aircraft for its high speed but flying it required constant attention which made it tiring to fly, it was a good job sorties were short. As the fortunes of war turned against the French, unserviceable aircraft were burned to stop them coming into German hands as the French forces retreated, finally, at the armistice there were fewer than a dozen aircraft left at Le Bourget airfield. Determined the Germans weren't going to learn the secrets of the aircraft, pilots and groundcrew set fire to the remaining aircraft so that none survived. The original prototype and all documents associated with the aircraft were hidden and only rediscovered post war. The model... The model comes in three plastic sprues (one clear), plus a number of resin parts, the latter are used for the main wheel wells, the radiator faces in the tailplane structure and the exhaust fairings, as previously stated, there's no decals, I have some spares kicking around which will hopefully do the job, I'll dig those out later in the week. Anyway, here's the stunning boxart showing the racer in flight... ...here's the kit contents... ...I've made a start glueing some parts together, here you can see the fuselage halves, the long cylindrical fairings on the cockpit wall are, I think, for the engine drive shafts. Locating these fore and aft is left to the modeller, I used the cockpit rear bulkhead to align them but I might need to fettle them later. Special Hobby suggest the cockpit interior to be red, frankly, that's not a very military colour for a cockpit so I went for something resembling bleu de nuit, a dark blue which was used on many French aircraft cockpits, I actually used Humbrol 104 for this. I also painted the wheel wells a chamois colour which is typical of many French aircraft (I used Humbrol 93). Special Hobby state the wheel wells are in a wood finish, great for a racer but again, not in keeping with a military aircraft... I'm leaving the paint to dry whilst I start getting dinner ready (steak and chips with a red wine and mushroom sauce in case you're interested). More updates in the coming days.
- 6 replies
-
- 7
-
-
- Special Hobby
- 1/72
- (and 1 more)
-
So I decided to actually do something rather than sitting around not feeling very well due to a cold. Out with the disc cutter and I even assembled part of the replacement The black sort of vertical lines are references for where parts are to go. I could possibly get away with moving the engine pack slightly forward as the helicopter now has a bit more weight behind the gearbox than there was before but I will probably keep it where it was as everything else such as the stub wings would have to be moved as well which is too much. The nose from the 56 will get replaced with that from the AH-1 as well. Not much done but it's a start. Gondor
- 38 replies
-
- 6
-
-
- What-If
- 1/72 Scale
- (and 1 more)
-
A new Work in Progress thread, picking up on the construction of the Tamiya F14, released many moons ago and a project I started soon after the kit was released. Over on the What-If Forum I suggested that rather than scrap this part built kit because it didn't fit my RAF Focus I could finish it as a Gulf War model, in RAF Desert Pink, as per the Jaguar, etc. The hypothesis was that if the Tornado had proved to be a disaster, or had followed the TSR2 into the scrap heap then we could have seen the F14 in RAF service. As others have posted, and I've discovered researching this magnificent airframe, it is not as fanciful an idea as one might think. The USN used the F14 as an air superiority fighter, but the Tomcat 21 program was developed as an option instead of the F18. Politics killed it. There are even a few people speculating that the Tomcat could be resurrected to replace the disastrous F35 project...!! To the kit. Whilst the model has the sort of fine detailing one might expect from Tamiya the fit between parts is generally poor. The first two photos show the amount of filler needed on the centre section. I've test fitted the front cockpit section to the centre section and there is a bad step on the underside: the joint will need quite a bit off work and possibly the use of epoxy as the contact area isn't that large. The wing section needs is screwed to the centre section. I've part finished some of the sub assemblies, but other than the Sidewinder missiles and external fuel tanks the load has to be gulf war RAF. So, I've ordered from David J Parkins the following: 2 RAF ALARM missiles. One of these will go with a Sidewinder on the port inner wing pylon, the other on the rear centreline mount. 2 1000lb Paveway II bombs, these will go on the front under centre section mounts, wher the US Navy Phoenix missiles would have been, 1 TILAD Pod, this will go on the starboard inner wing pylon, tofether with a Sidewinder. As work progresses I'll report. All comments, suggestions, etc welcome!
-
Gidday All, usually I am able to concentrate on only one model ship at a time hence I rarely have two on the go simultaneously. So what have I just gone and done? Started a third.😫 Besides Britmodeller I'm also a member of the ATF (Airfix Tribute Forum) and it's traditional for that forum to hold a "What If GB" for two months over December and January. I was going to give this year a miss but I'm a sucker for punishment I guess and couldn't resist - I signed up. In the 1930s Germany began a class of heavy cruisers known as the 'Hipper' class, after the name ship. Three were built, Hipper, Blucher and Prinz Eugen. The latter was built to a slightly different design. Another two were commenced, Seydlitz and Lutzow. These two were to be 'light cruiser' versions of the class, being armed with twelve 15cm guns in four triple turrets. At a full load displacement of over 20,000 tons however they were anything but light, but then it was main gun size not ship size that differentiated between light and heavy cruisers. It was decided before construction began however that these last two would also be armed as heavy cruisers with 8-inch guns. By 1940 Seydlitz was about 95% complete as such when her fitting out was put on hold. In 1942 it was decided to convert her to an aircraft carrier. She was renamed 'Weser' and the upperworks removed from her before a flight deck was fitted. She was never completed as a carrier however. In late January 1945 she was scuttled in Konigsberg, and later scrapped by the Russians. But what if she was completed as originally planned, with four triple 15cm turrets? She may have looked something like I plan to build here. I'll be using Airfix's "Prinz Eugen" as the donor kit. Below is the traditional photo of box art, instructions and parts. You can also see part of a drawing of a 'K' class cruiser, showing the triple turrets. That drawing is not the exact same scale as the kit however. I've started construction on DKM Seydlitz in that I've glued the hull halves together, plus reinforced the join with scrap styrene and drilled the mounting holes. This ship will carry four triple 15cm turrets, which I'll have to scratch build. You can see one of the drawings of the 'K' class cruiser and turrets that I'm using, that show the turrets in 1/600 scale. I've read that the final cruiser to carry these turrets, Nurnberg, had slightly larger turrets and it follows that Seydlitz being a later vessel would have shipped these larger turrets also, so I've enlarged them by 10% to fit the molded barbettes of the kit. Being a whiff I can get away with this. 😁 On the block of wood behind the model is my first trial at scratch building the turrets. Due to the method I now use for fitting turrets to models of large cruisers and above I don't have to wait until they're done - I can proceed with the ship build. More on that later. As an aside, I consider 15cm guns on such a large cruiser to be a bit of a waste, an under-gunned ship so in the past I'd been considering a slightly smaller model similar to this for some time. I'd planned on shortening the hull by about 25mm (which equates to 50 feet in this scale) and naming the ship Wiesbaden to commemorate the light cruiser of WW1 that took a pulverizing at Jutland. But that would require quite a bit of follow-on alterations and hence a longer build time and my build program is rather full at present so Seydlitz it is, OOB as much as possible. There was a Seydlitz at Jutland too, a battlecruiser and she took a hammering also but survived it. Just. I'd like to model her one day too, but not just now. Anyway, this is as far as I've gone at present. I hope to move swiftly with this build but as I've found in the past "swiftly" is a relative term for my builds, to be taken in the broadest possible sense. 😁 So stay safe in these times and regards to all, Jeff.
-
 Hi all, Here are some pictures of my another Flanker project "Su-27FSM (No:731) - Flankerstein", a "what if" build in 1/72 scale using Revell/Zvezda/Italeri kit rest parts in my junkyard. I did a lot of modifications in this build. Also the decals are custom printed with ALPS MD-5500. The color scheme is very eye catching to me and I am very satisfied having such unique aircraft in my collection. I hope you will like too. 🙂 The entire build report is here (which took around three years to complete): Thank you for looking and I wish you and yours happy and healthy new year. Serkan
- 16 replies
-
- 24
-
-
-
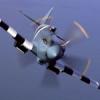
What if? What if the Confederate States of America had survived the American Civil War? What if the CSA had survived right up into the present? Well, that's the premise behind this aircraft. I created a scenario in which today's CSA co-exists with the USA here in the 21st Century. For brevity's sake, I won't bore everyone with the whole story, but I envisioned CSAF squadrons that were named for Confederate war heroes. I imagined four Maritime Air Stations; Norfolk, Charleston, Tampa and Biloxi, Miss. These squadrons are named after famous cavalry commanders of the Civil War. This CSAF Mirage F-1 is assigned to the Nathan B. Forrest Squadron based at Biloxi. Their primary mission is anti-ship interdiction. My "what if" Confederacy requires imported aircraft due to an aircraft industry that still hasn't reached maturity, nor any sort of parity with their neighbor, the United States. I guess I might flesh out my what if scenario a bit. A negotiated cease-fire, and subsequent, somewhat uneasy peace, left the United States and the Confederacy sharing what had been the USA. A continuing reliance on agriculture still retarded economic growth and manufacturing technology in the CSA. Faced with a long coastline to defend, the Confederacy, with its new capital in Atlanta, turned wary eyes seaward and made maritime vigilance both a priority and a tradition. Texas seceded from the Confederacy in the early 20th century over economic issues and concerns about the intrusive reach of the Confederate government. I'm still working out how this event plays out geographically, with current possibilities including Texas "annexation" of Oklahoma and possibly a Republic of Texas reach for Pacific ports (and all that that might entail). Confederate forces have been involved in several incidences in the recent past. These would include clashes with Venezuela and Cuba in the Gulf and Caribbean as well as joint missions conducted with Republic of Texas forces against insurgents/narco-terrorists in Mexico. The Maritime Air Stations share defense of the coast and other airbases throughout the interior of the South maintain bomber and interceptor squadrons. The choice of the Mirage F-1 for the role shown here was based on economy, simplicity and of course availability. France had been a supporter of the Confederacy from its beginning and provided various models for purchase by the CSA. The United Kingdom is the other major aircraft supplier for Confederate needs, having sold Hawker Hunters to the South as their first high-performance jet fighter. In these pictures, we see a CSAF Mirage F.1 at a small airfield in the Republic of Texas (yes, there's a "what if" story there too, lol. At some point in the future we may see a Republic of Texas Vampire), making an unscheduled lay-over for some unspecified reason. The kit is the Italeri Mirage F-1 in 1/48 scale. The Exocet she's carrying came from the Monogram Mirage 2000, the rails and Sidewinders from an old Testor's F-18 and the drop tank from something long forgotten, and modified for its role here. I guess I might mention an experiment of sorts. I dipped the canopy in Future colored with MM teal acrylic to get a tinted look. It worked alright here but the first test canopy from the scrap pile actually looked much better. Oh well. I learned a new trick, thanks Swanny! The low-viz markings were created by me and drawn by my son on an Autocad program and I printed them on our home printer. Primary colors are Humbrol enamels, Gull Gray and Lt. Ghost Gray. What-if exercises can really free up one's creativity I've found. Freed from the bounds of reality and real history, it's fun to imagine different outcomes to history. I make no political statement with this build I assure you. I don't defend the Confederate ideology or actions. But for one or two different outcomes in battle or politics, the scenario of Southern survival might have been real history. Anyway, I hope you enjoy my little exercise in alternate reality and thanks again for your interest. Gary
- 39 replies
-
- 53
-
-
-
 Are What-ifs allowed here? I hope so at least. Let's start first with a disclaimer: I mostly build aircraft and never something that stays on the ground. This is not just a Panzer-46 paper project but full on craziness since it's also a walking tank, a sort of Panzer-mecha, with a big rocket on top. What's not to like? The Rheintochter itself did exist though, and I've managed to see it in Berlin when I made a trip there some years ago: From a little Googling I found that the E series of tanks was an ambitious project that Nazi Germany couldn't afford but it has led to some remarkable stuff, some of it even available in plastic form. Modelcollect has issued a whole number of different E-75 configurations so I guess this stuff is exciting. For the interested, here is a look in the quite pretty box: The instructions looks quite nice, and are clear and easy to follow. Fun fact. To open the box, you need to be at least 15 years old, but to actually build it, you only need to be 14... There is a whole bunch of runners for this one though: To round it off, a small set of decals are also provided. The details are basic but ok. Umm, this does look like a turret with dual Mk103 30mm guns. Where does that go? Oh, it's supposed to hang from underneath!? Nice! Right, lets throw all caution to the side, and make a start with the rocket rail: The fit of the parts is not of Tamiya quality, but matches the detail level quite nice.
 -
NExt build will be the Trumpeter JGSDF Type 89 IFV with Eduard PE. THis will go the same way as the Type 16 with tri-tone grey digital scheme (may look to build a lot of modern Japanese armour in this scheme, to me it just lends itself to it). Well waiting on the kit so will put photos on once it arrives
-
Hey guys! Finished this one up a few weeks ago, a little what-if build to cleanse the palette and have a little fun. I built it as an "all metal" Salamander as if there was no aluminum shortage in Germany at the end of the war, panel lines and rivets added, and gave it a speculative scheme in Blue RLM 83 and 76. Consider it a semi-Luft46. Modifications include: - Panel lines and rivets added - Quickboost seat - Quickboost gunsight - BarracudaCast main wheels - Eduard Zoom - Master barrels, pitot, gear indicator - Custom masks for markings - AK Real Colors paints
- 13 replies
-
- 31
-
-
German Sd.Kfz.553 Ausf. Vierfüßler KaiserKäfer 1:35 ModelCollect Fist of War Series Fist of War is an alternative history series dreamed up by the designers at Modelcollect where the technology toward the end of WWII took a bit of a leap forward on both sides, allowing Germany to survive the Allied onslaught longer, and with futuristic tracked and even legged fighting vehicles fighting on both sides. Some of the tanks posited so far have been logical extensions of the German E range of Standart Panzers, and some have been quite a bit more advanced than that, sprouting legs and thundering round the battlefield leaving footprints rather than track marks. Enter the KaiserKafer, which loosely translated means “Emperor Beetle”, and looking at it you can see why. The Ausf. version of Vierfüßler means “quadruped”, which is again a very visible aspect of the vehicle. Rather than looking like a tank on legs, it looks like a four-legged spider and has a long-barrelled 7.5cm cannon on each side of the crew compartment, fed automatically to reduce crew workload. Would it have worked? Very unlikely with 1946 technology, but who cares? The unknown technology advances could easily have taken care of the details, and as the box art shows a Haunebu flying saucer in the background, it’s not a case of what if, more like why not? If you check out some of the other creations they’ve come up with, you’ll deduce that they have very fertile imaginations. I kind of like it. The Kit This is a new tool from Modelcollect, and arrives in one of their smaller boxes of a similar size to a tank kit. Inside are eight sprues of grey styrene, a small decal sheet in a ziplok bag, and a diminutive A5 concertina instruction and painting sheet. The vehicle is split sensibly on the sprues with the head on the largest sprue, four legs on identical sprues, and the two panniers with guns on two more identical sprues, all of which will simplify the build process a little. Construction begins with the two 75mm cannons, made up from two halves each and ensconced within their two-part panniers where the breech and loading mechanism would be. The rear of the hull is made up inverted with the two weapon supports each having two parts plus a splined retaining collar, with the modeller advised to be cautious not to glue the parts too generously so that the mounts can move using the three détentes to hold it in position with a click, thereby elevating the guns accordingly. No-one likes a stuck-up quadruped, or for that matter a floppy one. The gun paniers are brought together with the now righted hull, which is given a cupola straight off a King Tiger, plus a pair of rear doors on a frame that completes the assembly. The rest of the hull is made up from a two-part lower hull onto which the crew compartment is built, with vision slits and access hatches added along the way. The interior is decked out with flooring panels, then detailed with remarkably normal-looking crew seats split into two at the front for the two drivers/pilots, and another two in the rear for the gun crew with some fun-looking instrumentation for each task group. The front roof is dropped over the drivers, and a hoop allows the connection with the gun assembly, with a rear bulkhead fitted first to section off the interior. No tracks on this model, but you do have four legs to make, and these start by making up two cylinders, long and short with mounting points and pistons for movement, so don’t cover them with glue. The feet are flat-bottomed with four moveable toes pushed into their position over the domes round which they can rotate if you don’t apply glue to freeze them in place. The rest of the leg is also reminiscent of the AT-STs from Star Wars, with a large lower leg and foot pivot at the bottom and knee at the top. The top leg is at an angle just like the Scout Walkers, giving the legs the feel of a “chicken” or dinosaur if we’re going to honour their Therapod heritage. At the hip is a huge pivot and each part of the leg has a piston as its muscle substitute, with a couple of armoured plates fitted over the vulnerable joins at the top of the leg, and a more substantial set of armoured greaves on the lower leg that join down the front of the shin. The feet are also attached at this point, then each pair of legs are attached to a figure of eight joint with one fitted to the front of the hull and the other at the rear. Markings The majority of the small decal sheet consists of generic vehicle numbers in red, plus two types of crosses in black and black/white. There are also two pairs of stylised charging knights on horseback in red or dull green, with each pair having one reversed so they can both be applied facing forward. Both options/suggestions have a base coat of late war Dunkelgelb, over which are painted two types of camouflage, and it looks like it’s up to you to invent the history behind their units and theatre of operation. From the box you can build one of the following, although the decals provided don't seem to match up: Surprisingly for a small sheet and most welcome is the news that the decals are by Cartograf, which is a guarantee of good registration, sharpness and colour density, with a thin matt carrier film cut close to the printed areas. Conclusion It’s a simple model that will be made quickly and relies heavily on how you paint and weather it as to how believable it will seem when finished. I’m not averse to a flight of fancy from time to time, and this is an appealing model, having a very “that could work” design ethos throughout, and obeying the laws of physics to the casual viewer. I’m going to build this, although I can’t say when yet. Highly recommended. Review sample courtesy
-
Hello everyone Here is my Eduard 1:144 Messerschmitt Me 262A-1a painted in the standard Luftwaffe MTO scheme which I built in 2009. It represents "Yellow 14", 3./JG27, Luftwaffe, flown by Hans-Joachim Marseille, Libya, 1944 (fictitious of course). The Me 262 is one of my favourite aircraft and I always thought it would have looked great in a desert scheme and with the release of Eduard's lovely kit I decided to finally paint one this way. This "what-if" kit is based on two "what ifs": what if Hans-Joachim Marseille survived his fatal accident and was hospitalised for a while until he recovered and what if Germany didn't lose in North Africa and was eventually able to deploy Me 262s there. In this scenario, Marseille returned to front-line service at about the same time the Me 262s were delivered to JG27 and so his aircraft wore the same number of kill markings before his accident - 158. The kit was painted with brush. Since this was the bagged E-Day kit with only Czech markings, most decals came from my spares box. Marseille's markings were leftovers from Sweet's Bf 109F kit. Thanks for looking Miguel
-
Hello everyone Here is one of three 1:144 Focke-Wulf Fw 190Ds in fictitious schemes and/or variants I built back in 2013. In this case, it's a Platz Fw 190D-9 kit in an MTO scheme representing a fictitious machine from 4.JG27 based in Italy in 1945. The Dora never served in the MTO and I thought (correctly) that it would look great. The kit was built OOB and fully painted, weathered and varnished with brush. The JG27-specific markings (emblem, number, etc) came from a Sweet Bf 109F kit. Thank you for looking and all comments are welcome as always Miguel
-
Focke-Wulf Triebflügel (48A001) 1:48 Amusing Hobby Toward the end of WWII the Nazis were desperately casting around for wunderwaffe, or Wonder Weapons that would turn the ever-increasing tide against their attempt to take over Europe and probably the world. This resulted in some possibly more left-field designs being considered, when under normal circumstances they would more likely have been dismissed out of hand. One such project that has since gained traction in the minds of the Luft'46 community and beyond is the concept of the Triebflügel from Focke-Wulf, which was little more than a rocket body with a rotating set of arms with ramjet engines at their tips providing the motive power. This arrangement was to enable it to take off vertically, which was of greater interest as the front lines got closer, as was the use of the simple ramjet that was propelled up to speed by rockets, all of which used little in the way of strategic materials or complex technology. It went nowhere of course, and had some critical issues that would have needed to be addressed if it had gone further, such as the counter-rotation required to offset the torque of the motors was supposed to be supplied by the cruciform tail pressing against the air, it would have to land vertically with the pilot facing forward and the rear view obscured by the still rotating engines to name but two. Post war the Convair Pogo was to attempt a broadly similar flight profile with similar issues raising their heads and helping ensure its demise. If you've been following the Marvel Avengers film franchise (MCU), you'll have seen Red Skull absconding in a very Triebflügel-esque aircraft at one point, which although undoubtedly CGI could actually be attempted now with our computers and other technologies. Can we convince Elon Musk to give it a go? The Kit This is the first winged project from Amusing Hobby, and it's great to see them applying their sense of the unusual and what might have been to their choice of aviation subjects too. Because the Triebflügel only got as far as a general arrangement design, there is also little in the way of "you got that wrong" that can be said about the subject unless you enjoy being ridiculed for being a know-to-all with a crystal ball. Arriving in a slightly smaller box than their usual AFV kits, there is a dramatic CGI render of a Triebflügel in action on the lid, and inside there are eight sprues in sand coloured styrene, one small clear sprue, a sheet of decals, instruction booklet and two separate painting guides that fold out to provide quite a few options. There's a relatively small part count due to the speculative nature of the design, but what is there is nicely moulded and has fine panel lines and rivets throughout. The sprue diagrams show the centre ring (part 1) attached to the end of the main sprue, but it had been nipped from the runners before dispatch, probably to prevent damage during transit. Construction begins with the cockpit, which is built onto an L-shaped floor and rear bulkhead, with side consoles, rudder pedals, control column and instrument panel, all of which has good raised detail, and once the seat is dropped in, other small details such as the gun sight finish it off, with the nose area closing up around it. The two-part canopy can be posed open or closed, and the rotor base is added at the back of the nose from a cylindrical arrangement of three parts that can be left to rotate so you can show off those rotors. The tapering rear fuselage is made of two halves that close around the large tail-wheel, which sits inside on a platform and is allowed to rotate. The fuselage is completed with a DF loop and aerial, then put aside while the rotors and tail assembly are build up. The three rotors, which I keep wanting to call wings because they are, are all identical and are made from two halves, tipped with the ramjet cowlings that have the simple mechanism inside, most of which I'd paint black or rusty. Each cowling has two halves and an intake lip, and one of the drawings incorrectly has an intake fan drawn inside in step 8, and there is a fan on the sprues, so maybe they were considering making it jet propelled? These are glued into the holes on the centre fuselage section, or left loose for storage or posing later. The tail has four cruciform fins that are made of two halves with a slot down the centre for the landing gear castor, which has a separate yoke and wheel, replicated four times over. If you are posing your model landed, the clamshell aerodynamic covers are glued in place split, while in-flight they are posed closed over the four castors and the big central wheel. That's it! You're done, but part of the fun with this type of hypothetical is the painting. Markings The decal profiles have been drawn in conjunction with AMMO using their paint codes, and there are four choices with absolutely no facts involved, as it's pure fantasy. The world really is your oyster, and with the addition of some home-made hydra decals you could even paint it as the Red Skull's personal ride from Marvel's The First Avenger. There is no backstory to the options provided, so the profiles will have to speak for themselves. The decals have only the Amusing Hobby name on them, but have good registration, sharpness and colour density, with a thin matt carrier film cut close to the printed areas, with lots of different types of crosses, a few unit badges but no swastikas, so if you're stickler for your Hakenkreuz, you'll need some of your own. Conclusion Awesome! Lunatic, with a touch of bonkers, and a hint of desperation. I've had a hankering for one of these for a while, but as this is the first injection moulded kit in my preferred scale, it's been an idle quest until now. I just need to find the time to build it now. Why are you still here? You need to track down and buy one of these at your earliest convenience! Excruciatingly highly recommended. Review sample courtesy of
-
Heinkel He.279 Spirale (MX4857) 1:48 Master-X There are a few theories regarding the Heinkel He.279, some stating that it is a pure fabrication, others that it was a propaganda mock-up using a Heinkel 280 fuselage and wings to confuse the Allies, and another that it may actually have existed in some limited shape or form. Speaking personally, it has a few oddities that set the spider-senses tingling, and all but one of the very limited pictures of it online are clearly models, despite people believing otherwise. The old panel lines give the game away every time! The picture that does give one pause for thought is a head-on shot with a Luftwaffe chap stood nearby, but even that has a strangeness about the four-bladed prop that sends it packing into the "uncanny valley". It is purported to have been driven by an experimental X-arrangement engine, which explains the two runs of exhaust stubs on the sides of the fuselage, with a drive-shaft passing through the cockpit to the large prop as previously mentioned. The Fuselage and flying surfaces are identical to that of the He.280, with just the nose and cockpit showing any major differences. I'm erring toward it being a fabrication of someone's fevered imagination, but it looks just reasonable enough (with a few additions) that it could have been one of the aforementioned stories, or perhaps another more fanciful one. The Kit This is a resin kit with styrene clear parts, so strictly speaking we should call it multi-media because it is. I'm lucky enough to have the old Eduard kit of the He.280, so the resemblances there are more than passing. It arrives in a white top-opening hinged-lidded box, with the product details pasted on the lid, which includes a nice profile that is well printed. Inside the box are all the resin parts, with the large ones heat-sealed in a partitioned bag for their protection, while the small parts are found in a ziplok bag, as are the clear parts, which I would surmise have been made for them by Eduard as they are identical. This is backed up by the masks, which are in another bag with the decals, having the box-code for Eduard's recent reboxing of their He.280 kit cut into the yellow kabuki tape. Elementary my dear Watson! The instruction booklet completes the package, and this is a fairly short affair due to the simple construction. There is even a suggested colour scheme on the back page, although the world is your oyster, given the fact that it may well not even have existed! Not one to be put off by that fact, as I have a fondness for the Luft46 projects as the paper and research projects are sometimes called, I was very interested. Imagine the fun a what-iffer could have coming up with back stories and schemes from alternate timelines and so forth. Construction is straightforward, but that doesn't imply a lack of detail, as there is plenty visible. It begins with the cockpit, which has a rear bulkhead and insert that sits within the canopy, although that portion isn't shown in the profile. To that the seat lower, control column, rudders, side consoles, seat back and instrument panel are added, all with some reasonable detail that will look good under a coat of paint and perhaps with some Airscale instrument decals added into the dials. There is also an undocumented early ejection seat included in the box, although mine had become a little damaged, but it's nice to have the option if you so wish. With just the cockpit completed, the fuselage can be closed up around it, just remember to paint the underside of the floor RLM02, as it is also the roof of the nose gear bay. There are no details there other than a location point for the nose gear leg, so if that bothers you, add a little ribbing here and there to taste. The same goes for the wing-mounted main gear bays. The fuselage will need taping while you apply super glue around the mating surface, which I tend to do with a sharp blade while the fuselage parts are taped loosely together. That allows you to both join and fill the halves in sections, and generally results in less clean-up. The top of the fuselage was the location for the moulding stub, which has been removed by the manufacturers, and here you will need to remove some rough-spots and fill in a few little bubbles that have risen during casting. Grab some rod and a drill to ream them out to size, super-glue the rod in place, nip it off and sand it smooth to get rid of them quickly and easily. You'll also need to remove the flash over the cockpit opening, which just snaps off, leaving the edges needing a little smoothing. While you're there, check for flash over the exhaust apertures, as holes are always flashed over in casting so that the parts can still be removed from the rubber after. Interestingly, the diagrams show a nose gear bay assembly, but these aren't present in the kit, so must be a hangover from a previous version of the kit before release. With the fuselage done, you can install the four exhaust banks, two per side, which are perilously close to the aft of the cockpit. The wings have been cast as a single part, with the casting block removed from the trailing edge, and this too will need a little clean-up. There is a landing light part on the clear sprue, which fits into the slot on the port wing, and later on a pitot probe will be fitted further outboard on that wingtip. The fit of the parts seems good on a brief test-fit, so as long as you have got the fuselage fitted together neatly, the wings shouldn't give you any trouble. At the rear, the H-tail attaches to the top of the fuselage, and the rudders hang down perpendicular. That's the basic airframe done. The nose gear is a single strut with a yoke that holds a tyre between it, and a test fit may require you to deepen the depression at the centre to allow the yoke to grab the wheel better. A retraction jack braces the strut forward as per the profiles, and three small bay door parts surround the bay, making any lack of detail less evident. The main gear legs are substantial struts, with two jacks and a single wheel each. Again, the wheel will need the attachment point drilling out, as this has been left intentionally shallow to avoid bubble formation. The bays are finished off with a small bay door. The final parts mentioned on the instructions are the canopy, which can either be posed open in two parts, or closed with one. The great big fun propeller with hollow spinner (presumably an intake as-per the early Fw.190) isn't mentioned, but is present and where it goes is pretty obvious anyway! You'll need to clean up a little roughness at the trailing edge of each blade, and my review sample had a slight blemish on one blade, but that's nothing that can't be fixed with some filler, and then it just slots into the hole in the fuselage front. Markings The decals included in the box are sufficient to do the boxtop scheme, with the white 8, and enough crosses for the fuselage and wings, plus a couple of half swastikas for those that want them, or can use them. The scheme is an RLM 70/71 green splinter pattern with an RLM65 blue underside, but as the genre suggests, you can paint it any colour you like. You might be able to see the slightly raised underprinting on the crosses, which is simply the white borders that have been carried through from side to side. These shouldn't notice once you've glossed over them, but it's worth noting if you're not one for over coating decals. Conclusion It's hard not to like this kit, as it's a bit of a mystery that more difficult to solve due to the lack of easy evidence available on the net, but is very likely not to be real. Who cares? The shape of it was what drew me to it, and it reminds me a little of the Me.509 that's available from Hobby Boss, and I like weird things – ask my friends. The quality of moulding is good, with just a few blemishes here and there that will need a little fettling. If you've had experience of short-run kits or would like to try a resin kit for a change, there's no reason why you shouldn't give this a whirl, particularly if you like its unusual look like I do. A little reminder for those that may not already know: With resin, take the precaution of wearing a mask when cutting or sanding resin, as the tiny particles are harmful to your health if breathed in (as are all tiny particles). Washing the parts in warm water will also improve the adhesion of paint, as there may still be some moulding release agent on the parts when you receive them. Highly recommended. Ordering Instructions Review sample courtesy of
-
 Armour modellers of a sensitive disposition should perhaps look away now! Still here? Right. This was a commission build for a friend, intended to represent the upgunned Cromwell depicted in the World of Tanks game. The in-game tank has the option of mounting the Vickers 75mm High Velocity gun. This gun used a 3-inch AA gun cartridge, necked down to take US 75mm ammunition. Historically, there actually was the intention to fit this gun to the Cromwell, but it was discovered rather late that the turret was too small. In what-if world of course, anything is possible. Perhaps the fall of Malta in 1942 puts a serious damper on the progress of the desert campaign. Without the interdiction of supplies to the Afrika Korps, preparations for the Allied offensive in North Africa are seriously hindered, resulting in at least a year's delay to the build up of forces in Egypt. It does however mean that the new Cromwell cruiser can be giving its first taste of action; it proving a worthy opponent to the long barrelled PzIV and the heavy Tigers of the DAK. Anyway, all just an excuse to give the Cromwell a fancy Caunter scheme and a more serious looking shooter. The Tamiya kit was almost flawless as you might expect. The gun is a shortened 17-pounder from RB Model. Added 06/01/16: regards, Jason
- 17 replies
-
- 31
-
-
- Vickers 75mm HV
- what-if
- (and 1 more)
-
Soviet Ball Tank "Sharotank" (40001) 1:35 MiniArt via Creative Models This is a hypothetical design from an alternative reality where ball-tanks were practical, and although there are some quite realistic looking pictures out there on the web, this is a decidedly fictional or "what-if" design for a small infantry tank that might have been quite handy for approaching bunkers or installations with significant light weapons presence. It does appear to have some weaknesses though, such as the little outrigger wheels that if shot out, would result in a seriously dizzy crew at best, so it's probably for the best that it remains in the realms of the fantastic. The ball hull is static, with a large wide track running around the circumference, propelled by the motor inside. There would be some serious torque transfer to the hull on acceleration or deceleration, but as this doesn't seem to adversely affect those big-wheel motorcycles, it wouldn't be a huge impediment, especially as the majority of the hull won't be moving. There is a crew of five, with the top-most crew member in each side running the weapons stations, and the front-facing crew driving and operating the forward machine gun. The final rear-facing crew operates another machine-gun that faces to the rear. Oddly, the main guns face sideways in ball-mounts, which would make shooting straight ahead difficult without cooperation from the driver, which could be tricky in such a confined, noisy environment. In reality, it would probably have been a massive failure, but it's interesting nonetheless. The Kit This is the first real What-If subject from MiniArt, who usually keep their subjects in reality, or at least prototype form. A lot of effort has been put into making it appear real however, including a complete interior, which gives the model a bit more gravitas and believability than an empty shell would have done, and also opens up the possibility for dioramas or vignettes. The kit arrives in standard sized MiniArt box, with a yellow/sand colour scheme, and inside are 23 sprues in mid grey styrene of various sizes, a single sprue of clear parts, and a decal sheet. The instruction booklet is bound in a colourful glossy cover, with greyscale drawings inside, and the decal options printed on the inside covers front and back. Detail is really nice for a relatively small kit, and I have to say that this is just the kind of silliness that appeals to me, as it is at least semi-believable and just a little bit left-field. Construction begins with the engine, which is quite a complex assembly, and has a large friction roller at the rear to apply power to the track. The crew seats are built up next, and then attached to the main frame, which consists of two large hoops with cross-members to retain its shape. Track rollers are fitted to the inside of the frames, and the engine, seats and ancillary equipment are all suspended from this. Ammo racks for the main guns are built up at the same time as the gun breeches and the machine guns, which also have spare ammo cans made up, and all these sub-assemblies are installed into the hull halves, which have cut-outs for the ball-mounts, a radiator grille (backed with a fairly standard looking radiator), and conformal fuel tank. In the centre of each side is a crew hatch that is operated by a wheel, with arched hinges and interlock parts included. With the breeches and machine guns fitted from the inside, and the hatches put in their required positions, the halves are glued to the frames, and the hollow tipped gun barrels are added, plus a headlight with clear lens for night operations (ha!). The track is supplied in four parts with a chevron tread and matching joins to minimise clean-up. The four parts glue around the open section of the hull, with a scrap diagram showing the correct location on the lip, and of course the two "trainer-wheels" that stop it from tipping over. That's all there is to it! Markings As it's all fiction, it's probably more a case of choosing the scheme that appeals to you, and as there are a choice of six, it should be pretty easy. You can of course mix and match decals and scheme, as no-one (sane) is going to be complaining that it isn't accurate! From the box you can build one of the following: Red Army, Summer 1942-43 Red Army, Summer 1942-43 Mobile Checkpoint, 1st Belorussian Front, 1944 Captured Combat Vehicle. Wehrmacht unit, Eastern Front, 1944 Polish 1st Armoured Brigade in the Red Army, 1944 1st Belorussian Front. Battle for Berlin, 1945 Decals are by Decograf, with good registration, sharpness and colour density, with a thin matt carrier film cut close to the printed areas. The shark mouth is going to be quite popular, I'd expect. Taken from MiniArt's website Conclusion An awesome trip into alternative history that's got a certain hokey appeal, partly because it looks like it could possibly have worked. The internal structure has been well thought-out, and the variation in decal options makes for a fun project that shouldn't take too long to complete. Very highly recommended. Review sample courtesy of