Search the Community
Showing results for tags 'vietnam'.
-
This is the old but good (for its time, at least) ESCI/ERTL kit from 1983. The solid molded plastic tracks on ESCI’s little Patton look nice, but the road wheels and return rollers are depicted as wide single units rather than as the thinner, paired wheels as they actually were... Making those one-piece Mag wheels into the correct paired sets is actually a simple (if tedious) procedure: I started by taking two of the kit bogies and sanding the backs down half way. Then, adding a .030 inch thick plastic disc as a spacer between them, I glued them together. The width comes out exactly the same as the original single wheel but with a space between the two for the track guide horns. This approach requires twice as many bogey wheels as come with the kit, but fortunately I also had a M48A5 kit to plunder for parts... to make fourteen pairs – and a further ten return rollers needing the same treatment too! As for the tracks, the molded parts in the kit aren’t bad, but the inner sides have unrealistic gaps between links and are completely lacking in detail. My first thought was to simply replace them with better detailed tracks from a spare Hasegawa 1/72 M1 Abrams kit, which has very similar sections and guide horns... ...but unfortunately, the pads on the outer surfaces are of a different design. I experimented with various fixes, such as sanding away the Abrams pads and then shaving off the individual M48-style chevron pads and attaching them one by one – but that approach have been unreasonably burdensome for a whole vehicle. I finally opted to sand the outer surfaces of the Hasegawa Abrams tracks down until the remaining inner faces were almost paper thin, and then attaching them to the flat ESCI parts. A bit of work, but the upgraded parts do look a whole lot more like proper Patton T97E2 tracks! So here’s my rendition of ESCI’s M48A3 Patton in 1/72 scale. This classic kit from the early 1980s has a lot going for it, but I did make a few changes: • 14 road wheels and 10 return rollers corrected to doubled configuration • track horn guide channels added to the centers of the drive sprockets • mounted tracks and spares on turret improved with Hasegawa M1 Abrams track inside surfaces • headlight guards made from lead foil, headlights hollowed out and acetate lenses added • tool boxes on fenders improved with new plastic lids, hinges, & wire handles • air cleaners on fenders improved with wire and sheet plastic details • Xenon light improved with wire, facial tissue cover, and hand painted MAIN DEALERS logo • wire securing ring and lead foil clips added to blast bag at base of barrel • .50 cal machine gun replaced with a Hasegawa part improved with wire and plastic stock • various handles, lifting rings, antennae, MG barrel deflector, and hatch mechanism made from wire • raised casting codes on turret top are numbers shaved from plastic model sprue labels • turret basket scratchbuilt from plastic, wire, and nylon mesh; stowage from various sources • markings hand painted and assembled from model railroad stencil decals The completed tank: The model depicts DISASTER, a M48A3 (late model) Patton of the MAIN DEALERS, 2nd Platoon, ‘C’ Company, 1st Marine Tank Battalion during operations Southeast of Da Nang in February of 1970.
-
This is a MiG 21D All Weather Fighter in 1/72 scale. The kit was issued in the 1960s by the long-defunct Industro Motive Corporation (IMC) along with several U.S. jets of the era. The models were fairly basic efforts which have all since been eclipsed by newer, better kits, but what was unusual about them was the inclusion of special alternate “battle damaged” parts – very cool!
- 11 replies
-
- 25
-

-
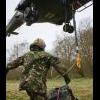
Hello!I'm starting new figure project, this time Navy SEAL from Vietnam era, sculpted by Vladi from Bravo-6. Excellent quality as always. I opted initially for the Tiger stripes camouflage, but the uniform cut is different, so will stay with standard ERDL. I have also small vignette in mind, with water and vegetation
-
Hello everyone , hello from Vietnam everyone . My name is Duy and i am 22. I live in Ho Chi Minh City. Im new to Brtimodeller and i like to build 1/35 tank ( mostly WW2 era), 1/48 aircraft, and 1/12 motorbike. I will show you guy my finished model very soon. But i dont know how to insert photo to my post , can anyone teach me ? Thank you
-
Hello mates, a Happy New Year to You! Hasegawa Tweet 1:72 built 1999 (there was a big bubble in the Hasegawa canopy). 937th IBAP Наu Giang VPAF as seen in Air International : this was really an old issue! The tarmac model picture is quite old on film... You can send a Tweet as letter.... so flat (and so nice)! Cheers, Thomas
-
While the Quad is in the paint shop i have moved on to my next build. Going with the Roden 1/35 scal M37 3/4 tonne truck (Vietnam era). Going to modify this one to move it from a bog-standard truck to an armoured one (not fully armoured) - adding 1 50cal MG on the front of the truck bed (possibly from the Eduard M4 Sherman kit, or may get the Academy 50cal/30cal set). This will be more WHIF so markings will probably stay the same as the kit one... anyway, box & sprue shots and some progress: 17554589_10154677585522979_6739972332872990214_n by Robert Worth, on Flickr 17634686_10154677585507979_3781796024347686817_n by Robert Worth, on Flickr 17636756_10154677737262979_8198002138214776341_o by Robert Worth, on Flickr
-
Hi I am not sure if this has been discussed here before, but I am after hand held weapons at 1/24 scale for my revel hugie helicopter I hAve figures from the tamiya rally crew kit but spanners would not really hurt Charlie. If any one could point me in the right direction to get some M16 or browning that would be great.
-
Hello all im in a bit of a confusing spot here ? I have a 1/48th Hasegawa A-4K the “KIWI” version. Its a later square tail that as ive researched was a derivative of The A-4F. Itself an updated “E” if memory and research tell me. My question is im backdating this Skyhawk to an “E” and an early one at that used by the USMC in Vietnam. All the parts are in the kit already so not a lot of work. I know it needs the shorter tailpipe, round tail, no chaff dispenser underneath the tailpipe, & no avionics hump on top, but where i get hung up is Antennae's ? Im not sure the correct antennae's for an early “E” type, nor there placement. Is there a go to website or does anyone here know the answer ? Any help at all is always greatly appreciated. Dennis
-
Done, work in progress here: http://www.britmodeller.com/forums/index.php?/topic/235023718-usmc-sniper-team-vietnam-135/&page=4&tab=comments#comment-2845164
-
To run alongside my Dakota Mk.III build, I wanted a smaller kit to crack on with, and looking in my stash I decided to opt for a kit I've never attempted before. This is a first in 2 ways, my first Special Hobby kit and my first Helicopter! I picked the kit up on holiday along with a Special Hobby Sf-1, it was cheap and although I don't usually build helicopters I fancied the challenge. So here goes on 2 firsts! The box includes detailed colour instructions, and a small but detailed sheet of decals, for the 4 options of paint scheme. There are 5 grey plastic sprues, all very detailed with panel lines, rivets and the like, and one clear sprue. I am planning on painting the aircraft in the scheme of Candy Ann, as flown by CW2 Randy Zahn and SP4 Marshall Maring of C- Troop, 1St squadron, 9th Cavalry, in Vietnam August 1970. Let the fun begin!
-
Ready for inspection I offer my first Special Hobby kit and first Helicopter build, the AH-1G Cobra. Built as an out of the box build, the kit went together pretty well to begin with and work progressed at a good rate, until I began the canopy. This has to be the fiddliest thing I have ever put together, and having lost my temper with it several times I had to concede to a misty canopy effect. The skids too were terribly thin and hard to insert. That said, I enjoyed the build, and she looks better than I anticipated.
-

Casemate Marine Corps Tank Battles in Vietnam - Casemate UK
Julien posted a topic in Reference Material
Marine Corps Tank Battles in Vietnam ISBN : 9781612005327 Casemate UK The US Marine Corps is fairly unique in that where ever they operate they generally rely on their own Air Power and own support elements including heavy armour, today operating the M1 Abrams in this role. Vietnam would seem a strange place for tank battles with its mix of jungle and paddy fields but the USMC tankers would serve with distinction. Vietnam was a war like no other, it had historical aspects, political aspects, and moral aspects. It was the first war to be shown almost live on television beamed into peoples houses on a nightly basis. From a history point of view units frustratingly kept incomplete records unlike other wars. We think of this as the air war with hueys dropping in troops accompanied by fast jet air strikes, with B-52s carpet bombing the countryside. Tanks though were used surprisingly a lot in Vietnam, though the tankers themselves were often frustrated that hard won lessons of tank/infantry cooperation learned in Korea and WWII were overlooked by their senior commanders. While they often worked in familiar roles; Vietnam also placed tanks, guarding outposts, in convoy protection, road blocks, and working in villages. Despite the challenges of a war which had no real front lines and was often more brutal in its fighting, while being hampered by Senior Commanders & politicians the tankers of the USMC fought in the Sand Dunes, paddy fields, villages, jungles, mountains, and historic towns of Vietnam with distinction. The book is divided up into 7 chapters; Two Thousand year of war (History of Vietnam) 1965: Taking Measure 1966: The NVA moves South 1967: A growing momentum 1968: Crisis and Decision 1969: On the Ropes 1970/75 : Withdrawal and Final Spasms This book is a reprint in an A5 softbound format by with 293 pages with one section of black & White photographs. The author Oscar Gilbert is an ex Marine himself and winner of the 2016 General Grenne award for outstanding non fiction for his book on USMC Tanks on Tarawa (Also available through Casemate). This book really is also a companion to the Marine Corps Tanks Battles in Korea we reviewed here. Conclusion If you're interested in The Vietnam War, Tanks, or the US Marine Corps, this is an interesting book on an interesting subject that should give you some hours of entertainment, and remain on hand as a reference for the modeller or historian. Luckily Vietnam has not been as forgotten as some other wars, however the role of the USMC tankers has largely been ignored; not so now. Highly Recommended. Review sample courtesy of -
This is my Academy M113 ACAV in 1/35 scale. Finished a while ago but only now I managed to update my site. Now I'm about to start working on a suitable base and the 5 crews... Hope you like it. Rato Marczak www.ratomodeling.com
-
Ok, time to make some kind of a start. I plan to build an 'A, one of the very first in service, and one of the first detachment of six to deploy to South East Asia, Thailand, on the F-111's combat debut over the hostile skies of Vietnam as part of operation 'Combat Lancer' in 1968. I'll be using the Italeri boxing of the ESCI '111. This has the detachment fin flash on the decal sheet. Not sure which a/c to build just yet, but probably one of the survivors. Some were later converted to Sparkvarks and served in Gulf War One, so they will be on the shortlist. Cheers. (ignore the Bf-109G-10 lurking on the bench. I have a few WWII fighters to finish off, but I can make a start on some small Aardvark bits )
-
Greetings This is a classic kit and one of the best representations of this aircraft . I was stationed at MacConnell AFB,Kansas in the 70's and got to watch them fill the sky. This aircraft has Kansas markings from that period and is a F-105F backdated from the kit F-105G. Aftermarket was Resin Seats, Metal Main Gear,MV Lenses for Landing lights, and Master Pitot. Paints were "what we have on hand"..Gunze Dark Green, Testors Acrylic Light green, Vallejo Brown and Humbrol Light Grey, over-coated by Testor Rattle Can Dullcoat (decanted). Had to go outside for the Photos because the model is quite Large . Reason for two different backrounds. Used Uschi Powders on Speed Brakes exhaust petals Really great kit of this Very Large "Fighter" Aircraft. Cheers Thanks for Looking Bill
- 14 replies
-
- 21
-
-
Good evening fellows, I have a nearly 20 year long relation to these Hasegawa model kits. One of them accompanied me from the last days of school, through my military career and over commercial pilots training to every base I served at. I never dared to build the kit, just opened up the box, glared at the exquisite detail and perfect craftmanship. When I found the announcement for the STGB I thought: Time to finally build it. In the last few weeks, I just needed to decide, which one to tackle. The F-111.net provided interesting information for all of my kits. So it will be this one: As previously said, the detail is excellent. I will be using some aftermarket pieces to build a specific vessel. I chose to do aircraft AF67 081 with tail code LN from Nellis, Las Vegas. The aircraft was transferred to Takhli and Korat Royal Thai Air Force Base, where the tail code changed to HG and it received a yellow stripe. The vessel flew regular missions for the 429th TFS / 347th TFW, until it ended up at AMARC on June, 21st 1991. So my plane will be a survivor. F-111.net states, it flew with four Mk. 84 bombs on the pylons. I obtained two very nice sets from Eduard and plan on using them. Wishing all of us a good hand in this job. Balloo
-
Kit - Trumpeter 1:48. Paint - Alclad lacquers, AK Xtreme Metals, Xtracolour & Humbrol enamels. Decals - Microscale & Superscale. Extras - Hasegawa 750lb'ers, Quickboost resin seat, Eduard pre-painted etch. NA F-100D Super Sabre 'Pahodee Tiger' 308th TFS, 31st TFW Bien Hoa AFB Mid 1965. Here’s my just completed Trumpeter 1:48 ‘Hun’. What a kit !!, simply fell together with almost no input from me. Only additions are a Quickboost seat and Eduard pre-painted etch set for the pit – neither of which are actually ‘needed’, simply a concession to middle-aged sausage fingers !! Not too much to say about the actual machine except that it is said to be assigned to Don Kilgus’ wingman in mid-1965, and despite my (and others) best efforts, just cannot find the name of the pilot. If the scheme is familiar, it may be because way back in the very late 1970’s Esci featured it for their (quite awful) 1:48 kit as the box-art. For my model, I’ve used an ancient MicroScale sheet for all the stencilling and a more recent SuperScale sheet for the aircraft specific markings. Overall aluminium paint is Xtracolour enamel, the heat-scorched NMF area around the engine is a combination of Alclad lacquers, AK Xtreme Metals and Tamiya clear blue & orange. Thouroughly enjoyed every minute of this one. Thanks for taking the time to look and/or comment. Next, a BoB Hurricane or AVG P-40. AFN Ian.
- 14 replies
-
- 22
-
-
Hi, It has been a while since I completed anything, but with having a little more time on my hands just recently I have completed Trumpeters 1/48 F-100C in the colours of 188th TFS, New Mexico Air National Guard, Tuy Hoa, 1070. I used Eduard's cockpit, exterior and undercarriage set to enhance the detail. Paints were Mr Hobby on the upper surfaces and Life Color on the underside. The metallic paint on the rear of the fuselage are Vallejo's dark aluminium and aluminium. I built this kit as my cousin in the USA was an instrument fitter on these when he was in the Ohio ANG stationed in South Korea. Unfortunately, no markings are available for a F-100C machine of the Ohio ANG, however there are for a D model. Guess which kit is next on the list to purchase. Next at on the production line is an Italeri F7F N3 Tigercat in Korean War colours. Regards Andy
-
 Hi all, following my previous articles about Vietnam era helicopters, this is time for a fixed-wing! In late ‘60s USAF introduced twin-powered Cessna O-2A to replace single engine Cessna O-1 (my next project). Testors/Italeri kit is acceptable but almost basic. It needed a lot of improvements that they absorbed me for 6 months and 293 hours of real work. Cockpit with avionics rack and rear junction box is fully self-made (... except for cloches). Continental IO-360 engine is coming by 2 sets of edited Lycoming taken from old Esci Cessna 172 kits to set up a 6 pistons propeller. Firewall bulkhead and front gear bay and plates are made by styrene. Rivets and panels were rescribed for the whole aircraft. Pilot is freely inspired by actor Danny Glover who played the role of Capt. Clark ‘Bird Dog’ in BAT21 movie. The real aircraft is now preserved at National Museum of USAF, Wright Field, Dayton, Ohio. WiP is here below.... Cheers, Alessandro Rome, Italy
- 41 replies
-
- 46
-
-
Cessna O-2A "Oscar Deuce", Vietnam war
_frequentflyer_ posted a topic in Work in Progress - Aircraft
Hi there, Alex here! I love to share with you my WIP of Cessna O-2A "Oscar Deuce" by Testors in 1/48. Started on October 15th 2016, I supposed to get a simple project after a well elaborated Hughes OH-6A earlier, but it wasn't! It's still taking a lot of time indeed! I collected a lot of pics and read some theads here and there before starting. During first check, the kit was quite attractive but basic. Some aftermarket items were a must. First of all about decals. The unusual "don't shoot" livery by Draw Decals was an exciting option at first, but after a long search on the web, I was quite sure it was a "fancy" livery, not on real life during Vietnam war. A second and good choice was given by Caracal decals by the sheet dedicated to O-2s. Above a picture of starting point..... Second step: opening door & baggage door... Some cockpit glasses were closed.... End part 1 Alex -
Hi, here some pics from one of my dioramas three years ago. The Hueys are 1/87 Modellpower/Lemke, upgraded with Roco parts, the Cayuse is 1/85 Hasegawa and the Kaiser Jeep is 1/87 Trident. Figures are mostly converted Preiser. inspired by: 1st/9th Cheers Ralf
-
Dear fellow modelers, It could be very much an old news, but I just got my Minigun by Mini World and can't help but to share my excitement about this tiny gem!!!! This not my first kit from this company, but yet it still can't stop to surprise me, by bringing quality and level of detail no the new height. Have to say, that this kit is not for novice, and require lots of patients, sharp eye and very steady hand, but result is well worth of all the trouble. Now I can finally give my Vietnam Era Gunship an excellent level of details. Very highly recommended!!!!
-
 F-4C Phantom 557th Tactical Fighter Squadron, 12th Tactical Fighter Wing Eduard/Academy 1/48th scale Hot off the bench is Eduard's re boxing of the excellent Academy kit. The kit is completely out of the box and proved to be a thoroughly enjoyable build, with no putty used anywhere! The kit comes with what I think is an SUU-23 gun pod, not shown in the instructions but I decided to use it. I am not sure how accurate this is as I believe the SUU-16 was initially used, perhaps someone can clarify for me? It has been painted mainly with the Mr Paint SEAC colours which were a joy to use. upload gambar
- 33 replies
-
- 59
-
-
Hi Pals, I have a question with a sticker for M109G in service with the US Army, the kit is Italeri 1/35, and not where they would place because the plane does not indicate anywhere. Someone could tell me where to place the right side ?. Upload image to see it and read it well, cheers and Thxs
-
Hi there! Just photographed my new model) I didn't work a lot on it, made only mantlet and searchlight covers and machine-gun shield. Hope you'll like it!
- 34 replies
-
- 31
-


-1-1MINIATURA.thumb.jpg.bd7a7e672869500d45ee6e80478f6f25.jpg)