Search the Community
Showing results for tags 'usaf'.
-
Hello mates, a Happy New Year to You! Hasegawa Tweet 1:72 built 1999 (there was a big bubble in the Hasegawa canopy). 937th IBAP Наu Giang VPAF as seen in Air International : this was really an old issue! The tarmac model picture is quite old on film... You can send a Tweet as letter.... so flat (and so nice)! Cheers, Thomas
-
Hi everyone, just recently finished building an academy F-22A. Here's what she looks like- Tell me what you think. Cheers
-
 Dear fellow Britmodellers, here's my 1/72 Hasegawa B-26B Marauder, built from the box, with the addition of Quickboost gun barrels (QB72088) and True Details wheels (TB72026). I chose to represent 'Flak Bait', a well-known and well-documented aircraft from 449th Bomb Squadron, 322nd Bomb Group, operating from an airfield in England, 1944/1945.. 'Flak Bait' flew 202 missions until the end of the war. There's a number of original photographs on the internet, depicting 'Flak Bait' in various stages of weathering and in different weapon configurations. I tried my best to replicate what I've seen. Hasegawa's gorgeous boxtop artwork was used as a guideline, too. I painted with colors from Tamiya (XF-17) and Gunze/Mr.Hobby (H52, H53). Photographs by Wolfgang Rabel, IGM Cars & Bikes. Thanks for your interest, greetings from Vienna Roman Quite a lot of nose weight was required to prevent a "tail-sitter": Assembly was easy, as the Hasegawa kit has a very decent fit. I started painting with the base color, Aluminium. Then I applied Olive Drab to the upper surfaces and Grey to the undersides. Paint chips were done using Vaseline creme.
- 32 replies
-
- 67
-

-
I'm doing a double build this time (on separate threads), one of which is a Hasegawa F-15C Bitburg MiG killer in 1/72 scale. Why this one? Because I want to do one in Mod Eagle and the other in the older ghost gray scheme. Decals will come from the excellent Two Bobs "Eifel Eagles" set. The kit will be the basic Hasegawa kit which I have already built numerous times so this will be a relatively quick and painless build (I also have a lot of time on my hands!). The kit itself has good fit, although the engines are a bit fiddly and the nose section fit with the fuselage has some alignment issues. Surprisingly for a Hase kit, the cockpit has phenomenal detail not least the avionics bay; overall one of the best I have seen in 1/72 scale. The rest of the kit shows some age, although the panel lines are nice and thin, there's no rivet detail at all and there's a bit of flash here and there. Anyway, let's get on with it: first steps were the cockpit parts and painting some of the fuselage interior bits.
-
Been a while since posting on here, finished a couple and started a few since. One that crossed the finish line was the L-39 from Eduard... From this kit (they reboxed the hell out of it) enough waffle, here's some beauty shots... In place of a series of photos of the build, I opted to just make a video of the full build process, owing to Pinterests horrific upload system. Hope you enjoy! (Also more stills at the end of the vid) Cheers!
-
CMK(?) is to to release a 1/48th MA-1A USAF start cart (generating high velocity air for starting an aircraft jet engine) resin kit - ref. 8054 Source: http://www.specialhobby.net/2017/01/8054-ma-1a-usaf-start-cart-148.html 3D renders V.P.
-
Hello, this is my 1/72 Revell B-17F, dressed as "Shamrock Special". Built from the box with the help of Eduard masks. Painted with Gunze acrylics. Photographs by Wolfgang Rabel of IGM Cars & Bikes. Thanks for your interest. Best wishes and happy Easter Holidays from Vienna! Roman
- 25 replies
-
- 45
-
-
Hi everyone, Just completed my attempt at building a `Skoshi Tiger` Freedom Fighter from Wolfpacks issue of the 1/48 Kinetic kit Completed as an F-5C of 4503rd TFS, USAF, Vien Hoa AFB, South Vietnam, 1965 Built mostly from the box contents, which is the Kinetic kit with resin refuelling probe and ejector seat, but I added bombs from a Hasegawa weapons set, ....... ..... some armour plate to the lower forward fuselage and replaced the rear view mirrors with some made from thick tin foil This kit came with sprues moulded in different colour plastics and didn`t go together as well as my previous Kinetic build and req`d lots of filler and sanding. `Skoshi Tiger was the name given to the combat evaluation detachment prior to it being selected for use by the VNAF Here it is with my VNAF build I did some time ago Hope you enjoy, thanks for looking Cheers Russ
- 28 replies
-
- 59
-
-
Dear fellow Britmodellers. I am currently working on Revell's 1/72 B-17F kit, which contains markings for B-17F-10-BO, serial 42-29591, LL-Z, The Shamrock Special, 8th Air Force, 91st Bomb Group, 401st Bomb Squadron. Revell's instructions are a bit vague: - Revell's painting/marking section show "Shamrock Special" with a astrodome. (The astrodome is not mentioned in the build instructions though.) As "Shamrock" is an early production B-17F (F-10 block), should it have an astrodome - or the flat transparent panel? I have found two period photographs of "Shamrock", but can't tell for sure which part should be fitted. Information on this subject is welcome. Thanks!
-
Hello, here's my rendition of Kovozávody Prostejov's Piper L-4, dressed as General Patton's personal aircraft in France, 1944. Having recently built their new Mustang and Lavochkin La-5, I was suprised by the rough nature of this kit. It's a typical short-run affair with heavy sprue gates that extend onto the kit's parts, some oversized parts and poor fit, especially around the glasshouse and nose section. The wheels are a joke. They should be round - well, you know what wheels should look like. The items in the KoPro kit suffer from offset moulding and look horrible. Because of their relatively small size no replacements were found in my wheel spares, so I took the task of sanding them to shape as good as I could. The decals aren't the best either, they are relatively thick and have a strong carrier film that remained visible even after I've coated with Alclad Gloss. Plus, the Blue of the US Stars is too bright. Because of the small size on the fuselage, no replacements could be sourced from the decal spares box. To bring this kit up to modern standards you will need to invest a lot of time, effort and patience. I added the boarding steps from scratch. The model was painted with Mr.Hobby acrylics. I'm not very happy how this little model turned out, but on the other hand I'm grateful to KoPro for releasing a kit of this important military and civilian airplane. With best wishes from Vienna, have a good day! All pictures taken by Mr. Wolfgang Rabel of IGM Cars & Bikes.
- 8 replies
-
- 17
-
-
- 1/72
- Kovozávody Prostejov
- (and 5 more)
-
Hello and thanks for your interest, this is my 1/72 Hasegawa B-24J, representing "The Shack" of 458th Bomb Group, 754th Squadron. The model was built using aftermarket parts from Eduard, CMK, Aires, True Details, Scale Aircraft Conversions and Decals from Sky Models Italy. This beast fought me for over 18 months. Most work went into the paint job. It was painted with Alclad lacquers, which require a perfectly smooth surface preparation. Due to the massive weight (90g) I chose to use metal landing gear from Scale Aircraft Conversions. Photographs by Wolfgang Rabel of IGM Cars & Bikes. ... and here is how it all started.... lots of aftermarket items, lots of motivation and optimism! Cockpit interior: Interior detailling underway: Fuselage halves before closing up: Cockpit again: A lot of weight went into the foward area of the fuselage to prevent a tail-sitter: Model primed Gloss Black (Tamiya14) in preparation for Alclad paints: Paint issues all along the way, of course all my own fault: Making the mask for the code letter "E": Final bits and pieces.... Glad I finished this, even if it took some time and a lot of Patience. But have a look here - there's already a "roll-out" queue on my workbench: Thanks for lookin'. See you next time! Best wishes from Vienna Roman
- 39 replies
-
- 56
-
-
Hi all, Got some time off work in September (the 2 middle weeks) and I am thinking of paying RAF Mildenhall and Lakenheath a visit to see whats flying around. Does anyone know if any exercises or visitors are planned for that time frame and where the best places are to park up and do a bit of spotting. Thanks in advance. Craig.
-
 MHU-12 Munitions Trailer - Duel Set 1:72 Videoaviation The MHU-12 munitions handling trailer is used by the USAF to transport munitions between the storage areas and the flightline. It can be changed to accommodate a wide variety of munitions. Two hinged deck panels in the centre of the trailer bed fold open to provide access. The trailer can generally carry bombs in one configuration, and missiles in the other. In the missile configuration it can carry larger missiles on the bed of the trailer (such as AIM-7 or AIM-120) a second higher layer can carry smaller missiles (such as the AIM-9). It is also available with a flat bed for general usage. The Kit Videoaviation already had this trailer available in the bigger scales, they have now scaled it down for the lovers of the one true scale The added benefit in the smaller scale is that it is available in a duel boxing. Each trailer has two main bed panels, the centre part, front & rear axles, missile & bomb chocks, upper missile rails, tow bar and 4 wheels. The is crisp with good casting and no bubbles present. Conclusion This is an important part in getting munitions to the flightline and will look great in any US Airfield diorama. Highly Recommended. Review sample courtesy of
 -
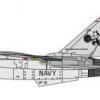
Kit - Academy 1:48 Paint - All Xtracolour enamels. Decals - Superscale 48-753 & Microscale 48-063 (stencils) Extras - Aeroclub white metal ACES 2 seat, AIM-9P from Hasegawa Weapons Set B F-15A Eagle Assigned to Commander: 5th FIS, Air Defence Command Minot AFB, 1987 Definitely not one from the 'top drawer' but looks quite imposing in the cabinet (as long as you don't look too closely). My thanks taking the time to look and/or comment, and as ever all criticism, comments and questions are welcome. Ian.
-
Technically this is not 100% done given I still need to add the photoetched seatbelts, the mirrors and the navigation lights. But I won't be able to get back to it for a couple weeks (deep into finishing up an Eagle Transporter right now for a convention), so I felt it was decent enough to post it as is. I took on this project as a quickie build to get my modeling mojo back. Lately I didn't feel like working on much of anything as the long projects just seemed to get longer with not much reward to show for it. I also recently picked up Trumpeter's NASA T-38C kit and while it is a good kit, it still needed some modifications and I didn't feel comfortable with doing the work just yet. What I needed was an out of the box build. So, I ended up with this to help my creativity and help me get a handle on what was needed for when I tackle the NASA T-38N I want to build later. I know, the Wolfpack kit is better. But this one fit together very well and looks good. The canopies are the biggest issue, but their shape problems aren't as noticeable with the canopies open all things considered. The rest of the model captures the classic T-38 lines rather nicely and I am more than happy with the results. Tamiya Fine White primer was used and over that I sprayed on Gunze Mr Base White 1000 as a base coat. Before adding the gloss coat of Tamiya Pure White spray TS-26, I used a mechanical pencil to draw on the panel lines and a Sakura Pigma Micron black pen with a .005 tip to accent the control surface splits as a form of pre-shading. It worked reasonably well as you can see it far away, but it is visible up close. The markings I used came from SuperScale sheet 48-905 and I selected this scheme because my local club was having a SAC contest at the next meeting. I finished it for the meeting and it took first place. T-38s were used by the 9th SRW as both proficiency trainers and chase planes and they looked good in the yellow striped livery they wore in the late 1980s. But, the decal sheet I used had some problems as the colors weren't quite right for the yellow, the stripe shape was off and even the USAF titles and national insignias weren't right. So I ended up having to use some proper lettering from other sheets. The national insignias came from a Testors F-5A kit. The decal instructions also had some errors, meaning I had to really scramble for references (which are surprisingly few for these specific planes). But I think I pulled it off. All the markings went down just fine with Microsol. Even the candy stripe decal on the pitot tube isn't quite right as it is too skinny. But, live and learn for next time. One thing I am very happy with though is the off-white coloring of the windscreen border. I know, it should be inside, not outside. But, application of a little 0.7 mm Aizu tape (same as Tamiya, just cut into finer widths) represented it nicely. I brushed on a little thin white glue to keep it from curling up with age. I was going to paint it in a pale tan coloring, but the yellow coloring of the tape looked close enough and I kept it as is. Now I'm on a T-38/ F-5 kick, so expect a few more builds of Northrop's nimble birds in the not too distant future, starting with a NASA T-38 or two.
-
Hi all, Apologies for this being a (deliberately) open ended question: Does anyone know of any currently available decals (1/72) for an early C-130 in USAF service? I'm thinking something classic- either using a bog standard Italeri C-130E kit, or even backdating the same to an 'A' or 'B'. There really doesn't seem to be much out there- all the USAF schemes available seem to be grey machines from the 80s or 90s, and the earlier 60's schemes are usually Commonwealth... Failing that- does anyone know of a good scheme which would be easy enough to make up from spare decals/ generic sheets? Will
-
One of the benefits or living between York and the East Coast is that i sit right below one of the RAF's training areas and in the good old days was lucky enough to watch Harriers, Jags and the odd Canberra and Nimrod etc flying about. These days its Typhoons, Tornado's and F15's (could be worse!). So now the USAF have kindly sent over some of their Raptors I have geared myself for the ensuing entertainment. Office window has been cleaned and Bino's cleaned and sitting at the ready on the window ledge! If I had some brain cells I might be able to track their movements but alas I have no idea how to do this. So in effect I am now on QRA! Chris
-
Hi, here's my 1/72 Tamyia Thunderbolt built from the box. WZ-P was fflown by Lt.Col. Benjamin Mayo with 84th FS/78th FG, Duxford/England, 1944. Painted with Alclad II Metallics and Gunze Acrylics. Thanks for your interest. Best wishes from Vienna, Roman
- 10 replies
-
- 29
-
-
There are some great photos of this exercice over on the USAF website: http://1.usa.gov/1XYNPnu
-
.thumb.jpg.d17ff607fc7e89ed057e63fcb6f2a888.jpg)
Debbie Sue, F-104C Starfighter, Udorn RTAFB
russ c posted a topic in Ready for Inspection - Aircraft
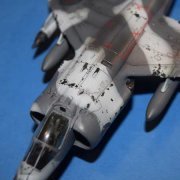
Hi All, Hope you don`t mind seeing some pic`s of my latest effort: Hasegawas 1/48 F-104C Starfighter Completed to represent `Debbie Sue` of the 8th TFW, based at Udorn, Thailand 1966/67 Made a few additions to the base kit, in the form of some RHAWS sensors ( I don`t know what it means ) fitted to the nose and rear fuselage and a small blade antenna just aft of the forward sensor Otherwise it`s what`s in the box apart from seat belts, rear view mirrors and decals: which are from Iliad Design `Starfighters in Combat` sheet the instructions unfortunately show the camo` pattern on the wings incorrectly so I had to do a last minute repaint. Whilst I`m here I thought I`d show some pic`s of an earlier attempt at the same kit Which isn`t really a `nam bird but `Hey, while I`ve got the stuff out` Kit decals but I left the candy stripes and comets off ( it must have looked like this at some point ) And above both together Hope you enjoy, thanks for looking Cheers Russ- 22 replies
-
- 41
-
-
Deciding what to do for the future EB-66E build once I have cleared a space - its a big lump for a 72nd scale kit! Looks like a backate to a RB-66B is out due to lack of clear references to the camera positions and details, so OOB EB it is. Decided to go with the sharkmouth 54-438 simply because you don't see it often on such big birds. Nice picture of it p22 of the Aerofax monograph - but in 4 colour not 3 colour camo the kit instructions say. In itself not a problem except theres lack of an overall set of pix to complete the scheme. Can anyone help? .... It wasn't a one off panel or partial repaint as there are ages scattered shots of others with similar light+dark tan & greens but limited to partial side shots. If I could get a look from above then I could guesstimate the pattern using the standard 3 tone tan/field green/dark green. Note: appears to be JW coded birds only from what I've seen with the ref pic being 42nd TEWS/388TFW and maybe a Vietnam mod removed during a later stateside repaint (iaw with standard + kit scheme)
-
North American/Fiat QF-91C In 1961 the US DoD authorised the loan of two Luftwaffe Fiat G.91s for trials by the US Army. These were flown alongside Douglas A4D-2 Skyhawks and a Northrop N-156 (F-5 prototype). One was an Italian built G.91R-1, c/n 0052 that served with the Luftwaffe (BD+102) whilst the other was a German built G.91R-3 (c/n 0065) Luftwaffe EC+105. Although all three types were highly regarded none were deemed suitable for the role of Close Air Support or Forward Air Controller. Rumours abound that this decision was based on political grounds as the US Army could not be seen to fly foreign, (G91), Navy (A4D) or High performance USAF types (F-5) .... In 1965, however, with the US deeply embroiled in the Vietnam war the lack of a dedicated CAS aircraft to replace the venerable A-1 became far too visible. With the USAF reluctant to give up it's F-100s, even though they themselves needed replacement, the US Army dusted off it's reports and looked again at the G91, albeit now in the new Y variant, much favoured with it's twin engines and greater performance. New trials once again proved the validity of the dedign and with minor changes the type was authorised for production under license by North American Aviation. By 1970 the type had virtually replaced to A-1 and had also been adopted by the Airforce as a F-100 replacement. It went on to have an excellent service record both in combat and peacetime up until it's withdrawal in the late 1980s. It was not the end though and many airframes had a 2nd life awaiting for them. Post Vietnam cutbacks meant the conversion of F-102,106 and F-4s to the unmanned drone role was under threat. North American jumped in and utilised the experience acquired from the successful QF-86 and QF-100 programs to offer a lower cost solution. Slowly the ranks of F-91Cs sunning in the desert shrank as the majority of airframe not allocated to museums or the spares pile, were returned to flying condition with the ubiquitous bright red markings associated with their new lease of life. Some were mostly grey, others mostly green, a few had 2 or 3 colour camouflage, and a rare couple had special schemes. One thing was agreed upon by all - even the anonymous birds looked spectacular in their new feathers.
-
 All Eagle Keepers, Really looking forward to this. It is my first Group Build and also my first Work in Progress, the standard pics below of the kit and aftermarket zacto goodies (well impressed with these), I may also use Ozmods pilots and will add a pic of them if I decide to use them. Still thorn on what one to do hence the dragon decal sheet, but think it will be the Tigermeet version as I have a serious short fall in spare weapons.
 -
 US Navy and Air Force GBU-38 Bombs Videoaviation 1:32 A very welcome pair of releases from Videoaviation arrived at BM Londons offices the other day. Two sets of GBU-38 JDAM bombs in 1:32 scale, one of US Navy style and one US Air Force style. Each set is very well protected, being contained in a clear plastic box, within a zip lock bag wrapped in bubblewrap. Although the bomb lugs need a bit more as a couple in the review sample were broken. Each box contains eight complete bombs, and come in these separate parts. Bomb Casing Tail Lugs GPS Antenna Protective caps Decals Whilst the tails, lugs, caps are the same for each type, the USN bomb casing is a much rougher casting allowing for the ablative coating used on Navy bombs. It is details like this that make Videoavition products to be some of the best in the business. Naturally, the USAF bomb casing is nice and smooth. The extreme nose sections are also slightly different between versions, with the USAF version being a more pointed affair than the USN type. The builds are pretty straightforward, as once the parts have been carefully cut away from the moulding blocks they will only need a swipe with a sanding sponge before the tail is attached to the casing, followed by the lugs and the tail mounted GPS aerial. If the protective caps are to be used, then the nose of each bomb needs to be used before the cap can be fitted. Each type comes with its own distinct style of markings contained on a nicely printed decal sheet. Conclusion These two sets make very nice additions to the Videoaviation product range and will add something special to a completed model. With the well moulded, flawless resin, it should go together fairly easily. Once built and painted they will look great, although it would have been nice if some remove before flight flags had been provided too. Highly recommended. Review sample courtesy of
 -
Hi everyone, this is my latest aircraft diorama. I had an old Academys F-84 thunderjet kit and I didn't want it to throw away and so I decided to make small vignette with it. I was inspired by the new Star wars: The force awakens teaser trailer when I saw the x-wing and the star destroyer in the sand. I started digging into reference if any thunderjet crashed in the desert, pilot was killed in the crash, so that is my interpretation of this event. I hope you guys like it!
- 10 replies
-
- 11
-
-
- aircraft diorama
- f-84
- (and 8 more)