Search the Community
Showing results for tags 'us navy'.
-
 OK, so it's not actually Christmas Day, but we are still very much in the festive season, plus one of the aforementioned ships was a Christmas present. So, I would like to do a triple build of these three Matchbox US Navy ships; USS San Diego USS Indianapolis And to round off the trio, USS Fletcher No idea when I will actually get started on these, as I'm in the middle of 2 half tracks plus I have a thread in the KUTA build, but I'm really looking forward to getting them underway!
- 37 replies
-
- 15
-

-

-
To complete my trio of Matchbox ships, I will be building the Matchbox USS Fletcher, a kit I actually received for Christmas. Its a noticeably smaller box than for San Diego and Indianapolis; 20221228_111834 by Dan Hardy, on Flickr USS Fletcher was the name ship of a class of destroyers that would eventually consist of 175 vessels, with some claim to being the best all-round destroyers of WW2, due to their combination of armament, range and speed. They would perform every task undertaken by destroyers, from anti-submarine (sinking 29 Japanese submarines), to anti-aircraft to surface action, with many of the ships having long post war careers, not only with the US Navy, but also with the navies of, amongst others, Greece, Brazil, West Germany, Argentina and Turkey, with 2 even seeing service with the Japanese. The last one in service left the Mexican Navy in 2001. Nineteen were lost during the war, with 6 more damaged and not repaired. Four Fletcher class destroyers still exist, three in the US (The Sullivans, Kidd and Cassin-Young) and one in Greece (Velos, ex-USS Charette). Fletcher herself was launched in May 1942 and would serve throughout the war in the Pacific, eventually earning 15 battle stars, plus another 5 in Korea. Whilst conducting shore bombardment off the Philippines in February 1945, she received a hit which killed 8 of her crew. One, Elmer C. Bigelow, would posthumously be awarded the Medal of Honor for his efforts in fighting the fire. During the Korean War, she participated in the Inchon landings. Fletcher actually appears in the 1960 film "The Wackiest Ship in the Army" starring Jack Lemmon, and also as part of some stock footage used in "Down Periscope". She was eventually decommissioned in 1969, and scrapped in 1972.
-
T-2 Buckeye Anniversary Markings (SH32087) 1:32 Special Hobby Following WWII, the US Air Force embraced the jet engine wholeheartedly, with the Navy lagging behind a little due to the slow spool-up of the early jet engines that made wave-offs and go-arounds a cheek-clenching prospect. By the early 50s the T-28 Trojan was showing its age, so those in command began looking for a replacement. North American won a contract in the mid-50s, and the T-2A flew by 1958, entering limited service a year later, with only one jet engine installed in the earliest variant, which was also called the T2J-1 at the time, although consolidation of naming in 1962 renamed it as the T-2A. By the time the T-2B entered service, the engine count had increased by one to give it more speed and similarity of operation to the aircraft that the trainees would eventually fly after graduation. Around 600 airframes were built in total, and the type had a long career that spanned around 40 years, with most pilots during that time having spent part of their training flying a Buckeye, the name given to it that relates to the location of the factory in Ohio that made them, which has a state tree by that name. The T-2C was the final variant in US service, with GE engines replacing the Pratt & Whitney units, presumably for efficiency and maintenance reasons, as they brought no extra power to the party. 50+ D and E variants were built for overseas operators in South America and more notably Greece, who took 40 and are still flying them at time of writing. In US service the Buckeye was retired in 2008 when it was replaced by the more modern T-45 Goshawk, which is a substantially re-engineered and Navalised version of the BAe Hawk, as used by the RAF and the famous Red Arrows. The Goshawk is faster and more agile than its predecessor, getting close to the sound barrier and with advanced avionics that mimics those of the current fighters better than the worn-out Buckeyes could manage. A few T-2s are still flying in private hands, and make appearances at air shows, as do the Greek airframes if you’re lucky. The Kit This is a welcome reboxing of the 2014 releases of the US Navy and Greek boxings in this scale, only this boxing comes with a choice of both markings of these initial issues, so if you missed out on those, now is the time. The kit arrives in a top-opening box that has a pair of profiles of the decal options laid over a merged US and Greek flag. Inside are nine sprues of grey styrene, or eight if your fuselage halves haven’t separated in transit. There is also a small clear sprue with a separate canopy part, a small box with a bag of seventeen resin parts, three decal sheets, and finally an instruction booklet printed in colour on glossy white paper, with painting and decaling profiles on the rear pages, followed by some adverts for some of Special Hobby’s other products. Detail is good, and improved further by the resin that’s included, especially a pair of ejection seats that are very well done. Engraved panel lines, accompanied by raised and recessed features where you’d expect them go to make a good-looking model that is surprisingly large once complete. Construction begins with the cockpit, diving straight into the instrument panel, which has a decal placed over the raised dials, and is inserted into the coaming along with a bump on the top, a job that is repeated to make the rear instrument panel, only the bump count has increased to two, and there is an insert with the rear of the panel depicting the cylindrical backs of the instruments. It also has a decal, and is then mounted on a support frame for later insertion. The four side consoles are detailed with additional parts, including arms that mount the rudder pedals from the sides, all of which has colour call outs using letters that correspond with a table of Gunze Sangyo paint codes. For a total change, the lower wings have their moulded-in main bay details painted and the flap bulkhead inserted, then we’re back with the cockpit, bringing together the various sub-assemblies on the cockpit floor, adding bulkheads behind each pilot, control columns, two more small parts on the tutor’s coaming, and a rounded enclosure on a shelf behind him. Another diversion sees the twin intake trunks built from vertically split halves, then attached to a bulkhead that has the front of the engine’s compressor blades moulded in, and a similar pair of trunks at the exhaust end that mate to a bulkhead with the rear of the engine moulded-in. The two-panel rudder is made from two pairs of halves, and the nose gear bay is glued together down the centre, while the two resin North American ejection seats are painted and decaled, with a few small resin parts added, at which point you’re ready to close the fuselage, remembering to first paint the two resin inserts that are placed in the fuselage under the wing roots. The insides of the fuselage are also painted around the cockpit and the exhaust trunking, then those assemblies, the intakes, nose gear bay and the afore mentioned resin inserts are all trapped between the fuselage halves, locating on raised guidelines for security. Although the wings are separate due to their position mid-fuselage, they are shown being built up together, adding bay walls around the cut-out in the lower wing halves, closing the wings by fitting the uppers with their now-painted interiors. Flaps, ailerons, elevators and their fins are all built from two halves each, ready for joining to the fuselage in the next step, remembering to first install inserts into the wing roots to complete the bay walls before you glue them in place. The rudder panels fit into the moulded-in fin, with the elevators and their separate control surfaces slotted into holes in the tail, allowing you to deflect them if you wish. Someone seems to have forgotten that the wings’ control surfaces haven’t been fitted yet, as the drawing shows them in place, but they’re done later. First, the gap that extends the full length of the engine “swelling” is inserted, the intakes are extended forward and capped by a single lip each, adding a gaggle of intakes and outlets around the nacelles, with fillets inserted aft of the exhausts, and the arrestor hook fitted under the tail. The flaps can be posed deployed for landing/take-off, or cleaned-up for flight by adding or omitting the small hinge points and jacks that push them back and down in their tracks. More small antennae and lights are fixed to the underside while the model is inverted, then the landing gear is created and installed. Each of the main struts have a straight strut that glues to a sturdy A-frame and plugs into the bay, with separate scissor-links and three bay doors, the inner door provided with a resin H-jack retractor that has series of scrap diagrams showing its correct location, along with the retractor jack, and finally the two-part wheels. The nose gear leg is a single part that has separate scissor-links, and a short-drum-like part that glues to the bottom of the leg, then it slots into the back of the nose gear bay, adding the bay doors to the sides that have separate hinges and retraction struts that help open and close the doors with the movement of the leg. The two-part tip-tanks are glued to the ends of the wings, with clear lights at the tip and outer face, adding the ailerons to their cut-outs, a pair of strakes down the fuselage sides, a probe in the tail fin, and two clear tail lights, one each side. Another clear light inserts in a recess in the port wing leading edge to finish work on the exterior. The two ejection seats that were made up earlier are fitted with three- or two-part rails before being placed into the cockpit, adding a gunsight for one decal option to the front coaming, with a choice of long or short opening jacks between the crew, depending on whether you intend to pose the canopy open or not, cutting off 6mm for the closed canopy. Before fitting the canopy, a central cross-brace and rear bulkhead are fitted inside with a non-fogging glue, painting them a dark grey as you go, which is as good a time as any to mention the canopy mask set that SH have, which we reviewed here a little while ago. There is a small indent on the underside of the cross-brace to help locate the opener jack, then you can glue the windscreen into position over the coaming. Markings There are two decal options spread across two of the sheets, with the third sheet containing stencils for around the airframe. From the box you can build one of the following: T-2C Buckeye, Bu.no.155241, No.309, VT-23 ‘The Professionals’, NAS Kingsville, Texas, 1976, marking the US Bicentennial. T-2E Buckeye, Bu.no.160084, No.84, 363 Air Training School (MEA) ‘Danaos’, 120 Air Training Wing (PEA), Kalamata, Hellenic Air Force, celebrating the 40th Anniversary of the 363 MEA. The decals are printed using a digital process and have good registration, sharpness, and colour density, with a thin gloss carrier film cut loosely around the printed areas. This means that the carrier film on their decals can be coaxed away from the printed part of the decal after they have been applied, effectively rendering them carrier film free, making the completed decals much thinner and more realistic, and obviating the need to apply successive coats of clear varnish to hide the edges of the carrier film. It’s a great step further in realism from my point of view, and saves a good quantity of precious modelling time into the bargain. Conclusion It’s good to see this kit back on the shelves, and with marking for US and Greek aircraft included to widen the appeal. The resin does a good job of increasing the detail of the model, especially those ejection seats. Highly recommended. Review sample courtesy of
-
 Here, my friends, is my first foray into the brave new world of resin kits. I have a soft spot for the 9 cruisers of the Brooklyn class, which are extremely good looking ships, and of great historical significance. Thus, it is hard to believe that no major manufacturer has come up with an injection mould kit of these ships! They were "there" for the entire duration of the US involvement in World War II, often in the thick of the action, and distinguishing themselves in every theatre. Then they found a long second life in South American navies, including the General Belgrano, sunk in 1982 during the Falklands War. Their main armament of 15 6" guns in 5 triple turrets packed a considerable punch. Anyway, having decided to build a Brooklyn, the only game in town is Polish company Niko Model(http://www.nikomodel.pl/index.php/en/), which offers a series of 1/700 resin kits of these cruisers, as they looked at different times. My choice was USS Philadelphia (CL-41), as it appeared in its final war configuration (1945, Atlantic and Mediterranean theatres). My hesitation in embracing resin kits was unfounded. I found that many of the skills acquired building injection kits were transferrable, but had to learn some new tricks, like straightening bent resin using hot water. The kit comes with almost everything you need, and even some spares of small parts you are likely to lose to the "carpet monster". The only things I added were the rigging (Uschi elastic line, which I used for the first time and liked a lot) and generic decals for the hull numbers and aircraft markings. The instructions leave a lot to be desired, in particular with respect to what exactly you need to do to insert and secure the main mast properly. Some patience, perseverance, and lots of dry-fitting are advised, but building this kit was an overall positive experience. Last year I started an "under construction" thread for this model, but this was a kind of start-stop-start build with months between any bits of action, so it was hard to find the discipline to keep it updated, for which I am sorry. If you would like to get snapshots of the construction process, please check https://www.marcellorosa.com/1-700-ships/ussphiladelphiacl-41.
- 11 replies
-
- 29
-
-
- Brooklyn class
- light cruiser
- (and 1 more)
-
.thumb.jpg.a1642e430572922c3befa12f87efb548.jpg) Well thought that I'd get started on my first build since joining Britmodeller. Here's Tamiya's 1/48 Scale Brewster F2A-2 Buffalo. I plan to use the kit decals despite them being a bit thick in order to depict it as an aircraft of VF-3 aboard USS Saratoga. More to come soon.. 🙂
Well thought that I'd get started on my first build since joining Britmodeller. Here's Tamiya's 1/48 Scale Brewster F2A-2 Buffalo. I plan to use the kit decals despite them being a bit thick in order to depict it as an aircraft of VF-3 aboard USS Saratoga. More to come soon.. 🙂 -
 Hello all, No, not *that* F-4G, *this* F-4G Academy's 1/48 McDonnell Douglas F-4B/N Phantom II kit repurposed so I can build the Tamiya kit without a duplicate in my collection. This is a scheme worn extremely briefly in the summer of 1966 prior to being converted back to an F-4B. I've added Eduard Brassin seats (since I needed earlier ones than provided in the kit) and wheels, and Hypersonic AC intakes and stabilators to replace the inaccurate kit parts. The decals are notionally from Kits-World, but in the end only the F-4G NAVY legends and red warning stripes were used. The national insignia are from Furball, the stencils are from the Academy kit and a Hasegawa kit, and everything else is masked and painted. I traced the Kits-World decals for the masks and corrected the stroke width for the NJ flash, but did not notice the two letters should be further apart. The 'VF-121' is too small. Two excellent photos exist of the starboard side of this aircraft, but nothing I could find for the port side, so that and the upper wings are complete fiction. The Academy kit is a complete pain to put together, mainly because of the terrible engineering of the landing gear and doors. I've now made two and am grateful I don't have any more. More photos are available at https://jonbryon.com/academy-1-48-mcdonnell-douglas-f-4g-phantom-ii-abridged/ and a full build article should be appearing in SAM later in the year. Comments welcome and thanks for looking, Jon
 -
My second build for this GB will be the Matchbox USS Indianapolis; 20220715_082939 by Dan Hardy, on Flickr In contrast to the subject of my first build thread, the relatively unknown USS San Diego, Indianapolis is a very famous (perhaps even infamous) ship, though sadly for very tragic reasons. A Portland class heavy cruiser (Indy and Portland being the only ships of the class), she was launched in 1931. Main armament was 9x 8in guns in three triple turrets. Indianapolis served with distinction right from the start of the war, escaping damage at Pearl Harbor as she was conducting a mock bombardment of Johnston Atoll. She served in most of the major campaigns in the Pacific, before, after an overhaul, starting down the path that would lead to her tragic end. She was selected to transport the enriched uranium (then half the world's supply), plus other parts for the Little Boy atomic bomb, destined for Hiroshima, to the island of Tinian. These were successfully delivered on 26th July 1945. Indianapolis then set out for Guam, where some (unknowingly lucky) crewmen who had completed their tours of duty left the ship. She set sail from Guam on 28th July, heading for Leyte. Sailing alone, en route she was spotted by the Japanese submarine I-58. Two torpedoes struck her on the starboard side, one at the bow, and one amidships. The vessel went down in only 12 minutes, taking with her 300 of her crew. This was tragic enough, but 900 or so crew survived to enter the water and await rescue. Unfortunately, due to the secret nature of her mission, the ship was not reported as overdue, and it wasn't until three and a half days later that the survivors were spotted by the crew of a PV-1 Ventura. Not being a flying boat, all the crew could do was drop a life raft, report the position and radio for assistance. By this time, out of the original 900, only 316 were still alive, due to a combination of dehydration, exposure, and, most famously, shark attacks. Although this aspect definitely was a factor, it may have been exaggerated over the years. The number of men said to have been killed by sharks ranges from a few dozen to 150, and it may well have been that sharks were mainly attacking sailors who had already died. Whatever the real circumstances, it must have been absolutely horrific to be floating in the water, desperately cold and thirsty, only to see shark fins appear, and it is this that most people now think of when the topic of the Indianapolis comes up, helped no doubt by Quint's memorable monologue in Jaws. First to arrive at the scene was a PBY Catalina, which, against orders, landed on the sea and took on board 56 sailors. Not being able to take off in this condition, the Catalina became a lifeboat until rescue ships arrived. The plane would end up too damaged by her ordeal to take off, so once the survivors and crew had been removed, it was sunk by gunfire. Two survivors would sadly die later in hospital. USS Indianapolis would remain undiscovered until 19th August 2017, when she was found at a depth of 18,000 feet (5,500 metres), well preserved, but with her bow broken off. Just hoping I can do this great ship justice with my model!
- 38 replies
-
- 14
-
-
Completed the Kinetic S-2. It was actually boxed as a Mirage 2000 so imagine my surprise when I arrived home.... An ok kit built OOB with the exception of seatbelts, spotlight and external wing braces. The decals were very thin and I gave up trying to use them so painted my own markings for VS-30 and used decals from the spares box. Enjoy.
-
 Hi all and here's my latest finish, built for the 'Salty Sea Dog' group build. Some goofs here and there and the original decals are really showing their age. But it was a stress-free build which I had fun with and I like how it looks on the shelf! The short build thread is here but to recap: Kit: 1/72 Hasegawa F11F-1 Tiger Build: Out of box, original kit decals Extras: Tamiya tape for seat belts Paints: Mr Hobby, Tamiya Acrylic,, Klear, Flory models wash This served with VF-33 'Astronauts' (also known as the 'Tarsiers' and 'Starfighters') from 1959-1961 before being replaced by the F-8 Crusader. While a short Navy life, the type flew with the Blue Angels from 1957–1968 being replaced by the F-4 Phantom. VF-33 was dis-established in October 1993 and I think this aircraft is preserved in a museum in the States. Mad to think there was only ten years between Grumman's prop Hellcat and the first flight of this supersonic jet. Thanks for looking, take care and happy modelling. Dermot Hasegawa_F11-F1_VF-33_done(1) by Dermot Moriarty, on Flickr Hasegawa_F11-F1_VF-33_done(2) by Dermot Moriarty, on Flickr Hasegawa_F11-F1_VF-33_done(6) by Dermot Moriarty, on Flickr Hasegawa_F11-F1_VF-33_done(4) by Dermot Moriarty, on Flickr Hasegawa_F11-F1_VF-33_done(5) by Dermot Moriarty, on Flickr Hasegawa_F11-F1_VF-33_done(8) by Dermot Moriarty, on Flickr With an Airfix Hellcat. Hasegawa_F11-F1_VF-33_done(10) by Dermot Moriarty, on Flickr
 -
Here is my completed USS Gearing, built from the Dragon 1/350 kit, out of the box apart from railings and some home made improvisations. Little did I know that, when I was gifted this kit by some friends at work (my birthday, 2019) this was going to become my most ambitious project yet. Pretty much from day 1 you have to deal with sub-millimetre pieces (each Oerlikon has to be put together from 9 parts, including a mixture of polystyrene and photoetch). My learning curve became very, very steep (this is only my third ship). The rigging is largely human hair, although for some thicker and thinner parts I used surgical silk and Caenis thread, respectively. I also substituted the jackstaff and the aerials sticking out of the aft stack with metal (hypodermic needle and tungsten wire), since the parts provided in the kit looked unnaturally thick, and kept breaking during the build anyway. There were some problems with the instructions. I have compiled a list of tips to avoid getting into trouble in my web site (address in my signature panel below). Feel free to email me for any questions. I am sorry for the quality of my photos, particularly in comparison with some of the stunning stuff I have seen in this web site. I only have my iPhone for this.
- 26 replies
-
- 51
-
-
-
 I rarely post on this site, but a mate suggested 3 of my recent 1/700 builds from 2022 might be worth posting, so here goes........ They are all 1/700 Trumpeter, and are the USS New York (BB-34), USS West Virginia (BB-48), and USS Alaska (CB-1) in their 1944/45 glory. I won't relate in any great detail here the ship histories, as I think we can all google search and /or check wiki and other sites for info on the individual ships and classes), but I will say that I enjoyed building the old WW1 veteran USS New York (sister ship of the probably more famous USS Texas) in it's late WW2 configuration with a large number of small calibre AA guns and amazing Measure 31a Design 8B camo scheme. This old BB is quite small compared to the more modern WW2 US BBs and is dwarfed by the Iowa Class. I have watched many youtube videos on the preserved sister ship USS Texas and found this a valuable resource and most of the videos were most informative and entertaining. The multi part (7 from memory) aircraft catapult on the middle turret gave me a small amount of grief as I do not own a bending tool, so ended up using fingers, a metal ruler and tweezers to make the multiple folds. The cranes also took a bit of work but look great in the end. The USS West Virginia was a rebuilt Pearl Harbour veteran (sank in shallow water and rebuilt) and a modernised Colorado Class which was back in service at the back end of the Pacific War and I finished her in Measure 32 7D scheme. Paints I used were Tamiya acrylic Nato Black XF-69 for the dull black, and the following from Life Colour US Navy WW2 acrylic sets 1 and 2 ..... 5-L light grey, 5-O Ocean Grey, and 20-B Deck Blue. The camo scheme was time consuming to paint and some masking was required as expected. Not too many other dramas experienced aside from the 'not great' instructions. The USS Alaska ends up being a surprisingly large ship in comparison to the 2 old BBs, and opinion seems to be split 50/50 on whether they are considered Battlecruisers or Large Cruisers (US Navy designation). My own thoughts are that Alaska and her 2 completed sisters shipped larger calibre main batteries than the Kriegsmarine Scharnhorst and Gneisenau and they WERE classed as Battlecruisers , and generally heavy cruisers had 8 inch guns during WW2, so they are Battlecruisers to me! They are also far larger than any other WW2 heavy cruiser at around 30,000 tonnes displacement and 808 feet in length. I finished her in Measure 32 7C with 5-L light grey and dull black camo and 20-B decks. All 3 ship kits are of fairly recent vintage and contain a good number of sprues with many tiny pieces (to be expected in 1/700!) - many of which ended up in my spares box, a smallish PE sheet, the usual instructions from Trumpeter which can be more than a little confusing at times if not studied well. I used mostly acrylic paints on all 3 ships and they were exclusively brush painted. My 30 plus year old basic Badger airbrush is in almost mint condition in one of my hobby desk drawers! I replaced the kit supplied SK-1 and SK-2 'solid' plastic radar dish and aerials from Flyhawk PE set FH700040. I am still working on the catapult floatplanes. I used 3 x magnification glasses when building and painting, but once high res pics are taken with phonecam, small blemishes become evident and I have had a fair amount of touch ups to do. Not a great situation when one is on the wrong side of 50 and the eyesight is not wonderful anymore. The fingers are still still steady enough though, which is one positive. No PE handrailings sorry - if I built 1/350 I would though. I'm considering building some Flyhawk RN WW2 1/700 cruisers next...with some trepidation! Posting images of these 3 USN ships (and an RN ring-in in one pic!) from my Flickr account now............
 -
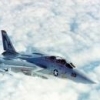
 Hello fellow modellers It's not exagerating to say that it's a pure joy to publish this topic, since it's my first finished model since last century !!! ( in fact my previously finished kit was a 1/48 Heller Rafale A completed in 1998 or so ... before this kit was even released ) . The famous 2001 Hasegawa kit is splendid in some areas , and bizarre , really inaccurate or approximate in others . To me , it's the exact link between vintage and modern kits . Anyway I fell in love with this kit , not to mention the aircraft itself and I plan to build at least ten more ... No aftermarket parts were used or hurt during the building , I tried to upgrade the model the old way , the modifications are as follows : - Model entirely rescribed - Cockpit / Canopy upgaded with PC , metal sheet , copper wire , tamiya tape etc .... - Seat almost totally rebuilt with head knocker , reshaped head rest , harness etc ... - Landing gear and doors modified and wired , front wheel visually detached from gear . - Scratch built landing lights well in left leading edge . - Slat wells reshaped to be flush with the extrados. - Canons drilled. - Armament pylons rescribed , modified with scratchbuilt sway bars and connections - Fuel tank rescribed and " welded " , drain added . - Shrike missiles and Mk82 bombs detailled with scratched parts . - RBF and pins . The WIP is located in the Skyhawk STGB here : https://www.britmodeller.com/forums/index.php?/topic/235091381-a-4f-va-55-uss-hancock-nam-1972-hasegawa-148/ And now , here are the pics : Hope you like it . for passing by § Cheers !
- 48 replies
-
- 91
-
-
-
Having finished a Revell FAA F4U (bloody over-complicated thing!) and my Sword Gannet, I took a few weeks off to contemplate what was next. Thought I'd take longer to think about it, but I went up to have a tidy of the 'bench' and whilst I was there had a look at the stash. Narrowed down to the following candidates.. I was very close to doing the lifeboat but the recent Top Gun hype has put me in a bit of a US Navy mood, so the Phantom won out in the end. That poor Lightning, it keeps getting so close to the top of the pile, only to be cruelly denied. Maybe next time.. Rather than the Sundowners on the front, I'm doing this as one of the alternative schemes, inspired by the lovely, well thumbed, volume Such a good book! Obligatory sprue shot (although I've hidden most of it!). I'd shied away from this for a while because I really didn't fancy painting the gloss white undersides. Now I have an airbrush I don't have that excuse. This will be a test, though, as I've so far struggled to get decent gloss finishes with the airbrush. Have tried pledge and Mr Color GX112 but I never get the high gloss (and smooth) finish that I really want. Always ends up closer to Satin and a little rough feeling. Any tips most welcome! Not much achieved so far, just a few bits painted. Since the white and grey is hard to brush I'm going to break with tradition and spray the cockpit, wheel wells, intakes, drop tanks etc. I don't normally get the airbrush out for small things as I spend more time cleaning it that actually painting, but I think its necessary this time.. Wish me luck! Al.
-
Having watched the entertaining Top Gun [not Gear] Maverick last week (and going to see it again tomorrow!) its time to consider an earlier Hollywood blockbuster about the US Navy. DIVE BOMBER - watch as Errol Flynn smokes, dive bombs, smokes, crashes, smokes, dive bombs and smokes again. But seriously another great and entertaining movie, with colourful biplanes plunging through the air! Okay from memory the biplanes are fairly transitory as it was the change to monoplanes, and the USN repainted or provided older colour scheme "Golden Wings" aircraft to help with continuity. See the trailer here! The USN was a big proponent of dive bombing as the only way to accurately deliver a killer aerial blow on a moving naval target. Ernst Udet whilst in the US saw demonstrations and enthused the early Luftwaffe with the technique. The Curtiss SBC-4 was the final incarnation of the Navy biplane dive bomber, subsequent aircraft would be monoplanes. I picked up this kit at a show, somewhere along its previous 30+ odd years it had lost the front windscreen - though unlike many secondhand kits it still had the stand, is there a black market in purloined stands? Never fear, after an appeal on here @Marklo kindly posted me one of his vacforms to save the day! Why so late starting? I am trying to do one kit at a time but completing my latest one-a-month 370z kit had dragged out for three months, so will I make it? I have this week off so there's a good chance by Sunday. Here's the parts prepared: Subsequently I have drilled for rigging (likely Prym elastic thread, I am not mad enough to do double wires at 1/72 though) and primed. Tonight I plan to paint the interior and can then assemble the fuselage. Cheers Will
-
 Hi Everyone, This dull November time needs some colour on the table. And what could be better then a nice trainer airplane on bench? Couple trainers? Three trainers? I thought I'd go for four!!! Assortment of freshly released kits and some issued several years back. Three of four are české krabice and the last is Wolfpack from Korea. Two are going to be white-orange USN (USMC?) fast and beautiful jets, two are propeller driven yellow and orange little cuties. So some work to be done!!!! More to come! Dennis
 -
Grumman F6F-5 Hellcat (A19004) 1:24 Airfix The Hellcat was a tough flying barrel of a 'plane, used extensively in the Pacific Theatre during WWII by the US Navy, as well as the British Fleet Air Arm. It was propelled (excuse pun) by the powerful 2,000hp Pratt & Whitney R-2800 Double-Wasp, the same as used by its faster stablemate the Chance Vought Corsair. It was a rugged aircraft that could absorb substantial damage, more so than the faster Corsair, so it was well-used and well-liked by the pilots. It was faster than the Zero, which was of a much lighter construction and couldn't absorb the punishment a Hellcat could. It came into service in 1943 and there were over 12,000 built before the end of the war, with it playing a substantial role in giving the Allies air superiority toward the end of the conflict. It was the replacement for the Wildcat, although it bears a very strong family resemblance that makes differentiation tricky for the uninitiated. The pilot was well protected by armour around the cockpit, and the fuel tanks were self-sealing, something that wasn't present on the Zero that led to some fiery shoot-downs, some of which were captured on gun-cameras and are occasionally shown on documentaries. By the time the -5 came into service, the 18-cylinder P&W radial engine was more powerful, the airframe tougher, and the forward visibility improved by the addition of a flat, armoured windscreen panel. There were Nightfighter variants throughout the production run, which were the last of the type to be withdrawn from service in the 50s, but the day fighter -6 was the direct replacement of the -5, with an even more powerful engine with water injection and supercharging driving a four-bladed prop. In British service is was initially named the Gannet Mk.I, which is heresy as there's only one Gannet and that's from Fairey The name was soon changed to Hellcat for simplicity's sake, with the Nightfighter named the Mk.II. The Bearcat was the final replacement of the Hellcat, keeping the cat naming theme that continued until the F-14 entered the Danger Zone. The Kit The initial reaction to the announcement of this kit at Telford probably wasn't everything Airfix could have hoped, but since then the level of excitement has risen, helped by its inclusion in the recent James May documentary about Airfix and Hornby, which also featured one of our very own members who was responsible for building the pre-production sample with that information helping design the instructions. It is the third of Airfix's reawakened interest in Superkits that restarted with the 1:24 Mosquito, and has continued with 2014's Typhoon, a reboxing of which we reviewed this week here. We've seen a few builds already thanks to the documentary and a few examples that have gone out early due to what seems to have been a bit of an early dart by one of Airfix's stockists. Our sample has arrived and it's another large box that is well-filled with sprues, many of which are the full size of the interior due to the fact that they have been moulded in pairs with a central "spine" holding them together. We've had to remove those and split the sprues up to be able to get them into the photobooth, so we end up with fifteen sprues in grey styrene, one in clear, a large decal sheet and a thick instruction booklet that will keep you busy for quite a while. The painting and marking guide is provided on two sheets of glossy A3 paper on both sides with another containing stencilling instructions printed on one side. First impressions are excellent, as the surface detail that was first seen on the Typhoon has been replicated on this kit, with oil-canning, riveting and a few lapped panels visible on the main parts, which will give the finished model additional realism once painted. The detail is continued into the inside with a fully detailed cockpit and engine compartment plus further fuselage detail behind the pilot and inside the wing in the shape of wheel and gun bays. Add to this the foldable wings, optional raised or lowered flaps, landing gear and a choice of weapons, and we have a literal super kit. The detail and engineering has to be seen to be believed and the 310 construction steps gives a clue to how much has gone into this kit. If you're going to break down the cost between the hours of entertainment you'll get building it, it will be extremely good value. If you're going to break the price down on part count you'll get similarly good value, and if you look at the sprues it's a similarly good ratio of smiles per pound. Each sprue has been protected by its own bag, and the clear parts have been cocooned in paper towel, then a bubble-wrap bag, and finally a similar style bag as the rest of the sprues, which indicates that Airfix are taking no risks when it comes to clear parts on their more recent kits. Construction begins with the option of building the kit with the wheels up and in flight, wheels down and wings unfolded, or wheels down and wings folded for storage. This will impact your choices later, so choose now, walk through the instructions looking at the silhouettes at the top of the pages making notes and you'll have less chance of getting confused later. The steps are in the new 3D style with the previous step's parts highlighted in red, and where necessary there are captions that will assist us with our builds, some of which will have been added due to experiences during the pre-production builds mentioned earlier. You also have the option to leave many of the panels open or off completely, so you'll still have some choices to make throughout the build. The final one of the initial options is to add an electric micro-motor to the heart of the radial engine to give your model an attractive spinning prop. There are even custom parts to allow you to do this, and the routing of the wire is mapped out for you. After drooling over the sprues and the decision making, the build begins in earnest with some actual plastic that makes up the cockpit floor, which has a number of ribs added along with the control column and its linkages. The aft bulkhead is detailed with fire extinguisher and headrest, then fitted to the rear along with the H-shaped foot rest for the pilot's feet when they're not pushing on the rudder pedals, which are fitted to the shorter front bulkhead. Details such as instrument panels with decals and extra parts, the crew seat with seat cushion, lap belts and the shoulder belts, as well as other mechanical parts fitted to the cockpit tub, while ribbing, and more controls/instruments are installed in the sides of the fuselage halves, which prevents sink marks associated with moulded-in parts, then the cockpit is positioned in the port half for further construction. Another bulkhead with tanks is fitted behind the cockpit and the arrestor hook is applied to its bay with two small frames fitted forward of it, a scrap diagram showing the completed position of all the parts. The radio gear is built up and placed on three palettes suspended in the aft fuselage, and the instrument panel with either moulded-in dial fronts or flat fronts in clear parts and a styrene front panel installed over the top. There are also decals at the bottom of the sheet, with their location called out on the back page of the instructions booklet. Before you close up the fuselage, you may need to open up two holes in the bottom centreline to accept the external fuel tank later. A choice of retracted or deployed tail wheels are the final dceision before closing up the fuselage, after which a central panel on the underside and the lower half of a fuselage frame aft of the landing gear are added. The wings are next to be built up into a full-width assembly that will be installed later in a similar style to the real thing. It starts with the centre lower section with stiffeners added around the landing gear bays, a short length of spar that will be visible if you're lowering the gear, and you'll also need to drill some holes if you are planning on fitting the bombs. The retracted gear is fitted along with its wheels, which are made up from two parts tyres, and three layers that make up the hub, and are used in all three options. Another spar part and ribs are added to the inside of the lower skin, and this is then made up with the upper wing halves. The gear down option differs by adding more internal detail and leaves off the gear legs for now, then the outer wing's lower interior is made up with masses of ribs inside to stiffen things up and add the compartments for the three wing-mounted .50cal machine guns. These parts are common to all versions, and the machine guns have separate hollow tips for more realism, plus ammo cans feeding them. The aileron hinges and hinge-point for the wing fold is glued to the inner edge, then the whole process is repeated on the other side, save for the wing light that is only fitted in the leading edge of the port wing. The gear-down inner wing is then added to the wing uppers, and if you're fitting the wings unfolded, the joints between inner and lower outer wings are inserted, sanding to width if necessary, and then added to the inner by sliding in the tab first and then gluing the assembly in place from below. A small panel is slid into place next to the open gear bays, and the open or closed gun bay doors are added to the upper wing, then the fuselage is dropped in place on top, with the clear wingtip light covering the lights with bulbs inside that you should paint green and red. The folded wing version has short sections of the upper wing added to the top of the lower mid-section, and the wings are made up separately with more detail in the joins, plus cranked joining tabs fitted to the outer wings for later insertion. Meanwhile the ailerons with their separate trim tabs, the flaps and inserts are fitted along with the gun bay covers, which are more than likely fitted closed when the wings are folded, although the open option is also included for completeness. The fuselage is dropped on the short centre wing panel, and then we're back to the common parts of the fuselage. Firstly, the fuselage intake is fitted under the wing after construction with the exhaust vent closed or open 14o if not carrying a fuel tank, or 5o if the tank is present. The tail feathers with their separate elevators and rudder are next, with their posable trim tabs that take us to the other end of the airframe, then it's back to the engine, which starts with a tubular shaft that can take the motor if you can find one. Currently it's a bit rare, with only a couple on eBay for 2-3 times their RRP, and out of stock at Airfix.com. Hopefully that situation will be resolved soon, as kits of this size deserve the extra attention. There are a couple of extra parts for this option, but otherwise the engine is built the same way, with the pushrods added early on, the cylinder banks, separated by another ring from the front bank, with the motor or styrene axle added to the front and covered up by the reduction gear housing, after which the wiring loom hardness is slid over, and the fun part begins (that's semi-sarcastic if you didn't twig). Airfix have supplied a full set of diagrams from front and back as well as cross-sectional diagrams for you to add ignition leads to all your pistons using a colour coded system which designates the length of 0.7mm wire you need to use. Although this will take some time and effort, it's well worth it at this scale. The complex tangle of exhaust collector pipes are added next at the rear of the engine, done in steps to reduce confusion and at the back various ancillary parts are affixed, with magnetos and such attached to the bell housing at the front. The engine mounts and more exhaust pipes are still to add, and the exit pipes have separate tips with hollow ends for realism. This goes on for a couple of pages, taking it slow to avoid mistakes, including various tanks and the tubular mounts almost last into battle. A number of ducts are added front and rear to aid cooling, and a header tank is strung between the top two mounts, with the chin scoop trunking slung under the engine and married up with the cowling ring which has the lower section as a separate assembly to obtain the correct shapes. The front bulkhead needs detailing before the engine is installed, so a set of styrene wires and hoses are added, partly inside the leading edges of the wings, with location aided by a translucent diagram that has the parts picked out in red. Ancillary equipment, the stays for the intercooler flaps and the intake trunking are put in place before the main engine assembly is glued in place, using some sturdy-looking pegs that fit into holes in the bulkhead, and helping to line up the two lengths of intake. The cowling for the very front of the fuselage is put into position part-by-part, covering up all the engine mounts, plus a small panel in the leading edge of the wing, the intercooler flaps in open or closed positions, and the supports for the engine cowling panels, which you can either install completely, or leave off in full or in part to show off your painting of the complex engine. The cooling flaps are last, and these too can be posed open or closed. Moving onto the landing gear, which is only appropriate for the land-locked options with folded or open wings, the struts are substantial and made up from two halves, with a large mating surface in the front of the bay, the retraction jack and separate oleo-scissors. You'll need to add some brake hoses from wire before you install the captive gear doors, and the small flip-up forward doors, then the wheels you made earlier. The tail wheel can be made retracted or deployed by using a different yoke and the same two-part bay door, with the assembly fixing to the bulkhead at the front of the bay by three tabs for strength. The flying surfaces for the remainder of the options are next with the flaps spread over the wing join in two parts, and the ailerons fitting to their three hinge points which have helpful guides to set realistic deflections of both the aileron and its trim tab. Here the instructions take a break to build up the stores carried by the Hellcat, then take up the addition of the delicates such as the pitot probe, aerials, formation lights, IFF lights under the fuselage, the two part canopy, which can be posed open or closed, and the prop which has a different rear part if you are using the motor, then the prop is fitted to the front (it has a separate rear section), and the spinner is placed on the centre boss. A couple of diagrams show where the aerial wires go, but you'll have to use your own material here as none is supplied. The remaining two pages detail the final fitting of the folded wings, which begins with the little drop-down trapezoid-shaped flap at the break, then the wings themselves which slot in on their big tabs, after which you add a couple of linkages to complete the job. Let's go back to the weapons and tanks for a moment. The Hellcat was rigged to be able to carry bombs and rockets as well as additional fuel in a centreline fuel tank. All these are included in the kit, and at 1:24 scale they're quite large. There are two each of the 500lb and 1000lb bombs, which come in two separate halves, plus a separate tail section and spinner inside the tail. These then attach to the aircraft by two pins via short pylons of three parts each. There are six 5" HVAR (High Velocity Aircraft Rockets) rockets in three parts and these have moulded-in rail-less pylons and fins. These also attach to the wing via two pins that are at an angle, so that the dihedral of the wing is countered and the rockets hang vertically. The bombs fit on the inner wing, while the rockets are attached to the outer folding panel, and the 150 gallon drop-tank sits on the centreline. The tank is made up of three main parts plus two additional straps giving eight attachment points and requiring the removal of a small pin that hangs from the centreline. To reiterate, the intercooler flap can only be posed closed or at 5o with the tank fitted. Markings Decals are by Cartograf, which is a guarantee of good registration, sharpness and colour density, with a thin matt carrier film cut close to the printed areas. There are four options on the sheet, with a full side of glossy A3 paper devoted to each option in full colour and all the paint codes on each sheet so you don't have to flip pages all the time. From the box you can build one of the following: F6F-5 "Paper Doll" flown by Lt. Carl A Brown Jr., VF-27, USS Princeton, Oct 1944 F6F-5 VF-12, USS Randolph (CV-15), May 1945 Mk.II "Operation Sunfish", No.808 Naval Air Squadron, Fleet Air Arm, HMS Khedive, East Indies, Mar-Apr 1945 F6F-5 Flotille 1F, Carrier Arromanches (R95), L'Aéronavale, Indochina War, 1953 The stencils are covered on another sheet of glossy A3, with quite a few dotted around the airframe. These small details make a model for me, so it's worth putting them all on the airframe, and there are even stencils included for the prop, bombs and rockets with only the drop tank escaping adornment. Conclusion Golly! What a big, detailed, impressive kit of this WWII slugger, as you can see above, straight from Airfix's build. My usual scale is 1:48, but this thing is really quite exciting from a detail point of view from the box, and will keep your average modeller busy for quite some time, especially if you're planning on putting your heart and soul into the build like it deserves. They're selling fast, so don't hesitate. Very highly recommended. Review sample courtesy of
-
 US Navy F-4B Phantom Decals (D48093) 1:48 Eduard (For Tamiya Kit) We all love a Phantom and the new F-4B from Tamiya is a cracking kit. The kit though only has three schemes, and the decals from Tamiya are on the thick side. This new set from Eduard gives us 5 new schemes fro the kit along with the correct walkways for them, national insignia and Jet Intake warning triangles. It should be noted that only 2 of the schemes will fit the new kit from the box as they are for the late F-4B. If you want to model one of the other schemes you will need early fin cap. If you need the early cap then these are available from Hypersonic model or CMK. The 5 options in this set are; 151478 - VF84 "Jolly Rogers" AG211, USS Independence, South East Asia 1965 153020 - VF92 "Silver Kings", NG204, USS Enterprise, South East Asia 1968 148417 - VF-121 "Peacemakers", NJ121, NAS Miramar, 1964 149461 - VF-32 "Swordsman", AB212, USS John F Kennedy, Med Cruise 1972 153018, VF-114 "Aardvarks", NH205, USS Kittyhawk, South East Asia 1968 The three sheets are printed by Eduard and have good register, sharpness and colour density, with a glossy carrier film printed close to the edges of the printed areas. Conclusion This is a great set from Eduard which give you different marking options from the Kit, with the added benefit that they are thin and should go down with no issues. Highly recommended. Review sample courtesy of
 -
Good morning, a few weeks ago, I started my biggest modeling effort so far: the well-known and praised USS Nimitz from Trumpeter. A fine kit, and to make it even better, I got the Eduard set, the Starfighter decal set and some more airplanes. After all, it should look rather busy. My idea is to have the carrier look like this: http://www.thunderstreaks.com/spotting/carrier-visit-uss-nimitz-august-16-17-1976/#prettyPhoto , with some minor changes on the aircraft layout. Let's start with the aircrafts: first problem, the trumpeter ones have folded-out wings, but on the original, almost all wings are folded. So, fist step, is to cut the outer wings, are reglue them straight up. That's however nor possible for the intruder/prowler/skywarrior, since the wings overlap. Corsair and phantoms are easier, they point straigt up, thus painting and decalling should still be possible. After glueing, they receive a small blob of maskol, and a black priming. You see the difference later. That's some 60 aircrafts, of many different types and colours. And that's why I build the old one, still with the phantoms. After the black priming, I airbrushed the white, and then brush painted the light gull grey. The decals are the ones provided with the trumpeter kit, only 6 corsairs of the "sidewinder"-squadron. And you can see, the cockpit without the black priming is far too bright. And that's a corsair with black priming and the starfighter decals. They are nice to handle, but still can drive you crazy. All decals are separate, where they could have been grouped together. In the front fuselage, there are some 6 decals on each side, which could have beed grouped easily together. Oh, another nice point of the black priming: the intake looks rather realistic. If you don't spray the white head-on, it looks like the real thing, as it is dark grey. With some more 60 aircrafts to go, don't expect an update too soon... it took me 90 minutes for one aircraft, but the others have a bit less decals than the corsairs. Alex
-
Questo é il mio ultimo progetto, il trattore da rimorchio dell’US NAVY e MARINES in scala 1/48 e 1/35. Lo utilizzerò per i miei modelli di F-18 F Hasegawa, F-35B (in attesa dell’uscita della versione Italeri) MV 22 Osprey Hobby Boss, AH-1Z e UH-1Y Kitty Hawk, per la scala 1/35 per il AH-1Z Academy e MH-60R/S.
-
High Vis vs. Low Vis When did the change in the painting occur? What was the reason of it? I wonder about the reason for painting the aircraft so nice and wonderful and the opposite. Is it just visibility? Since on radar it makes no difference at all? Was there any other reason behind I have no clue at all? Who knows? Thank you in forward.
-
Hallo Here I have a general question, which accompanies me since the start of modelling. On sever a/c this question arouses again. Here now: How does an a/c exactly look like, if it is parked or ready to go? My present day issue is the SBD Dauntless on the carrier. Before take off. Armed, no crew in the a/c, so not manned. · Flaps up · Dive breaks closed · The rear gun is stowed. (How?) · Rear gunner seat in forward direction · Pilots navigation board out · Already bombed up · Canopy open all section glasses in center position Anything else? The same situation I had on my Barracudas. I did lots of them wrong. Helldiver also. Looking forward your ideas! Happy modelling
-

Hobby Boss USS Lassen (DDG-82) in 1:700
neillydone posted a topic in Ready for Inspection - Maritime
Here is my model of USS Lassen in 1:700 scale from the Hobby Boss kit. I started this on 23rd Dec and with some fits and starts finished it yesterday. It was an easy kit to build, however, I rather bodged the paintjob as I painted the deck first, then the superstructures and when time came to attach them found some gaps needed filling, resulting in too many layers caused by masking and re-masking using Liquid Mask. As a result the sharp details have become rather lost and the decals exhibit quite a bit of silvering despite liberal application of Daco decal solvent. it was also my first time doing PE railings so they are bit wonky (I used transparent canopy glue & C.A. to fix them). The halyards are a combination of Uschi van der Rosten rigging and stretched sprue affixed with C.A. For the base, after building a frame using 20mm pine coaming from the local DIY shop the sea effect was created using stryofoam board, watercolour paper, then airbrushed Vallejo Dark Sea Blue, Pastel Green and Off White with the green & white closer to the vessel. I drew around the shape of the hull form using the bottom half of the waterline kit part and then gouged a seat for the ship. I created the waves using AK Interactive Sea Effect for the overall sea texture and then cotton wool soaked in the same for the churn, finished with AK Interactive Foam. I probably spent more time thinking and preparing the base than the model itself. Putting such effort on the sea taught me a vital lesson that despite the (perceived) shortcomings of my work on the model (paint job), once viewed as a whole, these somehow become less apparent.- 2 replies
-
- 13
-
-
- Hobby Boss
- 1:700
- (and 1 more)
-
 Hello all; After the odyssey that was the Lou IV project, and a false start with a biplane, I've taken a couple of weeks to get some mojo back and now settled on an F6F-3 Hellcat project for my next one. Specifically; Now, in trawling around the interwebs this appears, again, to be a popular subject for modellers (of course it is, loo at the markings!) but there is an absolute dearth of information about the pilots, their unit and what what they actually did. Eduard has this aircraft as a VF-34 Hellcat, but most of the images on the internet show it as a VF-38 Hellcat. there’s not much info on either unit. For example, here's the Wikipedia entry for VF-38; The markings should be fun to do, and it's a Hellcat, which makes it a meaty topic anyway, but this one will be my attempt to try and put a bit more info into the world on what this squadron did -whichever it was - and the campaign they fought in. I'll be starting into the cockpit tonight. Cheers; Mark.
- 55 replies
-
- 9
-
-
- US Navy
- Eduard 1/48
- (and 1 more)
-
Fellow modelers, The USN operated in the late fifty's a number of "cold weather" Sikorsky LH-34D in the harsh climate of Antarctica.. On searching on the web, pictures concerning these operations are very limited. Finding one, equipped with skis has been impossible so far. Is there any UH-34 specialist, who have some pictures concerning Sikorsky LH-34D equipped with these skis, and what were in general the modifications to make them "Arctic Proof". Looking forward to your information. This is the site, were I got my information. www.vaqH-34.com/vxe6/h-34.htm Regards, Orion, The Netherlands.
-
Dear All i wish you a happy new year here are my last two kits Hasegawa PhantomII and Fujimi Skyhawk Add on are: buddy tank for A-4 Skyhawk (attack squadron resin) -Sidewinder & sparrow missiles from hasegawa missile set -fujimi deck tow -figures from fujimi & revell -superscale decals for the F-4 phantom models are painted with gunze and vallejo metal color