Search the Community
Showing results for tags 'tamiya'.
-
Been working away on this alongside other things, it's had my full attention for the last few days, all that's left on the interior is some final weathering (maybe) and a coat of matte, which I'm waiting on from eModels. Ready to prime. Basic paintwork done. After some detail painting, a few enamel washes, a couple of acrylic washes, and some chipping, here's where I'm at.
-
After the pleasant interlude that the Autoblinda provided, it's back onto German stuff. Next up is this nice little kit by Tamiya, with the tarp being a resin piece from Mig.
-
Hello Everyone ... thought id show this M10 Achilles. This was my entry in the M3/M4 Group build. It was my first completed armor build since i came back to modeling 3 years ago. I was able to do some scratch building and found some smaller 1/35th stowage to use. Here is a link to the build. Without further ado here it is. I know the photo’s are dark, sadly they were taken at an poor time. A couple turret shots ↕️ A stowage photo I hope this meets with some approval. As usual comments ? Questions ? Dennis
-
Hi everyone! I'm currently building a 1/72 Corsair by Tamiya & applying all paint with the hairy stick. Will be doing my -1D in the tri colour scheme like above. Tailplanes joined onto both halves Interior painted interior green (Vallejo 'Flat Yellow' & 'Flat Green' in a 2:1 ratio) & sidewall detail painted black. Seat & rear bulkhead painted Rudder pedals have been drybrushed with aluminium paint to simulate chipping. Cockpit side & instrument panels have been glued together & painted. The reason the control stick looks wonky is because I accidentally snapped the thin rear section & accidentally cut off the handle in my rushed attempt to get it off. Glued them both back on fortunately. Gunsight painted Everything would receive a few more coats of paint & some weathering before they can be called done. The instrument panel & sidewall detail would get picked out before assembly [obviously].
- 7 replies
-
- 4
-

-
- Corsair
- Brushpaint
- (and 1 more)
-
Hi, Excuse the poor quality pictures. (taken with google pixel XL) I've mostly been a wings person and dip in and out of building models as and when time allows. I've found building armour more rewarding as it seems to need a lot less sanding and filling seams! Here is my first attempt at a Diorama, using 3 Tamiya Kits. It's not 100% complete, steering wheel is still to be attached and some of the figures are still to be finished off. Kits are Tamiya BMW and Sidecar, Tamiya Protze and Tamiya Flakvierling. Diorama base was made from scratch and the landscape was made from plaster of paris. The drainage ditches havent worked, I used woodland scenics water effects (rather than real water by accident) and it just kept disappearing after a few days. Google Photos Album
- 13 replies
-
- 20
-
-

-
Hi hope everyone had a decent Christmas. Im having issues with my tub of galeria matt varnish and vallejos matt varnish, I just cant seem to get them down without brushmarks, So im hoping a basic airbrush set to spray these with might solve my issues? Im more than happy with using a hairy stick so far its just the final matt coat, Grrrr! Im looking at revell set 39199.. Seems to be fairly priced. Would i be best with something like the above or would a single action cheapo airbrush do the job...The airbrush will be strictly for varnish! Cheers gents and all the best!
-
 21/2017 Finally the Persian quartet is completed. The Iranians were supplied with 75 F-84G, in service from 1957 to 1965 as fighters, fighterbombers and for aerobatics in the Golden Crown Team. Tamiya kit, main markings from Hi-Decals, stencils from the kit and sparesbox, as with the other IIAF birds, not all stencils are completely correct and some are missing. Painted with Vallejo Metal Color Aluminium, airintake and exhaust with Tamiya Titanium Silver. Streamlined (practice) bombs from the Academy Sabre kit. The model shows an a/c of TFS-41 in 1960. DSC_0001 by Reinhard Spreitzhofer, auf Flickr DSC_0002 by Reinhard Spreitzhofer, auf Flickr DSC_0004 by Reinhard Spreitzhofer, auf Flickr DSC_0005 by Reinhard Spreitzhofer, auf Flickr DSC_0006 by Reinhard Spreitzhofer, auf Flickr DSC_0007 by Reinhard Spreitzhofer, auf Flickr DSC_0008 by Reinhard Spreitzhofer, auf Flickr DSC_0009 by Reinhard Spreitzhofer, auf Flickr DSC_0010 by Reinhard Spreitzhofer, auf Flickr DSC_0011 by Reinhard Spreitzhofer, auf Flickr DSC_0012 by Reinhard Spreitzhofer, auf Flickr DSC_0013 by Reinhard Spreitzhofer, auf Flickr DSC_0014 by Reinhard Spreitzhofer, auf Flickr DSC_0015 by Reinhard Spreitzhofer, auf Flickr DSC_0016 by Reinhard Spreitzhofer, auf Flickr DSC_0018 by Reinhard Spreitzhofer, auf Flickr DSC_0019 by Reinhard Spreitzhofer, auf Flickr DSC_0020 by Reinhard Spreitzhofer, auf Flickr DSC_0001 by Reinhard Spreitzhofer, auf Flickr DSC_0002 by Reinhard Spreitzhofer, auf Flickr DSC_0003 by Reinhard Spreitzhofer, auf Flickr
 -
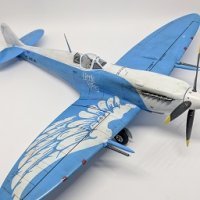
I'd like to present my "what-if" build of an A-16C. Back in the '80s, the USAF experimented with replacing the A-10 with a 30mm gun pod-carrying Viper. The program failed, but what if it didn't? This is the Tamiya Block 50 Viper and what a kit! Loved building it. Added the following goodies: - Eduard seat, cockpit PE, exhaust, and wheels - Caracal decals - Modern Hobbies AGM-65s and ALE-50 - Hasegawa Weapons set #3 provided the centerline GPU-5 gun pod - Master Model pitot and AOA probes - Painted with MRP The intake seams should have been worked more and the canopy needs tinting...things to remember next build! I thought about adding static dischargers for about .3 seconds but decided I didn't want to be committed to an asylum just yet! LOL Thanks for looking!
- 13 replies
-
- 29
-
-
I'm sending TIGER I photos. The Tamiya model is 1/35 scale. For the winter camouflage I used the "hair spray"
-
 A few weeks ago, I was presented by a kit of A6M3 Zero in a christmas present exchange action in a forum. It was an old tool Tamiya kit of Mod.32 "Hamp". As I have no japs in my collection yet, I went on to start it! I got lots of goodies for it, but I managed to destroy the kit as my skills in engraving the panel lines are nonexistant.... Thus, I aquired a new tool Tamiya kit, its a different A6M3 variant (Mod.22, different wings), and started it after a few weeks of research. Following goodies are here, but its likely not all would be used. Sure use are only the BigEd set and the "Saburo Sakai" pilot, plus diorama items. I always want to make a diorama out of my kits, but noone makes the japanese mechanics working on the airframe! I asked Luis "Panzer vs. Tanks" on shapeways, if he can make a set, but its not yet there, and he's not sure he will make it in time for decision. CMK Sakae 21 Motor - only if ground crew would come CMK Weapon bays A6M3 - not likely CMK Rear conus A6M3/A6M5 - not likely, new Tamiya looks correct to me CMK Cockpit - most likely not Big Ed A6M3 - already HGW Seatbelts Zero - not really, pilot has the belts molded on Scale Aircraft Conversions Metal Gear struts - quite sure use, I always have a stability problem with plastic struts when transporting to shows SBS Model Seat - nope Squadron Vacform canopy - likely True Details Wheels - sure Techmod A6M3 "Aces" decal - sure For the diorama I got CMK Ground crew (winking) CMK Saburo Sakai IJN Pilot PJ Productions IJN Pilot Tamiya Kurogane 4x4 jeep Tamiya Komatsu G40 Bulldozer Barrels, crates, etc from different kits. The plan is to make an aircraft coded T2-165 in a highly weared green over the IJN glossy faded grey green. This machine was a mitsubishi build A6M3 Mod. 22, so mitsubishi specific coloring applies. It was a part of 204 Kokutai activities in the Solomons in 1943, based on Rabaul and Buin. It was mostly flown by the top ace Shoichi Sugita. Shoichi Sugita was one of the 6 pilots who were escorting Admiral Yamamoto's Betty when P-38 Lightnings ambushed the group and shot down both Betties, killing Yamamoto. Sugita shot down one of the Lightnings, but too late to save the admiral. 6 Pilots were ashamed to have failed, and swore an oath to fight the enemy with no respect for their own life. In a few months, 4 were killed, and another went home after loosing an arm, only Sugita remaining. He was respected as the most agressive japanese pilot, and shot down between 70 and 120 aircraft. He was injured a few times, but returned to action, fighting over Truk, Peleliu, Phillipines and japanese mainland. In 1945 he was a part of the elite 301 Hikotai, 343 Kokutai, which was commanded by Minoru Genda and flew the brand new N1K2-J George to a devastating effect (most likely my next build ). However, on 15. April 1945 US carrier Hellcats from VF-46, led by Robert "Doc" Weatherup, struck the airfield. Despite the order to get in cover from Genda, Sugita and his wingman Miyazawa ran to their fighters and tried to start, only to be blown to pieces on takeoff by Weatherup. The plane weathering should look like this (its another Zero from the same area) The profile is:
 -
Well, a first attempt at a bike build! With a massive lack of mojo from aircraft building late last year, I have had thought about a bike for some time but couldn't find something that took my eye, until this was sitting on the shelf of a LMS. Built entirely out of the box. Moltaw liquid chrome used (wonderful stuff indeed!) as well as Tamiya paints. 20171129_094711-1 by Arthur Dent, on Flickr 20171128_143911-1 by Arthur Dent, on Flickr 20171128_143045-1 by Arthur Dent, on Flickr 20171128_142929 by Arthur Dent, on Flickr And a few build shots. 20171128_135756-1 by Arthur Dent, on Flickr 20171127_223217-1 by Arthur Dent, on Flickr 20171126_120631-1 by Arthur Dent, on Flickr 20171122_220520-1 by Arthur Dent, on Flickr 20171122_220417-1 by Arthur Dent, on Flickr This was a very enjoyable build which thoroughly restored enthusiasm for modelling. A lovely kit! Hope you like.
-
Hi all, I recently completed this beaut of a kit I had no problems whatsoever with the kit and throughly enjoyed the build Masked and sprayed the stripes as I didn't feel like risking it with the decals Used the pilots to fill the seats because I feel the decal seatbelts looks a bit flat Constructive criticism very much welcome! -Cam
- 19 replies
-
- 29
-
-
- Beaufighter
- Tamiya
- (and 1 more)
-
Here are a few pics of my WIP CAS Viper. Back in the 80s, the USAF wanted to replace the A-10 with a Close Air Support version of the F-16. They painted them like an A-10 and added a 4 barreled version of the GAU-8 Avenger in a pod (GPU-5). It wasn't successful but it is cool looking! I am using an Eduard seat, PE set, exhaust, and wheels to build a "what-if" version as a current Blk 50 Viper of the 421 FS..
- 34 replies
-
- 13
-
-
How do chaps, Just seen over on PMMS that Tamiya are to release a 1/35th Archer! One of those will be sneaking into the stash me thinks Regards Steve
-
to my modeling circuit there are, in addition to ships and technology, I send some models from my modeling workshop.
-
Billy's Mossie: Glam Mosquito in 1/48
Billy T. Pilgrim posted a topic in Work in Progress - Aircraft
Hi! So I've started a Youtube channel that I'm hoping to put build videos on - there's not much there right now but what there is is a build / tutorial video on my current build, Tamiya's 1/48 scale Mosquito NF Mk.II. I'm not the greatest modeller in the world, but I noticed that most build videos on Youtube tend to assume a certain level of knowledge as taken for granted, so I've been pitching these at absolute beginners. Still, might be an interesting way for you all to see the progress of my builds. Here's the first two parts of my Mosquito! -
THE SSV NORMANDY REMEMBRANCE FLIGHT (link here for what this is.) Urdnot Wrex: Bristol Beaufighter ARMAX ARSENAL AFTER SERVICE REPORT Substantial repairs needed after the SSV Normandy Remembrance flight did its scheduled show on Tuchanka. As de facto leader of the Krogan people, Urdnot Wrex was invited to take a flight in the aircraft he chose and designed. Eyewitness reports state that the aircraft returned a short time later filthy, dust-scarred and full of bullet holes. When asked for a comment on how the aircraft could end up with damage from weapons unseen in combat for over two hundred years, Wrex just grinned and sniggered. So, this was... let's say it was a troubled build. This is one of the first models I made when I was getting back into the hobby, using rock bottom cheap materials and gear. I made a start on it over two years ago, getting as far as painting. It's a really nice kit, Tamiya's Beaufighter from 1998, great fit if a little skimpy on internal detail. That time round, the paints were all dark and muddy, the surface finish was all sandpapery - and to make matters worse, after completing the quite complex camouflage pattern I had spilled a load of paint on one wing and wiped off the existing paint when I tried to clean it up. So, I stuck it on a shelf, telling myself I'd do it when I had the energy. Two years later, I thought "sod it, I'll give it a go". I think it's come out alright. The finish was a bit of a headache, I was trying out Tamiya polishing compound for the first time and it got all over the place. I experimented with various varnishes, and in the end a few coats of Future worked nicely. The heavy weathering and battle damage didn't come in until right at the end, when I decided it was missing something. The paint chipping is done with aluminium paint on a washing up sponge. The dirt and all over dark was done with artist's oil paint straight out of the tube. The good side of that is that if it's going onto a gloss surface you can blend it really well and choose how much or how little you want to stay on the surface when you wipe it off again. The downside is that it takes days to dry. Looking at the photos shows me just how many bits have obvious wipe marks, but *shrug* I know for next time. But yeah, if you read this far, I'm happy with how it came out given how much punishment this poor model has taken.
- 11 replies
-
- 25
-
-
-
i have had a liking for the Bell X-1 since watching The Right Stuff many years ago. It ss the early part of the film with Sam Shepard's extraordinary performance as Chuck Yeager that I most enjoy. A colleague, who knows of my model making habits, was kind enough to send me a portion of the "stash" of a a friend of his who passed away a year of so ago. Within that batch he sent me was Tamiya's 1:72 scale kit of the X-1 and I thought that it would make a good kit to start 2018 with. It was a very quick simple build (i decided against using the transparent fuselage halves). I used Italeri Acryl Acrylic Flat Orange as the main colour, applied by brush. A couple of firsts for me - I used an artists oil wash to highlight the moving surfaces and finished with Tamiya Semi Gloss Clear from a rattle can. Maybe a little grubbier than I intended, but the semi gloss finish is exactly what I wanted. I will be trying the Flat Clear on my next build. Build thread here. Thanks for looking. And some photos taken in the late afternoon sun.
-
So the second holiday project has hit the bench: Tamiya's 'Toms' Supra GT, definitely not going to be finished in the kit-supplied Castrol colours: Tamiya's TS-8 'Italian Red' with AK Xtreme Metals' Polished Aluminium' and some hand painted matt black (first coat only in these photos). The insides are all AK Xtreme Metals' 'Dark Aluminium' but obviously only just started, the cage is glued together but not to the chassis in these pics. Bodyshell is TS-94 'Metallic Grey'. Two light coats and nowhere near shiny enough, so I'll brush on a coat of Klear/Future before decalling, then another afterward. Going to keep the final 'look' a surprise as long as I can, but hopefully y'all will get a kick from it. Not too many 'What If' cars around so nice to do something that little bit outta 'left field', eh ? More soon. Ian.
-
Hi folks, I'm new here but I've been working on the new Mossie kits since they came out. I was fortunate enough to get the Tamiya kit in early July thanks to them arriving here in Canada so early. I have both kits well under way so the first couple of posts are bringing things up to date. Otherwise I don't build that quickly. Here's the obligatory box shot: This is the HK box on top of the Tamiya one. There is quite a size difference between the two.
-
 I received this kit for Christmas, and worked on it over Christmas and Boxing day. This was a straightforward build, and generally enjoyable. My main gripe is that with this being an old-ish Italeri kit, the fit of some parts was not great, and almost every hatch on the model required filler. That said, the figure provided by Tamiya and the metal gun barrel are a nice addition, and the slightly irritating build was well worth it for the chance to have one of these in my collection. I love the form of this vehicle, and building it after building the 232 is interesting, as the design is fairly similar in places. I have not worked out exactly how I am going to paint and weather this thing, but at the moment I am erring towards a cleaner build, lacking much mud or much fading, this vehicle being used in the French campaign, but with a lot of dust, and perhaps some rain streaks. Having said that, photographic evidence does show that just like every other military vehicle, these things could get quite filthy. At the same time, I would like to avoid too many oil streaking dirt effects and heavy weathering, as I feel like I've built up too much of a formula involving that. Instead, I will probably try to do some area-specific dirt, and very light streaking.
 -
Hello lads and gentlemen. Im going to build a 1:48 mosquito by tamiya, it will be good to have you along. I started this on the 29th march 2017 (you can check the picture dates) but have only just got around to uploading! Heres a photo of the kit and a couple of items I've acquired, Aries wheel bays. Decals Not sure which one to go for I've ruled out the silver one though . The green/grey F*EG is just a classic mosquito. The night fighter green grey black will be a good exercise in painting black (never done before...) And the Banff strike wing just look cool with all them rockets!!! Let me know what you guys think i should go for! I've also got a little bit of work start, Thanks for looking more to follow soon (: Joss
-
Hi all, I originally built this model around 25 years ago and I found it in a box of bits at my mums house, thought I'd have a go at updating it and creating a small dio for it. This is really my first go at a diorama for years so really just a bit of fun, hopefully I'll be able to improve on the next one, and improve my figure painting!! The kit is a Dragon 1/35 Jagdtiger and the figures are Tamiya. The model was originally painted grey all over, so i've re-painted it in camo - theres some bits missing, in fact just found a few bits of spare track to go on the side. Its probably not that accurate, not sure if an MG would have been tripod mounted on a tank, but looks the part! Anyway, see what you think! Cheers Simon
-
Without a two pronged crown; although I was tempted to an H6K Mavis with twin fins, I actually going to attempt the N1K1 Kyofu (Rex), which lost it's floats to become the N1K1-J Shiden (George) as I'm much more likely to actually finish it. A little background from Wikipedia: Kawanishi's N1K was originally built as a single pontoon floatplane fighter to support forward offensive operations where no airstrips were available, but by 1943 when the aircraft entered service, Japan was firmly on the defensive, and there was no more need for a fighter to fulfill this role. The requirement to carry a bulky, heavy float essentially crippled the N1K against contemporary American fighters. Kawanishi engineers, however, had proposed in late 1941 that the N1K would be the basis of a formidable land-based fighter too, and a land-based version was produced as a private venture by the company. This is a placeholder while I sort out picture hosting, and until the postie has been with the actual kit. Andy