Search the Community
Showing results for tags 'tamiya'.
-
G'day All, Here are my latest completions. A pair of 1/48 Tamiya Mosquitoes. They are both based on the B.IV kit, with varying mods. They've been sitting on my "shelf of doom" for about 15 years or so until I was inspired to get them done for our local club's theme build for this year of "Twins". The PR.XVI was awarded third place in the member's choice comp too. The PR.XVI has resin engines and a vac-form canopy from Paragon (they've been on the go for so long that the engines were designed to fit the Airfix kit, because Paragon hadn't made any for the Tamiya kit when I started them! ) and the B.IV Series II has a bulged bomb-bay, also by Paragon. But it was originally just a solid piece of resin, depicting the doors closed, meant to be fitted to the underside of the fuselage. It has been hollowed out and built up to show them open. The main markings on the PR.XVI are all masked and sprayed, which is the first time I've tried this, and I'm pretty happy with the results. The markings on the B.IV are a combination of kit decals and Fantasy Printshop codes and serials. The normal Tamiya canopy has lines on the inside to allow you to represent the internal framing by painting them. But the vac-form version for the PR-XVI didn't, so I decided to do it by actually builting the framework under the canopy (I don't think I'll do that again 🤪 ) They're not perfect, but at least they *are* finished! 😁 Thanks for looking. Cheers, Motty.
- 33 replies
-
- 88
-

-

-
Got this KIT at a discount at amazon,probably My first kit i had used airbrush in,And i must say,It may be the best Purchase i made....... Anyways i wanna know your thoughts..... I decided to keep the cover out,as it allows the engine details to be more visible
-
Well it certainly wasn’t hell to build, typical Tamiya precision build, no vices at all. Embellished with value gear stowage and painted with everything I had in stock ( how can there be so many shades of olive drab!) weathered with oils, clay washes and a first for me - pigments. The model shows an OTB scheme based in Italy so I’ve tried to create a dusty effect. Absolute blast to build and paint, really enjoyed it, big thanks to the guys who offered encouragement and advice during my WIP. Big dilemma for me now - stick with armour for a while or go back to aircraft!
- 42 replies
-
- 69
-
-
-
 Hi All, here’s my latest (unusually quick) OOB 70’s old school Tamiya build. I had an absolute blast on this and everything went fine until the last knockings. I tried hairspray followed by a thin coat of Tamiya buff as the first stage of the dirt weathering. Unfortunately (and I’m not sure why) the hairspray went white; perhaps the Klear coat underneath reacted(?) As a result, the weathering is a bit err, heavy. I also noticed that the sprockets drifted a bit out of line, meaning the tracks are a bit squiffy at the front. I was pretty sure I fixed them together correctly, but it’s something to watch if you tackle this otherwise simple kit. As I say, it was pretty much completely out of the box – rubber tracks, kit figures etc. The only things I changed were to add a bit of fender damage, drill out the machine guns and the headlights – Molotow liquid chrome refill paint followed by drops of gorilla clear glue. It was really nice to get progress quickly. I know there are issues with this kit, but not having every internal component and thanks to Tamiya's clever engineering it was great fun - and it looks like a panzer IV so I'm happy. Weathering is oil paints, ground up pastels and a bit of graphite. I tried fixing the mud pastels using white-spirit wash mixes of burnt umber and Naples yellow to get a bit of colour variation and I think it worked pretty well. This was a lovely distraction, and completed in record time for me, but I really need to knuckle down and get my scratchbuild back on track. There again, I do have another old school Sherman in my stash (such as it is)........hmmm.
 -
I’ve a lot on at the minute so I haven’t gotten round to my entropy builds all that much so far. However I really want to get started on some of the heavy weathering builds so I’m starting this one on the basis that I’ll build it fairly quickly and completely oob and then get into the paintwork which is going to be a lot of short bench sessions, so will fit into the gaps so to speak of my other stuff at the moment. The kit My muse ( not exactly the same model but close enough) The sprues. First step will be a coat of red oxide from a rattle can… The plan is assemble it then rust it, then camo which will be distressed back to the rust layer then dirt and weathering.
- 20 replies
-
- 10
-
-
Kit - Tamiya Paint - Vallejo metals (bomblet tubes) Tamiya acrylics (rest of loadout, interior, tail stripes) Mr Color lacquers (camouflage) Decals - Iliad Design Extras - Eduard etch cockpit details & harness, Bren Gun resin, loadout from spares box. A-1H Skyraider Assigned to Col. Sam Berman CO. 6th SOS Da Nang, 1969. A (relatively) quick project, finished just less than a month from opening the box, but it did have the bench completely to itself. Biggest challenge was finding the Minigun pod in my huge stash of spare ‘dangly bits’ that I’ve amassed over many year of plastic fettling. When I did I had to scratch the front cone from a lollipop stick and Miliput !!. Paint was a joy, I’m officially a lacquer convert & fanboy, yes I know it’s smelly and dangerous, but the results are undeniable and as long as you take sensible precautions… First time using Iliad decals and they were fine, I didn’t use the tail-stripes, preferring to simply paint/mask/repeat using the blue scalloped section of the decal as a template to make a mask. The ‘filth’ is all W&N oils, but I went back to Tamiya X19 ‘Smoke’ for the exhaust plumes as on this machine it just looks better to my eye. Very happy with the result. Please feel free to make any comments, ask any questions or post any crits. Cheers from NZ.
-
Hi, For my next project I will be making the Tamiya 1/48 Crusader tank (32541). The kit allows either the Mk I or II. I think I will be going for the Mk II depicted at at El Hamma, Tunisia, 1943. I have added a set of photoetch from Hauler, RB barrels for the QF 2 pdr gun & BESA machine gun and a set of jerry cans from MiniArt for some stowage: I have seen some mention of the underside of the main barrel being painted white (as in this photo). Does anyone know anything about this? The kit instructions have it in the 2 tone Black and sand colour as per the rest of the tank. Some more reference photos: Hopefully I'll be back once I've made a start. Thanks for looking! Stuart
- 30 replies
-
- 14
-
-
Recently I looked at how many unfinished models I have on my shelf. At first glance, there are a lot of them. But I made a disappointing conclusion that they are still not enough if I want to become the absolute champion in unfinished models. It turned out that this hard sport has a lot of competition, so I start a new model - Kübelwagen Type 82 from Tamiya. I hope that this will be another gem on my shelf with unfinished models Vytautas
- 102 replies
-
- 8
-

-
- Kubelwagen
- Tamiya
- (and 1 more)
-
I probably won't get into this fully until next year as I think I'll struggle to get it fully painted before winter hits. But hopefully I can make some good progress with the paint so I'll be about ready to build when the time comes rather than having to wait until I can spray the paint on. This one is Tamiya's Monte Carlo Alpine A110 kits which seems to get released in small numbers every few years. It's one of those kits which on first glance doesn't appear to have much to it, but looking at the instructions (and some other builds on here) I'm pretty certain it will be quite a detailed car once done. I've not decided whether to do the #22 or #28 car yet, still got a bit of time to decide on that. But to start with, here's the contents: As I said, it doesn't look much with just the two sprues, plus clear, chrome and bodyshell. But in true Tamiya style those sprues have made good use of the real estate available with quite a few parts on them. First job has been to get primer on the wheels and bumpers as they will be sprayed silver - if I go with the Silver Leaf that has quite a long curing time so I want that to have as much time as possible before the weather turns. No photo as it's only the pieces in primer. I've also removed the rear grilles from the chrome sprue. The instructions would have you paint the body colour in the grooves between the chrome grille bars (yeah, right!, like that's going to happen with a rattle can) so I've stripped the chrome. These will be painted body colour then when the time comes I plan to go over the grille bars with BMF - I'm hoping this will be much the easier method. And then it was onto the body, Last weekend I gave it a quick blow over with primer just so that any mould lines would show up better. There are faint lines which run along the top of the front and rear wings, then as is typical much stronger lines in the hard to reach places such as at the back of the windows and around the front of the body which were a particular pain to sand without losing any detail. This is the end result after sanding the lines back: Today it got put into primer. No mould lines reappearing apart from a very faint bit which should be behind the bumper, and no new lines appeared either so at this stage I'm quite happy with how it turned out. That's it for now, I'd love to make some more progress but next weekend I'm likely to be focussing more on the 300SL I think as that one NEEDS to be painted before winter. Thanks for looking.
- 158 replies
-
- 16
-
-
 North American P-51D Mustang, 411622 C-G4 'Nooky Booky IV', 357th Fighter Group, 362nd Fighter Squadron, RAF Leiston, 1944. Leonard K. Carson Subject; North-American P-51D (K specification), x6 .50 cals, long-range drop tanks. Manufacturer; Tamiya Kit number; 61040 Scale; 1/48 Aftermarket; Eduard Zoom P.E set and mask set. Paints; Exterior, AK Xtreme Metal Aluminium, Matt Aluminium, Dark Aluminium and Duraluminium. Tamiya LP11 Silver, AK Real Colour RC259 Olive Drab for the anti-glare, LP5 Semi-Gloss Black, RC267 RLM04 Gelb and LP7 Red on the spinner. Interior, RC262 US Interior Green, various Tamiya X and XF and Posca pens for detailing. Primer; Mr Finishing Surfacer 1500 Grey and XF1 Gloss Black for the metals. Varnish; AK Gauzy Shine Agent. Weathering; Flory Dark Dirt and Abteilung oils. Tamiya weathering palettes.
 -
As we've been given the extra time I thought I'd maybe see if I can finish this one, rather than it gather dust in the stash, in the little time left. I'm normally a slow builder so this will be an unusual quick build and paint straight out of the box. I think you all know this one. I'll be using this set of decals from Star. Probably one of the yellow ones just to lift the grey a bit. I accidentally double ordered this set so if anyone would like one, f.o.c., give me a shout.👍 Cheers all.
-
Should finish my current GB in the next couple of days, so I've made my choice to join in with this GB and thought I'd add my placemarker. Tamiya Subaru Impreza from the 2005 Monte Carlo rally. I've built other Tamiya Imprezas and hoping that this version will go together just as easily. Will be oob as I've not got much time left.
-
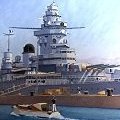
Hi All, after coming across a request from Martin @RidgeRunner, decided to throw my hat into the ring with HMS Rodney, a battle ship from Force H using the Tamiya 1/700 kit. I'm in a little bit of a dilemma with this build as I would like to fit her with a wood effect deck and other AM stuff but that's going to be pricey. What I may do is get a railings PE set 'coz it's got to have railings... The box. Instructions. A waterline hull. Plastic to stick on. Never built a capital ship before but it will give me skills for when I get round to building my Renown and Courageous ships. Won't be starting this just yet as I need to complete my Type 42 destroyers first. Stuart
-
Kit - Tamiya 35203 (1996) Paint - all acrylics Decals - spares Extras - Aber etch grilles, figures from Tamiya 35201 Mentioned here a number of times that I love building TD's, think I've done four-in-a-row over the last couple of years. I try something new with each build, and for this one, it was the figures - I have always been 'low average' when it comes to painting 'little men'. This attempt is definitely better than usual for me, but I have a long-way-to-go. Very easy and typical 1990's Tamiya quality kit. No surprises and everything fitted very well, although I felt the side skirts could definitely have benefitted from a much more positive join to the hull. Colours are my own mix of Tamiya acrylics trying to match the more saturated green and paler Dunkelgelb that you see in later war vehicles, not sure if I succeeded but they're close enough IMHO. I detest pigments and was 'this close' to not adding any at all, but did so anyway. Don't think I'll ever get the hang of applying them. So that is that. Please feel free to make any comments, ask any questions or hurl any insults. Cheers from NZ. Ian.
- 18 replies
-
- 42
-
-
-
Hopefully no one will object to my joining with the Tamiya 1/48 Hetzer with a CMK resin conversion kit to make it a post war Swiss G13 variant? I’ve got other builds in progress so I’m hoping to build it pretty much out of the box (if the box is regarded as the base kit plus the conversion…) and I’ll just paint it in the single colour grey-green Swiss summer scheme (I’m aware that the precise shade is a matter for some debate) to keep painting as simple as possible. The History The bulk of the Swiss tank forces through the Second World War were 24 LTH, an early variant of what would become best known as the Panzer 38(t). After the war the Swiss were looking around to improve their armored capability and they were offered surplus Hetzers by Skoda. These were originally assembled from Skoda’s left over stock of parts from manufacturing for the Germans but the last batch were newly manufactured. The main difference (there were others, but less significant / noticeable, especially from the outside) from the originals was that owing to limited stocks of the original Hetzer main gun on the G13 this was replaced with the 7.5cm StuK 40 L/48. The Swiss Army eventually operated 158 G13s until 1973, at which point they were sold off. Many of them ended up in Museums masquerading as WW2 Hetzers. Why the Swiss variant? Well, my partner’s grandfather was Polish, and, by all accounts had a pretty bad time of it during the Second World war, including time in various camps. When my partner first found out I was a modeller she asked me not to model Nazi German subjects out of respect for his experience. Not a problem, I mostly build British kit and I was able to present her with an assurance on that one. However, some German equipment does appeal to me so if I really want to model it I look to other operators. A long time ago I did a Master’s in History and a chunk of that was spent on the Swiss and Austrian experiences of the Second World War. From this I learnt about the German kit (especially aircraft) the Swiss operated which means that they’re my first port of call. So if I fancy doing a Hetzer, not operated by Nazi Germany, I’ll turn first to Switzerland and their G13’s. In the natural way that modelling ideas expand to overfill the available space somehow this means I’ve now got a Centurion, Mustang and Vampire in the stash earmarked for Swiss schemes as well… Not much modelling time at the moment so my apologies in advance that progress will be slow!
-
 Hi, It's my old Big-E, that I'd built twenty years ago, I have removed the planes and the island, changed the aircraft, rebuild the island, and applied the wheathering... It's the Enterprise in 1986-88 (Carrier Air Wing 11). . . . . . . . . . . . . . . . . . . It's the last aircraft carrier I built...
 -
Hi, This is my Tamiya 1/48 M20 US armoured car (delayed build from the Armoured Car GB...Finally removed from the shelf of doom!). The snowchains and some stowage is from a set by Blackdog. I have also added a metal machine gun barrel by RB, Hauler photoetch and some Tamiya figures. Scratch built base set at time of Battle of the Bulge. Thanks for looking! Stuart
-
Here's my take on the Tamiya CB 750 with some extra detailing and respoked wheels using stainless locking wire. All the chrome work was stripped and redone using Alclad Chrome. Paint was Ford Sovereign Gold from a Halfords rattlecan suitably lacquered after decal application. I really enjoyed making this one ! Hope you like it ! MODeller
-
 It was the local model expo last week, and I managed some interesting kits at the swap’n’sell. Varying degrees of complexity. None of them a quick build! I also picked this up for a paltry A$5. This very definitely has potential for a quick build, mostly to practice my painting and weathering. I’m going to complete it straight out of the box as a carrier from 1 Armoured Division in North Africa. Started work on Friday. It comes moulded in very dark green hard plastic, but other than some injector marks is pretty clean if flash. Not bad for a kit first released in the mid-70s. I realise early on that it was going to be easier to paint as I go. I used Tamiya acrylic NATO Brown as a primer, and used Vallejo Model Air British Light Stone as the main colour. I was moving along quickly without thinking to take photos, so here is where I am this evening. A quick dry fit: And that’s it for now.
- 44 replies
-
- 17
-
-
I think this is a popular kit and judging on first viewing it certainly a very nice one. A few of Tamiya's "legendary" ejector holes that will need filling but other than that, it looks to be a well detailed cracker. I'm not sure what colour choice, thick stripes, thin stripes and there's even photos of a Bet Lynch style Leopard print camo. Straight out of the box with this one by the looks of it. There is a Black Dog produced stowage set available but I'll see how I get on. Cheers all.👍
- 82 replies
-
- 11
-
-
I have finally time come back to bench. Now I have little bit more time for my hobby. Lancia S4 is soon in RFI section, so I can start new project. Short history Alpine was manufacturing this car between 1963-1977 and variety of engines was used. Tamiya kit contains decals for Monte Carlo rally -71 car, but I think I will make my build for another race. There are already fine examples in this forum builds from this race. I am still looking options, first I was thinking option for Corsica, but -71 event was cancelled and if I am correct next event car had wider body. So I am still thinking options. Car was raced in Tour de France also. And here is link to one option for my build: 1969 Tour de France car And in 1968 A110 was raced in Le Mans. Maybe I choose between these options. So below are mandatory pictures from parts. I would say this is typical Tamiya. Engine looks good and with small detailing it's possible make fine model. Only thing I can complain is these chrome parts. I think I just remove chrome and get those painted. Good think is that wheels don't have chrome.
-
 My take on the Tamiya 1/35 US Navy PBR 31 Mk.II Patrol Boat 'Pibber' (35150) This quick build was enhanced by the use of the Eduard PE set 53010. A smashing kit and one I heartily recommend! Dave
 -
 This is the kit. And this is the scheme I’m going to do. BOAC operated a number of PR.Mk IV and VI between Scotland and Sweden during the war. They were specially modified to take a single passenger in the bomb bay, but externally identical to a regular Mosquito. They were civilian registered and the letters were underlined in red white and blue to emphasise their civilian nature. One of the many and fascinating applications of the Mosquito and an extremely interesting part of its history.
- 23 replies
-
- 11
-
-
 Hi all - here's my latest project - Tamiya's Ilyushin Il-2 Sturmovik in 1:72 scale. Build out of box in in the Soviet 1945 scheme - only aftermarket was some Eduard canopy masks, which made a huge difference to the finished product. Brush painted in mix of Vallejo and Revell acrylics. Overall a beautiful kit with lots of nice touches that make the modeller's life easier. Minimal filler required. Took me about 2 months, which is very quick for me - and that included about 2 weeks of waiting for canopy masks to be delivered, and a repaint of the grey which was initially too light. Only thing to note would be that the instructions require you to add the landing gear very early in the build - but I don't think there's any way round it. Enjoy!
 -
 Hi all, this build has been a long time in the making. I had intended for it to be a relatively quick and stress-free build but it ended up being a slog at times and sat unfinished for a while. The kit is the 1/48 Tamiya Mk.X and was a breeze to put together, it's a great kit. The decals are the Avalon IAF Beaufighter set and caused me some issues, they were quite thin and the Star of David in the centre of the roundel ended up semi-transparent so the paint job can be seen underneath. Furthermore I can't actually verify that any of the Israeli Beaufighters actually wore RAF day colours but the option was there and I had the Ammo paint set on hand so went for it. The decals combined with a few silly mistakes on my end like using the wrong tail and ballsing up the camouflage scheme in places meant it sat in a box for a while untouched but I decided to just use it as weathering practice and managed to get it looking somewhat presentable so here it is: Thanks for looking in!
- 4 replies
-
- 25
-
-
-
- Tamiya
- Beaufighter
- (and 1 more)
.thumb.jpg.2c282efcc138b7cf7f1e1586a9c534d2.jpg)