Search the Community
Showing results for tags 'star wars'.
-
Hi all, I haven't tried a diorama since I was a young fella but when building a Star Wars Podracer for the recent Sci FI GB, I knew I had to give it a try! So armed with stuff I found around the garage and garden, here's some pics.. A base from MDF kindly donated by fellow forum member, Chief Wiggum. I went for a round base because I felt it was a good contrast to the Podracer which is long and narrow.. Sanded the base and added a couple of brush coats of leftover wood stain. I then glued down some cardboard and a piece of scrap wood to support the ship in flight.. Then lashed on some Polyfilla and tried to add some texture to it with a wooden stick while it dried. I also added some suitably sized pebbles from the garden as rocks, pushed into the 'filla. I sprinkled some of the kids' play sand over it as well as it dried. You can make out the brass beam that's glued in a hole drilled in the wooden block - this had a corresponding, smaller sized beam in the Podracer port engine Once the base was dry, I brushed it with a suitably sandy colour. But it looked a bit 'one-dimensional'. Having read a bit more about groundwork, I gave the raised bits a drybrush with a lightened version of the base colour...which I thought turned out ok! When the Podracer was finished, I added it to the base - the starboard engine is supported by a thick piece of wire hidden within the 'energy binders' while the pod itself is supported by two bits of painted wire coat hanger. And that's it! For something made from leftovers (apart from the metal beam which I bought), I'm really happy with the end result! Thanks for looking. Dermot
-
Star Wars - The Force Awakens Resistance & Poe's X-Wing Revell Well, if you've had your head jammed behind a wardrobe for the last six months it might be news to you that we're being treated to a new Star Wars film under the Disney auspices, with J.J.Abrams at the helm. A raft of new characters, the return of some of the old favourites, and a host of new hardware will be gracing our screens as of December 2015, and quite frankly I can't wait! The new X-Wing is a sleeked-down aerodynamically superior design, with a shorter nose, and new interlocking airfoils. The intakes for the engines are also new, with a reduced frontal profile and semi-circular shape that were initially criticised for having half a fan in each one, before folks realised they were more akin to a tea-strainer than actual fans… and this is Sci-Fi. Puny humans! They have a new style astro-droid in the shape of BB-8, which has a similar "head" to an R2 unit, but a spherical body with internal stabilisation (I'm rationalising Sci-Fi again, aren't I?). Poe's X-Wing is a darker colour than the standard, to differentiate him from the crowds during the frantic battle sequences. The Kit The first thing to get straight is that this is a kit, but it is firmly aimed at the younger audience, and has been simplified with them in mind, as well as being provided with a small sound-module that also has some lighting effects built in. inside the box the parts are held firmly by two vacuum formed clear end caps, with the smaller parts in a small polythene bag, with the parts being identical between both kits, with only the base plastic colour and painting differing between them. There are 18 parts for you to put together, and if I'm honest I'm quite impressed with the quality of the detail, although it's probably not up to a serious modeller's standards without some upgrades. That said though, it builds up in just a couple of minutes in the hands of an adult of limited intelligence such as this reviewer, and when it's done it looks really nice. Seriously! I've only shown the parts from the Resistance kit, as the lighter plastic shows the detail off better than the darker stuff of Poe's ride. It is moulded in ABS rather than normal styrene, as it gives a lot more strength to the finished model. It has some fun features like a retractable nose gear and removable main gear legs, plus an opening canopy in painted clear, and of course a little button in the shape of BB-8's head that activates one of three sounds. If you've watched the videos I posted up the other day, you'll be pleased to know that they're a lot better than the audio would suggest, and they are as follows: Firing cannons A general swooshing sound A muddled sound with a rather unconvincing electric swoosh The cannons are a lift from the previous films (I think), while the 2nd and 3rd samples are a bit poor compared to the cannon fire. There are no lights on this one, as the module is situated below BB-8 (who has a slightly oversized head, presumably to make it easier for little hands to press the button) but some cockpit lights might have been nice. Poe's X-Wing The famous X-wing airfoils split for "attack-position", revealing some nice moulded in detail between them, but when you want them closed, you'll need to apply some light thumb pressure to get them to sit flush, or the whistling as you fly through the atmosphere will be terrible!!!! Conclusion If you buy it expecting a highly detailed model of a new Resistance, or Poe's X-Wing, you might be a tad disappointed, although I think that it has potential if you're willing to put the effort in to turn it into a "proper" model. I was a little concerned that this one was going to be way too short in the nose from the PR materials, but it doesn't look too bad in the flesh, which is a relief. If you're a kid with a liking for Star Wars however, it will seem absolutely awesome to you, and I can't wait for my five year-old to see them when he comes home from school. As a bit of an update, the older Resistance X-Wing kit has endured much play at the hands of my son and his friends, with all the parts fully intact, including the wingtip cannons, which is a testament to their strength, as he's a big lad for his age, and as clumsy as you'd expect. Highly recommended if you understand what you're getting in the box. Revell model kits are available from all good toy and model retailers. For further information visit
-
X-Wing & Snow Speeder Kits 1:112 & 1:52 Revell The mainstay of the Rebel fighters, the X-Wing and Snowspeeder have taken part in some of the most dramatic battle scenes in Sci-Fi history, and gained a well-deserved place in people's hearts as such. Luke Skywalker famously piloted both, and although the Speeder was only used in Empire, who can forget them buzzing round the Imperial AT-AT Walkers like so many angry flies? The Kits These are both in the Level 3 range, and as such are more of a traditional kit than any of the Level 1 and 2 snap-together offerings as they require glue and paint, and are quite small thanks to the scale, which doesn't seem at all consistent throughout the five kits released so far for no apparent reason. That gripe aside, They arrive in a small red themed box with Kylo Ren (the new baddie) menacing us with a light sabre at the top, with a new style of colour printed instructions on slightly better paper stock. X-Wing Fighter At a diminutive 1:112 scale, the X-Wing isn't likely to take up much room, and consists of only two small sprues in light grey styrene, plus a clear sprue with the canopy parts. It does have a sizeable decal sheet however, as the X-Wing is a colourful ship. It has a single piece cockpit and a surprisingly good pilot for the scale, which snaps into the upper fuselage, trapping the canopy in place, which has a decal to avoid tricky painting or masking. The wings are full-width, with upper attached to the opposing lower, allowing them to be posed open or closed. The inner engine half is moulded into the spoiler, and when the outer engine nacelle is attached, completes the shape, a task which you must perform for all four engines, which have a small intake insert added before installation. The wing-tip blasters are single parts (x4), and attach to two studs on the tips, with blue spiral decals on two of them, and after adding those, you can join the fuselage around the wings and rear insert, then it's just a case of adding a full-depth R2 into the cubby behind the cockpit. Paint call-outs and decal instructions are supplied throughout, as usual in Revell codes with no tricky mixtures. The result is a small but quite detailed model that would be useful in a diorama where size is at a premium, or as an exercise in forced-perspective. Snow Speeder This one is the largest scale, at 1:52 and it's a shame they didn't just increase the size a tad to make it 1:48, as it would make more sense to a lot of modellers. It has a detailed cockpit with separate instrument panels, and continuing the tradition of the old MPC 'speeder, the two pilots have the most ridiculously out-of-proportion arms that desperately need some work! The cockpit slots in the upper shell, and with the addition of the rear bulkhead with those big cooling vanes and lower air-spoilers, the lower shell can be added, followed by the cockpit and the large cannons, one on each side with two integral angled cowlings, which are nicely done, but don't have the top-up spoilers on the rear, as seen in the movie. The important harpoon gun is the last part to be added, and then it can be placed on the two-part stand. Painting and decaling is again called out during construction, with just the orangey red stripes (which seem too orange to me) supplied. Conclusion Two nice kits for the smaller scale modeller, let down only by the inconsistent scales mentioned at the top… and the 'speeder pilots' gorilla arms. Watch out for the rest of the Level 3 kits – next it's the Dark Side. Recommended. Revell model kits are available from all good toy and model retailers. For further information visit
-
Knocked this one up the other night and weathered it over the last few days. You can see the build thread here if you're interested Thanks for watching
-
 INCOM CORPORATION T-65 X-WING SPACE SUPERIORITY FIGHTER Jek Porkins (Red 6) Incom Corporation T-65 X-wing space superiority fighter (Red 6); Bandai 1/72 scale finished in Tamiya and Vallejo acrylics, 502 Abteilung oils, and Secret Weapon Miniatures and Tamiya pigments. A work in progress thread can found here.
- 12 replies
-
- 14
-

-
Long time no post. Has any one got, and started work on the new Revell starter Kits for Star Wars, VII The force awakens. Family is bugging me for X-mas gift ideas. Of course im not gonna use the paint brushes from the kits but the paints and kits look quite nice. nice to get back on BM after so long away at work. Mad Larkin
-
I had some free time and an X-wing in pieces so I decided to do a quick build of the most endearing Rebel pilot from Star Wars: Jek Porkins! This is supposed to be a for-fun project, but when the client that I did Luke's X-wing for caught wind of it, he told me he was interested in buying it. He has the Porkins statue from SDCC 2014 and wants to display the ship next to it. However, I haven't decided if I'm willing to part with it... His color scheme has always been among my favorites and I think it's because it has similar colors to my favorite American football team, the Washington Redskins. Since this model was already disassembled, I went ahead and primed everything with some Tamiya Surface Primer from a rattle can. I preshaded everything with Tamiya German Grey (XF-63) and then gave the model a base coat using the same color I mixed for Luke's X-wing. His paneling isn't as varied as Luke's, but it is still rather interesting and the dark red color is unique to his ship. The yellow is Vallejo Model Air Ochre (71.033) and the dark red is a 4:1 mix of Vallejo Model Air Hull Red (71.039) and Fire Red (71.084). I used AK Interactive Heavy Chipping Fluid for the scuff marks on those colors. The lighter red is a 10:1 mix of Tamiya Flat Red (XF-7) and Hull Red (XF-9). I used some masking fluid applied with a piece of torn foam for the chipping effects. With the filter on this model, I used white spirits instead of turpenoid like last time. I let a piece of sprue soak in some white spirits all day and there seemed to be no ill effects so I went ahead and gave it a try. There are two coats of a filter made with 502 Abteilung German Ochre; the effect is obvious on the S-foil with the grey paneling, which was painted with Tamiya Royal Light Grey (XF-80). I added the grey panel just to give the model a little more variation. After this dries for a day or so, I'll give everything a couple of coats of Future in preparation for more weathering!
-
I grew up with Star Wars, so when I saw Bandai had got the license, I dipped my toe in the water with one of their 1:12 figures, expecting little for the price. I was mistaken, and have carried on acquiring them as they're released. I've been looking forward to the Sandtrooper, as they played a pretty big part in the first act of Star Wars Episode IV (the first one!), and they looked cool with their rank pads and the Lewis Gun based weapons. I also liked that they were a bit dirty & worn into the bargain I put this together a couple of days ago, and praise be to Bandai they got the colour and patina of the white plastic just right so you don't even need to paint the armour if you don't feel the need, which I didn't. I've also decided to keep the joints articulated for re-posing at some later date if I get bored with how they look in the cabinet. The shoulder pad decals are great in terms of colour, but I didn't have any luck getting mine to settle down on the curved surface, so I removed it, masked it off with tape & masking fluid, then mixed up a similar colour using some AKAN paints, which are just about right. I used BS557 Light Orange (70013) with a tint of red added over a white base that had more white in the upper areas, so that when I added more orange around the edges of the pad, it would look like sun-bleaching. It turned out ok, especially now it has a nice coat of dust. I wanted to dirty up the rest of ol' Sandy, so yesterday I sprayed an isolator coat of clear acrylic gloss so the various chemicals wouldn't attack the plastic, aiming for a more satin finish that would take washes, but also hold onto pigments. Once I'd got a nice solid layer on, I moved the airbrush back a bit and misted the gloss on to achieve a more satin effect, then left it to dry. While I was doing that I also hid the seams on the gun (they're quite noticeable here), then primed it with a coat of aluminium lacquer, over which I threw some AMMO satin black from their weapons set, after masking off the strap, which is a flexible styrene, with a different patina to it. In hindsight I might replace it with my own creation, as I noticed that in at least some photos the strap appears to be an olive drab cloth, which is much thinner than what's supplied. I distressed the black with a sanding sponge to reveal small areas of metal, so the gun looks a little used, then washed it with the Ultimate stuff mentioned in the next paragraph. With the gloss dry on the figure, I sploshed some Ultimate Weathering Wash on the backpack, to see which shade better suited the situation. The light dust was picked in the end, and I applied it all over the figure in liberal quantities. Once it was dry, I removed it from the main areas, and left the grooves, creases and panel lines stuffed with it, leaving more at the bottom to give an impression of accumulated dust. I also dotted a bit of True-Earth shading colours onto the panels to simulate dirt that the set dressers seem to have lashed on with a paste brush at the time! Using water, a paint brush and cotton bud I pushed it around and harassed it until it looked ok, then set the figure to one side to dry. In the cold light of day I'm trying to gauge whether it looks realistic enough, and whether I've gone far enough or not. If I'm happy with it after looking at it a bit longer, I'll seal it all in with another coat of satin gloss, and add a slight dusting of tan to the lower extremities to simulate dust. What do you think? More? Less? About right? The base is just the part that comes with the kit, to which I've given a thick gloopy layer of Games Workshop Agrellan Earth, which I saw AndyRM using in one of his builds I'll tidy this up, fix the crazed patches with some paint to adjust the colour, and hopefully keep the lovely texture that it gets when it dries. It's not a cheap way to do this effect though, as you use up a fair proportion of the pot on even a small area such as this. A couple of bases, and it'll be empty
-
This will be my first post in this section and the first Star Wars model since the mid 80's, some of the recent posts have been truly inspiring. The whole Force Awakens build up has got me again and have already booked my 0:01 ticket on the 17th December, taking me back to 77 and the old ABC in Walthamstow. Anyway, bought a Bandai Stormtrooper a month back and with some excitement started the build, the whole flexibility of the model was new to me and wasn't happy that the joints would be seen however it did give me a chance to create an individual pose which I suppose was the whole point to the design. I decided on the pose, superglued the joint as I was uncertain whether the plastic used would adhere to the usual polystyrene cement then filed the body with filler taking careful note not to impede the armour. The shoulder, hip and knee joints have come out pretty good, still not certain with the upper torso and 'corset' he appears to be wearing as yet but have left the unglued at moment. The weathering went on pretty well using citadel washes and sponging, might be a bit heavy but not bothered at the moment as I may reduce using a damp cloth. I have now bought a speeder and am looking to combine with another stormtrooper, whether I ever get round to this is another matter!
-
I just finished up my build of Bandai's 1/72 X-wing, painted as Luke Skywalker's Red 5. This model was commission by a friend of mine as part of a trench run diorama with Vader and his two wingmen. This was my second go at Luke's X-wing after I did a Fine Molds version for my personal collection last summer. The Fine Molds version of this kit really doesn't compare to the Bandai one; Bandai's is superior in just about every way. The only real downside is how Bandai's plastic reacts to thinner, which is something I'll take into consideration on my next Bandai build. In my short time building models (three years), this has by far been the most fun I've had working on a model. It's just a shame that it won't be living in my display case! Comments and criticisms are always welcome!
- 15 replies
-
- 12
-
-
I was commissioned by a friend of mine to build four models to recreate the trench run from Star Wars; Vader, two TIEs, and Luke's Red 5. I was excited about this because I wanted a chance to do another Red 5 X-wing after I completed my own last year and was never really happy with the final result. I started out with the cockpit and Luke. The interior was painted in Tamiya Neutral Grey (XF-53) and given a couple of coats of Future for the decals. I'm not too happy with the decals on the control panels, but since you can barely see inside the cockpit when it was complete I decided to leave them. I then went around and picked out some details before painting Luke. After giving everything a coat of grey Alcad II Primer/Microfiller, I went to work preshading all of the numerous panel lines over the model with heavily thinned Tamiya German Grey (XF-63), which turned out to be quite a tedious job! After the preshading was complete, I began laying down the base color. In the past, I have used a 1:1 mix of Tamiya Flat White (XF-2) and Medium Grey (XF-20), which I think makes a fine color for Rebellion ships. However, I wanted to try something different so I picked up a couple of Vallejo mixing bottles at my FLGS and set to work mixing up a custom color. I mixed one 10mL jar of Tamiya Flat White (XF-2), 2/3 of a jar of Tamiya White (X-2), twelve drops of Tamiya Flat Earth (XF-52), and four drops of Tamiya Neutral Grey (XF-53). Overall, I was pleased with this color. Although there is an extensive decal sheet provided with the kit, none of the decals have any of the typical weathering found on so many Star Wars vehicles. As nice as Bandai decals are, I prefer to use paint wherever possible for the most consistent finish. For the paint chipping, I used a combination of Tamiya masking tape and Humbrol Maskol applied with a piece torn foam, trying to mimic the weathering on the filming miniature as best I can. After a couple of hours, I had all of the panels on the fuselage complete. I tried to follow the studio model as best I could, but I took some liberties on various panels. I used twelve different colors on the different panels!The panels are rather stark right now, but I will go over everything with some fine grit sandpaper to give them a work look and then a combination of filters, washes, and pigments for weathering will tone them down. I moved on to painting the S-foils, which is the most complicated part of the painting due to the squadron markings. Again, the kit is supplied with high quality decals, but I much prefer the finish of paint an it's easier to weather compared to the decals. Luckily, this is not my first time trying to mask X-wing squadron markings so it went pretty well overall. The hardest part is getting the hash marks properly spaced, but after a little trial and error I think I got it. Like the red stripes on the fuselage, I used a 10:1 mix of Tamiya Flat Red (XF-7) and Hull Red (XF-9) for the squadron markings. The decal sheet has a medium grey colored decal for the lower wing panel around the cutout. I decided to use Tamiya Cockpit Green (XF-71) instead because it appears to be greenish in the reference photos I have of the studio model. Above all, I just wanted a little splash of color on the wings. I also used this time to insert the engines that I had previously painted. They were done with a basecoat of Tamiya Gun Metal (X-10) over a black primer and then highlighted with a misting of Flat Aluminum (XF-16). They were then given a light drybrushing with some Tamiya metallic weathering powder. Both sets of S-foils and laser cannons are complete. For the engine nozzles, I sprayed them with Tamiya Dark Iron (XF-84). During the weathering process, they will get multiple drybrushes of various metallic pigments. The brownish panel on the starboard engine was painted with Tamiya Medium Grey (XF-20) and the panel on the port wing by the squadron markings was painted with Tamiya Buff (XF-57). The black squares on the lower wing were painted with Tamiya NATO Black (XF-69) and the bluish panels were painted with Vallejo Model Air US Blue Grey (71.114). The barber shop stripe was painted with a mix of Vallejo Model Air blues: French Blue, Dark Sea Blue, and Intermediate Blue. I don't remember the mix ratio; I just added the different paints until I got a color I like and that more or less matched the decal. Now that all of the painting is complete, the next step will be to give the entire model a light rub with some high grit sandpaper to tone the boldness of the panels down, followed by an overall ocher filter to warm the entire model, and then begin work on the detailed weathering with oils and then pigments.
-
Star Wars The Force Awakens X-Wings Level 2 - 1:50 Revell Although we don't yet know the full story behind the new J.J.Abrams take on the Star Wars universe after the Emperor's demise, we know that the X-Wing is still one of the primary fighters in the galaxy, although it has been streamlined due to the march of imaginary technology. They appear to be in the service of both sides too, if the colours are true to the dark for bad guy, light for good guy, although Poe may well be the new anti-hero in a Han Solo style. The Kits These two are snap-together styrene kits in the Level 2 range, and as such are more detailed and larger than the lights & sound Level 1 kits (toys) I reviewed the other day here. They arrive in a bigger box, and both have four sprues in pale grey or black styrene, depending on which you get, plus one of clear parts. The details are painted at the factory, although there has been quite a bit of over-spray on my review samples, but that shouldn't be a major issue to the intended audience, and the Resistance as the Rebels are now known are more concerned with function over cleanliness. One kit is marked as a Resistance X-Wing, which seems suitably generic to pick it out as the mount of "those who also flew that mission", while the other darker kit is Poe's X-Wing, and we already know that Poe is one of the main characters of the film, so he's either an anti-hero, changes sides, or they just picked black to make him stand out from the crowd. I've built up Poe's ship and used the lighter kit for the sprue shots as the colour is more conducive to showing the detail. Both sprues are the same, and you can see the differences in the pre-painted markings in either state. Oddly, there aren't any pilots included in the kits, but a BB-8 Astrodroid is. The cockpit and rear glazing is dropped into the upper fuselage after the front windscreen is inserted, with the assembly holding the pivoting screen in place. The wings are full-width with the upper wing on one side linked to the lower on the other, so that the spoilers can be set to attack position, which gives rise to their name. The engines and cowlings snap together to form the Intake with linked exhaust, and a roof for the main gear bay on the lower wings, or just the intake and exhaust sections on the upper wings, both having intake inserts and linking pipework for added detail. The wing pairs slot together and are placed inside the lower fuselage along with the rear bulkhead, after which the upper fuselage is joined, trapping them in place, and allowing the wings to pivot. Exhaust tips and wingtip mounted cannons are added next, and then you have a choice of in-flight pose with closed gear bays, or landing configuration with the bay doors open and the gear skids deployed. Due to the snap-fit nature of the kit you could switch between modes, but it would just be a matter of time before the small parts got lost if my son is anything to go by! BB-8 snaps together from two parts, and the four-part stand with an undulating drought-crazed surface moulded into it finishes the build. There are no decals due to them having been pre-painted, and you can leave the glue closed too, as everything is snap-together. It might be an idea to use a little if you don't want it disassembled by small fingers, but that's up to you and little Johnny! Build Notes The kit is moulded in tougher ABS plastic, and sprue gates are consequentially tougher to cut off, so a sharp blade is of more use, and due to the pre-painted nature of the kit, there will be some small holes in the paint afterward. You can match some paint and make good if you're minded, and there are a couple of places where glue would be well-advised. Firstly, the wingtip mounted blasters are very prone to coming off, so glue these in place for your own sake. Secondly, there are pins on which main gear bay doors are supposed to flex-fit into recesses in the bay wall, but there is too little flex due to the thickness of both parts. This results in damage to the pins and subsequent loss of the parts if you don't glue them in. This last one could be down to my lack of strength, but be prepared. Everything else fits nicely, but there are little nubs that hold the wings in the closed position that are stiff to begin with, but might become slack later. In total it took me about 20 minutes to prepare and complete construction, with a little liquid glue added at the end to secure the aforementioned parts. Conclusion This is a construction toy, and a pretty good one at that. It's a shame about the slightly fuzzy painting, but given the intended audience, it shouldn't be an issue, and if my son gets as much fun out of these bigger kits as he has done with the Level 1 kits, they'll be a great buy for any kids you know of any age. Highly recommended. Revell model kits are available from all good toy and model retailers. For further information visit
-
Star Wars The Force Awakens Kylo Ren's Command Shuttle Level 2 - Revell Although we don't yet know the full story behind the new J.J.Abrams take on the Star Wars universe after the Emperor's demise, we know that Kylo Ren is the lead baddie (or is he?), and he's the one running the show over at the First Order, which is the re-branded and re-structured remnants of the old Evil Empire. He gets around in this black monster, which bears a family resemblance to an Imperial Shuttle of old in the folded configuration, and with the central fin missing. He's also bound to have a behemoth space station salted away somewhere, but we'll have to wait & see on that score. The Kits This is another of the snap-together styrene kits in the Level 2 range, and as such it is more detailed and larger than the lights & sound Level 1 kits (toys) I reviewed recently. It arrives in a bigger box, and has six sprues in grey black styrene, plus one containing a red painted clear part. The details are painted at the factory, although most of it is simply a different shade of almost-black with a slight greenish tint. Only the exhaust nozzles have been hit with a shade of silver and the canopy with red to give them a bit of a glow. The first thing of note is how big these wings really are. They're over 30cm long, so when it's built, you're going to need some headroom wherever you want to store/display it. There are contrasting inserts in the wing edges, and the cannons in the leading wing-root edge are carried over from the old shuttles. The lower hull has a crew compartment and bulkhead added along with an articulated access-ramp, which is covered by a blank bay to block your view of the interior. The canopy and wing root bulkheads are slotted in place along with a few other smaller parts, and the hull is closed up, with a pair of exhaust nozzles added to the rear. The wings slot into the hull's bulkheads on long pins for strength, and you then install the landing gear skids in retracted positions by leaving the gear legs off, or in landing pose by adding the legs beforehand. Conclusion This is a construction toy, and a pretty good one at that, with plenty of external detail to entertain the eye. It's a big kit, so if you're supervising the build you'll need to look out for joints that would benefit from gluing, but if my son gets as much fun out of these bigger kits as he has done with the Level 1 kits, they'll be a great buy for any kids you know of any age. Highly recommended. Revell model kits are available from all good toy and model retailers. For further information visit
-
Star Wars - The Force Awakens Millennium Falcon Revell Well, if you've had your head jammed behind a wardrobe for the last six months it might be news to you that we're being treated to a new Star Wars film under the Disney auspices, with J.J.Abrams at the helm. A raft of new characters, the return of some of the old favourites, and a host of new hardware will be gracing our screens as of December 2015, and quite frankly I can't wait! The new Millennium Falcon is as recognisable of the other kits in this series, having only some minor modifications applied over the years since the original trilogy, the most noticeable being the new "radar" dish that replaces the large circular one of old. The Kit The first thing to get straight is that this is a kit, but it is firmly aimed at the younger audience, and has been simplified with them in mind, as well as being provided with a small sound-module that also has some lighting effects built in. inside the box the parts are held firmly by two vacuum formed clear end caps, with the smaller parts in a small polythene bag. There are 19 parts for you to put together, and if I'm honest I'm quite impressed with the quality of the detail, although it's probably not up to a serious modeller's standards without some upgrades, due to the simplification necessary on the very busy surfaces. That said though, it builds up in just a couple of minutes in the hands of an adult of limited intelligence such as this reviewer, and when it's done it looks really nice. Seriously! It is moulded in ABS rather than normal styrene, as it gives a lot more strength to the finished model. It has some fun features like retractable landing gear, although these have been massively altered to make them strong enough for play, with little curved finger cut-outs to let you move them. The electronics are hidden within the rear fuselage and provide light and sounds when you press the central exhaust nearest the rear of the ship. The sounds cycle as before, and two blue LEDs light up the engine exhaust grille at the rear, which looks pretty good under the circumstances. If you've watched the videos I posted up the other day, you'll be pleased to know that they're a lot better than the audio would suggest, and they are as follows: Fly-by A slow and unrealistic shooting noise Rapid fire that sounds like the self-defence cannons that pop out from the underside The 1st and 3rd samples are a lifts from the film at a guess, while the 2nd is a poor fabrication of unknown provenance. The radar is mobile and can spin on its base, as can the central gun turrets we grew to love in the first film. As already mentioned, the landing gear clicks in & out for flight and landing poses, but the canopy on this kit is just painted on with no clear panels or interior, which is a shame, but hardly surprising at this scale, which must be near to 1:144. Conclusion If you buy it expecting a highly detailed model of a new Millennium Falcon, you might be a tad disappointed, although I think that it has potential if you're willing to put the effort in to turn it into a "proper" model. Like the real thing, it is robust enough for extended play, and only a few bits may get dislodged or lost. If you're a kid with a liking for Star Wars however, the fastest hunk of junk in the galaxy will seem absolutely awesome to you, and I can't wait for my five year-old to see them when he comes home from school. Highly recommended if you understand what you're getting in the box. Revell model kits are available from all good toy and model retailers. For further information visit
-

Star Wars First Order Special Forces TIE Fighter - Level 1
Mike posted a topic in Sci-Fi & RealSpace Kits
Star Wars - The Force Awakens First Order Special Forces TIE Fighter Revell Well, if you've had your head jammed behind a wardrobe for the last six months it might be news to you that we're being treated to a new Star Wars film under the Disney auspices, with J.J.Abrams at the helm. A raft of new characters, the return of some of the old favourites, and a host of new hardware will be gracing our screens as of December 2015, and quite frankly I can't wait! The new TIE fighter is operated by the First Order, which is the new name for the Evil Empire, who despite our fervent desires weren't polished off with the demise of the 2nd Death Star, but managed to re-establish their grip on the Empire, but to what degree we don't yet know. It is upgraded from the original, and squeezes a two-man crew into the same cabin space – even Sci-Fi technology is advancing in terms of miniaturisation! They're black now, and this one has a red accented panel, which I'm going to guess represents their unit badge? The Kit The first thing to get straight is that this is a kit, but it is firmly aimed at the younger audience, and has been simplified with them in mind, as well as being provided with a small sound-module that also has some lighting effects built in. inside the box the parts are held firmly by two vacuum formed clear end caps, with the smaller parts in a small polythene bag. There are 15 parts for you to put together, and if I'm honest I'm quite impressed with the quality of the detail, although it's probably not up to a serious modeller's standards without some upgrades. That said though, it builds up in just a couple of minutes in the hands of an adult of limited intelligence such as this reviewer, and when it's done it looks really nice. Seriously! It is moulded in ABS rather than normal styrene, as it gives a lot more strength to the finished model. It has some fun features like an opening cockpit hatch in painted clear, and of course a little button on the bottom that activates a red light in the cockpit and plays one of three sounds, once you've removed the little tab that breaks the contact with the two LR44 batteries that are pre-installed. If you've watched the videos I posted up the other day, you'll be pleased to know that they're a lot better than the audio would suggest, and they are as follows: The TIE fighter screaming fly-past Firing cannons A muddled sounding explosion They're lifts from the previous films (I think) and you can hear other weapons firing in the 2nd sample, while the 3rd sample is a bit poor compared to the other two. The red light illuminates the coaming of the cockpit quite nicely, which can be seen through the faceted windscreen. I did make a short video demonstrating the sounds, but my heavy breathing ruined it a little, so I deleted it Conclusion If you buy it expecting a highly detailed model of a new TIE fighter, you might be a tad disappointed, although I think that it has potential if you're willing to put the effort in to turn it into a "proper" model. If you're a kid with a liking for Star Wars however, it will seem absolutely awesome to you, and I can't wait for my five year-old to see them when he comes home from school. Highly recommended if you understand what you're getting in the box. Revell model kits are available from all good toy and model retailers. For further information visit -
Kit manufacture: Bandai Scale: 1/72 Type: X-Wing Extras used: Entirely OOB Paints and colours used: Tamiya XF-2 Flat White and XF-19 Light Grey mix for the base colour, XF-54 Dark Sea Grey as a primer and base for chipping, XF-3 Yellow, XF-7 Red and XF-18 Medium Blue for the panels, XF-85 Rubber Black. Luke was painted with various Vallejo colours and Citadel ink. Engine is Mr Metal Color Dark Iron with Tamiya weather set, Tamiya XF-84 dark iron as base for engine exhausts. Weathering is entirely Lukas Berlin black water based oil paints mixed with water and washing up liquid (75:25). Finish is Tamiya flat coat (excellent). I'm an outsider in these parts and normally hang around in the aircraft section, so hi to all who don't know me! Now, everyone loves Star Wars, don't they? So, after seeing Phil's build (on FloryModels.co.uk), I couldn't wait to get on with this. It is brilliant! This model is snap together and has only been touched with glue on the peg to connect the stand to the model, simply because I used the stand as a handle during painting and it got a bit loose. The decals are very good too, although I found X-20A to be better setting solution than Micro Sol for these. I used Lukas Berlin black oil paints thinly mixed with water and washing up liquid for a wash, which wiped off easily when dry. It acts very much like Flory Wash to be honest, although not as easy to use. I chose this under Phil's advise on his build, and used water based oils as thinners for normal oils will destroy the plastic. I way over chipped this using mask oil and attacking the decals with a sanding sponge; it was great fun!! I started this build at the end of June, and I've been effectively away for nearly 4 weeks during this period, so it's a dead quick build. Here we go: Thanks for looking Val
- 22 replies
-
- 20
-
-
Revell - new Star Wars kits for 2015 X-WING - skill level 4 TIE Fighter Millennium Falcon !!!!!!! look at their boxarts and compare with Fine Molds: http://www.rebelscum.com/2015-Toy-Fair/2015-Toy-Fair-Revell-Star-Wars/default.asp and MASTER SERIES sounds good
-
R2-D2 Astromech Droid Bandai 1/12 So, here's R2 himself, the second and final (for now) astromech from Bandai's double kit. Unlike U9, R2's been built strait from the box with minimal paintwork. The silver parts were painted with AK's new Xtreme metal which gave a nice polished finish and the blue panels were also painted although, in hindsight, that wasn't really necessary. The white parts were left unfinished apart from the weathering. The base is a photo frame with a piece of plasterboard stuck in the aperture and textured with Vallejo Sandy Paste and finished with whacking great stone which makes the whole thing weigh a ton. The full build is here Hope you enjoy the shots Thanks for looking Andy
-
 Now that you've all probably stopped laughing out there, yes, I'm going to try and build this one! Bought back when the film came out... Box art with a screen grab from the movie... A tease on the box side... What's inside (minus the instructions)... Pod & cockpit sprues plus the funky base.. Close up of Anakin...even for 1/32, he looks about 12 years old....I thought he was meant to be 6 or 7?! The engines sprues... Close up of the engine parts - some very soft detail in places.. The energy binder-thingys (purple sprue) and some metal wires so you can model it 'in flight'....which is racing mode I guess. Also in with the metal is a flat piece of clear plastic you need to curve for the windscreen...jeez, they broke their hearts in the AMT offices with that.. And that's it. I'm going to attempt to model this in flight but with only one engine supported underneath (like some other builds have done). This will be either be great......or as annoyingly bad as a certain Mr JJ Binks himself. Good luck with your builds! Dermot
 -
 I was asked last week to build a blaster prop for a friend. He's off to Secret Cinema's showing of Empire Strikes Back this weekend, and has been told he has to dress as a 'mercenary' - basically a Han Solo-type. He's got enough clothing to pull of the general look, but doesn't want to spend silly money on a prop on Etsy or eBay. "Pete, can you finish it in 10 days?" he asked me. Challenge accepted. A DL-44 Heavy Blaster Pistol. Not screen accurate, but more 'look and feel'. First job - I told him to order a toy Mauser from eBay. £4.99 and quick delivery It arrived last weekend, so I only got it Monday. Han Solo's gun came from a Mauser C96, and is quite distinctive. This thing makes a clicky noise when you pull the trigger. Cheap, plasticky rubbish. Let me give you a quick rundown of my schedule. 10 day turnaround was a pipedream. By the time this arrived, it was already 5 days after the initial conversation. He's going Sunday. I work from home on Fridays, which meant bringing in a finished prop on Thursday. Which means finishing it Wednesday. 3 day turnaround. First job on Monday night. Assemble the gun. On my way out of the office, I asked the IT department if they had a PC graveyard I could defile. I got a couple of heatsinks and a knackered GPU filled with capacitors and microchips. Win. I also found a toy sniper scope - my stepson broke the scope off his toy rifle, and it had been sitting around for 6 months. He said I could have it The batteries are flat, but I think there's a laser pointer (red light) in there. Next - shave the unnecessary bits off the pistol Glue the scope in place. JB Weld is strong, but takes a long time to set. Gaffa tape will help, and hide unwanted gaps. It's a prop, not a showpiece. 3 days, people - gimme some slack. I know, I know - gaffa tape. Add some capacitors and other greeblies to hide the tape, and give some visual interest, and we're nearly there. I even got some Warhammer on it. The problem was the muzzle - although not a replica/facsimile of Solo's weapon, I wanted it to look as part of the same custom-built family. There are at least 5 different versions used in the films - some of the early production photos don't even have a scope! What they all have in common, though, is the flared muzzle-end - a drilled I found the answer in the supermarket. A bottle of mouthwash had the perfect shape lid. Worth 65p, I think. I drilled the muzzle holes and found a couple of other bottle lids to glue it to, cut the main barrel and attached. This was Tuesday night. I ran out of JB Weld as well, so Araldite was found in the garage recesses. I gave it 24hrs to cure, and then set about painting. Mixed materials on the gun, so Alclad II lacquer primer and gloss black, and metals, and acrylic brown for the handle. A few touchups here and there where the silver oversprayed, and it's done. 1am tidy up, but 3 days from start to finish. Fun little build. Next one will be tidier, I reckon. I'll post a photo of this one in use after Sunday's event (if he send me one)
 -
 All, I am assisting with compiling a listing of all the decals applied to the 5-footer filming model of the MF (the one we first see in A New Hope, aka "Star Wars") and while much progress has been made (with graphics being drawn for eventual release for producing a sheet for modelers to use), some of the decals have the little team over on the RPF forum stumped. So, I am spreading the net wider in hope that others can help. The RPF thread, BTW, is at: http://www.therpf.com/f11/bata-hlmf-hrmf-decals-90-done-95-hasbro-parts-hrmf-build-233543/ The decal currently stymieing us is used in various spots, usually in a group. Since many of the decals come from various armor, car & truck kits (a LOT are from AMT tractor & trailer kits) I have been searching for THIS (click to see post on RPF) which appears to be a 'vent' design, or a rectangular light depiction. However, I've had no luck so far. I am hoping someone might recognize it from their own modeling and let me know the source. It will be drawn directly from the images, but knowing the source can also be useful to those building 'full size' replicas of the filming model since they could (hopefully) source just as was done by the original ILM crew. Thanks for the consideration! Regards, Robert
 -
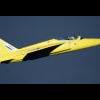
Hmm. I've been umm-ing and aah-ing about this one for a while now, so thought I'd stick it on here to see if anybody had any views on it. I've not gone with the kit instructions on this one (evidently) as far as the colour scheme goes, trying my old layered drybrushing / washes rigmarole to see if I could get close to the look of the cgi, but I have a sneaking feeling it looks a bit like a refugee from the Star Wars universe – not a bad thing in itself, but woefully un-canon! True, the camera flash has made it look lighter and whiter than it is in real life, but I think it still might be a tad pale. I'm toying with the idea of giving it another coat of silvery-tinted varnish. Good idea? Bad idea? I've left the front probulon thingy off as at some point the model's going to go in the post, and that'll go for a burton for certain. Other than that, oob, (Revell boxing) and had great fun building it, despite the obvious bloopers (Don't look too closely at the alignment of the sidepod interior decals, inter alia) Thanks for looking, dave.
-
Just picked up the first issue of this: http://shop.deagostini.co.uk/build-the-millennium-falcon.html Somehow it slipped under the radar for me. I haven't decided if it's worth the £900 it will cost to collect all the issues yet, but the inital issue parts seem quite good. Anyone else considering this one? Cheers, Stuart
-
Imperial AT-ST Walker Bandai 1/48 So, here it is. The finished Chicken Walker, stress cracks and all. Thanks to all who followed the wip and for those who didn't it can be found here http://www.britmodeller.com/forums/index.php?/topic/234978365-at-st-bandai-148/ This isn't meant to represent Tempest Scout 2, the AT-ST that Chewie commandeered (with the help of Widdle and Wunka) but the big furball gatecrashed the photo shoot Enjoy the shots Thanks for looking Andy
- 35 replies
-
- 18
-
-
Imperial AT-AT Walker Approx 1/68 I picked this up years ago with the intention of repainting it to be more movie accurate. It was from the, now defunct, Star Wars Miniatures tabletop game by Wizards of the Coast. It sat in the loft until a year or so ago when I decided to get it done. Essentially it's an AT-AT shaped lump of plastic and, although it's generally accurate in shape, a lot of the details are simplified like the actuator arms on the feet which are moulded solid. It was meant to be pre-finished which actually meant it was moulded in grey plastic and then slathered in a grungy black wash. I didn't bother to enhance the simplified detail as this was just going to be a simple repaint job, although, in the end, I had to rebuild the cheek and chin guns as the original parts were soft vinyl and were badly warped. The new parts were made from brass and styrene tube and a few extra panels and greeblies were stuck here and there to sharpen up the detail. The repaint was mostly done with Vallejo followed by various washes and some staining with pigments Enjoy the shots You can spot the Sd.Kfz.222 hull that ILM used in the construction of the originals in the above shot Thanks for looking Andy