Search the Community
Showing results for tags 'spitfire'.
-
I believe the thread hit its maximum size so was automatically locked. I have had a few PM's. If you don't like the thread don't subscribe. For those who enjoyed the melting pot...knock yourself out HERE IS THE LINK TO THE 1ST THREAD WITH LOTS OF QUESTIONS, ANSWERS and PHOTOS - START here TIP: search from Google, enter the search parameters followed by site:www.britmodeller.com
-
Second build. Another spitfire completed. A few mistakes on my behalf but I am learning and most important enjoying myself.
-
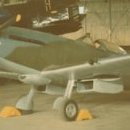
Last year on one of the model shows I was given revell set of spitfire Vb and Bf109 G10 in 1:72. I would not buy this set myself, as I've seen how many errors are in those two kits. First I wanted to sell them but I noticed that this two pack is more expensive than those two models when bought alone. Sigh. Model landed in back of the stash for some time. But after building first Spitfire Vb by revell this year and noticing that you can, indeed turn it into a decent model I started thinking about doing something with that other duopack. And then I found good images of Spitfire MkVb DB605 aka Messerspit. It was captured Spitfire Mark Vb (EN830/NX-X) that accidentally landed on the Channel island of Jersey on 18th November 1942. It was taken to Rechlin, Germany within a month of its capture. After some testing Germans decided to remove Merlin 45 and replace it with a Daimler-Benz DB 605A, a propeller and carburettor scoop from a Messerschmitt Bf 109G was fitted as well. Also its 12 volt electrical system was replaced with the Luftwaffe's 24 volt one. The original guns of the Spitfire Vb was removed as well According to multiple test pilots this hybrid plane turned out to be better than both Spitfire MkV and Bf109 G, joining strong sides of both planes while eliminating some of their problems. If I knew how much work it would be I would probably just get Brengun model... Especially as Revell propeller for Bf109 is completely crap (I guess molds are completely worn out by now) - each blade has different shape and length So I would have to buy new one (possibly Eduard printed one). But, instead I started work on revell plastic by removing engine from Spit and attaching new one from Messerschmit. It indeed fit well, having same width as spitfire hull but I found out I had to build entire upper part of cowling and fill the intake on the under side of it. Then I built cockpit with spare Eduard frame and plasticard floor, I also found 3d model of spitfire seat and printed it. Seat belts are from eduard set. I used front part of canopy from kit, but I decided to use another piece from Eduard for the back and movable part - as I plan to build my Eduard spits with open cockpit I have spare closed canopies from multiple models. So I cut one of them and tried to place it on this model. The fit is... not great. I had to thin parts of movable section as well as cut into the hull to fit it and even then I got small crack on the glass... But still it is better than Revell's foggy and scratched offering. With cockpit done I was finally able to join flusage halves, wings and attach engine. It obviously turned out not fitting that well but lot of fitting, gluing, puttying, sanding and polishing later, the result look like this:
-
While working on Vc from Malta, I pulled out "Spitfire Mk.V" by Revell - the well known 1996 boxing featuring some nice looking details and some massive blunders. I actually thought it is mk.Vc so I started it planning to build it with Xtradecal decals I used for the other Spitfire. But as you may be aware, it is in fact mk.Vb. Oh well. At this point I decided to build it as LF version as I do not have clipped Spitfire in my collection. Kit has decals for it - AEoE, EP120 (boxart plane). So I built model with clipped wings. And then I learned Revell idea of "Sky" as used on code letters and band is too dark. I looked through my spares box but haven't found any decals for LF version of mk.Vb. I do have some nice ones for full span wings. Sigh. Now I am not sure how I will paint it. Either I will stay with AEoE and ignore that letters are too dark. Or I will make undocumented plane from 303 Squadron that operated some LF Mk.Vb from late 1943 to June 1944 using RFoD codes from well known Zumbach's plane from the period when 303 first operated ordinary Mk.Vb (Oct'41-June'43). Cockpit is one of the weakest parts of this model that would require complete rebuilding. On the other hand, transparencies are so terrible, you will not see much of this. So, as I started this model with attitude "I have it so I will build it" I decided to paint what little there is and hide it under the glass. The other major problem is obviously lack of gull wing. I decided to check if I can do something about it. Using rotary tool and sandpaper and copious amounts of putty and surfacer plus actual forcibly bending the plastic parts I managed to get some promising results. During this process I learned changed shapes interfere with cockpit floor. This plus the fact that this "flat" part has no panel lines (despite model having very nice panel detail overall) got me thinking and I believe this may be actual reason why they flattened this piece - they could have discovered that there is a problem when building test shots and at this point the only way to make body buildable was to carve into mould to flatten it. At some point (I have this model for a long time so box was opened numerous times) I managed to lose kit spinner so I fitted Rotol prop from Airfix. Is it acceptable? If the shape is bad I may print new one as I got the files when building Malta Spitfire.
-
I am building model of EP120 as LF MkVb with AEoA codes in 1943. While it is described as LF, I am not sure it actually got new engine (would this mean new exhaust?) as the plane today has 3 stacks with tube shaped ends (somewhat similar to Mk I exhaust). Wouldn't ordinary Vb use fishtail? This may be due to engine replacement at some point. Photos of EP120 current state: https://airlegend.fr/en/aircraft/supermarine-spitfire-mk-lfvb-ep120/ As I would prefer to make it as it appeared during WW2, I'd like to ask which exhaust type it had. Maybe there are wartime photos? So far I found only photos showing middle area of this plane.
-
My first kit in over 50 years. Thoroughly enjoyed it. Made some mistakes but all part of the fun! For a starter kit I was impressed by the quality of the fit.
- 10 replies
-
- 33
-

-

-
 Border Model is to release a 1/35th Supermarine Spitfire Mk.Vb kit - ref. BF004 Test shot pics. Source: https://www.facebook.com/rayxdow/posts/pfbid04xS58D4fcgaMmbAqPTjW5RTiGynVzEEu85eospWW7N6pq4tiEV8baKzugsuh3pgMl V.P.
 -
 Like https://www.britmodeller.com/forums/index.php?/profile/29912-robstopper/ I too have recently acquired an airbrush (a Neoeco) and, like him, I wanted something to practice on and went for the same kit. Didn't want to invest in any extras for what should be a painting exercise so going with the scheme on the box.
 -
.... and we're off. My wife ( blessed be her name) bought me this for my (hrrmph) birthday. It's taken me nearly two months to get started. (I blame the distractions involved in moving from Brazil to Canada). But now here we go. I've completed page 1 of the 44 page instruction booklet in a day and a half - that means I should be finished sometime around christmas....😮 It'll be the RCAF Ian Keltie City of Winnipeg version. I've previously built the 1/24 Typhoon, which judging from other posts, seems to be a pre-requisite for doing this.!🤣
-

-
 I can't quite pin down when it started, but I think I may have developed a Spitfire acquisition problem. I think it happened when I bought a PR Mk.XI for the Recce and Scouting GB after joining the forum earlier this year, then followed it up with a build of an FR Mk.IXc in the same GB; I'd already restarted my modelling with a couple of Eduard Mk.XVIs before lockdown, followed by an Airfix Mk.I and an AZ Models Mk.IIa (LR) in 2020 when I paused the Eduard ones until after a house move (not wanting to knock off IFF aerials etc.). After finishing those, I acquired an Eduard Mk.IX and accidentally bought a Mk.22 in the local model shop, but didn't start either. It seemed like it was under control. Then I found and read @ModelingEdmontonian's Hawker Hurricanes Around The World thread, modelling more-or-less every non-RAF marking scheme of Hurricane. And I bought more Spitfires, and started thinking 'well, I've done one each in PRU blue, PRU pink, Temperate Land Scheme (with and without sky band), Day Fighter Scheme (with vestigial invasion stripes) and DFS (2TAF with C1 roundels on the upper wings) - what if I try and do something in each major RAF marking scheme?' So I bought an Eduard Mk.VIII, which still lies in the stash, thinking that I could add a SEAC colour scheme. Then I thought 'hmmm, I didn't make any Griffon-engined Spitfires when I was modelling in my youth, it'd be good to build a couple', and I started researching how to kit-bash a Mk.XII. Then I discovered Kingkit.co.uk. And then this happened. Ooops. The Admiral Spitfire Mk.24 probably has a prop that's too small (I've not measured it yet) so I'll make sure it's removable for if I ever find an aftermarket one. The Airfix Mk.22's prop will be replaced by a Freightdog one, and the original which will then find its way onto the Sword Mk.XIV (which will be converted to a Mk.XVIII - are you paying attention at the back?). One of the Seafire Mk.XVs (probably the Ventura, but maybe another Sword Mk.XV) will be turning into a Mk.XII, although I've just put a bid on fleabay for an Academy stumpy Mk.XIV and a Brigade Spitfire XII conversion kit which I might try on something. Griffon-wise, there are also Marks XIX, 45, 46 and 47 to consider at some point, although I'll probably draw the line at the Mk.IV/XX. Then there are the Merlin varieties to start thinking about... This will be a slow-burn, long-term project as I've been enjoying doing the GBs and have my eye on a couple which can't have a Spitfire or Seafire shoehorned into them, and will be used as a focus for my modelling rather than haring off to try different things. First thing is to finish the Mossie for the Airco & DeHavilland GB and the Mustang for the Southern Europe GB - then I'll probably start with the (hopefully) nice and simple Airfix Mk.22 to get the mojo going. Although, knowing me, it'll probably get started well before the other two are finished. Here's the current state of affairs, in poor lighting as the weather is currently dreadful. Here's looking forward to adding a few more before the year is out!
- 147 replies
-
- 28
-
-
-
 ok here we go..... This is the version i'm going to do - as now restored at Duxford. No 3rd Party Items just things i had knocking around at home ... like the odd bit of wire Later found out that the IFF? tranmitter should not be there? oh well its there now! First time using photo eched parts ...interesting Just taped in place.... the fit is just great on this kit! Another day another few bits of primer... Mr Surfacer 1500 naturally Same bits detail painted Cut the tail elevators to droop a little. All orifices filled - ready for a coat of Tamiya Surfacer. The undercarriage covering panels are just blue tacked in place ... i thought better than having two undercarrige stalks poking out in the way. Never used Tamiya Surface Primer before .... lets see! Seems Ok... Its bought out some details i had not even seen before Thats it for now.....
- 10 replies
-
- 14
-
-
 Good day fellow modellers! I would like to present you my the latest model in a few words and a few more pictures. Criticisms, comments and suggestions are more than welcome. Spitfire Mk.Vb, 1/48 Eduard, 11149 (Eagle's Call Dual Combo) Pilot: Lt. Dominic S. Gentile, Debden-Essex/England, August 1942. Level of details: EXCELLENT! More suitable for a 1/32 scale! After famous Tamiya's Spitfire series in 1/32, the second place is certainly occupied by Eduard's Mk.V Spitfires! Accuracy: I did not make precise measurements, but I would say that Eduard has done a superb job here as well. On the Internet, didn't find any objections in this regard. And when we are talking about accuracy of the details, just worlds of praise. FIT: Almost flawless. First of all, I would like to point out that I am extremely satisfied with the fit! Parts with extremely complex geometry fall into place without need for a puty! I used puty in very small quantities at only 2 places: the upper cowling of the engine (given in two parts) and the connection of the lower wing with the fuselage. But Eduard's plastic made sure that everything was not ideal, which caused a slightly obtuse dihedral of the lower wings. The problem was easily solved by applying masking tape in order to stretch up wings to the right angle when assembling the body and the wings. Decals: A new type that gives the possibility of double treatment: as standard decals and as transfer decals. In both cases they worked great! If you prefer to peel off decal film, do it after 24 hours at least and after that (the peeling) immediately protect the decals with varnish. Decals have responded wonderfully to gunze's decal setting solutions. The box: Attractive with a brief history of RAF and USAAF units in which American pilots flew Mk.V Spitfires. There is also a review (of a few sentences) about each plane that is the subject of this Eduard’s boxing. The illustration is in the newer (already old) Eduard manner for limited editions - it's just a illustration of the plane (great one) with a symbolic, graphic background. Painting and weathering: I used Gunze C colors (standard RAF shades C361, C362, C363, C368) and the camouflage was done freehand (no masks at all). Weathering was done in the following order (conditionally): chrome silver (partly), chipping fluid, first layer of camouflage, marbling technique in several colors (used stencils for that), final camouflage, sponge technique, chipping the paint, wooden crayons, protective varnish, decals, protective varnish, powder pigments, protective varnish, panel wash (Tamiya), protective varnish, oil painting wash and final varnish. FINAL IMPRESSION: Absolutely for every recommendation! As far as I'm concerned, it's only the first in a row, and I'm not even an die hard fun of Spitfires! The model made for review purposes for online magazine Maketar plus (https://www.maketarplus.com/) and obtained by courtesy of Eduard. ...the few references photos (internet sources, for discussion purposes only): And "few" photos of details...
- 26 replies
-
- 63
-
-
-
 Hello everyone, I’d like to share my completed Spitfire Mk.XII from Airfix in 1/48. This was an ok kit, there were some big gaps to fill and the detail was really lacking in the cockpit which I enhanced with a Eduard PE set. Those with a keen eye will see both ailerons are down which I have since found out was a chargeable offence for a parked aircraft back in the day. The weathering may not be to everyone’s taste but I’m happy with it. Thanks for looking, Tom
 -
Spitfire LF Mk.IXc MH 712 "Pat" from 302 (Polish) Squadron during its operations in France after Overlord (summer 1944). I painted this Spitfire last autumn and since then it was waiting for weathering and some final detail. Finally some two weeks ago I sat down and painted scratches, worn paint and exhaust residue as per photos and some dust and streaking. She was painted with paints suggested here - it is a mix of humbrol, revell and Vallejo acrylics. I consider it done, Photos are a bit washed out but the weather is not really photo friendly lately. WIP thread: here
-
In August 2020, Eduard is to release in August 2020 - just in time for the 80th Anniversary of the BoB - a new tool 1/48th Supermarine Spitfire Mk.I limited kit - ref. Source: https://www.eduard.com/out/media/InfoEduard/archive/2020/info-eduard-2020-01.pdf V.P.
- 720 replies
-
- 5
-
-
- Supermarine
- Spitfire
- (and 1 more)
-
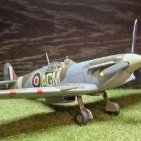
Greetings to all, as this is actually my first build in a long long time ( started at 6 y.o. stopped at 12 due to school ), I'd like to thank you for accepting me in the group and I'm happy to share with you my efforts in building an iconic spitfire , its nothing compared to what I see here but, it's a start! By now I'm 24 and finally have the time to enjoy perhaps one of the best hobbies in the world as I have already managed to create a respectable stash. I tried to improve the frames by drilling the holes , I avoided any kind of wires running through , although I do regret it now.. All comments / criticism / tips are more than welcome!
- 15 replies
-
- 10
-
-
 I offer these pair of RAF fighters for inspection. I bought them a couple years ago in an Aldi store for about £4 a piece including the acrylic paints and brush.. Starter Kits ! They were fun to make and my partner ,who is a teacher ,uses them for children as part of VE Day celebrations. The kids do drawings of them and use the planes to get their cammo schemes something like the original! the decals are quite thick and I painted then too thick.. but hey they amused me and they get to inspire some lively and creative minds!
- 11 replies
-
- 10
-
-
 Supermarine Spitfire PR.Mk.XI "USAAF" (KPM0291) 1:72 Kovozávody Prostějov The Spitfire was the champion of the Battle of Britain along with the Hurricane and a few other less well-known players, and it’s an aircraft with an amazing reputation that started from a bit of a damp squib in the shape of the Supermarine Type 224. The gull-winged oddity was the grandfather of the Spitfire, and despite losing out to the biplane Gloster Gladiator, designer R J Mitchell was spurred on to go back to the drawing board and create a more modern, technologically advanced and therefore risky design. This was the Type 300, and it was an all-metal construction with an incredibly thin elliptical wing that became legendary, although it didn’t leave much space for fuel, a situation that was further worsened by the Air Ministry’s insistence that four .303 machine guns were to be installed in each wing, rather than the three originally envisaged. It was a very well-sorted aircraft from the outset, so quickly entered service with the RAF in 1938 in small numbers. With the clouds of war accumulating, the Ministry issued more orders and it became a battle to create enough to fulfil demand in time for the outbreak and early days of war from September 1939 onwards. By then, the restrictive straight sided canopy had been replaced by a “blown” hood to give the pilot more visibility, although a few with the old canopy still lingered. The title Mk.Ia was given retrospectively to differentiate between the cannon-winged Mk.Ib that was instigated after the .303s were found somewhat lacking compared to the 20mm cannon armament of their main opposition at the time, the Bf.109. As is usual in wartime, the designers could never rest on their laurels with an airframe like the Spitfire, as it had significant potential for development, a process that lasted throughout the whole of WWII, and included many changes to the Merlin engine, then the installation of the more powerful Griffon engine, as well as the removal of the spine of the fuselage and creation of a bubble canopy to improve the pilot’s situational awareness. Its immediate successor was the Mk.II with a new Mk.XII Merlin, followed by the Mk.V that had yet another more powerful Merlin fitted. With the development of new Merlin 60 powered Spitfires, both the Mk VII and VIII were to have photo-reconnaissance (PR) variants. T he Mk XI was based on a combination of features from the marks VII, VIII and IX. It was the first PR variant to have the option of using two vertically mounted F52 cameras in the fuselage behind the cockpit. Other configurations could also be fitted, depending on the mission. The Mk XIs had a deeper nose fairing to accommodate a larger 14.5 gal oil tank and used the unarmoured, wrap-around PRU windscreen. Booster pumps for the wing tanks were fitted these being covered by teardrop shaped fairings under the wings. Retractable tailwheels were fitted as standard and the majority of the Mk XIs built had the later large-area pointed rudder. 260 Mk XIs were powered by Merlin 61, 63 or 63A engines, while the remaining 211 used the high-altitude Merlin 70. All of the Merlin 70 and 198 of the Merlin 60 series aircraft were fitted with the Vokes Aero-Vee dust filter in the extended, streamlined carburettor air intake under the nose. All Merlin 60 powered aircraft featured the fuel cooler in the port leading edge wing root. Additional slipper drop tanks could be fitted under the centre-section; in common with the Mk IX these could be 30, 45 or 90 gal capacity and, for the Mk XI, a tank of 170 gal capacity was also available. The aircraft were capable of a top speed of 417 mph (671 km/h) at 24,000 ft and could cruise at 395 mph at 32,000 ft. Normally Spitfire XIs cruised between these altitudes although, in an emergency, the aircraft could climb to 44,000 ft. However, pilots could not withstand such altitudes for long in a non-pressurised cockpit.[info from Wikipedia] The Kit This is a new tool 2022 boxing in KP's line of Spitfire kits. As is usual, they have produced a number of boxings that vary in decals and parts , giving the modeller plenty of choice which one(s) to get. The kit arrives in a small end-opening box, and inside are two sprues in grey styrene, a clear sprue, decal sheet and A5 instruction booklet, with the decal options printed in colour on the back of the box. Detail is excellent for the scale. Construction begins with the cockpit, the front bulkhead gets its instrument panel, with the instruments being provided as decals. The seat back and head armour attaches to the rear bulkhead and this is fitted to the floor members. The control column is added followed by the seat. Belts are supplied as decals. At the front of each fuselage half blanking plates go in for the exhausts and then the cockpit can go in the and halves can be closed up. Moving onto the wings the left and right uppers can be added to the single part lower wing making sure the small parts for the wheels wells go in first. The radiators go on. The wing can now be fitted to the fuselage and at the rear the tail surfaces and rudder are fitted, along with the tail wheel. The main gear can be built up and added along with the chin intake and prop. On top the canopy and aerial mast is added. At the front the prop is fitted. Markings There are three decal options in the box to represent The USAAF 14th Photographic Squadron of the 8th Air Force, which operated Spitfire Mark XIs from November 1943 to April 1945 Decals are printed in-house and have good registration, colour density and sharpness, with a very thin carrier film cut close to the printing. Conclusion Another great release from KP with excellent detail, and plenty of choices. Recommended. Review sample courtesy of
 -
 Hi all, Trying something new with this tried and tested Hobby Boss kit of the tropicalised Spitfire Vb. This model is intended to complement the 1/32 Spitfire Vc I'm also planning to build over the winter! The box! Nice artwork of Wg Cdr Ian Gleed's clipped and cropped Vb with the Aboukir filter. My intention is to build it with an interchangeable nose section so I can swap out the exposed full engine nose for the streamlined covered version using magnets. Quite ambitious, but technically possible! I'll be building it as AB502, Ian Gleed's Vb of 244 Wing. All the best, Alan
- 84 replies
-
- 8
-
-
- 1/32
- Hobby Boss
- (and 1 more)