Search the Community
Showing results for tags 'skyhawk'.
-
A-4E Skyhawk 1:48 Hobby Boss The Douglas A-4 Skyhawk was a carrier capable ground attack aircraft developed for the US Navy and US Marine Corps. It is a delta winged single engine aircraft. It was developed by the Douglas Aircraft Company originally under the A4D designation, latter changed to A-4. The A-4 was designed by Ed Heinemann to a 1952 US Navy specification for a carrier based attack aircraft capable of carrying heavy loads. For this an aircraft was to have a maximum weight of 30,000Lbs, and be capable of speeds up to 495mph. Initially the Douglas design with a specified weight of only 20000 Lbs was greeted with scepticism. Ed Heinemann had in fact designed a very small aircraft. This was to be roughly half the weight of its contemporaries. In fact the wings were so short they did not need to fold for stowage below decks. Having a non-folding wing eliminated the heavy wing folds seen in other aircraft, one reason for a low overall weight. The prototype also exceed the maximum speed the US Navy had specified. In fact not long after the aircraft would set a new world record of 695mph for circuit flying, bettering the specification by 200mph. The A-4A was the initial production aircraft with 166 being built. The A-4B was ordered with additional improvements over the initial design. These were to be; Stronger rudder construction, a pressure fuelling system incorporating a probe for in-flight refuelling, external fuel tanks, stronger landing gear, additional navigation equipment, an improved ordnance delivery system, and an external buddy refuelling package. A total of 542 A-4Bs were to be made with fleet deliveries beginning in 1957 only a year after the first A-4B flight was made. The A-4C would then follow giving an all weather capability with the AN/APG-53 radar, a new auto pilot and bombing system and a more powerful J65-W-20 engine. The E model was a major upgrade to previous aircraft included a new Pratt & Whitney J-52-P-6A engine with 8400 lbs of thrust. The air-frame was strengthened and two more weapons pylons were added. Improved avionics were installed including a TACAN, doppler system, radar altimeter, and a bombing computer. Later an even more powerful J52-P-8 with 93000 lbs thrust was added. The E would then see the addition of a dorsal hump on the fuselage spine to house extra electronics as appeared on the later A-4F. The Kit This a new tool from Hobby Boss of this famous Douglas aircraft. The kit itself is on three sprues is fairly simple much like the real thing. Construction starts in the cockpit you will be surprised to know! The two part Escapac seat is put together and placed into the cockpit tub after the aft wall is installed. The seat is fairly basic and there are no belts included in the model. The control column is then installed along with the instrument panel (details by decal), this is followed by the area just behind the seat. The completed cockpit is then installed onto the top of the front wheel well along with the rudder pedals. Next up the wings are completed. This is standard single part lower wing with left & right uppers. Once complete it is placed to one side. Construction then moves to the main fuselage. The completed cockpit assembly and the intake duct are installed in the main fuselage as it is closed up. The avionics hump or the top fuselage fairing are installed depending on which decal option is being modelled. Two side intakes are added along with the main wing assembly. Two small parts then need to be removed from the tail. Lastly the engine exhaust is added along with a rear underside panel. Next up the left and right engine intakes are assembled and added to the main fuselage. The instrument coaming and HUD are added to the cockpit and the 20mm cannons & fairings are added to each side. Two small fairings are added to the rear fuselage. The all moving tails are made u (conventional upper & lower construction) and added, along with the air brakes. The canopy is added along with two strakes just above the cannon barrels. The underwing/fuselage pylons are then made up and added along with the gear doors. The front undercarriage leg is added which has the nose wheel moulded on to it. The rear legs and retraction struts are added along with the wheels. To round things off the arrestor hook and til bumper are added. Weapons Hobby Boss aren't known for being stingy with these, and as you'd expect there are plenty to choose from, infact 5 sprues in this kit are devoted to underwing stores. As always, check your references for likely load-outs if you are going for accuracy, or slap them all on if not. It's your choice! Included are; 12 x Mk.82 Bombs 12 x Mk.20 CBUs 2 x AiM-9B Sidewinders 2 x Wing tanks 1 x Centreline tank Sway braces are provided where needed, as are launch rails and multiple ejector racks. There are other weapons on the sprues not used here so good for the spares box. The back page of the instruction booklet shows the pylon positions of the various options, but as above, check things over before you proceed. Stencil locations are shown on a separate colour page, with positions and colours all called out. Markings Hobby Boss often supply only one option with their kits, but this one has two, one is documented incorrectly, the other is not. It is really about time HB started giving some information about its decal schemes in the kits rather than modellers going on-line to work it out themselves. The decals are printed in house, and are of good quality. 150056 VC-1 US Navy - No data is provided but the box art is very similar to an image from 1972 from NAS Barbers Point, Oahu,HI 151074 VA-155 USS Constellation 1966 wearing experimental 3 tone camo. Note this aircraft did not have the dorsal hump despite the painting instructions showing it. Now preserved at Naval Air Facility Atsugi Conclusion This is a nice new tool of the A-4E from Hobby Boss. Recommended. Review sample courtesy of
-
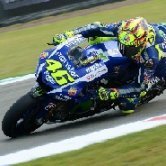
 Hi all, My latest finish, the lovely wee Skyhawk in 1/72 from Airfix using decals (more about that later) from their much older Skyhawk kit in the Falklands War multi-kit gift boxing. This is 100% OOB (so some aerials will be missing) and the only extra was masking tape belts in the cockpit. If you're interested, the full WIP is here. Using the old Airfix decals seemed like a great idea but the carrier film was thick enough to land a plane on hence the really bad bumps/silvering on the final finish. Oh well, you live and learn. I handpainted the tail colours as the decals wouldn't stick with a gallon of setting solution and a brick on top. I kept the final finish grubby, to try to lessen the decals but also because I imagined these had a rough life in the South Atlantic in 1982... Kit: Airfix A03029 - a little gem and loved building it. Scale: 1/72 Build: Out of box Paint: White from a Halfords rattle can, all others Revell Acrylics with a brush. Klear, Flory Models Wash, W&N Flat Coat. Decals: A-4Q Skyhawk S/n 3-A-304 from No. 3 Attack Squadron, Argentine Navy. Operated from Bahia Blanca, 1982 and survived the conflict. Extras: Masking tape seat belts. Thanks for looking and comments/criticisms accepted! Dermo And with an Italeri Sea Harrier from the same time...
 -
 Thanks Luis. Condor Decals Is to release a 1/32nd Douglas A-4Q Skyhawk conversion and decals set for Argentina Navy birds - ref. 32059 Source: http://www.condordecals.com.ar/condordecals/home.php V.P.
 -
A few pics from a quick visit at Wittmund air base on last week. The Discovery Air A-4N Skyhawk are acting as target towing a/c for the seven Austrian Luftstreitkräfte Eurofighters currently deployed on Air Practice Camp in Lower Saxony. . V.P. With all my thanks to Taktisches Luftwaffengeschwader 71 Richthofen - Stab S1 InFü/Pr/ÖA
-
Hi all, This was one of the last models I managed to finish in 2016, though it has been in very slow progress for about 5 years. It's the Hasegawa 1/48 TA-4J built to represent a TA-4J of the IDF/AF's Flying Tigers squadron. The build was basically OOB, only the extended exhaust from Quickboost and additional antennas from scratch. Markings came from Isradecal and Hobbycraft for the Shield of David. It's been an enjoyable build and I hope you enjoy the pics as much as I've enjoyed the journey. DSCN5475 by Aidy Abdullah, on Flickr DSCN5479 by Aidy Abdullah, on Flickr DSCN5478 by Aidy Abdullah, on Flickr DSCN5476 by Aidy Abdullah, on Flickr DSCN5480 by Aidy Abdullah, on Flickr
-
Hi all, Inspired by Paul's Portsmouth thread I thought I'd post a couple from the Aussie visit: A-4F Skyhawk Wessex Mk31 S-2F Tracker Sorry about the scratches!!!! Martin
-
Hello, Here is my USMC A-4M Skyhawk II number 160024 in VMA-311 Tomcats markings around the mid 1980s. BRIEF HISTORY The A-4M Skyhawk II was the dedicated Marine version with improved avionics and more powerful J52-P-408a engine with 11,200 lbf (50 kN) thrust, enlarged cockpit, IFF system. Later the A-4M were fitted in the nose with the Angle Rate Bombing System (ARBS) with TV and laser spot tracker. The A-4M was the ultimate Skyhawk type in use with USMC. The final A-4M Skyhawk was delivered to USMC in 1979, and were used until the mid-1980s before they were replaced by the AV-8B Harrier II. The last Skyhawk retired from USMC was the OA-4M two-seater variant in 1994. KIT The model is based on the Trumpeter A-4 Skyhawk series in 1/32nd scale. Those kits are good, not at level of Tamiya/Hasegawa kits, but can be easily improved to obtain a nice Skyhawk replica in large scale. Size, shapes and construction remind me the Hasegawa’s A-4 Skyhawk in 1/48th scale… with the same pros and cons. The plastic is a little bit soft and this can be a problem with strong glue, filler and sanding. CONSTRUCTION Basically all the specific parts of the A-4M variant are in the box, but I had to improve and details a lot those parts in shape and fines. All the following parts are made from scratch: · FOD for jet intakes and engine exhaust; · Details of the rear cockpit bulkhead. The followings are kit parts modified and detailed: · All undercarriage bays, legs and wheels; · ECM/RWR antennas and bulges; · Arrestor hook; · Windscreen wiper; · Cockpit tube and canopy details and rails. Some resin and PE aftermarket sets were used too: · Aires resin set for some antennas; · Eduard PE for vortex generator rows over the wings. · Eduard PE for slates vane; · Mk.82 bombs; · Cannon barrels; Many access panels, panel lines and rivets were re-scribed. COLORS & MARKINGS Paint were from the acrylics lines of Gunze and Tamiya. For the main TPS pattern colors from top to bottom: · Gunze H306 Gray FS36320; · Gunze H308 Light Gray FS36375; · Gunze H338 Light Gray FS 36495. A black primer was sprayed first all over the model. Then, thin layers of paint were airbrushed to obtain some variation of shades. Some drops of black and white were added to the basic TPS colors to create a random patchwork of new/old paint and weathering effects. The bombs are finished with colors and stencils to represent training drills. No one made a decal sheet for Low-Viz A-4M in 1/32nd scale nor inside the kit itself. So, I collect most of the stencils, serial number and codes from many different sources. The big Tomcat on the vertical fin sides is the black one from CAM decal sheet for Hi-Viz A-4M, over sprayed with highly thinned gray paint. RBF tags were added to finish the model. And now some pictures of the completed model. CIAO! Piero
- 16 replies
-
- 33
-

-
1/72 OA-4M SkyHawk by Fujimi
Air Hockey Propellers posted a topic in Ready for Inspection - Aircraft
Hello everyone, this is another model I did since my last WIP. I used pretty much the same paints as in the Kfir but I didn't follow the paint scheme exactly. I simplified it for the sake of enjoyability. Once again, I used Mr Color lacquer paint which are the best for brush painting in all aspects. It's like rediscovering the hobby, really. I did use, though, enamels for the cockpit, the landing gears and the small stuff in general because it has its advantages. This is actually the second time I make a SkyHawk, the first time being when I was a kid. Interestingly, it was the jet I played with the most. I practiced a lot of take offs and landings with it. I decided just before applying the decals to have the air-brakes closed which meant snapping them of and giving it a go with the putty, which I'm not very good at. For what I've seen so far, Fujimi offers a lot of details and parts but the precision is lacking in comparison to Hasegawa. I hope you like! -
Hi all, This is my recently finished 1/48 Hasegawa kit with FCM decal. I built it OOB with some scratchbuild parts unique to Indonesian Skyhawk. This particular bird is one of two ex-Israeli AF's TA-4H purchased by Indonesia in 1980. She was also the last flyable Skyhawk in Indonesian service, retired in August 2004. Thanks for looking
- 42 replies
-
- 60
-
-
 Hi, I had an online £5 voucher (with no minimum spend) for Argos a few weeks ago, looking through their kits found a few offers on their starter sets. The A-4 was down to £6.88 with free delivery, so one brand new A-4 kit was delivered to my door for £1.88!! (Is there a prize for the most inexpensive build? ) I had intended to build it OOB representing BuNo 142833 (kit markings) as exhibited in the Intrepid Sea, Air & Space Museum, but looking at a few photos I will need to do a little bit of work to match it. I'll have to drop the flaps for starters and there is a brace/collar on the front undercarriage to I'll have to make as well. More things will probably come to light as I find more photos if it online. I've been working mostly in 1/144 & 1/200 since getting back into the hobby so going back up to 1/72 for this feels like I'm in "The land of the giants"! Couple of pics to start off, the kit (which I haven't even unbagged yet) and what it should hopefully turn out like.
 -
 Good evening! Impulse purchase from a local store - found the A-4B Skyhawk starter set by Airfix in 1/72 for a fiver and couldn't resist. I know there are quite a few on here but thought I'd share my attempt. Added a resin ejector seat, scratch built the area behind the seat and replaced the basic cannons with resin examples. I had to shave a considerable amount off the bottom of the ejector seat to get the item to fit correctly in the pit and had to make my own pull handle after the item arrived slightly damaged. Building was a breeze except for concealing the join on the top of the fuselage which took lots of filler, sanding and re-scribing panel lines and even now still i can see a little bit of the join. I've not matched the grey very well this time with my Tamiya blends and also wished I had put down a layer of white under the red as it's too dark. I am going to go back and touch some area's up after looking at the pictures and matt coat the ejector seat and bomb. I normally finish my models in matt varnish but left this one glossy as most of the pictures I could find show the plane to have a shiny finish. Anyway - here's the pics and thanks for looking!
- 14 replies
-
- 26
-
-
(EDITED) Hello folks After being pointed out in the right direction regarding the shape of the bombs (we all make mistakes ) here are the 3D renders with the corrected shape for our EXPAL BR-250 (free fall) bombs and BRP-250 (parachute retarded) bombs, which will be available in early July. Set 1: BR-250 (2pcs each) set 2: BRP-250 (2pcs each) Price: TBA Distributors worldwide encouraged to contact us at [email protected] All the best Thanks for looking Amaru
-
A4D Skyhawk & F-4 Phantom II 1:72 Lindberg This is a double boxing recently re-released by Lindberg. Lindberg kits have been around for a while and it would seem that the F-4 kit dates back to 1965 not too long after the first Phantoms went to the US Navy. The A4D seems to have its origins in the IMC kit from the 1970s which was first reboxed by Lindberg back in 1990. Both kits featured the addition of extra parts to re-create a "battle damaged" look to them, and no doubt to appeal to the younger generation of modellers. A4D The overall shape for the Skyhawk seems to be good, details as expected from a kit this age are sparse. The pilot is moulded to his seat, and the bombs to their oversize pylons. The battle damaged parts consist of a second left fuselage and second horizontal tail part. F-4G The kit was boxed as an F-4G and may reference the US Navy F-4G aircraft from 1963 which were modified F-4B aircraft. Indeed the kit has the thin wing of the F-4B. For this kit that's where the similarity ends, the nose, and under nose fairing look like no F-4. There are no seats for the pilots in the cockpit and no underwing stores apart from external tanks. Damaged parts are a new left intake and a left upper wing. Decals Two options are provided for both kits. The ones for the Skyhawk seem to represent real squadrons, where as those for the Phantom are entirely fictional. The A-4 has the standard US Navy Scheme of the day, where the F-4 features both a SEA scheme and a grey scheme. The decals for the A-4 look well printed, where as he F-4 not so good. Conclusion These kits are a product of their age. Recommended only if you fancy some nostalgia modelling, or fancy trying the "battle damaged" look. Review sample courtesy of UK distributors for
-
 Built mainly OOB except for scratch built LAU-7 launcher mounts and Tamiya AIM-9Bs. Decals from Hawkeye Models Australia. Also repositioned landing gear and dropped flaps.
 -
 The British Aerospace Sea Harrier is a naval short take-off and vertical landing/vertical take-off and landing jet fighter, reconnaissance and attack aircraft; the second member of the Harrier Jump Jet family developed. It first entered service with the Royal Navy in April 1980 as the Sea Harrier FRS1 and became informally known as the "Shar". Unusual in an era in which most naval and land-based air superiority fighters were large and supersonic, the principal role of the subsonic Sea Harrier was to provide air defence of Royal Navy aircraft carriers. The Sea Harrier served in the Falklands War, both of the Gulf Wars, and the Balkans conflicts; on all occasions it mainly operated from aircraft carriers positioned within the conflict zone. Its usage in the Falklands War was its most high profile and important success, where it was the only fixed-wing fighter available to protect the British Task Force. The Sea Harriers shot down 20 enemy aircraft during the conflict with one lost to enemy ground fire. They were also used to launch ground attacks in the same manner as the Harriers operated by the Royal Air Force. I have the Dogfight Double version of the kit - looks a nice kit, similar to the latest GR3/GR7/9 releases by Airfix, looks to be a newer tool? Will be built out of the box, although I do have some extra decals (Modeldecals sets 65 and 66) to build any SHAR from the Falklands....it may be prudent to to the aircraft pictured if I am going to build the skyhawk too at some stage. Funny thing, Pilot seems to be WW2 vintage! I shall use the skyhawk pilot in this case. Looking forward to building both Britain's last fight and last Bomber, the Buccaneer....also in Fleet Air Arm markings!
- 64 replies
-
- 5
-
-
- SHAR
- Sea Harrier
- (and 3 more)
-
Today I finished this Hasegawa 1/48 TA-4F Skyhawk. I used Xtracolor paint, Afterburner Decals and TwoMikes resin seats. I sprayed it freehand as usual. Now I have finished adversary TA-4s No. 13, 14, 15 and 16. ' Jens
- 34 replies
-
- 42
-
-
Hi All, I present to you my first completed model since taking up the hobby 3 or 4 months ago. It is a 1/48 Hasegawa A-4E Skyhawk. Mr hobby paints were used as well as some ammo and mig weather products. I stole a pilot from a phantom kit and used the eduard seat belts to strap him in. I set him up so he is giving a wave. Annoyingly a piece of clear sprue fell over during the painting process and was lost forever as well as a nice yellow decal with the name of the pilot on it Apart from that I am pretty happy with it. All comments good and bad are welcome.
- 12 replies
-
- 29
-
-
Good morning, it's time now to present some better photos of my Scooter, which was part of the Vietnam GB finished end of last year. Not much to add from the WIP, it's a nice kit with some minor problem areas (like the fuselage joints). Decal sheet was missing the AJ on the fin,which I airbrushed using a mask I cut out of a tape. Weapons are from the hasegawa weapon set, the tank is from the kit. It was the first time I used a photocube, some people think the photos were initially too brownish, so I adjusted them online. Next photos will be better, I hope! Thanks for attention, and for running the GB! Alex
- 14 replies
-
- 23
-
-
Along with the A-4M posted last night I have also finished this Kiwi A-4K Skyhawk. It's the Hasegawa 1/48 A-4E/F converted to an A-4K. The changes are all minor, and they are well described on the Gekko Graphics decal instructions. I used Xtracolor enamels for the SEA scheme and Gekko decals to finish it off. I armed it according to the Gekko instructions using a couple of LAU-10 fra the Hasegawa weapons set. Jens
- 16 replies
-
- 30
-
-
A bit late, but with a small kit, even I should manage to finish on time. I chose the Fujimi A-4, it's a small kit, and I always liked the scooter. Small, but powerful ( a bit like me! ). I will use decals from Super Scale International, which has a nice A-4E from the VA-152, based on the Shangri-La. The starting picture: the first colour, some grey for the cockpit. Anyone knows what colour the bangseat was? I've seen both grey and black... And a close up. After some airbrushed grey, I brushed the black and some white and yellow buttons. it will do, as the cockpit opening is tiny... btw: that's a picture of the original: http://geta-o.jp/USMIL/A/A-4/A-4E/A-4E-1/A-4e%28aj500%29150001-sd5.jpg Alex
-
Hello! The model is easy and pleasant in the assembly. In the assembly used a of photo-etching set, wheels, ejection seat and bombs from other kit Paint- Tamiya and hobby Color. Weathering- oil dots and pigments, salt dots. Scratches and chipped paint - salt dots.
-
Instead of making a seperate thread for each of my (many) projects I will post them here. All kits are Hasegawa 1/48th scale. First off is my F-104G from Taiwan:
-
North American/Fiat QF-91C In 1961 the US DoD authorised the loan of two Luftwaffe Fiat G.91s for trials by the US Army. These were flown alongside Douglas A4D-2 Skyhawks and a Northrop N-156 (F-5 prototype). One was an Italian built G.91R-1, c/n 0052 that served with the Luftwaffe (BD+102) whilst the other was a German built G.91R-3 (c/n 0065) Luftwaffe EC+105. Although all three types were highly regarded none were deemed suitable for the role of Close Air Support or Forward Air Controller. Rumours abound that this decision was based on political grounds as the US Army could not be seen to fly foreign, (G91), Navy (A4D) or High performance USAF types (F-5) .... In 1965, however, with the US deeply embroiled in the Vietnam war the lack of a dedicated CAS aircraft to replace the venerable A-1 became far too visible. With the USAF reluctant to give up it's F-100s, even though they themselves needed replacement, the US Army dusted off it's reports and looked again at the G91, albeit now in the new Y variant, much favoured with it's twin engines and greater performance. New trials once again proved the validity of the dedign and with minor changes the type was authorised for production under license by North American Aviation. By 1970 the type had virtually replaced to A-1 and had also been adopted by the Airforce as a F-100 replacement. It went on to have an excellent service record both in combat and peacetime up until it's withdrawal in the late 1980s. It was not the end though and many airframes had a 2nd life awaiting for them. Post Vietnam cutbacks meant the conversion of F-102,106 and F-4s to the unmanned drone role was under threat. North American jumped in and utilised the experience acquired from the successful QF-86 and QF-100 programs to offer a lower cost solution. Slowly the ranks of F-91Cs sunning in the desert shrank as the majority of airframe not allocated to museums or the spares pile, were returned to flying condition with the ubiquitous bright red markings associated with their new lease of life. Some were mostly grey, others mostly green, a few had 2 or 3 colour camouflage, and a rare couple had special schemes. One thing was agreed upon by all - even the anonymous birds looked spectacular in their new feathers.
-
After the One-O-Four (http://www.britmodeller.com/forums/index.php?/topic/234965275-148-lockheed-f-104g-starfighter-by-eduard-hasegawa-rebox-released/), Eduard is to rebox in the same way (with their usual add-ons) the 1/48th Hasegawa's Douglas A-4 Skyhawk kit. Source: http://www.eduard.com/store/out/media/InfoEduard/archive/2015/info-eduard-2015-01EN.pdf V.P.
-
Due to the smaller size of the Royal navy,s carriers the Skyhawk was found to be Ideal in the light strike/ground support roll as a partner to the Phantom due to be purchased for the FAA and like that project some avionics and the engines were to be British in origin which led to inevitable delays and problems without much improvement to the aircraft,s performance.The Skyhawk or Kittywake as it was Known in RN service Had a short service life especially after the cancellation of the new proposed carriers in the mid sixties,all were sold on to smaller operators including Argentina,here,s a 700A NAS machine based at Yeovilton in 1963.