Search the Community
Showing results for tags 'sharkmouth'.
Found 19 results
-
My first Group Build in an age and my first kit for a couple of years! I had a change in personal circumstances with an amicable separation, now in the final stages of divorce. This hampered my ability to build anything at all, but my domestic arrangements have now settled enough to let me get back on the plastic horse! I thinned out a lot of my stash, but kept some that I really wanted to get built, including the 1/48 Eduard Adlertag boxing of the Bf110. I’m not settled on which version I’m going to build yet, but there’s a sharks mouth that’s drawing my eye at the moment! Steve
-
Hello everybody. I am taking time off from my ever-increasing collection of 1/32 Hawker single seat piston fighters to do the Great Wall Hobby P-40. It is staggeringly comprehensive, so far I have concluded that after-market is pretty much entirely redundant. It comes with a great deal of interior detail within the body of the fuselage, I am considering indulging in a bit of surgery to skeletonize parts of the body, this may come to naught if I chicken out! The plastic is a change from what I have working with most recently (Special Hobby and Fly) - it is distinctly harder and more brittle, something that can be seen on the sprues where a few of the injection moulded engine pipes have snapped. Probably a job for wire anyway when I get that far into it. The 'Curtiss Green' is an eye-balled mix based on taking some Tamiya IJN cockpit green, then adding blue and yellow in proportions suggested by GWH for Gunze paints. On with the pics: Those dials are individual decals. I punched them out. Very tedious. You might see traces of green, that's because the instructions were silent on the colour of the IP whilst saying everything else in the general area was green. So I painted it green, applied decals, discovered lots of references showing it to be black, and repainted with the decals in situ. Laugh? I nearly started. A couple of views of the built up cockpit tub: The moulding and fit is first rate - easily up there with Tamiya. The seat - OK I lied about aftermarket. I acquired a 3D-printed Sutton Harness, because I am going to be modelling this as a slightly inaccurate P-40 from the Desert Air Force, so I needed to replace the supplied American harness with a UK version. And that's where things rest ATM. I'm going to take a leisurely approach to this build - the kit is too good to get carried away and start slapping stuff together! Mike
- 10 replies
-
- 9
-

-
- 1/32
- Sharkmouth
- (and 1 more)
-
Hello, Here's my 1/72 Revell 1/72 P-51B. This one was started as a simple build when I was away from home for a week early this year. It then moved to the shelf of doom for a while, but got resurrected a few weeks ago. The kit is not the most accurate one and the clear parts are pretty bad, I even used a mask set on them which I normally never use. But overal a fun build, with nice surface detail. I used the kit decals, minus the famous yellow tail markings, which didn't seem to be present on this particular plane. Other Mustangs (26th FS) in the unit did have them. Painted with Mr. Hobby acrylics and some Revell Aqua on the spinner. Thanks for looking. Pete
-
I have been planning to build an Spangdahlem F-4G for some time and got a set of decals for this. The pack included a set of Sharmouth decals for the other half of the mid 80s hunter killers pair, the F-16C block 30. Now I have built a few F-16s in the last year or so and had saved one kit with a view to using these decals. Equipped with Shrikes and Aim 9s but before the full on block 50 Weasel F-16s, this is how she turned out Now the kit. It’s an old ESCI A model. I took off the rear stabilisers and replaced them with the standard larger ones and tilted them up. I opened the airbrakes, scratch improved the cockpit and wheel wells. Plus various other little bits. Decals are a mix of ESCI kit stencils and Xtradecal Spang set. The ECM pod is the best I could find. I seem to have mislaid my ALQ 131 pod - it will turn up at some point. Hope you like it - thanks for looking
- 22 replies
-
- 27
-
-
 Hi all, In a fit of madness I decided to build four 1/48 Phantoms at the same time. Here's the first: Hasegawa's 1/48 F-4E from a 2001 boxing in the kit decals. Paint is Mr Color and applied freehand. The seats and pylons are True Details resin. The engine exhausts are from an Academy F-4. A full description is written up here: https://jonbryon.com/hasegawa-1-48-mcdonnell-douglas-f-4e-phantom-ii/ Comments welcome and thanks for looking. Jon
- 34 replies
-
- 69
-
-

-
- Vietnam
- sharkmouth
- (and 1 more)
-
Hi all, Here's my just finished 1/48 Special Hobby Fairey Firefly Mk.IV, done as a Dutch Naval Air Service one, based at Biak in New Guinea in around 1960. Not my best ever build, but at least I managed to finish a Special Hobby kit this time. Previous ones always ended up on the shelf of doom for some reason. It was painted with Humbrol and ModelMaster, decals from the kit and a gun sight from Quickboost. Thanks for looking, I hope you like it. Pete
-
Just wanted to share an Italeri Mustang I completed a month or so ago. Had a lot of fun building this kit, and am pretty certain its a Hasegawa rebox by Italeri. Although it builds up well, I much prefer Tamiyas offering of the P-51. I bought this kit at Flying Legends 2016 as I'm a fan of the sharkmouth P-51 that currently resides there, hope you like it. A pic of her in the cabinet with some of my collection The real thing at Flying Legends this year
- 3 replies
-
- 15
-
-
- Italeri
- Sharkmouth
- (and 1 more)
-
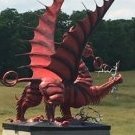
Hey guys, after few centuries the miracle happened and i have finaly managed to finish a model.. Well, sort of.. The kit is the "new tooling" Eduard 1/48 Bf 109G-6. It was in shelf of doom´n´shame for some time already and as i have moved the box here and there, i have lost some of the little parts (antene column, aileron counterwights and more) and managed to damage the back part of the canopy. So i have decided to finish the kit in what-if scheme - in the end it is an Australian shark I wont bother you with some background storry, so making long storry short - plane was captured in Tunnisia and then delivered to Australia as a birthday gift to one of the top officiers. The plane had part of the canopy cover broken, so it was covered by aluminium sheet. Part of the gift was special marking, based on markings used on the unit´s spitfires at the time. To make it even more special, sgt. A.J.Cangaroo painted blue shark head on nose of the plane. So well,here it is, i have tried to make some dusty weathered surface. I m sorry for the photos, i have problems with backlight and the white is not well balanced Thanks for looking and have a nice day guys
- 35 replies
-
- 47
-
-
Hi to everybody! First posting for me at Britmodeller, a kind of symbolic, I may say. This is a recently built 1/48 Italeri (Special Hobby reboxing) Spitfire Vc , representing a Royal Hellenic Air Force Sharkmouth Spitfire, immediately after the return of the RAF Greek squadrons to Greece (hence the mixed-bag markings - fuselage Greek, wings still RAF). It wasn't exactly a problem-free build, but with the help of Eduard photo-ethed and the recently published RHAF decals from our native LM decals, I tried to do my best. Hope you like it. Dimitris K.
- 25 replies
-
- 43
-
-
- Sharkmouth
- Spitfire Vc
- (and 1 more)
-
Thats it, now I'm finally finished with the beast. Built with Airscale cockpit placards, Eduard Cockpit etch, RB Productions seatbelt, SAC white metal landing gear, Eduard Brassin wheels and painted markings from Miracle Paint masks. Work in progress can be found here: But now, over to the all the pictures I started it in November 2014, and finished yesterday, august 2016. The kit is nice, the the constant scraping of mold seams isn't. Will I build the Car-Door version? Sadly no, since I'm out of room... But there'll be more Tiffies in 1/48 and 1/72 though!
-
 Hey guys, one week ago i have finished this kit (built as a birthday gift), but i did not have time to create the RFI till now For anyone interested, some quick WIP is here http://www.britmodeller.com/forums/index.php?/topic/235002039-f6f-hellcat-148-eduard/(i was rushing to finish the kit in time so i did not take that many shots during the build). The kit is totaly great and amazing, well recommended to everyone interested in building the Hellcat in 1/48! I have added some details here and there, mostly scratched (tank infront of cockpit, reworkded cockpit, opened and reshaped flaps) For painting i have used Mr.Paint brand paints for the very first time and also these are totaly amazing and wonderfull (for airbrush only though), well recommended as well Weathering was done by using various Ammo and AK products (chipping fluid, fresh engine oil, fuel leaks, panel line washes), a bit of oil colours (mainly to tone down the washes a bit) and some pigments of various brands. Here is the result - i know i could add some more weathering and dusting around if i had time, but i was running out of time badly But i m still quite happy with the result So first some scratched details And the final look Thanks a lot for watching and have a great day
- 31 replies
-
- 42
-
-
One of my first kits I recall completing to an adult competency was a bagged kit of a 1/72 Monogram P-40. I don't recall too much of it, besides the glossy tan and chocolate "dessert" camouflage it wore, and the ravenous maw slathering for more victims. I built it with my friend in his basement while he worked on some 1/24 pick up truck nonsense. He was so enamored with my awesome results he begged me to crank out the lindberg sea king kit next. To which I obliged. Of course, all this excitement and new found modelling mojo was quashed by the demeaning scolding I received upon showing my old man what I had spent my money on. This, is where you the reader feel sad. From that point onward I hid my models and only worked on them in the very dead of night (2:00am) where I wouldn't be chastised for wasting my hard earned pocket change on $3 kits. Now, in the glory of adulthood, I have compensated abundantly with a glorious collection model kits from many genres. That shadow of guilt instilled in me then still lingers though, and I find myself sneaking kits into the stash past... no one. Well, to be honest my wife questions my time availability but she still supports my one link to sanity. Thankfully. SO, onto the work part. I had a single 1/72 Hasegawa kit in the stash, which was doomed to have a place in oblivion had it not been for the sudden and irresistible urge to build something with teeth (yes, I am blaming Procopius and his growly Lancaster). And, as some of us do, I went online looking for build articles and reviews of my kit to see if I could scrounge up any information on the shortfalls, etc. This meandering in the lush temptatious realm of the internet led me of course, to a purchase. Who could resist? An online auction for an ALTERNATE packaging of the very same model kit I already had?!?!?! Well, there was no resisting. And the concept of this thread started. Here we go: The obligatory shot leading to one's work area. The furnace and vestigial heat recovery system produce copious amounts of ambient noise which often leads to a state of slack jawed un-productivity. As we get closer the cause of the rampant laziness becomes fully apparent: A computer and tv screen with which to watch Lord of the Rings on while modelling. Bad idea. See also the many other projects going on. They all inevitably get put away and taken out again when inspiration strikes. The kits in question: the older yet better cared for version which I possessed all along, and the new acquisition (with a Spit IX as well). Kittyhawk. Smesh. I prefer Warhawk. Ominous, but I have worked with worse with decent outcomes. I have ordered back up decals in the event these are truly not salvageable. Yes, one of these will be an AVG bird. The other will get roundels to go next to a Maryland and quite possibly a Spit Mk. IX in desert colours. A quick look has me smiling with the realization that the panel lines are engraved. YESSSS! But that is tempered with the need to do tiny modification work to the exhausts. Drilling those out should be fun. The strange lumps and bumps. After looking at other model kits, I have concluded that these here are OK. I am glad I don't have to files them off, and if you tell me otherwise... DING DONG! Seriously. These came in the mail today too. Serendipity. I might have a condition.
-
Hello! Time to start another build and continue the African theme. This time I’m going to build an Ivorian SU-25UB used by the Ivorian Air Force (FACI) in 2004 against rebel forces and I’m planning to build red 20. The kit is KP's SU-25UB/UBK and it's their Masterline version so it comes with a really nice multimedia cockpit too. Here's a good link if you're interesting in reading about the SU-25 in FACI service LINK. Lastly I’ll round of with a picture of the nice shark mouth of a FACI SU-25 and a couple of pictures of the cockpit that I have painted. Feel free to comment! Jakob
- 16 replies
-
- 5
-
-
- KP models
- SU-25UB/UBK
- (and 5 more)
-
 You al know how it is. Once in a while, it doesn't matter that the stash is filled to the brim, that there's no more room on the shelf of doom, and the modelling table is filled with 1,2,3 - many ongoing subjects, sometimes you just need to clear everything, and take the latest and greatest purchase and go with the flow. In my case this happened with the enormous Typhoon. I've never built anything in larger scale than 1/48 before, and there was nothing in the stash of that sort either, but it didn't matter. I needed it, badly. It wasn't possible to resist a view like: Trying to battle the AMS didn't work either, which is why I've got the Airscale instrument decals and some Eduard goodies Let's make a start at it then! what could possible go wrong? Well, since my previous attempts at building Typhoons has been less than successful, my track record might not be the best, and its a BIG model! No matter, I'm filled with cheerful optimism, and neither the dreaded crack in the hood (got a new clear sprue from Airfix last week, which was as good as one can hope), or a rather nasty short-shot: will stop me this time. Everything is possible! Lets cut off a few pieces, clean them up! Rear spar is a little bent: Some heavy persuasion with brute force and glue should sort that out later on. I hope :-) Also decided to drill out the holes in the rear form(imf=er, just because I could. Edit: ARRGH! It's post preview one should click on, nothing else! Story continues: Well, all parts were cleaned up an glued together, and after a quick coat of Vallejo black primer, it looks quite ok actually. Quite a lot of parts was left out of the initial assembly, but also primed Citadel chainmail was sprayed next and I hoped that all ejector pin marks on the engine firewall is hidden later on... On to some other fun stuff. The floor boards were drybrushed and received a couple of washes: Main instrument panel was painted too, and prepared for a long session of small small decals from Airscale. A really large sinkmark in the middle of the compass was a cause for concern: but since it will all be painted anywway it was filled and sanded flat. After half of the decals had been added it started to look nice! Finally, all was installed in the cockpit And there we are! I've started the most challenging build ever, but I'm having so much fun! Luckily, I have 3 weeks of christmas vacation coming up and hopefully I'll be able to sneak of to the modelling den more than once, so even with my usual geological modelling pace continues, some progress is expected! //Christer
- 166 replies
-
- 13
-
-
Hi guys, some questions for any of you who've ordered or used decals from Aero Imageworks. First off, and most importantly, are they still around and active? Their website doesn't have a news posting later than late 2012. Secondly, how are the decals? Are their 1/72 "Shark Attack" Spitfire VIII decals worth the $29.95AUS plus shipping price? Lastly, anyone know of any sellers for them outside of the antipodes?
-
Hello, everyone! Here I am with a simple enough question (the answer, however, so far proves to be elusive) - could anyone provide a credible source (picture, article, anything) on whether the aforementioned airplane (Messerschmitt Bf 110E G9+JM) had a sharkmouth nose artwork or not? My search ended with only a single picture of that airplane in action and that specific detail isn't visible (Murphy's law, gotta love it)... If my understanding is correct, this plane was a regular all-black Nachtjager and was only painted with RLM72 for a specific channel dash mission in 1942. Whether sharkmouth was added as well, remains a mystery to me... All of the models shown all over the internet built so far had this detail, DuncanB and myself had a little discussion about it on my WIP thread, but haven't been able to reach a satisfying conclusion... So, if anybody could provide anything he or she might consider useful, I'd be most grateful... Oh, and, while I'm here trying to get that sorted, could anyone suggest any particular site or an article on riveting on this plane? Managed to find great pictures of it in Touvdal's thread, but only for the upper half and I'd very much like to see how the lower half should be done... Many thanks in advance, Vanja
-
Just finished painting and glossing a Revell (Heller) Vampire in the RAF Germany camo and pru blue scheme. This was on old boxing (scalemates says 1991) not the newest one so the decals were old, out of register and the wrong colours. I also had an Airfix sheet from their 1998 boxing. The register on these was even worse so they went straight in the bin. I have asked Revell if I can have a replacement sheet from their newest boxing However if they say no, is there an AM sheet including the 112sqn Vampire with the Sharkmouth? It will be part of a small 112 sqn collection with the Tomahawk, Mustang, and Sabre Cheers Chris
-
Just wrapped up this Hase F-4F for the ARC 'Toom group build today while "working from home". Made a number of mistakes, including forgetting the slime lights and the little loops above the ejection seats. C'est la vie. Please excuse the photo quality, I use a cell phone camera, and right now the sky is falling here in Chicago.
- 2 replies
-
- 2
-
-
- postwar luftwaffe
- phantom
- (and 2 more)
-
 Hi gang, right time for another build. I've had this in the stash for a while, and bought the excellent Aviaeology decals when they came out. http://www.aviaeolog...m/aod48003.html I mean a Tiffie with a sharkmouth? - what is not to like? I also bought a truck load of Ultracast parts to enhance the build at the same time. Then I hit what I thought was as tumbling block, and put the whole thing on hold...until recently when a chance discovery in the spares stach, tipped of by a post on here, re started the project. Little needs to be said about the Hasegawa Typhoon. Apart from the cockpit infills, it fits really well, and has no real vices. I've built 2 of them already so this is a chance to add some extra bits too. So in no real order - here we go: First - the cockpit infills. Experience suggests that adding these to each fuselage half first so they are flush, making good the join lines and rescribing is the best way to deal with the less than ideal fit. Here you can see this done, which gives a smooth join on the fuselage sides, but will leave a small gap on the fuselage centre line join. Nothing a plastic shim won't fix though. A damn sight easier than having no gap at the top and a step on the sides! I've also opened up the foot and hand holds on the side too. Inside the moulded detail has been removed as I'll be adding my own. Here is the resin feast that is Ultracast's sonata to the Tiffie: All well cast with no pin holes and fantastic detail. The wider Tempest tailpanes are a simple push fit, and de rigeur for any very late war Typhoon, while the exhausts are a drop fit replacement and a great improvement on the kit parts. They are also, in case you ask, much nicer than the Quickboost resin exhausts ( which Ive used before) being the correct size (the QB ones have always seemed just a tad small to my mind). The seat features a cast-in late war "Q" harness, and as the cockpit opening is rather small this will be a a really obvious bit. Wheels have really nice detail, and the new radiator part has the late war "cuckoo" filter - again a must for a Tiffie from this period. Now for that stumbling block I mentioned. The rocket rails. We are all used to the Tiffie Mk I steel rocket rail with its gently tapering front and twin horizontal launch rails. Here's one attached to a Sherman - yes I know! All Hasegawa's rocket Tiffie boxings come with these.( Mk I rails that it is not Shermans!) However from late 1944 onwards the MkI rails were replaced by the lightweight MKIII aluminium rails. They look very different, as you can see below. And my particular carcharadontic Tiffie, MR-U MP197 245 sqn, shows 2 of the MKIIIs fitted under each wing with a long range drop tank. The MKIII rails are quite fine with subtle rivet detail, and I wasnt amazingly convinced I could scratch them convincingly. While there are some MKIII resin rails available from Airwaves, theres a snag with these.... However I stumbled over a BM thread about Mossie rocket rails, which also showed MK III rails, and as I had bits left from a Tamiya Mossie in the spares stash, a quick check revealed 8 MK III rails sitting unnoticed in the box. Huzzar!!!. The attachment stubs are different for the Tiffie, which is the problem with the Airwaves et - as these seem to be MK III rails attached to Mk I stubs, but thanks to the gracious help of "Mr Typhoon" Chris Thomas - some e-mail pics quickly allowed me to modify and scratch a prototype, Cheers Mr T! Its needs little refining - but I think I know what I'm doing now. Well I hope I do anyway. More to follow..... Cheers Jonners