Search the Community
Showing results for tags 'scratchbuilt'.
-
 Jehlik's Armoured Vehicle 1916 In your, frankly disappointing universe, Jehlik's armoured vehicle didn't progress any further than the filing cabinets of the US patent office, but in mine it went on to a gloriously disastrous career. Why limit yourself to this pretty uninspiring reality when a quick browse through the other more interesting alternatives is significantly more entertaining. Anton J Jehlik was mad. Madder than the maddest mad thing ever to hop though madland, you'd have to be to have designed this: Silly isn't it. Sillier still when you know that the big roller is on the front and the bangy things are pointing backwards. Aaaannnyyyway…. It's generally considered that the Americans were supposed to join the WWI party in 1917. However, in 1916 they got themselves a brand new toy and couldn't wait to play with it. The original idea was for the roller-beast to be built in vast numbers in a shipyard on England’s south coast, before the British government tactfully declined, stating “There's no ******* way we want to be involved with such a studi...”, well... the details aren’t important. The contract went to a ship yard near Boston who built eleven metal monsters before they ran out of steel. The machines went through exhaustive testing to see what they could achieve, and isn't it remarkable how fast a nations jubilation can turn to despair – squashing the marching band during the military parade can sometimes do that. With great fanfare the army held a service-wide competition to pick the crew, and the losers started their training soon afterwards. Jehlik became a national hero… briefly, before changing his name and seeking asylum in Andorra where he lived out the remainder of his days breeding with sheep, sorry I mean breeding sheep. After six of them ended up keeping the Titanic company on the bottom of the Atlantic, the remaining five machines trundled ashore in France. The initial surge of joy from the French was soon extinguished after the fourth village was reduced to rubble in the attempt to get the machines to the front. Their début on the battlefield would have been a great success, but as the existence of the roller beast was difficult to hide, those cowardly Bosch had dug a long pit in front of their trenches which caused the first four behemoths to get their silly rear castors stuck. How unsporting is that? The Americans wrote a very strongly worded letter to the kaiser saying it really wasn't fair as they were looking forward to a damn good squishing. To show the strength of their feeling they even omitted the kisses from the end. The kaiser missed the post that day as he was at the bingo. Here we see the sole survivor, number 7 which also had the official name 'USLS (United Sates Land Ship) Friendly Fire' which became the only one to engage the enemy. Enabling the American to successfully take the German trench after finding the occupants helpless with laughter after seeing the roller-beast get stuck on a tiny muddy mound. The ref later ruled the American move to be off-side and they had to go back to their own hole in the ground, leaving the score nil-nil. And so Jehlik's monster was edited out of history by an embarrassed nation. Aaannnyyyway… This took about six months in total. Thanks for havin a ganders - I hope you like it.
- 39 replies
-
- 44
-

-

-
- Jehliks Armoured Vehicle
- scratchbuilt
- (and 1 more)
-
 A model from 5 years ago Here is another Arup flying wing, this time the earlier -and smaller- S-2. There were at least three different configurations and color schemes; here I am reproducing the one without the wheel fairings. I have a great opinion of Bill Hannan and collaborators, my main source of info came via one article on Skyways magazine of January 1997, but I differ on the interpretation of the colors, and tend to believe, in spite of their explanations, that there were possibly three colors involved, red, black and aluminum. Just a personal interpretation, not more valid by any extent than theirs.
- 22 replies
-
- 35
-
-
- Arup S-2
- scratchbuilt
- (and 1 more)
-
S309, Grey Fox was one of the 7 steam gunboats built to the Denny & Sons design. They were intended to counter the S-boot threat in the channel and were the smallest RN vessels equipped with steam turbines. They were 135 ft on the waterline, 23 ft 4 inches in breadth and had a draft of 3 ft 9 inches forward. Displacing 135 tons (initially) they could make 36 knots. Grey Fox was built by Yarrow and launched in September 1941, she survived the war and was sold in 1947 They bristled with guns, of various calibres', really being armed from whatever guns were available at the time. The main armament was a HA 3inch gun of WW1 vintage, originally intended as a land-based anti-aircraft gun. The gun shield sshows was only fitted to this gun when mounted in SGB's. Grey Fox saw action in the channle and was there at D day. The following action report is taken from a thread about Grey Fox on the BMPT forum July 10th 1942. In a furious night encounter, off Etaples, Grey Fox and Grey Wolf engaged 6 German minesweepers. They sank 2 but a 3rd collided with Grey Fox with such force that everyone on her bridge was thrown on their faces and a huge hole was driven in her hull. Grey Fox struggled home, with her bows almost awash. And is backed up by this first hand account of the incident So far as I remember the almost simultaneous result was a sharp heel to starboard as the ship turned, and a burst of gunfire from our own gunners. This was followed by what my mind registered as an explosion on the port side forward. I was thrown violently out of my seat and against the ship's side. As I picked myself up the ship slowly righted itself and I have an indelible picture on my mind of seeing sea water pouring through the open watertight door in the bulkhead between the galley flat and the wardroom passage through which spare ammunition had been passed. At that precise moment there was no one forward of that bulkhead and by good fortune, or perhaps design, the watertight door closed from forward and as I pulled it together the inrush and water pressure behind it helped to shut it making it easy to knock the clips on. We were well down by the bows and I think fear of sinking was uppermost, but our forward gunner was still firing. Some minutes later the First Lieutenant came down and between us we completed shoring up the bulkhead with timbers kept at the far end of the galley flat for that purpose. I then learned from Lieutenant Erskine-Hill that what I had thought was an explosion was the sound of the German R-Boat as it rammed itself through the ship's side into the wardroom and forward messdeck. It shortly afterwards fell away and sank, leaving a large gash in our bows ... The next couple of hours or so were considerably nerve-wracking, sitting on watch with the ship very much down by the bow and wondering, apprehensively, whether the bulkhead against which I sat would hold. The level of water on the other side could clearly be seen by the condensation line which was somewhere near shoulder high, with the deck of the wireless office awash ... We were apparently wavering sluggishly all over the place but heading slowly in the correct general direction and managed to get within sight of Newhaven under our own steam. However, we could not be trusted to keep a straight course to enter harbour unaided and "Grey Wolf" took us in tied alongside. I do not remember ever being so relieved to get off watch! Daylight revealed what a remarkable escape we had had. Lieutenant Erskine-Hill solved the problem of inspecting the damage by the simple expedient of rowing the dinghy through the hole in the ship's side! Following the conclusion of the build tread Grey Fox build, here is the finished vessel in its display case and some detail shots And for a size comparison, here it is next to the Fairmile B I built last year to the same scale Fairmile B build, waterline the same Thanks again to those who followed and provided help and kind comments, Schnellboot thread starting tomorrow Steve
-
Before we continue to enjoy our hobby -as he would have liked-, I want to make a brief homage to James (Jim) Schubert, who passed away just a few days ago. Jim was a very good friend, a Boeing engineer for many decades, with a long and successful career. He was as active at his 85 years old as he ever was, and regaled us all with his vast, seemingly inexhaustible knowledge on aviation and modelling and a plethora of other matters. I knew him for many years, and often, sometimes seriously, sometimes tongue-in-cheek, embroidered his name in my modeling posts, many times here at BM. He was a very, very, very good friend, to me and to many. Aviation and modeling is what gather us here, and that's how I met him, and he was an extremely important mentor for me (and again many others) in those matters. But there is something, for me far more important than his aviation career or knowledge, or his excelling modeling skills: he was an extraordinary human being, a classy gentleman, educated, polite, intelligent, humorous, witty, kind and always friendly and ready to help. His models are extraordinary, but what I admire the most is his true quality as a human being, sadly not very common nowadays. Dear Jim, your laughter and your incomparable, kind, warm, sometimes mischievous smile, will stay with us; even as you fly yonder. This is an old build, from 11 years ago, with the original text: Between 1929 and 1931, Mr. McClary developed a series of prototypes of which not much photographic evidence remains. The Model A is what you see here, according to Aerofiles. It seems that it was considered a motorglider. Unfortunately there is no record of it ever flying, but I am an optimist. Control was obtained mainly by fervent praying, but also through elevators and rudder, and some sort of ailerons protruding from the…-I guess I should say wing, although I am not totally certain. This sort of flattened zeppelin ,although simple in appearance, offers certain challenges, not being the lesser one the absence of 3 views. I concocted one in my periods of lucidity. Areas that will need attention are the engine (55 parts) the wheels (of the spoke type) and the various struts and protrusions. On the engine and its cowling aluminum sheet, styrene, solder and a home-made metalized vacuformed part were all used. Some generic interior was built into the pilot gondola too. It looked simple enough at the beginning, but after all the dust settled down the count of parts surpassed the 140 mark. Nothing a normal modeler can’t deal with. If we could only find a normal modeler. In 1/72 the model has a reasonable size, not too small, not too big, which makes handling easier. Nevertheless, a number of parts had to be made twice or three times in order to get a reasonable result. The unusual shape dictated equally unusual production of parts and assembly procedures, not to mention that you normally make the fuselage and then glue the wings to it, but in this case you make the (only) wing and glue the fuselage to it. Then you glue the tail surfaces to the wing too. Feels strange, but the same can be said of the plane, isn’t it? McClary went on to design other interesting places if on slightly more conventional lines. Is contemplating these kind of designs that I start to see fine art in aviation. A link to some photos of the real thing: https://1000aircraftphotos.com/Contributions/Shumaker/6191L.htm
- 23 replies
-
- 27
-
-

-
-
- Jim Schubert.
- scratchbuilt
- (and 1 more)
-
An unusual but beautiful golden age "flying wing", a build from 3 years ago. The Golden Age of aviation... long distance or endurance flight records were being often beaten again even before the winning machines and pilots could fully enjoy their glory. Amidst this background that is my usual inspiration field, recently three designs caught my attention; they are similar in some regards but have distinctive characteristics. I am referring to the EMSCO (E.M. Smith and Co.) "flying wing", and the Bryant and Vance "flying wings". None of them is, actually, a real flying wing, but the term points out to the absence of a "real" aft fuselage, being this replaced by the twin-boom arrangement. So we have a fuselage pod, usually short, instead of the traditional fuselage to which all other members attach. These designs relied on refined aerodynamics and large, high-aspect ratio wings, associated with high lift capacities and the ability to carry a large fuel load. None of these three were particularly successful, a fact about which I give a rat's bottom. The Bryant had a push-pull twin engine arrangement. The Vance design was quite similar to the EMSCO, but with double vertical stabilizer instead of the single one. There is a lot to be said about these three machines in general and about the EMSCO in particular, but I will say no more; if you are curious, go find about them, they are very attractive and have juicy histories. You won't regret it, but I won't do it for you, enough work is for me to scratchbuild these belles. Suffice to say about the EMSCO is that it was designed by Charles Rocheville (the same designer of the Rocheville Arctic Tern that I built long ago). The EMSCO had two strange aerodynamic devices: the fuselage pod was a duct inside a duct, to channel the inner airflow from the NACA cowl aft of the engine. There was also another device that ingested air, located beneath the wing, and pumped it through slots on the aft upper airfoil, thus creating what we call now a blown-wing. These devices were to help the lift and speed of the plane. They worked very well, according to contemporary accounts. The model: Every scratchbuilding project is a challenge, for diverse reasons. There are always areas or parts that require some head-scratching, and that's part of the charm of scratchbuilding. In this case there is not even a plan, or a meager 3-view. So I had to work on a plan, or better said, a building sketch. Once the plan was more or less ready, work began on the model, and there a second challenge appeared: the fuselage pod, which was, as said above, a duct inside a duct. The inner duct surrounded the pilot and copilot stations, which were located therefore in a sort of bathtub. The air entered at the front of the NACA cowl, passed through the fuselage main section and then the aft cone which acted like a Venturi device and then the air was expelled at the narrow end. My thanks to Lars Opland and Alain Bourret who provided some additional useful pieces of information. Mika Jernfors came to the rescue with the decals I commissioned from his outfit, Arctic Decals. Enjoy your EMSCO flying wing
- 19 replies
-
- 30
-
-
-
- EMSCO
- Flying wing
- (and 1 more)
-
Conceived as an anti Zeppelin The PB 31E was designed to carry a crew of 5 with two Lewis guns and a fixed 1 1/2 pounder gun, it was intended to be able to patrol for up to 18 hours and wait for passing airships. The PB is for Pemberton Billing the designer who sold his interests in the company to the other directors who promptly changed the name to Supermarine. So this is the first design by the company responsible for the Spitfire. The name Supermarine came from a wonderful piece of logic; if a ship that was under the water was a submarine then a plane that was on top of the water would be Supermarine hence the name . Thankfully Supermarine eventually found some good designers and the rest is as they say history. Givrn my rather large Wip (about 9 builds) this may be a slow burner and I’m still not sure if it may be at (or past) my modelling skills. But I think it’s a wonderfully wacky airplane so will press on.
- 29 replies
-
- 11
-
-
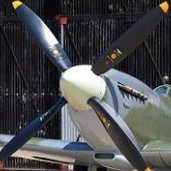
Hi folks, here is my latest lockdown project. The inspiration for this build came from a walk through the fields down by the coast. I passed an information board partly hidden in the undergrowth that told the tale of RAF Needs Oar Point, an advance landing ground used around the time of D-Day by a Typhoon squadron. So, here is my interpretation of a Typhoon 1b carved from Beech in approx 1/48 scale and finished in danish oil. Thanks for looking.
-
Here another build from 2010, nine years ago, with the same basic but not unfair take: Since I was at it with the Macchi M.C.72, I decided to also go for the M.67, which was a slightly earlier -1929- machine equipped with an Isotta Fraschini ASSO 18cyl in “W” of 1,800 hp. The particular configuration of the engine determined the shape of the front fuselage. Three machines were made and experienced the multiple problems associated which such complex pieces of engineering. Like the M.C.72, the M.67 was a pure bred racer seaplane, conceived to compete for the Schneider trophy. The lines and general arrangement are similar to those of the MC72, also having radiators on the wings, floats and struts, besides the fuselage sides and the oil cooler under the chin. It had a three-blade propeller that of course created some torque, so one float carried more fuel than the other and the wing was very slightly asymmetrical to try to compensate. The design was not fortunate due to technical problems, but one machine survives at the Vigna Di Valle museum. How to paint an Italian racer: You must know that the secret is in the tomatoes. The right ones will give the finished model that characteristic bright red racy hue. But seriously: The model followed the same methods as the similar MC72 posted here, one difference being the shapes created for the engine cylinder bank fairings. As it is sometimes the case, the carving and sanding of these particular parts and their fit over a compound-curve surface required some attention and time. Aeroclub vac floats were adapted removing a section and re-joining their front and back halves which matched the plans very well. A cockpit interior was created of which little could be seen once the fuselage halves were closed. The fuselage needed several sessions of puttying, sanding and priming. The fuselage side radiators were engraved on thin alu foil that was painted brass later on and added to the finished fuselage. Struts for the floats were adapted from Contrail streamlined stock. A leftover bomb from a kit was put to better use creating the conical spinner, and blades were re-shaped from a white metal prop. Spars were located on the fuselage to align and secure tail and wing halves. Decals, 77 of them, were home made The fantastic lines of this racer look like a sculpture influenced by artist Carra, Balla and Boccioni of Italian Futurism fame.
- 20 replies
-
- 35
-
-
-
A model from 4 years ago, in a sort of wintery environment, suitable for the season on the Northern Hemisphere. Alexandrov-Kalinin AK-1 of 1924: Please notice that this Kalinin and the K-1 Kalinin are not the same, and should not be confused, being these Kalinins two different comrades. In any case, the AK-1 was a boxy and irresistibly cute nice little Russian passenger plane. One was built and it can be seen in photos at different times in its short life with different schemes and some mods. One photo shows the Lamblin radiators hanging underneath the fuselage, other shows the plane on skis with no visible markings, yet some others show a sort of complicated scheme with abundant lettering and symbols. Monsiuer Alain Bourret from Canada has already scratchbuilt a nice 1/48 scale rendition of the latter, so I thought I would go for a different version. By the way, you can see on the Net interpretations of its colors as being green, blue, red, metallic and grey. It is up to you, dear comrade, to pick one. The AK-1 was powered (the term may be excessive) by a water-cooled Salmson 9cyl. radial engine. It could carry four including the pilot, who weathered the elements in an open cockpit as Russians do to enjoy the breeze and temper their characters. Of these four people, a couple of fortunate ones rode inside in a well-appointed cabin that most likely included a samovar and had enough leg room to perform that strange dance that we see in movies in which they extend their legs in the air while crouching with their arms crossed on their chest. In any case, just bear in mind that the wings had a design that gives the deceiving impression of a gull wing, illusion produced by the thickness of the airfoil being constant from the root up to the point where the struts attach.
- 5 replies
-
- 28
-
-
- Kalinin AK-1
- passenger transport
- (and 1 more)
-
Ta-Daa! Only 11 years in the making, I started this in 2009 (When HL brought out the Panzer III) and got disillusioned 6 months later when they produced the StuG. The recent lockdown prompted me to revisit all the half-finished models, and this was the oldest. It's based on the HL Panzer. All the superstructure forward of the engine cover was removed, and the StuG crew compartment, gun and schurzen scratchbuilt. I also gutted the interior, stiffening the hull sideplates with 3mm styrene for full metal suspension and tracks, and fitting an aluminium plate in the front to take Mato metal gearboxes. It also has the Asiatam recoil system and the new fan powered smoker. Due to it's vintage it is still running the TK-13 main board. I also fitted a bigger speaker, moved the battery to the inside of the hull and added a charging port under one of the rear engine hatches. The left hand main engine hatch is hinged with access to volume control, off/on and smoke on/off. It's very crowded inside the hull! I also added some aftermarket (tiger) parts that were suitable, reskinned the mudguards and hinged the ends. Lots of clips and brackets were fabricated from brass, the MG shield is completely made from brass. Basic hull layout Gun location and recoil Switch panel With all the bits and pieces on it (and the lack of Zimmerit) it dates to about May 1943 production. It will get weathered slightly, I just need to find some muddy puddles. Hope you like it!
- 6 replies
-
- 12
-
-
- Heng Long
- scratchbuilt
- (and 1 more)
-
From 13 years ago, another model of a vintage plane that precognized the future: Now, there you have an airliner. Almost an ocean liner, one could say. And, ladies and gentlemen, this was 1920. 32 passengers, mind you. Mister Vincent Burnelli developed a whole family of planes around the lifting body concept, -used much, much later in more contemporary machines. Its earlier interventions in the design field contributed to planes like the Lawson Airliner and the Continental KB-1, amazing creations on their own. Structural soundness, safety and many other qualities of the plane were sought after with the rational use of advanced design concepts. In a way, the “lifting body” is related to the flying wing, both searching for minimum drag, efficiency and structural advantages. Lifting bodies will appear much later, among other examples, in the NASA experimental planes that studied atmospheric re-entering vehicles. A similar line was pursued by French designers: De Monge (his De Monge 7.4 in 1924), Dyle-Bacalan (D.B. 70 around 1925) and Carpentier (C-1 of 1935). There is a wealth of material on the Net, so if you feel attracted to these types and concept do your homework and you will find many interesting stories and the planes and men that created them. For the purpose of this article, I would just say that this story starts in 1920, when Burnelli got associated with Mr. Remington (hence the “RB” denomination), and that there were two version of the plane, the RB-1 and the RB-2, but RB-1 got reincarnated at least once. Here we deal with RB-1's second life. You could have tons of fun trying to sort out which is which, as many of the photos on the Net are mislabelled, and some minor modifications were performed in the machines, even in the same versions. Here some clues: look at the wheels, vertical tail surfaces, engines, tapering –or not- of the aft fuselage and the protruding –or not- ailerons. And the best part as always is when sources contradict each other. The model: Boy, what a corrugated slab! It was love at first sight. A long haul enterprise, without doubt, proven by the fact that this model went on an off the building board for more than a year. After I reached the three hundred parts mark I decided that I was better off not counting them. Although it seems hard work, I can assure you that it is much worse than what it seems. All in all quite an adventure, including the hundreds of genuflections and push-ups performed to recover minute parts from the carpet, which rendered going to the gym redundant. And I’ll throw my gauntlet at the feet of the ones that dare to call it ugly.
- 58 replies
-
- 60
-
-
-
- Remington-Burnelli
- Scratchbuilt
- (and 1 more)
-
Record Fever. The 20’s and 30’s saw one record flight after another fall more rapidly than the transit of the sun. They were a combination of show business and keen aviation skills, and helped to develop the industry as well as to create confidence among the general public towards the capabilities of the airplane. Individuals, Cities, States and Countries alike sought to gain the first page of newspapers, not to mention the industry brands that saw their products widely advertised in a way many times impossible to buy with money. So it was a win-win situation for everybody involved, pilots, sponsors, media, industry and the general public. This particular machine, thanks to in-flight refueling stayed aloft for more than seventeen days, piloted by Forrest O’Brine and Dale Jackson above the Lambert, St. Louis airfield. The machine was an out-of-the-production-line Curtiss Robin, slightly modified, equipped with the standard Curtiss Challenger six-cylinder engine, named the St. Louis Robin1. Two men manned the plane, taking four-hour turns to pilot and rest on a bunk above the fuselage super-sized auxiliary tank, refuel from the tanker and repair the engine in flight using an external rig braced around the engine. The flight was from 13 July to 30 July 1929. Quite a feat, isn’t it? This particular plane, as said, was adapted for the record flight, so a number of little things will need your keen attention. Always, always, always, no matter how good you think the plan or kit you have is, look at photographic references and contemporary accounts of the events. You will be very surprised almost every single time discovering how far from reality representations could be. No kit for this one, fellows (see, there are some advantages to scratchbuilding), and many an hour was spent looking for additional references, but you can start with the very good article on this plane on Skyways (Oct 2011) magazine. Nice history, nice plane, nice colors. What else could you ask for an engaging modeling project? The ancillary structure around the engine was for in-flight -plein air- repairs/inspection (yes, believe it or not). The opening on the back was for the in-flight refueling operation.
- 23 replies
-
- 37
-
-
-
- Curtiss Robin
- scratchbuilt
- (and 1 more)
-
This small early French airliner is now completed, it was among the firsts to provide restroom facilities for its passengers. It serviced a line that went from France to North Africa stopping on the way in Spain. It shows that undeniable charm of these pioneers, a bit ungainly but well-proportioned, that make them so attractive. Typical of many designs of the time, the cockpit (and pilot) are located in the aft fuselage exposed to the elements, while passengers traveled in relative comfort in an enclosed and fairly well-appointed cabin. It provided service for a time, but did not reach the popularity or production of other later Latécoère designs that will make themselves and their pilots famous, most notably in South America. Nevertheless, and considering that this was 1921, it its no doubt among the harbingers of the typical small airliner designs that would follow. The WiP can be visited here:
- 26 replies
-
- 33
-
-
-
- Airliner
- scratchbuilt
- (and 1 more)
-
Here is my latest creation, a 1/20(ish) Ferrari 330 P4. All carved from one solid piece of beech, with a few walnut accents and finished with whatever leftover varnish I had in the garage. Took about 2 months
- 7 replies
-
- 9
-
-
- wood
- scratchbuilt
- (and 1 more)
-
Happy Birthday Royal Air Force Today is the 102nd Anniversary of the formation of the Royal Air Force. Two years ago - to the day - I started building this model of an Avro 504K. My intention was to mark the centenary of the Royal Air Force's formation by building an example of an important aircraft that had served in the RNAS, RFC, RAF and many of the commonwealth air arms that followed. It's just as well I remembered the commonwealth because it turns out there's a very good chance that in 1918 this particular airframe was actually in service with the AFC (Australian Flying Corps) and not the RAF at all. This, despite my strong attachment to Australia, was not my intention. It seems a dodgy reference book might have let me down there, but that does not matter to me really, I still think that this model of an Avro 504 fits the original purpose. I finished the model yesterday and in doing so completed the project just one day inside a self-imposed deadline of two years. This project is, by far, the most challenging and technically difficult model I have ever attempted. It's 100% scratchbuilt, mostly from wood but with significant amounts of brass and plastic. There are no purchased parts at all (well actually there's one tiny kitset piece scavenged off a Tamiya kettenkraft) so everything you see is hand made. There is no 3D printing used. It's mostly done the old fashioned way of solid model building with the fashioning of all of the large parts starting by running a bit of wood through a bandsaw. I'm an old fashioned kind of dude at heart and gain a certain satisfaction from the belief that I'm keeping some old-time skills alive in this nutty modern world. If you would like to have a look at how this model was put together, please click on this link... The project is not completely finished just yet. Sadly, right now, there's a silver plaque sitting in an engraving shop in Perth reading 'Avro 504K, RNAS, RFC, RAF' but I can't go and get it because that journey into town is not deemed essential. When next I can get into town, I'll pick the plaque up and attach it to the side of the display base's frame and then this project will be wrapped up for good. This build has made me extend my skills in many different areas and I believe I come out of the experience a better modeller; more confident than I was that I can handle technically challenging subjects. I'm not lining up to do a biplane any time soon but I won't rule out doing something like this again some time. For now however, I already have some research into the SS Xantho happening on the maritime pages and if you want to see some more Bandsaw action very soon, keep your eyes peeled in the military section. I've got something starting up in there that's about as far away from a WW1 biplane as can be imagined. Anyway - enough of that. There's not much left to do except thank everyone who commented, suggested or contributed to the Avro 504 WIP thread in any way at all. I fear I'm actually a bit vain and always get a small kick out of scoring a 'like' or a 'happy face' and watching my 'reputation tally' go up. Without the ongoing interest and support of the Britmodeller community I am unsure that I would have bought this to a conclusion. So thank you everyone, including the mods and admins and tech folk who make the site run and keep this a great spot to hang out. Here's some photos - I hope you enjoy them. Best Regards, Bandsaw Steve
- 33 replies
-
- 61
-
-
-
 A good evening to you all, despite the sad events of today, First of all, a bit about me: From a young age I was first introduced to the RAF Museum at Cosford, I have been there during the construction of the Cold War hangar and although I can't remember it, I presume that I must have been there before the Nimrod (XV249) arrived and I have since become well acquainted with it when they brought it in during 2012. Out of all the exhibits there, the Nimrod is still the one that catches my eye- perhaps it is because of its size or it might be due to the red goose emblem of 51.sqn on its nose! (Pictured) Having gone to Telford in 2015 and having seen an Airfix 1:72 Nimrod kit, I simply couldn't resist! So, without further ado, the following is a quick summary of the kit and modifications: 1:72 Airfix Nimrod kit A set of fabulous decals from RAM Models (more on this later) A really excellent Raven Scale Models lighting kit (again, more on this later) A few scratchbuilt bits and pieces, mainly the "forest" of antennae and pitot tubes. Finished with a combination of Vallejo "Air" paints and some AK Interactive washes. NOTE: THE MODEL I HAVE CREATED IS NOT 100% ACCURATE and the positions of the lights are certainly not accurate! Issues with the kit: The wing-fuselage join was horrendous (although this might be due to the wires of the lighting kit getting caught in the internal structure of the fuselage) and so vast quantities of liquid poly glue were utilised and subsequently sanded down to get a "decent" seam. The wing-tip pods were not suitable for the R.1, these were made from bits of sprue which were sanded down and hollowed out. -This isn't much of an issue with the kit, but an issue nevertheless: trying to get the wiring through the wing structure and into the wing-tip pods was a nightmare, this is not a fault of the Airfix kit or the lighting kit- just a problem with trying to integrate the two. Now, time for some pictures! The superb RAM Models decals for the 51 sqn goose on the nose. And another view of the nose..... You can tell that I love that decal Last one I promise!!! (Note the effective texturing of the goose decal). A nose-on view A view of the wing structure, intakes, wing fuel pods, antennae under the wing, try and ignore the light to the right of the intakes, the hole is to allow a strong beam of light through from the LED A view of the central fuselage section, note the "forest" of antennae The flaps and engine nozzles. And the left side... (The rigging from the fuselage to the tail needs re-tensioning) A close-up of the tail section Excellent decals once again from RAM Models I attempted a moderate level of weathering using an AK Interactive wash From a distance... And underneath... A selection of AK Interactive washes were used for the landing gear bays, also note the antennae just in front of the pylon and another one coming out from the rear of the wing-tip pod (this one somehow survived without breaking off!) One final shot before I demonstrate the lights. As mentioned previously, I used the lighting kit from Raven Scale Models, the image below shows the underside of the Nimrod- note the position of the bomb-bay panel. Now you see it... Now you don't! -The wiring was redirected into the bomb bay area, where the battery holder is located and where the switch (silver coloured thin tube) is activated from. It lives! (sort of) Demonstrating the landing lights- I haven't added lights to the nose or to the inner wing-mounted landing lights, purely due to the fact that using fibre optics would ultimately reduce the intensity of light coming from the lights that are currently present, I would prefer there to be two bright lights compared to 5 dim lights. They're quite bright! The placement is pure fiction, but there is one red flashing light (pictured) and two flashing strobe lights Furthermore, there is one light in each wing tip (red and green), again their placement is somewhat fictional; i've been told that they should be swapped over (I'll be damned if I'm changing their position now!) And that, alas, is that. Thanks for having a look, she'll now be fitted with wire and hung from the ceiling- flying alongside the Shackleton, the Nimrod MR2's predecessor and stablemate in the ASW role during the Cold War. Perhaps I'll get round to doing an MR2 one day.... But for now, thank you and have a good evening- my best wishes, especially to members in Belgium. ;( Sam
- 16 replies
-
- 34
-
-
Some may have noticed that I am a S L O W modeler, with some of my projects taking up to a year and a half to complete. One of the downsides to this is I don't get much practice painting, which I see as my biggest weakness. So when I finish a model and it's time to paint it, its been 1.5 yrs since my last attempt. Not a great way to make incremental improvement. This has been bothering me a bit, so I decided to try and intersperse my bigger projects with quicker, built-over-a-weekend type projects that are more spontaneous and get me trying out some different paint techniques more regularly. So here's the first in what I hope will be a series of quickie scratch builds. For this one, I wanted to do a sort of space probe or satellite in the Ma.K style. I did a couple of sketches and I thought this one had some potential. For the bottom sphere, I used an acrylic Christmas bauble. For the top dome section, I printed it in polystyrene filament on my cheapo 3D printer. This is something I hope to do more of, going forward. I was able to go from my sketch-->to computer-->to holding it in my hand in a matter of hours. My printer isn't great for highly detailed stuff, but it can print styrene so it's perfect for quickly building up structural shapes that can be easily detailed with kit parts. I printed the dome in two sections. Once it was finished, I glued them together and gave it a rough sanding to remove layer lines. I then applied Tamiya putty to give it a heavy cast texture. I know satellites are built as lightweight as possible, so making this one look like it was cast in iron is completely absurd and really appeals to me. To make the transition between the two shapes, I used this plastic part that I've been dying to use for ages. The paper towel dispensers where I work use these plastic inserts inside the cardboard tube ends to secure the towels inside the dispenser. Every time I change the roll, I grab the little insert. I thought it had potential for future model use and as luck would have it, it's made of polystyrene. I still have a bunch left over for future models. I sanded the tines to match the contour of the sphere by wrapping a narrow strip of sandpaper over the sphere and sanding two opposing tines in turn. Then I just rotated it to do the next pair and so on. A styrene tube down the center, is what registers all the parts together. I also adapted this tube to receive a 3mm brass tube to support the model for display. The sphere got the same Tamiya putty texture applied with a piece of sponge. All that was really left to do was add some detail with kit parts.... So this came together quickly over a couple afternoons, which is pretty huge for me. Working fast and carefree without agonizing over every detail was very liberating. I think this will be a fun model to paint and practice chipping and rust techniques on in preparation for painting my Ian McQue flying truck. thanks for looking. Pete
-
I decided the Depredussin as my only 1/32 model is looking awfully lonely and needs a companion, another racer, again one that was largely ahead of it's time (but had many aerodynamic issues so never raced) the Bristol Type 72 racer . Should be pretty straightforward (construction is very similar to later WWI types but there's no rigging or visible cylinder heads), all except the undercarriage and the ducting around the nose, which will require a bit of figuring. Strange to think that only 9 years separates it from the Depredussin. Keel and formers for the Fuselage.
- 73 replies
-
- 12
-
-
- Scratchbuilt
- 1/32
- (and 1 more)
-
For some reason or another last weekend I did something I have in 25 years of modelling never done before - fired a scratch-built steam-punk type model together. I was actually working on a Tamiya Fw190 A3 and I think I was so bored with how well it fitted together that my hand went a wandering. The main body part is the fuselage ventral fuel tank from the Italeri B-58 Hustler chopped off. I started with the pilots station using the 1:48 pilot from the Tamiya Fw190 kit and some bits of one of Revells Stars Wars kit's. The tail unit is also for the B-58, the wing units form a Su27 (or Mig29) and the cable cutters are from the Revell Type VII C u-boot. After that it's a explosion of parts from the spares box and Everegreen. Parts still to come including modified side fuel tanks and ventral fins. I am going to call the pilot the Commissar of Grievance as there seems to be a lot of them about these days ;( The pilot is 1:48 Luftwaffe (needing Borg type interface with the control panel ) and 1:35 head from Takoms St Chamond tanker with face mask and with a respirator, trunk and mohawk added for good measure. Will post update again later when closer to painting stage Regards Brian
-
Recently, during a brief spurt of house cleaning, I happened across a journal that featured seaplanes and floatplanes. On the cover there was a bright red profile of a Macchi Castoldi MC.72. A featured article inside on the Schneider Trophy Cup piqued my interest on floatplanes somewhat and moa and greggle's builds on, respectively, the Supermarine and Curtiss entries ramped it up even further. So, after researching the various entries, and being partial to those bright red Macchis, I started experimenting with the best way to build the floats for the M.39. After several attempts and a couple of A4 styrene sheets I got a result that I was happy with. I've since decided to build the other float and then continue on with scratch building the rest of the diminutive 1926 Trophy winner using the techniques found in Harry Woodman's book on scratch building in plastic card. This first photo is of the completed float in 1:48 scale. In successive photos I'll show how I went about plunge moulding the deck and keel and putting it all together. Welcome to follow along and comments and suggestions always welcome. Thanks for your interest, Dennis
-
HMAS AE2 - World War One Submarine. About a decade ago I started idly dreaming about scratchbuilding a model of the famous Australian World War One submarine AE2. One year ago, almost to the day, a generous fellow modeller lent me a set of his plans for an E-class submarine. 11 months ago work started. Three days ago I finished the model. After what seems like a very long time and a great deal of fun, here's the result. Please enjoy! Those of you that have been following the WIP thread will know that the last week of this project was essentially a blinding sprint to get this thing completed in time for the Western Australian Scale Model Exposition (WASMEx). So how did I go in the competition? Well have a look at the photo below and have a guess which one won! Hmmmmm.... No real surprise! Yep - My little submarine came second in the maritime scratchbuilt class. This was what I expected all along because there's one guy here in Perth who is an absolute master of maritime scratchbuilding (lets call him GW shall we). I figured all along that he would win - that's his HMS Vanguard in the Perspex case! Scratchbuilt - from balsa of all things! Well - there's nothing wrong with being beaten by a true champion! Congratulations GW, a deserved win! In any case, I can't complain because it was GW that lent me the plans in the first place! So my submarine came second, which is fine by me, especially since there was a field of nine entries in the maritime scratchbuilt category. So it looks like maritime modelling in Western Australia is in good health. If you are interested in how this model was made please have a look at WIP log which can be found here... And if you will allow me to indulge in a small 'plug' - why not check out my next project - a scratchbuilt, 1/32 Avro 504. That WIP can be found here... All comments and critiques most welcome. Warmest Regards - Bandsaw Steve
- 36 replies
-
- 47
-
-
-
- Scratchbuilt
- Wood
- (and 1 more)
-
After many months it's finished a 1/48th scale scratchbuilt Gloster Gamecock in 17th Squadron colours. Wheels and upper wing from a Smer Bulldog, a Resin Engine but otherwise all scratchbuilt including home printed decals.
- 13 replies
-
- 28
-
-
- Gamecock
- Scratchbuilt
- (and 1 more)
-
I've lurked her a long time and thoroughly enjoy the WIP threads and take great modelling inspiration from them, so I reckon the time has come to start my own. Seeing as how this is (I think) an interesting subject which will have many modelling challenges I thought it would be a good first WIP. I do also have a wip thread on the Irish IPMS Forum which will be broadly similar, but then again might not be. This is my intended subject asn as luck would have it the SMER Bulldog has Decals for the black wavy line. The Gamecock was an improved Grebe which in turn was an improved SE5a, however I started from the Bulldog because they have (more or less) the same engine and the SMER kit was also available in quantity and at a low price, so I bought 2 with the intention of completing one as a Bulldog (maybe) and using the other as a donor for the Gamecock. So............ This is where I'm starting from. The SMER kit isn't terrible but like me it has some issues for example the markings are molded on (the kit not me ) . The engine , wheels and Decals are a definite part of the build and I'll see how much else can be beaten into shape as the build progresses. As luck would have it the upper wing isn't a million miles off and can be cut down to shape. Here it is with the markings sanded and scraped off and marked up for cutting. The lower wings and forward fuselage may also be good. It will definitely need a new tail and possibly a new rear fuselage, but I'll see as the build progresses. The upper wing cut and the left wing (confusingly the one on the right) cut to shape but not finish sanded.
- 136 replies
-
- 14
-
-
- Scratchbuilt
- SMER
- (and 1 more)
-
For those who have endured the WIP for this, it needs no introduction, so let me introduce my 1/48 100% scratch-built A7V tank and base (I may have got a little carried away with the 'basic' base which is also 100% scratch-built and cost me £0.00). It would have been nice to use some figures (preferably in 'running away' poses), but of course none are available in this scale. Thanks to anyone who has offered help and encouragement during the build and particular thanks to @SleeperService for giving me the idea. If you're interested this is the WIP thread. Gorby.