Search the Community
Showing results for tags 'scratchbuild'.
-
 A build from 5 years ago: I am always thrilled by the clunky but charming Farman designs. Their simplicity is not in any way a detriment to their beauty, furthermore, their somehow squarish lines look always harmonious and balanced. The 250 is not the exception, and although a passenger carrier, its stance and proportions give the impression of a racy machine. One sole sample was built and went to the Société générale des transports aériens, the SGTA from now on. Simplicity, we were saying, was Farman’s trademark, which in modeling terms generally translates as an easier building process. The only part that needed an extra effort was the bump on the upper fuselage deck, vacuformed in a snap over a Sculpey master . The interior followed a description in a Flight magazine article of the era. Colors were the source of animated and highly educated speculation among fellow modelers until some very credible conclusions were reached. I got an after-market engine and wheels, both had to be touched-up: The engine required a special exhaust arrangement and the wheels the fabrication of cone-shaped covers. A few details were added too: the Pitot tube, wind-driven generator, tail skid, Venturi and navigation lights. Home-made decals and a windshield completed the model. These French know Charm.
- 5 replies
-
- 22
-

-

-
- Farman F.250
- transport
- (and 1 more)
-
A build from 11 years ago, text as originally posted: First a few words regarding this article: The objective of this series was to spark awareness and interest regarding wonderful but lesser known designs, especially from the Pioneer and Golden Era periods of aviation. Their creativity, significance, and unparalleled charm are for me (and perhaps for many of you) a very important but often overlooked part of aviation history. I would also like to express my thanks to the ones that with their supportive, affectionate, informative and sometimes witty correspondence established a wonderful feedback that allowed me to improve my articles and models. Thanks also for the invaluable help received from fellow modelers, aviation enthusiasts and friends. Was Mr. Arnoux a minimalist? Were his creations early expressions of Minimal Art? The concept of Minimalism, applied now to creations in diverse media that characterize for being stripped to their essential components or elements, both structurally and expression-wise, surely can be applied to Arnoux’s aeronautic creations. His work in the field was precursory in many ways, and the rationale behind his research can perhaps be summarized as: -Which are the essential components of a plane?: a lifting surface, a power plant, and the space necessary for the pilot. I have previously dealt with one of Arnoux’s earlier creations, the Stablavion of 1912 And this is the fully evolved concept, of 1922. Built to compete in the Coupe Deutsch, a control problem and the subsequent rough landing prevented this incredible design to enter the event. It was powered by a Hispano-Suiza engine and the control surfaces at the wing’s trailing edge acted as what we would now call elevons. Vision for the pilot was masterfully impaired by having his head protruding on top of the trailing edge and behind the cumbersome Lamblin “lobster-pot” radiator. As usual with these odd-balls, references are not abundant. Fellow modeler and friend (the late) James Schubert helped a lot with this one. The plans that are around are good, but as usual the few available photos quickly showed some minor inaccuracies, mainly in the landing gear, lower tail and a few details in the radiator area. Once the model engineering was solved (at least in paper) it was out with the Mattel to vac the fuselage sides and just a bit of careful work on the Lamblin radiator and the wood prop. The remaining parts, including some interior and exterior details, were straightforward although the fuselage nose took some fiddling because of the number of details grouped there. No decals for this one, which alleviates the task, and just some airbrushing for the two-tone livery that was the product of educated guessing. Minute, cute, plumped-looking “tailless” racer to celebrate aviation history!
- 4 replies
-
- 10
-
-
- Arnoux Simplex
- racer
- (and 1 more)
-
A build from 11 years ago: Yet another glider! At about 5.5 meters span the Louis Clement triplane seems like something you can take on your carry-on bag to the nearest airstrip. It was first presented at the Paris Aero Salon in 1919 with an Anzani engine behind the pilot on top of the aft fuselage, transmitting power through an extension shaft to the propeller on the normal front position. One could say it was the ultra-light of the time. It reappeared in the Salon in 1921 without the engine. The Clement triplane was made of a rather complex tubular metal construction it was also braced outside with a number of wires that would make the delights of the 1/72 model builder. As you can see on the model, a tricycle landing gear was provided, with a nose wheel recessed in the front and the other two being located on the wingtips of the lower wing; an unusual arrangement for the time, no doubt. The pilot, its only occupant, had the plane built around him, the only way he could get in. Anyway, by 1922, with the engine removed, the plane was presented at the Combegrasse gliding competition where, according to press reports, managed quite well considering its cumbersome design and aerodynamics, but ended up having a too close and sudden encounter with the ground. I saw a youtube clip where you can see this thing actually flying, but unfortunately I lost the link to it. As you can assume, in 1/72 it is indeed tiny and somehow vaguely resembles the Fokker DR1, save that is far less famous and it is not red, for which it is unlikely to be kitted in the next 300 years. Nevertheless, even small as it is, it consumed a certain amount of parts, time and patience. For the ones with shelf space issues, some leftovers in the styrene bin and perhaps a certain sense of humor.
- 3 replies
-
- 7
-
-
- Clemente Triplane
- Glider
- (and 1 more)
-
A build from 11 years ago: What would have been of us without the 60’s… The Beatles, the Mattel Vac-U-Form, so much good stuff. But before the 60’s there were the 50’s. And before the 50’s, in case you didn’t notice, were the 40’s. And the Eldred Flyer’s Dream was born exactly then. In 1946. Many would argue that Eldred’s creation is not a Flyer’s Dream, but a Flyer’s Nightmare. There will always be those who are impervious to beauty. The Eldred was apparently impervious too, to criticism and also to water. If, as many of you apparently do, you think I am a shameless generator of apocryphal stories and planes, just have a look at this one, thanks to Youtube (and to the gentleman that posted it): http://www.youtube.com/watch?v=pvVS97dmVYQ As you probably guessed, there are no three-views for this clunky baby; so I had to make mines. They self-destructed after the well-known five seconds period. The model was made utilizing the best cutting edge technology available, namely the Mattel Vacuform Psychedelic contraption. I used it already in previous projects, as many of you know, but this is the first time I made a whole fuselage shell out of it, not left side and right side, but bottom and top. As you will discern from the accompanying images, the lower part was made of white styrene, while the top was made of clear styrene for reasons that will also become clear -no pun intended- later. The technique was inspired by the contemplation (and avid ingestion) of Argentinean empanadas. And as convenient filling some interior was fabricated. The floats came –as well again as for previous projects- from the Aeroclub Models generic vac float sheet. Some little tweaking was necessary to get it right for the project. Given the unusual “W” dihedral arrangement –no, it is not for “Weird”- and the car-like fuselage pod, this creature was referred to as a “StukaBaker” by enthusiast Richard Weber. Now, tell me, isn’t it the Mattel Vac-U-Forming a psychedelic experience? Escape to paradise in your Eldred Flyer’s Dream. I did!
- 6 replies
-
- 17
-
-
-
- Eldred Flyers Dream
- seaplane
- (and 1 more)
-
A build from 12 years ago: Long range planes were in vogue in different countries at the time when the record fever was burning high. This elegant monoplane was designed by Alessandro Marchetti aiming to conquer the endurance and distance records. First flown in 1928, the unusually configured machine demonstrated that the potential was there to intent the planned feat. The S.64 was in a way a sort of motor-glider, with a large wing area and minimal extras, capable of accommodating a crew of three in a small pod blended with the wing, on top of which the engine –a Fiat A 22T- was enclosed inside a streamlined gondola. Construction was mostly of wood –even the wings were covered in plywood- and the struts were metal. It conquered the distance and endurance records in closed circuit and later, in a flight to Brazil, in straight distance. In 1929 a second machine, the S.64 bis, with minor modifications, re-conquered the records that by then were in the hands of France and Germany. None of the machines survived long Thanks to Fabrizio D’Isanto, Jim Schubert and all the modelers that helped with information and advice. A perfect reference for this build is Paolo Miana's "L'ala di gabbiano con la finezza di uno Stradivario" "Seagull wing with the finesse of a Stradivarius"
- 15 replies
-
- 34
-
-
- S.M.64
- scratchbuild
- (and 1 more)
-
A model from 11 years ago: Let's try with another glider: French extravagance and flair is not just limited to fashion, as this Alérion Peyret of 1922 demonstrates. Of tandem-wing configuration and with a fuselage in need of a corset, it nevertheless won the soaring competition –at the hands of Maneyrol- at Itford, England, in 1922 setting an endurance record of 3 hours 22 minutes. Some time later Maneyrol pushed the record beyond the 8 hours mark with the same plane. The model: At 6.6 meters of span it is small in 1/72 scale. Images will walk you through the building process. An interior, as succinct as conjectural, was provided. Wheels from Aeroclub, struts were from Contrail and Strutz!, but you have to eat Liverwurst as you use the latter, which guaranties success.
- 4 replies
-
- 12
-
-
- Peyret Tandem
- glider
- (and 1 more)
-
A build from 11 years ago: We are talking arcane here. Like a strange moth, or flying ravioli, or piloted manta-ray, or perhaps a motorized cookie, the Canova flying wing glides across the sky. Or does it? Little can be found on this one. A “Flight” magazine article states that Mr. Canova’s all-wing design has been tested in wind tunnels at Milan and Rome and that no less than 5 scales models were built. This model is based on the project figures given in the article. At least one full scale machine was built. Nihil novum sub sole, as they say. When we see the “new” designs that populate the skies nowadays, it is interesting to compare and see how really new they are. Time and time again, neglected, laughed-at strange concepts of earlier periods are re-hashed and re-presented as cutting edge. Makes you wonder about the things that are laughed-at today and will be state-of-the-art tomorrow. Minute cute little model in 1/72, not really complicated to scratch, guaranteed to raise many an eyebrow. Styrene sheets of diverse thicknesses were used and Aeroclub Models wheels, engine and prop completed the model. A disfruttare! https://www.flightglobal.com/pdfarchive/view/1935/1935 - 0956.html
- 8 replies
-
- 24
-
-
- Canova
- Flying wing
- (and 1 more)
-
A build from 11 years ago: With very simple lines that somehow resemble a Renault 4 family car, the Caudron firm developed an amphibian prototype as a two-place, twin-float, all-metal touring amphibian in pusher configuration, using an inverted Renault 4 cylinder inline power plant. A few mods were made to the prototype during its life, most noticeable on the engine enclosure, according to photographic evidence. Both positions could pilot the plane, but usually one member of the crew was in charge of making the omelettes while the other took care of the croissants. The Plane was named Caudron P.V. 200, -P.V. for Pierre de Viscaya-. Remember that plans and three-views constitute, more than anything else, great decorative pieces, and when possible check them against photo documentation. To follow the model scratch-building sequence, use the provided images in order to get confused, and if any apparent mishaps are spotted, assume it is you who is mistaken. In all, more than a hundred and fifty individual parts were made for this apparently simple, boxy, floaty thing. Who knew. Modified Aeroclub generic floats, together with engine, wheels and prop from the same source were used. Considering that this was 1932, one could say that those French do know their design, don’t they? My Thanks to the late Jon Noble who provided a great deal of info that contributed to the making of this model. And now, for something completely different, another contribution to Reflections of a Troubled Modeler: Things to amuse yourself while building: - Make a puddle of super-glue to dip-in the needle used to attach a part. Immediately forget that you did that and, while holding some delicate assembly, put your hand on the puddle. - Variation of the precedent: use the top of a container to put some glue there. Forget about everything as previously described. Then place the model to rest exactly on that glue spot. Go and have a sandwich. Come back and lift the model, now with the attached container. Cry. Desperately try to figure out a way to make a diorama that will include, for some obscure reason, that container attached to the model. Cry again. - Finish the most delicate part of a model; let’s say a very tiny scratch-built engine. Contemplate it and congratulate yourself. Make a phone call, probably to a fellow modeler to brag about it; discretely, of course. When the moment arrives to install the engine, look for it in the finished parts’ container. Oh, that’s true, you left it somewhere else to make the call. Start to look in all the other containers. Then on the floor, fighting valiantly the carpet monster with your X-acto; then, cringing, look below heavy objects. In despair, go and look in the fridge, because you went there at some point too, remember? When midnight arrives and you have already dismantled your workshop looking for that tiny engine, give up and take a seat. Oops, what was that noise underneath your butt? - Build several models at the same time. Ha!, this time you finished them all. Start to take those pictures. While processing the images on your computer, suddenly notice the strange size of the wheels, propellers and the like on ALL the models. Scramble to detach the parts, swap them, and put them in their correct models; after all, you were struggling to glue them in the first place, remember? They kept falling off again and again. They may even be loose. Well, guess what, now they are firmly glued. As you pull off the prop, all the entrails of the models will come out attached to that prop. - Your building space is a mess. You decide to clean up. Ah, satisfaction; finally a clean and neat working surface. Now, where were those parts? Oh, they were there, where now there is nothing! Run desperately to rummage the trash can. AFTER you are done with your rummaging, somebody will tell you that the trash was already taken out. Run again outside your house, only to hear the sound of the garbage truck as it meanders down the street, blending with the crepuscular light that now sets on the scene.
- 3 replies
-
- 15
-
-
- Caudrom PV 200
- amphibian
- (and 1 more)
-
A build from 10 years ago: Why not an unusual glider to break the routine? At the beginning of the 20’s German students grouped in associations to promote gliding. One of those was located in the Berlin area and gave birth to a number of designs, the fist of which is presented here. It is not clear if this tail-less design had such economy of materials because of the tough after-war times or perhaps due to the influence of the Etrich zanonia-type gliders. In any case the attractive lines of “Charlotte” were enough for me to have a go at her. I was introduced to this remarkable lady by fellow modeler and friend Sönke Schulz. The number of gliders in my collections tends to increase noticeably, perhaps –besides their undeniable aesthetic qualities- due the fact that they do not have engines, propellers, wheels... or tails as in this case. But do not fool yourself; this one is made of more than fifty parts. Fellow modeler and friend Jim Schubert from Puget Sound told me that indeed the Akaflieg B1 was designed after the experience of WWI, when pilots had their enemies attacking almost invariably positioned at their tails. The absence of such tails, says Jimmy, would have deterred enemies from attacking. Hum. Being this a small article I will compensate by passing on some modeling wisdom in the form of 12 ½ suggestions: 1) Forget about what you painfully learned with your previous models. There is always room for invention –and oblivion. 2) Collect a reasonable number of references. Don’t even look at them until you are finished. 3) If you want to try something risky, and you got that very complex and time-consuming model almost ready, now it’s the time. 4) Write-down a suitable sequence for painting and gluing parts that will alleviate your burden during building and save you time. Leave it underneath some reference books and forget about it (see 2) 5) Very sparingly glue the interior parts. Knock the model against a hard surface when close to completion. You will get a very pleasant, maraca-like rattling effect. 6) Set-apart the more delicate parts in a separate container. Go and do something. Anything will do. Come back and sit on top of them. That’ll teach’em. 7) For painting your painstaking, beloved masterpiece, choose a windy, dusty day. Do it out there, on the balcony or out the garage. Ah, fresh air. You may feel as if you were Lawrence of Arabia making models in the wild dunes. And you will probably obtain alike results. 8 ) Do start a model and once you are half-way, meticulously store the thing in the darkest crag of your closet/cabinet. Come back to it by the time you have forgotten all the insights you had regarding construction and ways to correct/improve it. 9) Scratch-build that nightmare that you always wanted, and carefully finish it by the time a kit is finally mass produced and on the shelves for a ridiculously low price 10) Need the right tool but is out of reach? Nah, use the other one that’s just on the table. It won’t work the same, or probably won’t work at all, but in the process you will manage to ruin the part. That will give you the chance to get more practice time doing it all over again or even learn how to scratch-build it!. A similar procedure could be used for materials and almost all modeling supplies. 11) Get carried away and glue all the pointy/fragile bits before you are completely finished, let’s say before painting or decaling. Then look at the model in a state of dismay until the next season (see 8). 12) Run out of the paint you were using in the middle of the job? May be you can use that suspicious other one at the bottom of your drawer; then you will achieve two things: the colors will never match and the coat underneath will crackle/blister/melt and/or otherwise produce remarkable –although not necessarily desired- special effects. 13) back to 1)
- 11 replies
-
- 16
-
-
- scratchbuild
- glider
- (and 1 more)
-
A model from 12 years ago: (A rather coarse and basic effort now that I see it 12 years later, but it was one the first scratch projects; in any case I thought that in spite of the shortcomings of the model you may enjoy the strange design of the real plane): To say that the Johnson’s Uni-plane of 1934 was once offered by his builder to a hamburger company to make flying advertisement will completely make the case. The builder, though, couldn’t: due to an unfortunate crash upon take off -one in a series of them, if I may add- sponsorship was unplugged. At a mere 14 feet span (about 4.27 meters) massive it is not, but radiates charm. A Church Marathon of 42 hp took the plane to the air, but since in its first incarnation it had only control in two axis (no ailerons), it was extremely difficult to make it stay there. Further development included a single vertical tail and the missing ailerons, but this lovely machine stubbornly refused to stay aloft. It made, though, a series of straight-line long hops and eventually –err, after some crashes- reached plane’s heaven, wherever that may be. Oh, behold the strange shape of the Uni-plane! Any resemblance with the “Voyager” of “Star Trek” or the nose of the “Seaview” from “Voyage to the bottom of the sea” is a mere coincidence. The (not-to-be) flying hamburger is another proud member of a long lineage of airborne food items like the Lee-Richards annular wing –AKA flying doughnut-, Charles Zimmerman’s “flying pancakes”, B. I. Cheranovsky’s “flying croissants” and so forth. With this one, the expression “piece o’cake” reaches new heights (although "heights" here is a strictly poetic term). Enjoy! http://eaavintage.org/october-2015-mystery/
- 8 replies
-
- 20
-
-
- Johnson Uniplane
- flying wing
- (and 1 more)
-
A build from 12 years ago: (The original plane is being restored at the Musée Régional de l'Air - Anger: http://www.avionslegendaires.net/wp-content/uploads/images/reportage/Riout-102T-Alerion-%C3%A0-ailes-battantes.jpg (I did not have this information -or much anything- at the time I made the model.) Dragonflies have been around for hundreds of thousands of years. If you think they were big back then (two to three feet for some species), the real airplane that inspired this model had a wing span of eight meters. Born in France, as you can infer by the baguette-like fuselage, this ornithopter –ornitho/bird pteron/wing- (flapping-wing flying machine) created great expectation –and confusion- but didn’t go too far. Far enough to provide for steady modeling amusing, though. Imitating nature has been a profitable path for science, but not always works. Since the beginning of aviation history a number of designers tweaked around the concept, and in spite of some encouraging little success, true achievement seems so far to have eluded them. The model at a glance: Aeroclub wheels account for most of it (sounds easier this way, doesn’t it?). In the photos you can see the construction progress. To abbreviate this article, regarding mistakes, I would say: think of any, I committed it. I even ended up with a tail sitter, but a trestle was sneaked below the tail. It wouldn’t be out of place in a science-fiction movie, would it? My thanks to master scratch modeler Alain Bourret for the spark that started this construction.
- 13 replies
-
- 23
-
-
- Riout 102T
- ornithopter
- (and 1 more)
-
A build from 10 years ago: Another jewel found in the AAHS Journal (Spring 1968), the Argentinian Gresci (or Greschi, or perhaps even Grescci) helicopter imposes its towering beauty upon the unwashed modeling masses. Only two photos can be found in the Journal, of the blurry/grainy quality type, but hey, better than nothing. I found nada on other sources on this very obscure subject, including the ever-providing Internet. Mr Gresci, as stated in the Journal, also designed the 50 hp rotary engine that was supposed to propel the artifact, but apparently choked and died in the valiant attempt of performing its duty. Now, you will see rotor blades, wings, sponson-like elements, a kiosk… You may see Frankenstein bit stitched together... I see Beauty. Apocryphal statements that affirm that the Kiosk was used to sell ice-cream, or that the whole concoction was indeed a “Calesita” (Merry-go-round) must be dismissed. It is not obvious in the photos how would you access the apparatus, but I think that you just simply put it on, like a hat. Or perhaps you used the oval windows. Or perhaps the door was in the other side of the photo. I turned around the photo but I found only white paper there. The interior is also a mystery. Only the rotor/engine shaft seems to continue through the kiosk-like structure. And mysterious will it remain, since I painted it a dark color. The whole thing was covered in what looks like a silver-doped canvas, and the Argentinean cockade can be found underneath at least one of the rotor blades. The model: I am proud to say that I drilled my thumb only once. Yet another wonder is brought to the light from the most inaccessible and obscure crags of aviation history. May all of them shine under the bright sun of recognition. And now as a bonus track, a brief biography: The great Greek philosopher, modeler and olive pitter Styrenides (V century B.S.) in the eleven volumes of his “Brief Comments on How to Better Understand Why the Cutter Fell Exactly on Your Foot With its Pointy End Down” describes, in parables, the fascinating world of model-making. Styrenides even includes some paragraphs dictated by his wife, Methyl Ethyl Ketone –presumably under the threat of the imminent fall of a kitchen rolling pin- about the delights and secret pleasures of finding very small parts that (as it is explained in the Theory of the Membranes) are snatched into parallel dimensions. Fame nevertheless systematically eluded Styrenides. The cause may be found in the fact that his scale model airplanes were made before the airplane itself was invented. Or perhaps one could argue that Styrenides had to carve his vast literary production in stone, mainly in the frontispieces of public buildings, for which he was accused of engraving graffiti. Styrenides was eventually ostracized to Argentina, which was indeed a very harsh punishment; but since Argentina at that time neither existed nor could be reached, he managed to stay home. At the end of his hard-working life he repudiated model-making and took on politics, becoming instantly rich and famous and appearing at guest-shows in a number of amphitheaters.
- 18 replies
-
- 24
-

-
-
- Gresci helicopter
- Argentina
- (and 1 more)
-
A build from 11 years ago: If Mini Me would have a plane, what would it be? So here it is, the world famous Gurney-Grice Mosquito, a.k.a. The Flying Coffin. I was acquainted with this plane thanks to Richard Hopkinson. He stated –and I am quoting him: "...It does have two outstanding advantages over most aircraft: 1. It is the box it came in. 2. After flight the pilot can be interred directly after simply removing the wings, engine & undercarriage. Economical & practical!” There is only one photo that I know about published on Aeroplane Monthly, a 2003 issue about the ugliest 100 planes. Unfortunately, due to copyright issues and the current state of the hobby where Big Companies want the kit manufacturers to pay for using the names of the planes, I am afraid somebody may sue for making an article that may produce some laughs and eventually even make somebody happy for a few minutes. The Mosquito achieved control by changing the angle of incidence of the fore wing and by tilting the aft wing –anchored at fore and aft central struts -side to side. It is generally though that the word “control” here is an overstatement. I had to sketch my own 3 view of course. Anyway, the usual recipe: styrene here, styrene there, hocus pocus, Aeroclub wheels. For the ones with small shelves/budgets.
- 12 replies
-
- 26
-
-
-
-
- Gurney-Grice Mosquito
- scratchbuild
- (and 1 more)
-
A build from 10 years ago: I know, I know. So easy to call it names. But look at it from another perspective, more art-like: imagine you see it in the MoMA, MoCA, or SFMoMA. I don’t know what intentions brothers Ervin and Lyle Joy had, but I know what they achieved: A remarkable, out-of-the-ordinary design, considering that the year was 1935. Regarding the flying abilities, one could say that it hoped and it hopped. Eventually, a wire fence prevented what could have been a record number of UFO sighting reports. With five rudders, two engines and what can be considered as a lifting body lodging a no doubt pensive pilot, this apparatus deserves our admiration just for the mere fact of being. The Joy JX quite precisely falls –in this case the use of the verb depicts more than it intends- in the category of lifting fuselage designs. Usually you have in “normal” planes different parts accomplishing specific functions: The fuselage lodges the payload, the wings are in charge of the lift and the tail performs the control and gives stability to the whole. In the case of lifting bodies or flying wings, those functions are accomplished blending, eliminating or fusing some of the above-mentioned elements together, thus reducing drag, weight and cost, and hopefully improving the overall efficiency of the system. The search for information on this one was arduous and rendered just enough to go ahead and concoct a three view. Since this was bigger than what my Super-Mattel Psychedelic Machine can handle in its little vacuforming plate, two styrene shells were cut and formed, trying to convey the underlying tubular structure of the original. An interior was produced as well as the other, many, flying surfaces –one fin/rudder, one stab/elevator, two auxiliary rudders under the stab, two more following the engines nacelles, one fin under the fuselage and last but no least a small wing between the engines. Bombs from the spares bin were transformed into more useful engine nacelles (I always like that part). The abundance of struts was dealt with using metal Strutz, and Aeroclub aftermarket Salmsons and wheels. Decals of course were home made. It wasn’t that difficult: just get a stork, an umbrella, a pancake, two blenders and a fish. Mix everything well and Presto! I can’t feel but admiration for the boldness, creativity and gills of the remarkable bunch of designers, mechanics and pilots -some times one and the same person- that contributed so much to aviation and, in the process, to general amusement. A real Joy.
- 9 replies
-
- 29
-
-
- Joy JX
- scratchbuild
- (and 1 more)
-
A build from 5 years ago: Another example of how blind can the establishment be regarding a new , perfectly viable concept: a metal monoplane in 1921, the Golden Era of the Biplane Dinosaurs. How can you not be touched by the old photographs of these chubby, lumbering, stumpy monoplanes making their way through grass airstrips. Interestingly enough, the metal, corrugated skin monoplane formula that this plane embodied was being advanced since early in aviation times by Hugo Junkers, a brilliant man that is more often (and more unfortunately) associated with WWII, obscuring the fact that he despised and rejected the nazis, who ousted him from his own company in the 30s. The basic design configuration of the K-16 (1921) -a two-passenger plane- is a bit reminiscent of the Focke Wulk A16. The FW A16 flew later on (1924) although with three/four passengers. Also following the same formula is the Russian Tupolev Ant-2, of 1924 (two passengers). The K-16 is a very good-looking little feeder airliner that reached many countries and ended up even in Argentina and Uruguay (pity I couldn't find more on the Argentinean one, only a bad photo on the Pavlovcic booklet on local registrations). The little chubby machine is wearing in this case the livery for the 1925 Rundflug. Again -as in many other occasions- my gratitude goes to fellow modelers -among them Matias Hagen and Sönke Schulz- for their help with this project.
- 20 replies
-
- 27
-
-
- Junkers K-16
- scratchbuild
- (and 1 more)
-
This build has changed, instead of it being a conversion of the Heller kit the plan will be to scratchbuild the model without using any parts of the kit. On the real rebuild of HMS Victorious, from wartime fleet carrier to a modern angled-deck carrier of the jet age, the whole ship was completely cut down from the flight deck to the hangar deck. More to follow in due course, unless my medications run out! Mike
-
A build from 5 years ago: The albatross is an unwilling character of the infamous Monty Python sketch, but the Albatros (one s) is a nice cute little plane of the early 20s. Mind you, this is in the thick of the biplane era, that will last for (too) long. This remarkably "modern" design says a lot about about mainstream wrong choices. After some information gathering and much mulling over photos (found not a lot, but enough to get a sense) one of the plans was selected as a guide (plans are never, ever, fully correct, although they are of course much welcome especially for us, suffered scratchbuilders). I would like to provide you with a lot of information regarding historic context, similar designs, underlying design concept, the type variants, materials used, number of machines, their uses, the evolution from the L.59 into the L.60, some details in the photos that are a must to consider and so forth, but I won't. I happened to find in my magic little boxes a suitable pair of wheels, a very nice little engine that Master Modeler Matias Hagen from Argentina once gave me, my own scratchbuilt laminated wood prop made with extremely thin plywood planks and a couple of generic seats from some forgotten kit. So prepared, I proceeded to stare at the building board, a Zen meditation technique that brings relaxation, inner peace and universal acquiescence, but doesn't do much in terms of the practical issue of putting together a model. Day two Today more staring is done, not just at the plan but also encompassing the general vicinity and my own hands. The staring was interrupted to sip some Argentinian yerba mate and eat facturas, a pastry of the same origin. Not much actual modeling was done, but a great happiness was achieved nevertheless; i am starting to understand why people do not build models, and why some of them even actually specialize in unmodeling. Day three the first fruits of meditation: the inner realization that the Power of Staring does not cut through styrene sheet. Day 245 The Power of Staring showed the firsts positive effects
- 30 replies
-
- 23
-
-
- Albatros L.60
- scratchbuild
- (and 1 more)
-
Hi everyone. This is my first post here. I’d like to share a model I’ve been working on for a while. Its based on a drawing by artist Rob Turpin <https://thisnorthernboy.wordpress.com/> I really like the design of this ship . It has a real Moebius/Heavy Metal/ 70’s sci-fi paperback vibe that I really dig. I also like that its just a marker sketch and I can flesh out the details as I go. I found a 40mm styrene test tube, so I'll be using a piece of that for the bubble canopy. Based on this, it follows that the final model will be about 300mm long. The scale is ~ 1:87 (HO) I turned the base for the canopy on the lathe from some 2"polystyrene rod that I got from a local supplier. I also made the bottom ring to be glued on to add some extra detail. I cut a section out and fit in this gunpod from an airplane kit. The kit part was sanded to match the contour of the test tube. The gap was then sculpted in with epoxy putty. I vacuum-formed the front section out of .060" styrene over a form made from some high-density foam. The final thickness wound up being about half that. I had just made the vacuum former the month prior and this model is it's maiden voyage. The convoluted middle section was turned from the same 2" rod. That's all for now. Thanks for tuning in.
-
A model from 6 years ago. The Bellanca 28/92 is indeed an example of how unusual a particular product of a fairly traditional designer family can be. If you consider the other, more known Bellanca types, you would have never guessed this plane descends from the same ADN strand. The only other Bellanca type that trumps the 28/92 in rarity is the very peculiar Bellanca TES Tandem, which I really hope I’ll be able to build one day too. The 28/92 has many similarities with the preceding, more conventional 28/90 racer design. This glamorous trimotor started life as the result of a request for a long-distance flight plane. It was supposed to be flown by Alex Papana, who in 1937 clumsily managed to break it, have a tantrum, and leave the plane unpaid. The plane was entered in the 1938 Bendix piloted by Frank Cordova, but had to abandon. It then placed second in the 1939 Bendix at the hands of Art Bussy. The plane eventually found an obscure end being shipped to Latin America, where it was lost, after being bought by a military representative. What a sad end for such beautiful machine. I have seen models of this plane that have the colored areas on the nose and nacelles painted in red, black, blue and other colors. That seems not to be the case. So far I have found written evidence of it being aluminum overall with the mentioned colored areas in matt green. I would have really liked red or blue instead. The flowing lines and the three engines make this plane very appealing, with a stance similar to those racers flown by the heroes of the comics.
- 14 replies
-
- 26
-
-
- Bellanca 28/92
- racer
- (and 1 more)
-
Hello all! I must apologise and confess that I had been drawn to the dark side of non-maritime modelling recently, for which I humbly ask forgiveness! I think my problem is that I hit a brick wall with my previous scratchbuild project, the screw steamer Knight Templar. I managed to get quite a way into that build, but stalled. I have dabbled with a couple of ships, the latest being the Airfix RMS Queen Elizabeth. I have tried a number of times to get back to the Knight Templar, but I have put it on hold for the foreseeable future. I still wanted to do a scratch-build, and @Bandsaw Steve was kind enough to help me out with some plans, for the E23 Submarine, but at the moment I think that would be a step too far, but it will be done sometime. I have Suffolk/Norfolk blood in my veins, and a recent return to my roots has prompted me to have a go at building a Wherry. To that end, I searched Abe Books and found this little gem: Inside, I found these: One plan was scaled at 1 inch =10 feet, and the other was 1 inch = 8 feet. A frantic hour trying to remember schoolboy mathematics and ratios to scale both to 1/72 took place and I whizzed up to my local library to get the scans re-scaled took place. It then took a few tries to get the A4 paper into the right place on the platen, but then I ended up with 6 copies of of each, and then I redid some of them as sacrificial copies for when I start building. To ensure my maths had worked I remembered to take a tape-measure and measured the scale mark to ensure 1 inch = 6 feet! My intention is to try and build it in a similar way to the real thing (plastic allowing) and have some form of interior, and have the hatches removable. The reason I wanted to do it 1/72 was so I could get a couple of crew for it, and it should be easier at that scale.. The book itself is a fabulous read, and Roy Clark has put a lot of detail on construction of wherries into the text. Along with loading, operation and things like lowering the mast when going under bridges. It is amazing to think that most wherries had a crew of two, some only one! One such part reads 'a wherry was not properly loaded unless a robin could drink off her decks'. Now, that got me to thinking about putting her in a Broads waterway, but all I would have was a mast and sail (black of course) and a bit of cargo visible. So I am going to try and do her as a full hull. It is funny how things turn out. I was searching for potential models, and found this: https://www.kartonmodellbau.de/epages/63481486.sf/en_GB/?ObjectID=49327947 Hopefully, it goes to HMV models paper model of Gleaner and Albion. The trouble was it was only 1/250 scale, so they were too small. However, that led me to Albion, which is a wherry that is still in use, and forms the main subject of the Norfolk Wherry Trust, and I have found loads of photographs of that. My model may well end up as hybrid of the two, but the book does give some detail for Gleaner. She was built in 1894 and was originally called 'Orion' and had a load limit of 25 tons, so was a smaller wherry. He also gives details of Gleaner's colours, so hopefully I can get something reasonably close. I am likely to take some time with this, but first I need to figure out how I am going to do the hull. My first thought is to try and build the hold, cabin and coal bunker, then build the hull around it, thinking I can pack out the hull easier with a core already built up. I would also like to make the mast swivel on its tabernacle, but I will see about that later if I get that far! Any advice would be greatly appreciated, along with warnings if I say I am going to do something which is patently wrong! I have been known to mis-read plans, and my nautical knowledge is sketchy to say the least... I will report soon, all the best, Ray PS, Some wherries even went to sea, 8 of them sailed around to Gosport from Lowestoft - most made it, one had to be run up onto a beach when she ran into difficulties
-
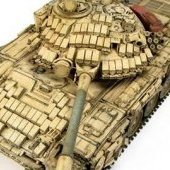
Hi all This is a 1/72nd scale scratch-built turret of the first production version of the Ukrainian T-84. I've co-authored a new book on scratch-building techniques, my contribution covers building this in detail from start to finish. https://www.insidethearmour.com/product-page/more-scratchbuilding-masterclass regards Alex
-
We're currently having building work done in the house so not much motivation, especially for modelling at the moment, therefore I have been spending a little time repairing lost mage links in some older threads. This one is a scratchbuild of a Topol ICBM on a seven-axle MAZ-543 chassis. It was part of a group build in 2013 but I thought I would resurrect the link here in the armoured section. cheers Mike
-
Hi all, For various reasons I set this project aside back in the summer. Then our photo sharing went belly up. I have gotten back into the model and I have Flickr for my photo sharing. I will be re-posting the earlier pictures over the next few days and updating the text a bit in light of the long break in time. Thanks, Jim The Original Start: I have wanted a model of a Y-wing for some time. In my mind, the Y-wings are rather like the F-4 Phantom family- reasonably fast, rugged, multi-mission, and they were around for a long time. As I thought about a Y-wing model, some baseline goals became apparent. 1. I wanted one in 1/48 scale 2. I wanted a model of a “real” Y-wing, not a model of a filming model 3. I wanted the ship to be in flight 4. I wanted to install lighting (a first for me) 5. The cockpit needed to be deep enough to take a full pilot figure, and while I was at it, I wanted to make a two seater- the Guy In Back should be a WSO however, not a gunner. We’re going to be carrying guided proton bombs as well as the proton torpedoes on a regular basis with this baby! I started by assembling as much information as I could find and drew up some plans. I found a few pictures of a Y-wing filming model from ROTJ from the studio with a tape measure in the image; I resized them to appear in half-studio size on my computer screen and that gave me a length of a little under 14” for a 1/48 scale model. I used the images to make basic measurements and drew up a set of plans from which to build the model. I began collecting bits and pieces, lighting parts, and interesting bits from many sources about three years ago. I found some nylon plumbing pipe which would become the engines, and a wooden egg which I could use to vacuform the front engine domes and the vectral housings at the rear of the ship. Without those elements, there is no Y-wing! Now how can I build this beast? I soon decided that creating open bulkheads, ribs, and stringers (following traditional aircraft construction) would not be as robust as I wanted. Based on goal #2 above, I chose to build a ship with the “guts” on the inside; remember that the filming models were solid shapes with the “guts,” or greeblies, on the outside. But even if you want to show interior spaces you still need a robust model. In reviewing the various Y-wing pictures on-line there appears that there could be a central tub in the fuselage; see the pic below. They show the top edge of the tub shape I am talking about. My buddy Boz mentioned the idea of making something like the tub found in F1 racing cars, and that sparked the idea of having a central tub running from one end of the fuselage to the other. I added a series of solid bulkheads plus quarter-round pieces to give greater gluing surface, and in the end I got a fairly robust tub which I could add details to, both inside and outside the tub itself. More to come!
- 81 replies
-
- 14
-
-
- diary
- scratchbuild
- (and 1 more)
-
Hello everyone, I've been looking around here for a while and now it's my turn to contribute. I returned back to modelling a couple a years ago. And after building a couple of models I found that my creativity wasn't triggered enough by just putting together pieces someone else had made. I read all I could find on the internet and when I felt like I knew enough to start I kicked away. This build started somewhere last spring so I try to recreate the progress. Materials used, scrap electronics, cardboard, plasticard and spare parts from other kits. First step was using an old dock station for a laptop as a base and detailing it, this would later become the centre area underneath the spaceship.
-
Dear forum members, I have seen the wonderful Turbolaser diorama from Tony Agustin from 2003. I was so fascinated from his work that I decided to build one as well. As I was not a model maker and have never tried to build something from scratch this project has been a big challenge for me. The X-Wings are from Bandai 1:72. In total it took me 200 hours +. I hope you like it!
- 31 replies
-
- 45
-
-
-
- Scratchbuild
- Star Wars
- (and 1 more)


.thumb.jpg.ba34a9f6ddce411193946dbdcc7b5fe8.jpg)