Search the Community
Showing results for tags 'scratch'.
-
 Hi all Haven't posted much in the way of build photos as this one just didn't seem to appeal to many. It may still be that way but it is what it is and I enjoy doing them. So, this is a hand carved Ferrari (the eighth I've done of this model), but this time I wanted to hack it from nice woods ... mahogany and padauk ... with some light coloured veneer, then give everything a highly polished lacquer finish. Decided to do a matching pattern on the base just for fun. Not highly detailed as I like my wooden models mostly to emphasize and concentrate on the beautiful shapes of these early cars. OK, I'll let the pictures speak for themselves. Enjoy (I hope) Frank Other Scratch builds ... Lancia D50 Sport Fishing Boat Half Hull Boats Flying Scotsman A3 Lola T70 Mk 1 Dragon Sailboat
- 21 replies
-
- 22
-

-
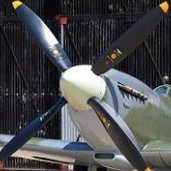
1/32 Scratch-built Sopwith Camel in mainly basswood with oak prop, walnut axle, gun barrel cooling jackets and cylinders and bamboo struts plus brass odds 'n' sods, finished with 0.1mm rigging thread. As with my earlier Spitfire the brief from Controller, Home Forces was that it could be a wooden sculpture rather thaan a painted awar machine, so it is left just varnished. About a month start to finish, but actually more like two solid weekends of doing with lots of gaps in between. Not sure what's next!
- 13 replies
-
- 29
-
-
Welcome omce again my friends to the show that never ends. This months lesson in wood fondling will be a demo of how to find a camel in a plank. Specifically, uncovering the sopwith camel that is hiding inside the offcuts of my spitfire build. Step 1, plans and bits Part B, Hercule Poirot's moustache: iii, carefully measure the fuselage Four, get distracted during planing and take too much off, plus the top of my finger. Grrrrr More anon when the bleeding stops. Nick
-
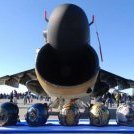
 The epic movie "The Flight of the Phoenix" is a favorite of many modelers and aviation enthusiasts. Two versions exist, from 1965 and 2004. The first is the one that will occupy our attention here. It would be redundant for me to abound in comments and notes about the movie itself, since most are familiar with it, and if not a quick Internet search will provide all the necessary background, plus I like to use the available time to build. Suffice to say that the movie used several airframes for its static and motion shoots. Of course there is the "original" plane that has the "panne", the Fairchild Packet. Then the plane that is "built" from it, then the plane used by Paul Mantz (Timm-Tallmantz P-1) for the real flying sequences, and then the modified North American 0-47 used for some shots to cover for the demise of the Timm-Tallmantz P-1. (Here at Britmodeller you have an excellent representation of the "static" plane by Mike N): I will be aiming for the plane used to film the flying sequences (there were actually two, see below). There are many differences between the filming static prop and the flying machine designed by Otto Timm. The static prop has a three blade prop, if you excuse the redundancy, while the flying machine has a two blade prop. The wing on the static prop has a more elongated appearance with more squarish tips, while the flying machine has a shorter wing with round and narrow tips. The noses are very different, even if at first glance they look somewhat alike. Many other differences can be spotted. Sources state that to expedite construction of the flying machine Tallmantz Aviation used the nose, engine, prop, cockpit and wheels of a North American T-6 Texan, as well as the outer wing panels from a Beechcraft C-45 Expeditor, so I got those kits ("used", at a fair price) to expedite my construction too, although this is not going to be a fast one, since the schedule ahead looks busy. The main body is a cylinder, while the tail is a cone, as in the original. The tail feathers will be the usual styrene sheet construction with spars. The old Heller kit and the parts that may be used: Since these are going to be cannibalized, get affordable ones in a used state: Parts that may be used from the Texan: A couple parts are glued to determine the diameter needed for the main body:
- 112 replies
-
- 10
-
-
- scratch
- movie planes
- (and 1 more)
-
 Hi, Aero A 101 was a light bomber-recce airplane. It was a kind of developmnet from Aero A-100. However only few parts remained unchanged. In general it was about 10% larger by wingspan, also chord of wings and by lenght of fuselage. Instead of V-engine, 12 cylinders Hispano-Suiza (case of A-100) the A 101 was powered by 1000 HP 18 cylinders licence build of Isotta Frascsini engine. There is a model of A-101 by Planete in 1/72 but I was thinking about doing this rather massive conversion since already 15 years and currently I have just did it! The whole build of two Aeros was subject of WIP Almost all produced (~50) Aero A-101 were sold by Czechoslovaks to Spanish Republican Government but about half of them (22 transported on Panama ship from Polish port Gdynia) were captured by I think German navy making blockade in Golf of Biskay and those went to Nationalists. Majority of them served in northern front in 5G17 groupe, but some were present in Andalus, in group 4 G 10 which has base in Grenada. My model of 17.12 represents machine from Grenada, 1937 The prop is rotating And just for comparison with A 100 (#20 this year, # 390 on shelvs)..... Comments welcome Regards Jerzy-Wojtek
- 14 replies
-
- 24
-
-
- scratch
- conversion
- (and 1 more)
-
My friends I want to give you a way to make a scratch submarine with balsa First we choose the plan. I use the blueprints plans and I prefer there are three views of sub f.e Then I analyzed how make it. I seperate to the main submarine corp and the turret. I save the plan as foto and go to open with painture I zoom the foto in dimensions I want. ( Because I use leaves of balsa 1000mmX100mmX10mm the dimensions must be less from the Balsa) To make a sub 70 cm we want 8-9 pieces of balsa I fix them with cyanoacrylic glue and not with wood(water)glues because the woodglue will warp the balsa. Be carefull because the cyanoacrylic glue when comes in contact with balsa makes temperature and gas. You must me very hurry to fix the pieces I have a piece of balsa 1mX 80mm (if I use 8 pieces)X 100mm. That for the main corp. I calculate the turret and make the same with smallest pieces of balsa. Then I take a piece of paper and design the plan (all the lines) of corp from the zoomed foto. The same for turret, Cut the paper plan of sub and design it on balsa Then design the plan from upper side of sub (deck) Cut the paper Do the same design on balsa piece upper side. Be careful the lines to be on correct position in 3 dimensions We leave always a small piece of balsa and cut the balsa to the small around black lines.If do nt do that the sub with the sand paper work will have smallest dimensions . then with a sand paper on sand paper driver begin to scratch the balsa until lines We must have in our mind the geometry , symmetry and stereometry. The same do for the turret Be careful The external lines of plan are the real dimensions on 2 dimensions. The 3d dimensions give us the interior lines. In that level we use and the front and back plan to see the angles and curves. In that level the balsa "speak " to us. We see the scheme to construct and always must make small steps because the wrong difficult repairing. When we make the corp ....... we paint with wood varnish , dry well and with a sand paper smooth it. That for three time. The sand paper must be light Then paint with acrylic varnish ( I have nt foto of type 214 with acrylic varnish) We paint the acrylic colur 2 hands or more We fix the turret on corp. (the turret paint with the same way) For antenas etc I use plastic sprue, tooth peaks, and wires. For propeller make it from a piece of metal in scale For other accesories of sub I use interior pieces of mobile. You will discover a modelling microcosmos in an old mobile. (Barrels for machine guns are good and the lighters gas tubes) I am happy to answer your questions
-
A recent scratch build project that i have completed, Focke-Wulf 190 T-1. This is a fictional design of a Fw-190 D-9 fitted with a turboprop engine and tricycle landing gear. For the paint scheme i used a Tricolour scheme from a Fw-190 A-8 With the colours of Yellow 15 from a Fw-190 D-9, the scheme was weathered using a graphite pencil and various washes. I was happy with the overall build of the model but was not as pleased with the paint schemes finish as i had to brush paint rather than using a airbrush due to my airbrush being out of commission. Thanks to anyone who took the time to look over my build, look forward to hearing any feedback.
-
Hi, Yesterday evening I finished her. This is Potez 29 - small airliner, transport, ambulane and liason development of Potez XXV. In real thing it has common with XXV whole lower wings and upper ones except the center part, which was incorpoated with fuselage and wider, as fuselage also was. I di it similar - I used wings of Broplan Potez XXV (vacu) and buid our of scratch everything else includeing central part of top wing. The build was reported in thread The painting scheme was on side profile - but since the wings has no dihedral on side profiles you cannot see any detail. So it my reconstruction how it might be based on some photos. I explained my decisissions and motivations in WIP threat . Comments welcome Regards Jerzy-Wojtek
- 17 replies
-
- 21
-
-
Hi It is like that that Potez XXV and Breguet 19 are in a way coupled machines. From begining they were competiting and still if you think on one of them you immediately have to think on the second one. Since I am just about to finish construction of TWO Breguets out of a SINGLE Hit-kit kit I started to construct Potez XXV family. In my stash I have three of them: 1. Hit Kit Potez 25 TOE 2. Hit Kit Potez 25 Jupiter 3. Broplan Potez 25 A2 (Lorrain engine) However, I think that doing three Potez XXV could be a bit too much. Therfore I decided to to do: 1. Vichy from Indochina - P. XXV TOE (almost OOB if this term can be used in case of Hit-kit kit) 2. Spanish Republican P. XXV Jupiter - ex-Estonian (as above, however this paointing scheme is not included in box) 3. Scratch conversion to Potez 29 made with use of wings and some more parts from Broplan 25 A2. Here the painting scheme is from Marocco, 1943, but I have two others schemes in some French journal or booklet. Not decided yet which exactly I will do. There is a resin kit of this machine by Lift Here, but why not play with scratch a bit? The fuselage is winder and therfore the wingspand rised from 14.15m to 14.60m (in other sources 14.50 m) Therefore I have to cut the wing. The whole central part will be re-worked anyway... So As you see I started like playing 3NT in bridge. From the most difficult colour... Cheers J-W
-
 Its been a long time in the making but its finished. Its a long way of a clean build and the decals are very annoying but other than that is was great fun to build and i learnt lot about scratch and kit bashing. The bits and bobs used to build up the TEER HG Exia HG Kashatria MG Sinanju HG IBO weapons kit A screwdriver handle, hose connector, sample pot, hair clipper grader, some sort of electrical connector picked up from DIY shop, a plastic tube and a few bit of pla-plate and tube, the odd bit of copper wire and a few paper clips. This is my imagined ship from the Gundam universe that they call a mobile armor, this one is a massive over powered gun designed for bowing up space stations, small moons or asteroids Spec: Length 87.5m Height 27.5M Wide 45.0 (with arms) Weight 415t Speed Mach 35. Hyper Mega Cannon 5 Funnels High Energy Beam Cannon 2 High Energy beam sabres Battle Claw I-Field Barrier
 -
Hi, I posted PZL 43 A in Bulgarian markings recently and it was found exotic, but what I am posting now is even more exotic, I belive. As far as I know there is no model of this plane in any scale... If someone knows differently - please tell me. My model is a totally hand-made sculpure - out of scratch. On one photo you may see drawings, which were published in book "Sojusznicy Luftwaffe" ("Luftwaffe aliants"), published by Books International. I scaled it to 1/72 and it was a basis of the work. The machine is a kind of countrpartner of Lysender designed and produced in Bulgaria during WW II. The name of this airplane is Kaproni - Bulgarski (Bulgarian Caproni) KB 11 Fazan (Pheasant). It was driven by Bristol Pegasus XX engine (produced under licence in Poland before WW II and delivered to Bulgaria by Germans, after capture of Poland). 24 such machines were produced only. However - it is described in Wikipedia: http://en.wikipedia.org/wiki/Kaproni_Bulgarski_KB-11_Fazan. Model presents airplane which was used to fight with partisants in Macedonia during 1943. Please have a look and perhaps enjoy it Regards Jerzy-Wojtek
- 31 replies
-
- 35
-
-
- KB 11 Fazan
- Bulgarian AF WWII
- (and 1 more)
-
Hi, Back to secondliners. De Havilland DH 90 Dragonfly. One of "missed" (not produced) injection kit in 1/72. For me it bacame so much "missed" that I decided to do her out of scratch. There are some resin but very expencieve. Old vacu is not available, I think. I reported the construction work, together with DH 84 (far from finish as yet) on WIP: http://www.britmodeller.com/forums/index.php?/topic/234971246-de-havilland-dh-84-dragon-and-dh-90-dragonfly-scratch-conv-172/ (EDIT 26 JUl 2017 - it will be re-available soon I hope) So, this is my the newest production - today, when I was making photos the matt coat was not still very dry I am sorry that I havn't done it in British markings - I was searching for interesting camo for RAF, RAAF or SAAF (preferable - I had hopes for DE/MS/Azure) and I did not found any interesting one. I found some but typical. Thus I was considering Spanish (both sides of Civil War) or Danish (silver, what can be inconvenient for scratch build model) when I found in Net photos of a Dutch one - impossed to Royal Netherland Air Forces, 1940. This particular machine was destroyed during German invasion in 1940 (photos I posted in WIP). Here she is: And two last photos with help of flesh: Thank you for watching I wish all the best for everybody on the BM in New Year 2015! Cheers Jerzy-Wojtek
- 11 replies
-
- 13
-
-
Hi, About 10 Feb I started build of three Polikarpov R machines: two R-5 and one R-Z. There is a WIP thread on this. First R-5 (transport version in winter camo) I presented here already a couple of weeks ago. Now time for second one: the R-Z Natacha in Spanish Republican colours from fall of 1938. The presented here LN-045 was shot down along with five other R-Z on 23 Dec. 1938... She wear a Nungasser-like emblem on sides. Decals were home made (ughh....). Generally the R-Z is not just a variant of R-5. After constructing this model I consider it much different, similar or even more then the difference between Typhoon and Tempest, for instance. The original SH kit was seriously reshaped to match Michail Maslov's drawing o R-Z from his monography about R-5/R-Z family. Even despite small errors which I noticed in those drawing while compare them to photos (details in WIP). The most serious surgery was cuting out 5 mm from whole chord of lower wing (!). The whole tail was reshaped as well: fin and rudder are enlarged whereas tailplane was made smaller and different in shape. Wheels are a bit bigger and nose was also a bit modified. More details in WIP thread mentioned above. She looks like that: This is my number 32nd of SCW And here you can compare chord (especially of lower wings) of R-5 and R-Z On photo above, besides this old lady there is Soviet the R-5 limousine (transport variant). She was already on RFI some weeks ago, it is scratch conversion from Apex/Encore kit. The third one will be R-5 bomber (MPM vacu), likely in camo from Russian invasion of Eastern Poland in September 1939. Not very much left to finish it... Comments welcome Regards Jerzy-Wojtek
- 23 replies
-
- 20
-
-
- Polikarpov R-Z
- scratch
- (and 1 more)
-
Hi all, a "little" project for my Eighth Airforce stuff, all from scratch Cheers Macki
-
Hi First time I presenting something not RFI but in WIP forum. Some weeks ago I posted on RFI my Proctor, and I noticed that it was accepted much more than I was expecting. I mentioned there, That I still keep in the stash next Proctor, which one day I want to convert into Vega Gull P3. In last Friday this day suddelny came... I started in the evening. Proctor generaly is based on concept of Vega Gull P3, but has bigger fuselage to have more comfortable inside in early variants for also 3 people, later (like the Frog kit) for four. And wing have also larger wingspan etc... So first one had to make fuselage a bit (2mm) slim in the middle. I cut it with blade. Next I have to cut each half of fuselage into 4 pieces and remove some parts to adjust to the shape of smaller fuselage of Vega. In engine bottom it brake, OK, it will be reshaped anyway. Then I glued pieces together back. Then Humbrol filler Wings also had to be done smaller... The Saturday work - sanding - brought some results: and more body putty Some details for inside The canopy I am glueing window by window from flat card of transparent polystyrene Regards Jerzy-Wojtek
- 21 replies
-
- 13
-
-
Hi A small break in series of "old and odd Germans" which I am doing this year. Back to Hawker biplans. Actually, I started them in 2015, as a kind of glossa to build of five members of Hawker Hart family and a repair of mine 40 years old Spanish Fury. They are: Hawker Nimrod and Hawker Persian Fury II (Bristol Mercury engine). Let me start form the backgroud. I had one A-model Fury in stash and Ii was difficult which one of them should I do. So I bought the second one! The true is that I was thinking on doing both of them since time when I saw for the first time Persian radial fury in Profile Publication when I was a young teenager visiting together with my brother library of Krakow's Museum of Aviation about 1974. The Danish Nimrod "seduced" me shortly afterwards - we got from our Grandfather (who was living in London) a British book "Encyclopedia of Air Warfare - exactly that one: ( https://www.amazon.co.uk/Encyclopedia-Air-Warfare-Christopher-Chant/dp/B000I9NK1O) . Inside there is a colour profile (among hundreds of others) of Danish Nimrod. Those days the conversion from Matchbox was the only option but the problem was, that I was not able to do new wings... So I was waiting about next 40 years to do it now finally . As I told now as a base I took Hawker fury by A-model. The Bristol engine and cowling I took from old Letov S-328 (old KP kit) but I have to modify it a bit. Since I bought the new Special Hobby Letov (excellent kit indeed!), the old one from stash went to box with spare parts. The propeller is from AZ Hart (a spare one) as the exhaust pipes (but shortered). The oil cooler is a resin copy of A-model Hart one. The nose was a bit tempered and small other modifications were applied followings photos from Net and from a Spanish monography of Fury. Decals - the crown and the Lion and Perisn numberings are hand work with brush on decals. The national insignia are from set for F84F by Hi-Decal. What is really peculiar - the national insignia for Nimrod are also taken from the same set! - That is really funny that such decals containing Persian and Danish roundels together exists The Persian Fury is in presumable look from defense against British and Soviet invasion of Persia in 1941. Here it is: And mine "Iranian Set" - Fury and radial Audax (posted on RFI in last year already): More difficult was Nimrod. About construction I will tell below, let me show first a photo of both conversions nose to nose: And more photos of Nimrod: The painting scheme (on ski!) are from winter 1939/40 - not exactly from German invasion on 9th April 1940. But on that day nothis special happend to Nimrods - they were not flying at all... In all work I was following arictle in Small Airforces Observer (SAFO) from 1990. I discussed the problem of small/large tail (I decided to left small one) on a thread in Interwar section recently - many thaks to John Aero and Mike (KRK4m) for explanations and comments which they made there. Here is a page from SAFO and model: Going back to wings. A year ago I did DH 84 and DH 90 by scratch work - so I realized that I've got a know how of doing fabric covered wings. OK - more or less . So I start to do them. Below are some photos from progress. The lower wings I made from outer parts of upper wings of Fury (enlarged by about a single rib distance cut from lower wing). I sanded it to remove all ribs structere ans then started to draw new positions of ribs. The upper wing is in central part left from Fury and in outer parts it is made out of RWD-6 Polish model (of course following the drawings). Below are raw wings from top and bottom: So - I added ribs, covered gently everything with Tamiya filler, first sanding, then correct & sanding, correct & sanding etc... After first attempt - the slope a bit too big (this is a difference between the SAFO drawing and the second drawings which I had). So I have to break it and change a bit slope... And a fuselage That is all - comments welcome Regards Jerzy-Wojtek
- 15 replies
-
- 17
-
-
- scratch
- Hawker Persian Fury
- (and 1 more)
-
Bonjour tous le monde, Ceci est un nouveau scratch diorama 1/35 en cours, nous sommes au fond d'un estuaire de la Bretagne, Il y aura un quai liittle en bois et une cabane de pêcheur, un petit bateau en bois et un ou deux pêcheurs (je ne sais pas exactement en ce moment ...) Il est juste le début des travaux, l'altération de la cale et de la hutte est en cours ...... .....To be continued
-
Hello, here is another project that started with the pictures found in the internet. Even the tires had to be built from the zero. The scale is 1:25 The project is half made in resin, although my models are mainly built in tinplate In this picture the tires are from the old project that I made years ago. In this picture the tires are from the new project that I made this month.
-
Hello. I am planning to build a vihor tank. Since there are no kits for this tank on the market I ll have to modify the T-72M 1/72 Revell kit or some other. The vihor tank was partially based on soviet T-72. The frame is the same, the number of wheels, the gun and some other smaller parts such as headlights and machine gun on the top of the turret. Other parts are different such as the turret, side rubber skirts, mud fenders, upper plate on the hull and other things. The biggest challenge will be the turret modification and I don't know how to pull that out. I have no experience in scratchbuilding so I ll need a lots of advises. One of my plans was to buy a resin modification set for the M-95 degman tank which is based on vihor but I ll have to cut a lot and still wont have that I need. I ll post you the pictures of vihor and then you'll be able to tell me what to do in order to convert the T-72 tank into this one> THANK YOU IN ADVANCE
-
 Hello , This is an old diorama ( i built it 25 years ago ) it doesn't exist anymore because of an "accident" in a moving house. ...only 2 pictures to remember it A typical 60's little wooden boat ( with a little inboard engine ) leave a small harbour in Côtes D'armor
- 9 replies
-
- 8
-
-
- Typical
- Wooden boat
- (and 4 more)
-
Hi guys! Let me show you one o my older plane. It was a really quick building out of the box, with some scratchbuilding just for fun! Hope you like it, thanks for watching! Matyi from Hungary
- 13 replies
-
- 22
-
-
Hi, Promised few days ago and just finished - second one radial Audax, this time with 9-cylinder Bristol, next of my "Hawker Hart Family mass production" - the Hawker Persian Audax. Model was scratch converted and detailed from AZ Hart B4 kit. Markings are following the Profile Publication scheme with small differences based on speculations or photos In Interwar section I tried to discuss confusion I have with details http://www.britmodeller.com/forums/index.php?/topic/234986512-persian-audax-1941-confusion/ - many thanks for most of all John Aero for his comments, which encourages me with finish. This machine is in markings of 4th regiment based in Abadan. However - the numberals on cowlings and upper wing are Perisan "2" - why not "4"?. The individual number is 253 (read from right to left). She is suppoused to take part in few days war against British-Soviet invasion of Iran in 1941. Since it was short war and before it machine was exploited in peacefull time and was repainted shortly before the war - I made very delicate weathering despite desert condisions there. Here she is: Comments welcome and thanks for watching Regards Jerzy-Wojtek
- 19 replies
-
- 21
-
-
- Iran
- Hawker Audax
- (and 1 more)
-
Hi, Something what I just finished, not the archive one. Northrop Gamma 2E, China markings from second Sino-Japan War, Hankow 1937 (till perhaps 39?) I started this about two years ago and was standing unfinished for a long time. I will try to explain a bit why it was going so slowly - but first I would like to present the photos: Here I realized, that some mud or dust must be added on w wheels, so I added: The model is scratch conversion of Williams Bros Northrop Gamma 2a/2b kit Here is a couple with another Gamma from my shelves - the Spanish one 2D. And here those two with Northrop Delta - which I also converted from the same kit: They used the same wings, undercaridge, horizontal tail, in case of Gamma 2D and 2E they basicly have the same fuselage, but 2E has shorter engine bad... Gamma 2D and Delta were alredy posted separately before. Well, I have to confess something. All those three models are made from a single Gamma 2A/B kit from Williams Bros.... I breed them - I copied some needed parts in resin... Here one can see that it was resin indeed: I engraved the lines and added details which differ them.. The canopy is made of 15 separate sheets glued together : This was a kind of pure "academic" work (opposite to work on Delta, which is really hard to get AFAIK ) since the Gamma 2E exists as nice resin kit by RS. Nevertheless - It took me some time. Finally I would like to present my small set (as yet) of China airplanes from first part of second Sino-Japan (before 1941). All of them I posted already separately (Dewoitine, Vultee V11, I-153) Thank you for watching, comments welcomed and regards Jezry-Wojtek
- 16 replies
-
- 17
-
-
- Northrop Gamma
- scratch
- (and 1 more)
-
 Hello everyone: group photos of my recently finished Egyptian MiG-17F and MiG-17PF Frescos: the MiG-17PF in natural metal is from around the 1967 war with Israel. Hobbyboss plastic (very good, hardly any problems) still in UARAF (United Arab Republic Air Force) markings, decals are sourced from various sources, the 31st squadron "bat crow" unit insignia was printed at home with the artwork provided by Tom Cooper, thanks!!, see in progress build KK-2 ejection seat is from Aires (a bit small!), 23mm cannons and pitots are from Master and very recommendable! the MiG-17F is from the closing stages of the war of attrition/ beginning of the Yom Kippur war, in cmouflage colors, but an example apinted before the Nile valley camo scheme was introduces fleetwide. the flag shows the Hawk of Quraish which was used from late 1972 up until the 80ies when it was slowly replaced by the current Eagle of Saladin. Decas are Hi-Decals, which at the moment seem to be the only ones who provide the correct flag for this time frame. the decals were reshaped though. Arab numbers come from the Iraqi airfoces decals sheet from Lindenhill decals. cannons and pitots are from Master, the KK-2 ejection seat is from Neomega resin (very recommendable!) the MiG-17F is armed with one 37mm and 2 23mm cannons in the nose, as well as 8 Sakr rockets and 2 250kg bombs on fuselage pylons only to be found on Egyptian MiG-17s! in progress and lots of additional information from Tom Cooper, many many thanks!!!!, without your help this build would not be half as accurate!!!!!, and all the others that contributed can be found here: http://www.britmodeller.com/forums/index.php?/topic/234974798-mig-17f-and-pf-fresco-june-1967-and-war-of-attrition-1967-1973-double-build-148/ so here some impressions: now fully armed: more photos of the individual planes will follow soon if you want thanks for looking, reading and your comments! regards, Werner
- 13 replies
-
- 17
-
-
Hi Some months ago I posted photos of my scratch build of Caproni Ca 309 Ghilbi http://www.britmodeller.com/forums/index.php?/topic/234971248-caproni-309-ghibli-scratch-172/ Continuing - next from Caproni shelf - the Ca 310 Libeccio in Norwegian markings. Norway had only four Ca 310 received, although initially they wanted 24 of them. In net it is now easy to find some photos: http://www.airwar.ru/image/idop/bww2/ca310/ca310-15.jpg http://en.wikipedia.org/wiki/Caproni_Ca.310#/media/File:Caproni310.jpg It was much worse years ago when I was making this model... I made this model as scratch conversion of Italeri Ca 311 about 10 years ago. Whole fuselage is a scratch construction. In fact - it is even worse. The whole model is made from resin, all parts which are the same with Ca 311 like wings, engines, propellers, tail are resin copies of Italeri Ca 311, not the original styrene parts. I had just one Ca 311 and wanted to do have two models...Or rather three - since some copies were used also to construct Ca 309. Obviously it would be much simplier to convert them from normal plastic kit. But those days Ca 311 was not available at all. And this way there was more fun, do you agree? -I hope "yes"! I made it on wheels - It is likely that during German invasion in April 1940 she should wear skis, not wheels. But I did not have drawings for skis. So I made wheels. Nowadays there is a nice model from MPM with skis already in...However - I found recently in net a photo of captured Ca 310 in Stavanger - and she is on wheels. Anyway - mine is on wheels http://xoomer.virgilio.it/f5avipatches/ca%20310%20page.html So, mine Ca 310 looks like this: Thank you for watching - comments welcome Regards Jerzy-Wojtek
- 5 replies
-
- 9
-
-
- Caproni Ca 310
- Norway 1940
- (and 1 more)