Search the Community
Showing results for tags 'scratch'.
-
 Hello folks, inspired by my friend Francis who recently built an M47 Patton, I decided to present the Croatian Balkan War version called “AZDAJA”, that means “DRAGON”. Look the real tank...these are the only two photos about AZDAJA that I found. Note that the tank does not have the headlights: and have the T80E1 links.... For this project I will use the M47 Patton from Italeri, kit number 6447, and I will added a set of photo-etched and resin parts from DEF Model, code 35024, plus the set of metal tracks T80E1 type from Fruilmodel, code ATL-145, and decals from Star Decals 35-C 1085 M47 Patton Balkan War and Peace. I agree with the others modellers that despite its age, this M47 is one of the best kit produced by Italeri, and it is a great platform for improvements. Well, first I assembled the bottom of the hull, the rolling train, I added some missing bolts (only 68) in the most notorious parts of the supports of the oscillating arms: Then, I added casting detail and foundry numbers in the hull and turret, and I replaced the support for the .50 machine gun and added rear lubrication points too: After that, I scratchbuild seven triangular hooks and added more 4 bolts over the rear plate, plus I made corrections in the gun lock: That's all for now...
- 54 replies
-
- 15
-

-
- Scratch
- photo-etched for tank
- (and 1 more)
-
This has been on the beach in it constituent part for a while so I thought I would put them together tonight, I still want to add a track cover over the top of the ball but it mostly ready to paint I think.
-
Farman Moustique (mosquito) Winner of the Tour de France, 1924. The diminutive motoaviette Farman Moustique is simple in nature and quite straightforward, nevertheless requires care and attention to detail. The flying surfaces are ribbed and had rib tapes, making them suitable to develop those techniques. The fuselage is mainly a box, but has some additional volumes on the rounded front, curved belly and behind the pilot, and some details like the cabane struts and pilot office. Having wing rigging and control cables and horns exposed, more detailing can be practiced. The completed model is here:
- 6 replies
-
- 13
-
-
- Lightplane
- Scratch
- (and 1 more)
-
 Found yet another one, from the dawn of my scratchbuilding efforts, a model from 13 years ago. What is an Archaeopteryx, besides a very good Scrabble word? Literally, an “ancient wing”. And you know that with that kind of name…err, it will look…well, you get the idea. The Granger brothers started to build a plane upon a design of their own -refined by Latimer Needbam- that flew in the very early 30’s. It was influenced by the equally bizarre –read “beautiful”- Pterodactyls built by Capt. Hill. Although unusual, it has a pinch of elegance. The engine used, a two cylinder 32 hp Cherub of very limited power, made take offs very…interesting. Being a small plane of course it renders an equally small model, as you can see in the image with the quarter. The Archaeopteryx –sorry to make you read this word again- is a fairly simple scratch project, no doubt helped by the use of tiny brass “Strutz” for all of the –many- required homonyms. The photo sequence will provide you with a general idea regarding materials and construction steps. As this little moth-like bug flies off your book case into the eerie atmosphere of the room, it will remind you of Tinkerbell, leaving a sparkly trail as it lands, with a subtle shudder, on your building board. A couple of mentions on Flight Magazine (links to their archives) https://www.flightglobal.com/pdfarchive/view/1935/1935 - 1503.html?search=granger archaeopteryx And with a different tail decoration: https://www.flightglobal.com/pdfarchive/view/1933/1933 - 0268.html?search=granger archaeopteryx
 -
Howdy forumites, its been a long time since I rock'n'rolled, but never mind that now. Today, may I present for your consideration a carved wooden series 1 Jaguar E-Type at roughly 1/24 ish scale. Entirely scratch built out of panga panga and basswood, with a little bit of plastic and brass. Took about 6 weeks with numerous pauses while work kept me away from my toys. I Don't think I'll use panga panga again, it is a bit of a pig to carve as it is splintery, and the heavy grain overpowers smaller details. however, it turned out all right, and taught me some more about the joys of whittling. Until next time, keep your tools sharp and your fingers out of the way.
-
A very tiny cute little thing from 2 years ago: The light plane concept of course isn't new, and during aviation history a significant number of efforts were directed to produce a small, affordable, low-maintenance, low-power, low-consumption, one or two person machine that could be (hopefully) acquired and used by a large number of people. The concept, as we know, er...never really took off, but many interesting planes were produced, mainly in small numbers. England was one of the supporters of such concept, and organized many events and competitions to entice design and production of light machines. The Parnall Pixie is one of such machines. Designed by Harold Bolas, it was produced in the early and mid-twenties and came in four flavors: The Pixie I, a long wingspan, two person machine; the Pixie II, a short-span, one person plane; the Pixie III with some modifications and refinements, and the IIIa, a strange-looking biplane obtained by the simple prospect of slamming a small wing on top of the plane. The Pixie II, represented here, a sort of "racer", reached more than 70mph (110kph +) with a Douglas engine of 750cc! (bigger than the two-place Pixie one, that had a Douglas of 500cc). The plane had pleasant lines and had a very simple and awkward landing gear that did not have shock absorbers, but actuating just but flexing its steel components. A small number of Pixies was produced, and eagerly participated in many sport events. Other power plants were used, but always on the smallish side. The Pixie II was of reduced dimensions, with a span of 28"6' (5.43 meters!), so the model is also small of course in 1/72. Applying the habitual techniques I normally use for my scratchbuilt models, the main components did not take long to line up. Aeroclub prop, engine and wheels were added to speed-up construction. Care must be exercised in replicating the particular change in airfoil section: thin at the root and wingtip and thick in the middle, a detail some times obviated by modelers. A similar concept model of the De Havilland D.H.53 Humming-bird (manufacturer spelling) -a plane designed under the same concept and flown contemporarily to the Pixie- was just posted here. Originally it even had the same Douglas 750cc engine. Bibliography: Parnall Aircraft Since 1914 (E. Wixey) N.A.C.A. Technical Memorandum No. 261 The Light Plane since 1909 - J. Underwood The Light Plane Meeting at Lympne, Flight Magazine, Oct 18th 1923 The Lympne trials -Ord-Hume Decals again by Arctic Decals:
- 3 replies
-
- 12
-
-
- Light plane
- sports
- (and 1 more)
-
A build from 2010, nine years ago, when the only option was the extremely poor Delta 2 kit, and way before the exquisite kit from SBS was released. See, kids, we had to make our own models if we wanted something! ask the Yorkshiremen! The Macchi Castoldi M.C.72 is so famous that I won’t bother with extensive introductions or descriptions. With an aura between the paintings of Giorgio De Chirico and the sculptures of Marino Marini, the pure lines of the MC72 speak for themselves. Suffice to say that the speed record it set in 1934 for seaplanes still stands today, 76 years later! It was powered by a FIAT AS.6, which was actually two AS.5 in tandem. It used surface radiators on the wings, floats and, if needed, in the lower back fuselage. Two sets of contra-rotating props were used to cancel torque. Once more the scratchbuilding approach was needed in order to have one. A little relief came from the generic Aeroclub pontoon vacuformed sheet that is available from some vendors. This has floats that were a good general fit to the ones needed here. The fuselage was carved from basswood but since my Mattel Psychedelic Machine has a small plate it couldn’t be used to vacuform parts and the original was used instead. Flying surfaces were made of styrene sheet and for the pontoon struts Contrail airfoiled stock was used. The struts were given the correct silhouette and pins were inserted at the ends in order to facilitate assembly later on. An interior was built with some structural detail, seat, joystick, rudder pedals and instrument panel, but -as it is some times the case with these types- very little can be appreciated due to the small cockpit opening. A spinner that needed a bit of adjustment to match the plan was found in the spare box. Prop blades were carved using as a base a discarded four-blade prop. The vac floats were glued, re-contoured and prepared for receiving the struts. Once those bits came together and after priming and painting decal time was up. I decided to work the radiators as a two-decal endeavor. A metallic brass coat was sprayed on decal paper and the radiator pattern was printed on another. Masks were cut and then the decals applied. For the statistic-inclined here are all the decals used: 2 black strips to cover the exhaust areas 2 aluminum strips for the stripe underneath the precedent 2 registration numbers in white at the base of the tail 2 Italian flags on the rudder 2 crests on the mentioned flags 4 brass decals for the wing radiators 4 brass decals for the struts 4 radiator patterns for the wing 6 radiator patterns for the struts (the front pair, as it is angled, required both sides covered separately 2 tiny aluminum covers on the nose on top of the upper oil radiator 6 louvers on the front fuselage 4 louver pairs on the belly 2 red strips that cut the lower wing radiators in half 1 black strip on top of air intake 6 little decal strips for the canopy frame 6 hinges (they are only little red squares to represent the fin hinges protruding into the rudder) 12 for the radiators on the floats (again, these are two-stage decals) Total: 67 To that 16 streamlined struts were added and a trolley was build to support the model. It is a joy when design encompasses beauty and efficiency, isn’t it?
- 10 replies
-
- 21
-
-
 I thought it was about time I started a kit bash and scratch build again and it just so happens that the club build this year is some Russian tank thing, well most peaple will see a Russian tank I see a anti-grav self propelled rail gun, so I have been rummaging for parts. Yakult bottles check, old remotes check, old kits and plastic bottles (doing my bit for the environmenta) check. OK let see were this goes......
- 53 replies
-
- 6
-
-
- Kit bashing
- Scratch
- (and 1 more)
-
A build from 3 years ago: (After this long series of models posted aiming to present the case that there is life beyond the usual modeling subjects, today I post what I believe is the last of what I can offer to you on this matter. I had selected an posted these last months a large number of models of unusual planes and/or unusual media. I left out of this chronology a number of more mundane builds for one reason or another, not considering them relevant in this context. Today I post what you may see as my closing arguments 😉 regarding what I been building during the past 12 years or so, so from now on I hope I will continue to post the normal builds as WiPs or completed models (I still have no fondness whatsoever for the phrase "Ready for Inspection" and would gladly substitute it for RtF -Ready to Fly). Anyway, here we go: I simply can't resist the bizarre. (A photo of the original plane -and the model- were featured in the very informative aviation publication Arawasi International magazine #13, Summer 2017). Long ago, when I saw on a Japanese site this beauty, I took note and opened a folder for it. The folder, in spite of my best efforts, remained after many years with only that one photo. My Japanese friends and the Japanese sites I wrote to, weren't able to find anything on it. As you can see this delightful contraption was based on a Nieuport 24, of which the Japanese had many, some in very nice civil liveries for which you can even get decals (Rising Sun, for example, produces a set for J-BAFC). I also found online an interesting photo of three Nieuport 24 that were apparently raced by female pilots for a demonstration (J-BAIF, J-TEIO and J-BAPB), may be for another model down the lane. After the long wait during which no info came, I decided to give it a go anyway and bought the Nieuport 24 from Roden (Choroszy also produces the Japanese-built version, the Nakajima Ko-3). The kit from Roden is very nice, in line with their known standards, and as an unexpected bonus you get a bunch of spare parts (engine, props, wheels, stab, rudder, little thingies, etc.) since more than one version is packed in the same sprues. No decals are needed for this project, and that makes things easier (if you don't think on the 234 struts and many parts you have to scratchbuild). In fact, very little will be used from the kit, just the fuselage sub-assembly minus the bang-bang bits. Work starts then by intensely staring at the one photo and trying to make sense of it. A sketch was produced based on the proportions of the many elements and known measures of the kit's fuselage. The plane has two vanes protruding from the mid-line fuselage, a bit ahead of the pilot (acting most likely as ailerons) a "wing" on top of the fuselage and then above it two separate panels for yet another wing. This might thus qualify as a negative aspect ratio triplane. The mystery remains: what was it? who built it? and why? Did it fly? is it a triplane? is it a random accretion of parts flying now in orderly formation? Will we ever know? And meanwhile, should we call it Wingzilla? Here with another negative aspect ratio model posted here before, the Flick-Reinig Apteroid:
- 17 replies
-
- 29
-
-
- Experimental
- scratch
- (and 1 more)
-
A build from 11 years ago: The Ford Company involvement in the aviation industry had some bizarre, lesser known sides than its proverbial trimotor. Of this obscure past almost nothing exists now, as if a stealthy hand had erased the trail of some strange ventures. Among those ventures are the Stout Dragonfly (a tandem amphibian design) and the subject of this article: the Ford 15P flying wing. These designs followed the same pattern of the Ford Flivver, aiming to provide an affordable ride to every-day people and in doing so supposedly replicate the success of the Ford automobile. Not many photos exist to document the 15P. There was a mock-up with a faked registration and then the real thing. The lines were very attractive; the engine was behind the two-seat side-by-side cockpit and transmitted power to the tractor propeller via a shaft. And in case you are asking yourself yes, the engine was indeed a Ford V-8 engine. For 1932 the design does really look futuristic, with those curvaceous, trousered landing gear legs and the tear-drop blended fuselage. The 15P flew quietly into oblivion, though. The model consists basically of one upper and one lower vacformed shells with the addition of wrap-around style styrene sheet wings. A succinct interior was provided and a few external details added. The gear legs, given its complex curvatures, provoked a bit of head-scratching during the construction process. The issue was finally solved using several pieces of styrene to determine the general shapes and then “rounding” with Milliput. MV Products lenses were used as landing lights. The originals look a lot like car headlights. Finally, the chubby although somehow racy shape of the 15P came to light and surely Humpty-Dumpty would not have been uncomfortable flying this plane and, like the character, it just makes you smile, doesn’t it? -I would like to thank Mike Fletcher and (the late) Jim Schubert for their help with this project.
- 18 replies
-
- 23
-
-
- Ford 15P
- flying wing
- (and 1 more)
-
A build from 11 years ago: The Demonty-Poncelet was the first Belgian enclosed cockpit, side by side, foldable wing plane. Also reportedly it was the first plane that caused ladies to faint at its sight at aero-shows and the first plane that used a corset, hence the sinuous lines of its waist. It was very active in the 1924/25 period participating in aerial meetings and even won a few prizes (not the beauty contest, though). The first incarnation had a Gregoire engine, an adaptation of a 4 in-line car engine. Then an Anzani of 6 cylinders was installed, modifying noticeably the nose area. It sported a not very common 3-blade propeller and had an all-flying stabilator. That fist version also had to carry the Lamblin radiator on its back, adding to its already notable aesthetics. This first machine was named “Cyrano”, most likely due to the prominent nose that the Gregoire engine imposed on the design. At this stage the plane had only painted the word “Cyrano” on the nose side and no visible registrations –on the existing photo of that early version-. Looking at pictures of later modifications it can be seen that at least 4 more different schemes were painted: Numbers 3, 8, 30 and one with just the registrations and no number. One unreliable source (the Lübeck Marzipan Fliegende Tageblatt) states that Hercule Poirot was a passenger in one flight. The model was built with the usual methods you would apply when using sheet styrene. The wheels came from Aeroclub Models. The tiny prop was made of aluminum sheet, glued to a styrene tube hub that had a metal pin inserted though it. The blades were warped to get the pitch and a photo-etched boss was added at the front. This was one of those builds were you can “feel” the pleasant design of the plane by just handling the components, like a stab or a half wing, even before the parts are put together. Colors are somewhat speculative, but most likely in the ball park. A “wood” treatment was applied to the corresponding model surfaces. The windshield area is not very clear in the photo of this particular version, so again some speculation was necessary. A generic interior was added to give at least the impression of something going on inside, although graphic data in that regard is missing, besides the side by side arrangement. The making of the model was possible in part thanks to information gathered by Tracy Hanckok and Alain Bourret, although they are not responsible for my potential mistakes. Now you know why they called the twenties “Les années folles” (the crazy years).
- 9 replies
-
- 20
-
-
- Demonty-Poncelet
- Aviette
- (and 1 more)
-
A build form 10 years ago: How could anyone resist the temptation of modeling a 1928 small blue and orange cabin biplane that has three doors and Felix the Cat painted on it? When I found the Knoll biplane on Aerofiles, I immediately fell in love with it. Later on I found more information on the Net at http://www.pknoll.net/knoll_aircraft/knoll_kn1.htm Where there was –a rare case with these odd balls- enough documentation to build a model. You will find that there were three versions: Knoll KN-1: three doors on the left hand-side, matching painted surfaces on the right hand-side. Knoll KN-1 modified with only two doors and inline power plant (Hispano-Suiza) (Reg. 8861) Knoll KN-3 with open cockpit on the upper aft fuselage and two doors. Louvers on the engine cowling. And I don’t need to repeat here what you can read there if you like to explore further. The Mattel vacuforming device provided the fuselage shells made upon a Sculpey master previously fabricated. A reasonable interior was also scratched and the flying surfaces were built using the time-honored method of suffering. Some wire and metal “Strutz” were also used, wheels came from Aeroclub. I started to chop down the nose of the model to create the space for the engine, making and correcting many boo-boos in the process. I temporarily sandwiched the engine between two thin layers of Milliput and pressed all the involved parts together to represent the neatly faired cylinder openings of the original. Any squeezed-out material was then removed and the parts later smoothed out. What can I say…: “-Kids, don’t try this at home”. A note for the younger among us: Felix the Cat, the cartoon character represented on the plane and model, is not the brother of “Hello Kitty”, nor is he Barbie’s pet. And since you are so savvy with the computer you can google him to learn who he was. I made the drawing of Felix myself, which was a pleasure and an honor given the immense amount of joy I had as a kid watching his cartoons. Accompanying images will give an idea of the building process as usual, although bloody pictures and violent scenes that portrayed what occurred during the building process have been removed for the benefit of the impressionable audience. After all photos were taken fellow modeler Alain Bourret made me notice that the wheels seemed aluminum color, which were therefore painted over with that color. Tail regs were also added, because they were not any good still on the decal sheet, were they? I made those of a goldenish color, and you can see those additions in the very last photo. And which do you think was Mr. Knoll’s first name? See you in the sky.
- 6 replies
-
- 18
-
-
- Knoll KN-1
- passenger transport
- (and 1 more)
-
Well, I have built so many models that I had actually forgotten about this other Uruguayan machine, scratchbuilt at the same time than the three others previously posted. Also part of my sinister past, another practical example of scratchbuilding that is all I want to convey, again hoping not abusing your esteemed patience: The Uruguayan ARME (nothing to do with arms, just the acronym of “Avión de Reconocimiento Modelo Escuela”, -Reconnaissance School Model Plane-) "Montevideo" -in honor of the country's capital city- was a vernacular creation loosely based on the Breguet XIX. It was an observation trainer powered by a 450 hp. Lorraine. One was equipped with floats –of archaic design- aiming to a Montevideo-New York raid (Via the Pacific Ocean climbing the Andes, not an easy feat) that fell short in Colombia. Three machines were built and operated from the late 20’s into the mid 30’s. This model was a commission that pressed a little bit more on the skills department, as the stringer-ridden fuselage needed a viable way to be reproduced. So again a wood fuselage was created, and again the lack of vacuforming equipment of the right size prevented a copy to be made; therefore the wood shape -done slightly smaller- once carved was covered with previously-engraved skin panels. Some small parts as per photos were vacuformed with the Mattel Psychedelic Machine, and the rest was created from styrene sheet of varied thicknesses again as per images. A wood prop was made and much fun was had with the 28 struts and rigging that populate the wings and attach the floats. The two cockpits were provided with generic interiors and the decals were home-made. The fuselage and tail added up to 75 parts, the wings to 12. Floats to 18. And better stop here. A number of images is included to depict the techniques used during construction, saving me (and you) from large explanatory paragraphs. Not in the same aesthetic category as the Uruguayan seaplanes posted here before, but this one had two merits: it was a local creation and after all its clumsy lines look in a –strange- way appealing.
- 20 replies
-
- 26
-
-

-
- School plane
- Uruguay
- (and 1 more)
-
I will post today, with your indulgence, Three Old Builds from my times as a sinner. Their only purpose for me is to illustrate examples of scratchbuilding. Here is the third one. In my defense I would say that these machines never fired a shot, being Uruguay the peaceful, welcoming and charming little country it is. These models were made as a commission, long ago, for a local collector. Once again Aeroclub accessories saved the day. The Hanriot H-431 (derived from the H-43 was 1928 a biplane of metal fuselage for training purposes powered by a Loraine Mizar radial engine. Uruguay ended up with one which is the subject of this article; a nice model to make, without too many complications. The accompanying images show as usual the building process.
-
I will post today, with your indulgence, Three Old Builds from my times as a sinner. Their only purpose for me is to illustrate examples of scratchbuilding. Here is the second one. In my defense I would say that these machines never fired a shot, being Uruguay the peaceful, welcoming and charming little country it is. These models were made as a commission, long ago, for a local collector. This Cant.21 began life registered as I-AAPW in service with S.I.S.A. in Italy. It was later acquired by the Uruguayan government and put to service but not as a civilian plane as we see it here. It looks a bit like a grown-up version of the Cant.18 I posted here before, and required a slightly different approach, since the fuselage was carved from wood and later hollowed. When I create a wood master I try to make a vac copy, but in this case the size was far bigger than what my Mattel could handle. The process of finishing the surface of the wood fuselage proved lengthy and laborious, necessitating a number of layers of fillers and primers in preparation for the final painting. If you are familiar with scratchbuilding you may have noticed that one tends to create first a “kit” and then proceed with the assembly. In this case the engine, gondola (another wood master for those parts), prop, supports and associated bits took more than forty individual parts to be made; the trolley ten and the interior only twenty one. The other parts went as usual as you can see in the accompanying images, passing the hundred and twenty parts not counting rigging wires and decals. Something you don’t want to think much about when you are building the model. Decals were of course home made, printed on white decal paper which fortunately was required by the images’ background anyway. It is interesting to note that in spite of being morphologically similar to the above-mentioned Cant.18, this model took double the time and more complex techniques to be finished. In the accompanying photos some diagonal wires are missing, those were added later, but I didn’t want to re-do the photo session. The Italians produced a plethora of flying boats and seaplanes designs, all with appealing lines and good performances, in a time when this branch of aviation made sense. One can’t avoid feeling a bit nostalgic contemplating them.
-
I will post today, with your indulgence, Three Old Builds from my times as a sinner. Their only purpose for me is to illustrate examples of scratchbuilding. Here is the first one. In my defense I would say that these machines never fired a shot, being Uruguay the peaceful, welcoming and charming little country it is. These models were made as a commission, long ago, for a local collector. The Cant.18 was a member of a successful and large family of Italian flying boats. The graceful lines of the type are complemented by the presence of the Issotta Fraschini V6 engine, actually a six cyl inline engine in spite of the “V”, and the Warren truss bracing. The type flew for the first time in 1926.
-
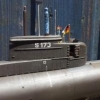
I finished this several weeks ago, but never got around to putting it in RFI. The build log can be found here; https://www.britmodeller.com/forums/index.php?/topic/235044294-israeli-improvised-armoured-car/&page=1 Thanks for looking. John.
- 19 replies
-
- 17
-
-
- Italeri 1/35th
- Panzerart
- (and 1 more)
-
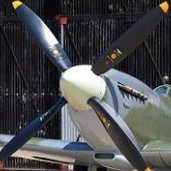
Hello you, and a belated welcome to 2019. Here is a quicky I did in the post Christmas blues, a Mozzie carved from wood and camouflaged with wood stain. Its a bit of a mishmash, its supposed to be the cannon armed fighter, but the cockpit and exhaust blisters are from the MkIV bomber and the Brownings are too high in the nose. Still, it kept me out of the wife's way for a couple of weeks so it's all good. Enjoy.
- 15 replies
-
- 38
-
-
Here is my 1/20(ish) scratchbuilt carving of a 1956 Aston Martin DBR1. Carved from Lime finished with Danish Oil, with a few plastic and metal bits and pieces for the wheels. Took about a month, with a week of that waiting for the oil to dry. Thanks for looking
- 13 replies
-
- 14
-
-
1/32 Scratch-built Sopwith Camel in mainly basswood with oak prop, walnut axle, gun barrel cooling jackets and cylinders and bamboo struts plus brass odds 'n' sods, finished with 0.1mm rigging thread. As with my earlier Spitfire the brief from Controller, Home Forces was that it could be a wooden sculpture rather thaan a painted awar machine, so it is left just varnished. About a month start to finish, but actually more like two solid weekends of doing with lots of gaps in between. Not sure what's next!
- 13 replies
-
- 29
-
-
Welcome omce again my friends to the show that never ends. This months lesson in wood fondling will be a demo of how to find a camel in a plank. Specifically, uncovering the sopwith camel that is hiding inside the offcuts of my spitfire build. Step 1, plans and bits Part B, Hercule Poirot's moustache: iii, carefully measure the fuselage Four, get distracted during planing and take too much off, plus the top of my finger. Grrrrr More anon when the bleeding stops. Nick
-
The epic movie "The Flight of the Phoenix" is a favorite of many modelers and aviation enthusiasts. Two versions exist, from 1965 and 2004. The first is the one that will occupy our attention here. It would be redundant for me to abound in comments and notes about the movie itself, since most are familiar with it, and if not a quick Internet search will provide all the necessary background, plus I like to use the available time to build. Suffice to say that the movie used several airframes for its static and motion shoots. Of course there is the "original" plane that has the "panne", the Fairchild Packet. Then the plane that is "built" from it, then the plane used by Paul Mantz (Timm-Tallmantz P-1) for the real flying sequences, and then the modified North American 0-47 used for some shots to cover for the demise of the Timm-Tallmantz P-1. (Here at Britmodeller you have an excellent representation of the "static" plane by Mike N): I will be aiming for the plane used to film the flying sequences (there were actually two, see below). There are many differences between the filming static prop and the flying machine designed by Otto Timm. The static prop has a three blade prop, if you excuse the redundancy, while the flying machine has a two blade prop. The wing on the static prop has a more elongated appearance with more squarish tips, while the flying machine has a shorter wing with round and narrow tips. The noses are very different, even if at first glance they look somewhat alike. Many other differences can be spotted. Sources state that to expedite construction of the flying machine Tallmantz Aviation used the nose, engine, prop, cockpit and wheels of a North American T-6 Texan, as well as the outer wing panels from a Beechcraft C-45 Expeditor, so I got those kits ("used", at a fair price) to expedite my construction too, although this is not going to be a fast one, since the schedule ahead looks busy. The main body is a cylinder, while the tail is a cone, as in the original. The tail feathers will be the usual styrene sheet construction with spars. The old Heller kit and the parts that may be used: Since these are going to be cannibalized, get affordable ones in a used state: Parts that may be used from the Texan: A couple parts are glued to determine the diameter needed for the main body:
- 112 replies
-
- 10
-
-
- scratch
- movie planes
- (and 1 more)
-
 Hi, Aero A 101 was a light bomber-recce airplane. It was a kind of developmnet from Aero A-100. However only few parts remained unchanged. In general it was about 10% larger by wingspan, also chord of wings and by lenght of fuselage. Instead of V-engine, 12 cylinders Hispano-Suiza (case of A-100) the A 101 was powered by 1000 HP 18 cylinders licence build of Isotta Frascsini engine. There is a model of A-101 by Planete in 1/72 but I was thinking about doing this rather massive conversion since already 15 years and currently I have just did it! The whole build of two Aeros was subject of WIP Almost all produced (~50) Aero A-101 were sold by Czechoslovaks to Spanish Republican Government but about half of them (22 transported on Panama ship from Polish port Gdynia) were captured by I think German navy making blockade in Golf of Biskay and those went to Nationalists. Majority of them served in northern front in 5G17 groupe, but some were present in Andalus, in group 4 G 10 which has base in Grenada. My model of 17.12 represents machine from Grenada, 1937 The prop is rotating And just for comparison with A 100 (#20 this year, # 390 on shelvs)..... Comments welcome Regards Jerzy-Wojtek
- 14 replies
-
- 24
-
-
- scratch
- conversion
- (and 1 more)
-
I'm building a 1/144 Sopwith Pup. This Valom kit requires some serious work to get to my standards so a few weeks of work to keep me busy. Starting with a Le Rhone 9c engine.